-
Notifications
You must be signed in to change notification settings - Fork 70
AppleII FujiNet Quickstart Guide
- Status of the Apple II FujiNet
- Getting to Know Your FujiNet
- Supported Apple II Systems
- Hooking Up FujiNet
- Apple II System Specifics
- Navigating CONFIG
- Web User Interface
- Updating Firmware
- Finding and Loading Software
The FujiApple is in its 3rd revision of hardware, Rev000 being the most recent. Rev0 and Rev00 do not support CP/M without a hardware modification to the board but all other functions are supported. A SmartPort enabled Apple II is required. FujiNet emulates the following: SmartPort drives (HDV, PO, 2MG), Disk II (WOZ & DSK), CP/M (with fixed FujiNet hardware), Clock, Modem, Printer (with custom Apple ii ROM).
- The FujiNet will obtain power from the SmartPort cable and power itself when the Apple is turned on. There is no power switch for your FujiNet.
- The right side has a push/push MicroSD socket. An SD card is not needed to use FujiNet.
- There are 2 status LEDs; BOTTOM (white) is WiFi connection, TOP (YELLOW) is BUS (SmartPort) activity status.
- There are 2 buttons; TOP (S2) is Reset, BOTTOM (S1) is To Be Determined
- The left side has one IDC20 port for SmartPort/Disk II connections
- In the center is a 0.1"/2.54mm double row header for debugging purposes (eg, logic analyzer)
- Apple IIGS
- Apple IIc+
- Apple IIc
- Apple II Plus
- Apple IIe
- Apple IIe Enhanced
- Most clones of the above machines
- Apple /// & ///+
- Apple Liron: SmartPort mode only, no Disk II mode
- Yellowstone (currently not working for Apple ///)
- KBOOHK softSP Card v5 or v6 and 5.25" Disk Controller Card
- Grappler+ w/ DIY softSP (E)EPROM and 5.25" Disk Controller Card
- SuperSerial w/ DIY softSP (E)EPROM and 5.25" Disk Controller Card
- Original Disk II Interface Card with two IDC20 headers
- Apple 5.25 Drive Controller with DB19 connector
For systems with native SmartPort or a DB19 Disk Drive card you will need a DB19 to IDC20 adapter that connects to the FujiNet.
For systems with an ICD20 header (two rows of ten pins), connect the FujiNet with an IDC20 cable. If using the Disk II card, be sure the cable is plugged in correctly to the Disk II or you could damage the FujiNet. IDC20 Pin 1 is marked on the FujiApple board with J1. The FujiNet can work as Drive 1 or Drive 2, but start with Drive 1 for testing.
For systems with slots, many combinations may work, but it is known to work with the SmartPort card in slot 5 and the 5.25 Disk controller card in slot 6. SoftSP should be updated to v5 or v6.
You can get adapters from the locations below:
FujiNet is powered directly from the Apple II bus and no external power is required. You can, however, optionally power the FujiNet from the MicroUSB port on the ESP32-DEVKITC board. The MicroUSB port is also used to upgrade firmware and provides debug output messages to a serial monitor on a computer.
The first time you power on the Apple II FujiNet will have it's CONFIG disk mounted. Press CTRL-RESET to get a prompt, then type PR#X (X=whichever slot your DIY SoftSP ROM card is in, ex: PR#5), then press ENTER. The CONFIG disk will boot and display a list of the detected SmartPort devices; press ENTER to continue into CONFIG. See Navigating Config below.
Please help fill in this information
Please help fill in this information
- On Apple IIGS you can set boot device as Port 5 (smartport) by entering into the Control Panel at boot (Ctrl-OA-ESC). Choose Disk and set startup disk to slot 5. Now your Apple IIGS won't miss the FujiNet and ask you to attach a drive.
Keys                               function
-----------------------------------------------------------------
Ctrl-OA-Reset                      Reboot
Ctrl-Shift-OA-Reset                Reboot and re-load BRAM (ROM 03)
Ctrl-OA-OPT-Reset                  System test (OA-OPT to repeat)
Option while power-on              Menu to Reset standards
Ctrl-OPT-Reset                     Reboot and give menu
Ctrl-OA-ESC                        Go to control panel
Ctrl-OA-Shift-ESC                  More direct to control panel
Shift 5 times                      Enable sticky keys (ROM 03 or Sys 6)
Shift-OA-Clear                     Enable keyboard mouse (ROM 03 or Sys 6)
Ctrl-OA-Del                        Clear keybard type-ahead buffer
Hold OA, then Ctrl-Del             Auto fire Button 0
Shift-Period on keypad             Comma
Ctrl-OA-2 in GS/OS desktip app     Select "About.."
Control-6, then <key> in BASIC     Set cursor to <key>
Ctrl-OA-OPT-N  at sliding Apple    Credits
          (i.e "Check Startup" screen)
Two options available to connect the FujiNet:
- Liron card - allows Smartport drives only. This needs DB19 pin to 20 pin adapter to connect the FujiNet to the Liron card.
- SoftSP card or DIY SoftSP on Grappler+. FujiNet is connected to either the external or internal drive port with a 26pin to 20 adapter cable.

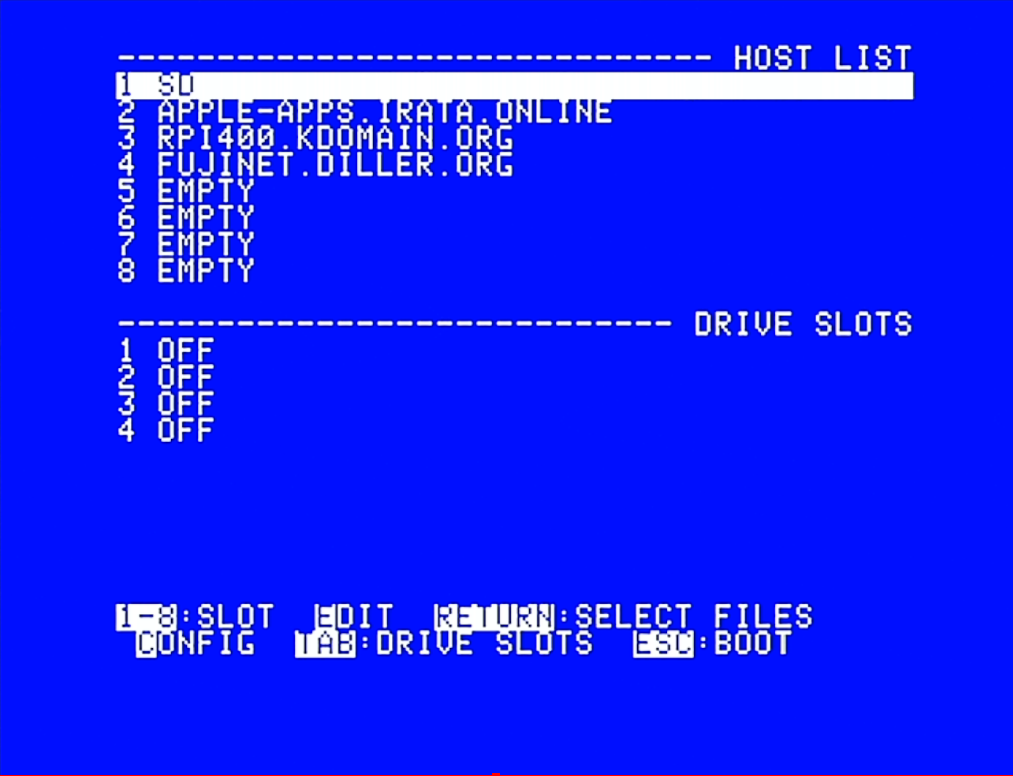
The config screen for Apple II
The first time you boot FujiNet CONFIG it will prompt you to connect to WiFi. You can select your access point and enter it's passphrase. This information is saved internally and if an SD card is present will be saved there also to fnconfig.ini
PLEASE NOTE: FujiNet is powered by the Espressif ESP32 chipset, which works on 2.4GHz WiFi networks ONLY. If you are using a "mixed" 2.4GHz/5GHz WiFi network (using both radio bands with the same SSID), you MAY have problems connecting your FujiNet device with other devices on the network.
CONFIG was designed to be intuitive and reminiscent of Apple2 programs like ProDos. On the main CONFIG screen you will see host slots on top and disk slots on bottom. You can jump between the host slots and disk slots with [TAB]. Selecting a host slot ([RETURN]) will begin the process of selecting and mounting a disk image from the host to a disk slot.
Host slots can be an IP address or hostname of a TNFS server (eg, apps.irata.online, fujinet.diller.org, fujinet.online). Any host slot can also be named SD which points to the onboard SD card socket. With a host slot selected, press [E] to edit it.
To boot from a SmartPort disk, select the desired host and subsequently a disk image file. It will prompt you to select a disk slot, choose the first slot. When returned to the main CONFIG screen, press ESC to reset the Apple II. For those systems that need it, press CTRL-RESET and PR#X (X=whichever slot your DIY SoftSP ROM card is in).
To boot from a Disk II disk, select the desired host and subsequently a disk image file. It will prompt you to select a disk slot, choose the first slot. When returned to the main CONFIG screen, press ESC to reset the Apple II. On Apple II+/IIe, the disk will automatically boot.
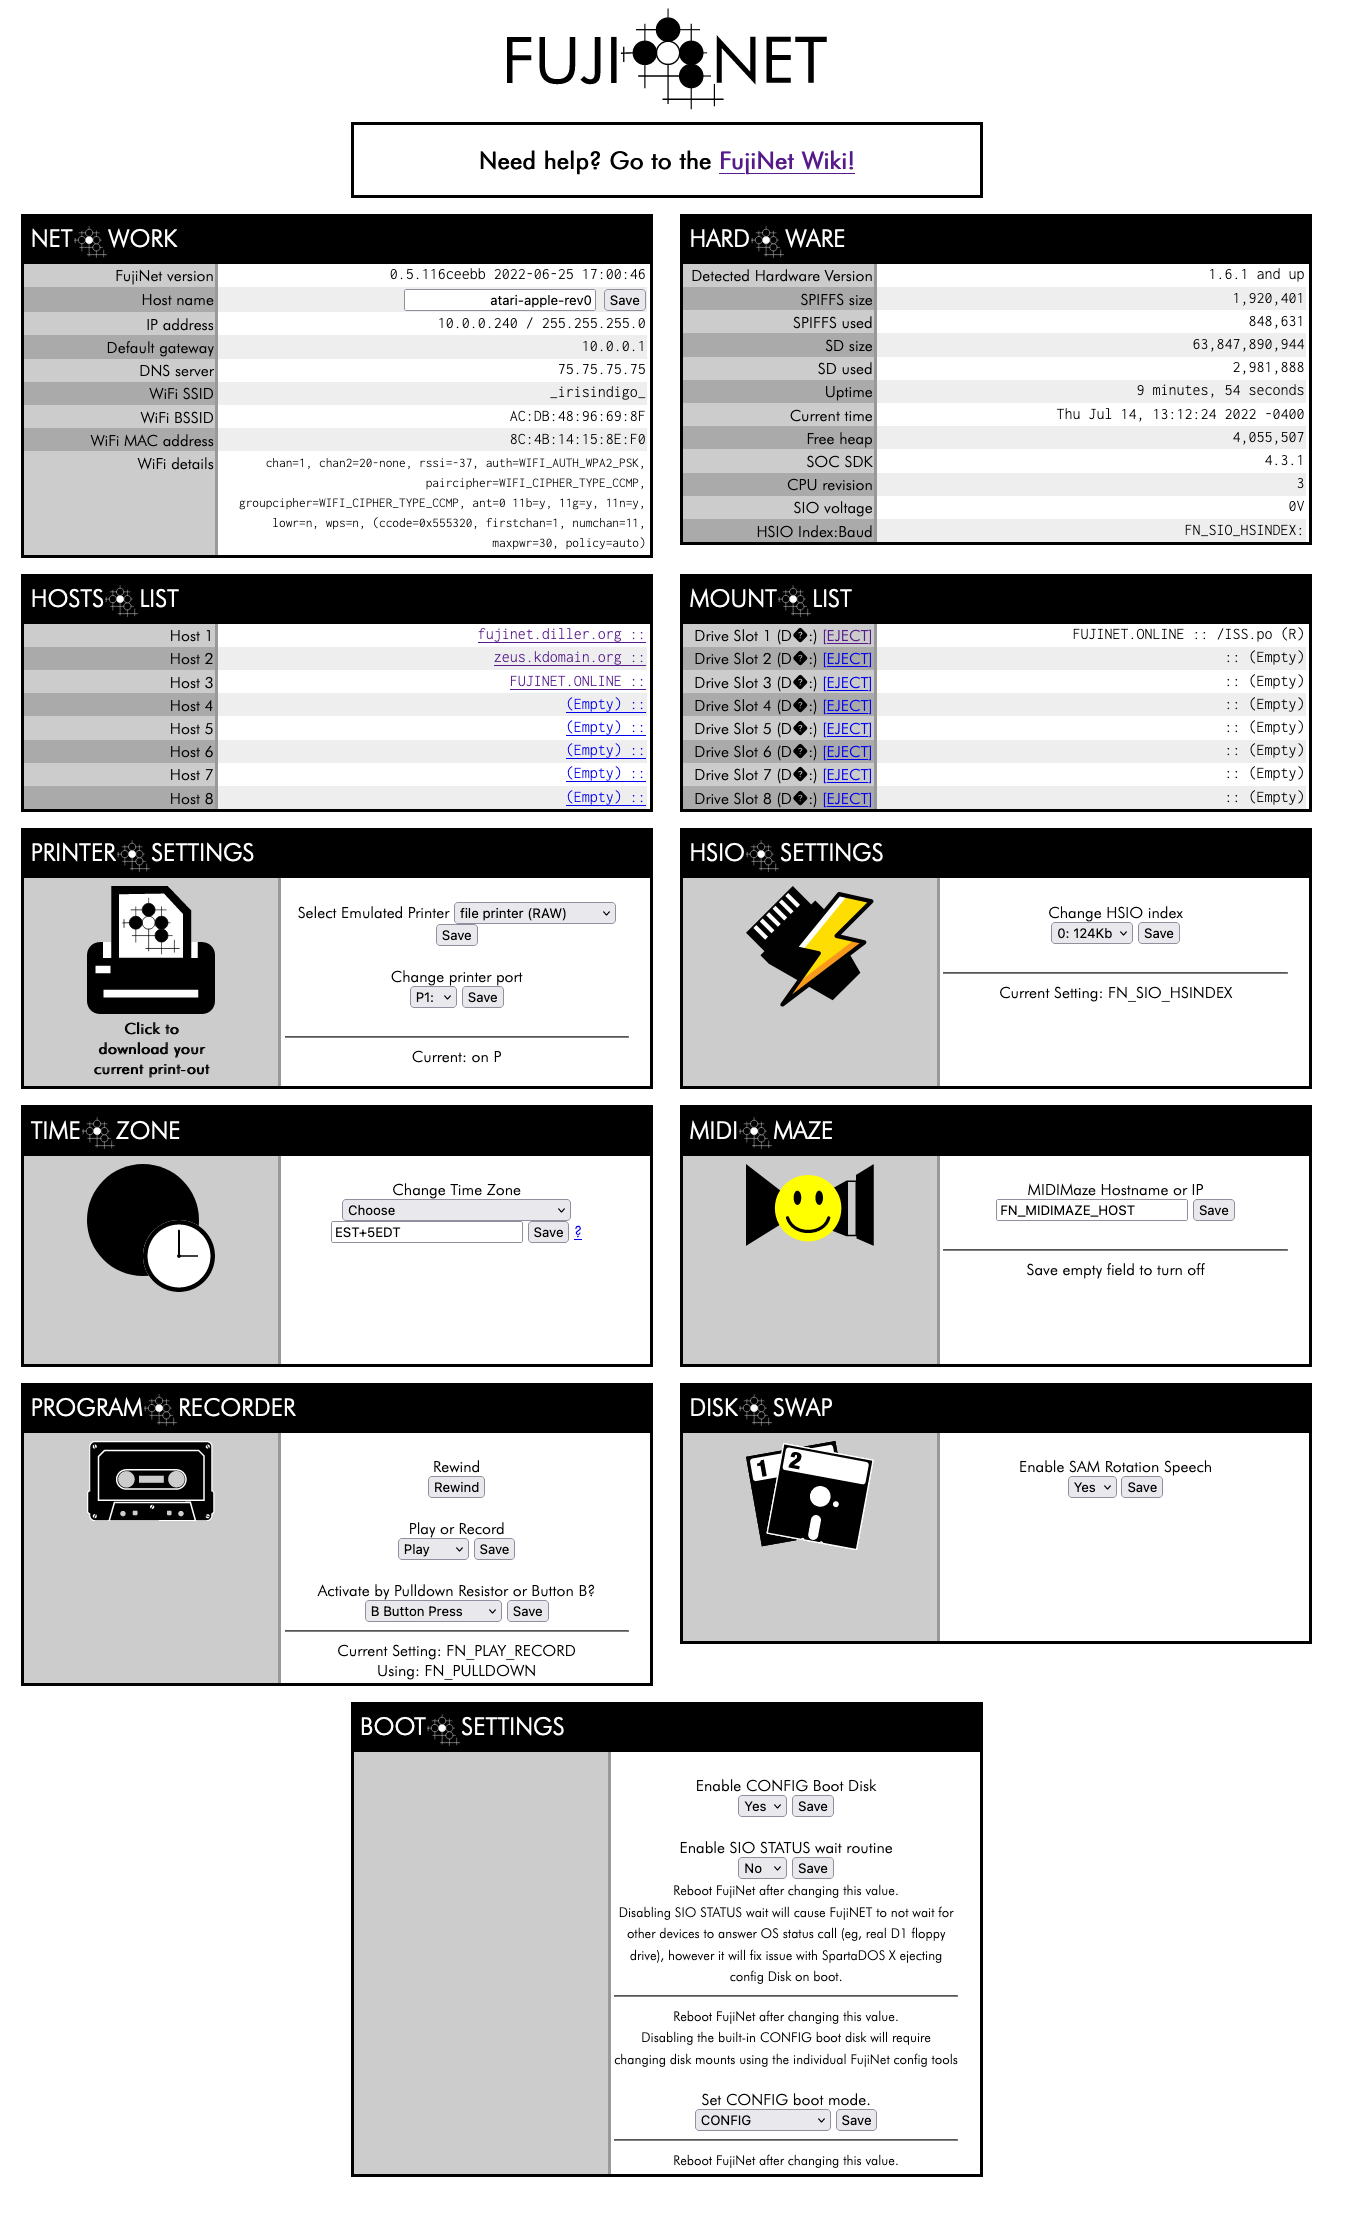
Your #FujiNet makes available a simple web-based configuration interface when you visit your device's IP address while it's powered on.
To find its IP address, use the [C] "Show Config" option, available in the main screen of the CONFIG program. You can also find the #FujiNet in your router's list of connected devices, by its hostname (default: "FujiNet").
For example, if your #FujiNet's IP address on your local network is "192.168.0.123", you would visit http://192.168.0.123/ in a browser connected to that same network.

Note: not all components of the web ui work with Apple II at this point.
You can download the FujiNet-Flasher (for Windows, macOS, or Linux), from https://fujinet.online/download/. For more information, see FujiNet-Flasher
There are some Apple2 disk images available on various tnfs servers:
- FUJINET.ONLINE
- FUJINET.DILLER.ORG
- apps.irata.online
The Host names can be entered in lower-case on the Apple II, however they will appear in UPPER CASE when the CONFIG app is re-loaded. This is normal.
Copyright 2024 Contributors to the FujiNetWIFI project.
Join us on Discord: https://discord.gg/7MfFTvD
- Home
- What is FujiNet?
- The Definition of Done
- Board bring up for FujiNet Platform.IO code
- The Complete Linux CLI Guide
- The Complete macOS CLI Guide
- Development Env for Apps
- FujiNet-Development-Guidelines
- System Quickstarts
- FujiNet Flasher
- Setting up a TNFS Server
- FujiNet Configuration File: fnconfig.ini
- AppKey Registry - SIO Command $DC Open App Key
- CP-M Support
- BBS
- Official Hardware Versions
- Prototype Board Revisions
- FujiNet Development Guidelines
- Atari Programming
- Apple Programming
- C64 Programming
- ADAM Programming
- Testing Plan
- Hacker List
- FujiNet VirtualMachine