In order to get a complete score on the project, you have to follow the following requirements:
The requirements are divided into API, pages, and core components. Core components are components that have to show up on all pages.
This contains all the documentation you need.
Documentation = https://developer.themoviedb.org/docs

This contains the references to the API endpoints
API_References = https://developer.themoviedb.org/reference/

This contains the Baseurl that you will use to interact with the API.
API_BASEURL = https://api.themoviedb.org/3
We will be using themoviedb API. To use it, one of you will have to register their account. Take the API-Key, which is used to authenticate all the requests to the API and use it. Please follow the following:
- Go to this page
These are the core components that have to show up on all pages:
- Navbar - The Navbar should show up on all pages and contains the following:
- Logo - This could be a design or simply text of your page.
- Genres - This is a drop down that include the genres of all movies. The Genres should be fetched from the API.
- Movies - This is another dropdown that contains the following options ["Top Rate", "Popular", "Latest", "Now playing", "Upcoming"] - Clicking on one of these options takes the user to the movies page (#2) and gives them the corresponding data. Each one of those has a dedicated API route.
- Actors - Goes to the Actors page (#4) and shows a list of all popular actors.
- Search box where you can type the movie or actor name and display the related results.
- Footer - The footer should also show up on all pages and include the credit to you and your team mates (Names + Github + LinkedIn)
Your website need to have the following pages:
- Home page - This should contain a list of the latest movies. Clicking on a movie should take the user to the Single Page movie (See #3)
- Movies page - This page contains lists of movies. Depending on the user choice in the Navbar (See above) this page shows the corresponding information. For example, if the user clicked on "Top rated" in the Navbar this page shows all the top rated movies. This page will act almost similar to the home page. It will show lists of movies. When the user clicks on a movie it takes them to the Single Movie Page (#3)
- Single Movie page - This pages shows the information about the current movie.
- It should contain the following information:
- The movie poster
- The movie title
- Release date
- Runtime
- Movie's Language
- The movie rating and how many votes has it received
- Director's name
- Overview of the movie
- The main 5 actors of the movies in the credit section (Use the API for this)
- A related movies section which includes at least five related movies (Use the API for this)
- A trailer section that has the movie trailer from youtube
- The movie production company name and logo.
- Functionality:
- Clicking an actor in the main actors should go to the single actor page.
- Clicking on a movie in the related movies section should take you to the Single movie page (#3)
- It should contain the following information:
- Actors page - Shows a list of all popular actors. Clicking on an actor takes you to the Single actors page (#5)
- Single actors page - Shows information about the current actor.
- The information includes:
- Actor picture (If applicable. Some actors have no pics)
- Actor name
- Gender
- Popularity
- Birthday
- Biography
- [BONUS] - List of movies the actor participated in.
- The information includes:
- BONUS - If you finished early, can you also show tv shows as well?
Styling everything on your website from scratch will take a lot of time. However, there are some libraries that you can use to help you with styling.
There are a lot more than those, but these are the famous ones. Open them and check which ones seem easier for you and use them. Also, notice how I listed tailwindcss at the bottom. Thats because it doesn't come with ready components and you will need to develop things from scratch in some cases.
All the code should be put inside the right places. Look at the following example
https://miro.medium.com/v2/resize:fit:1400/format:webp/1*XmOAHrdcqIzsnSmRoQjimg.png
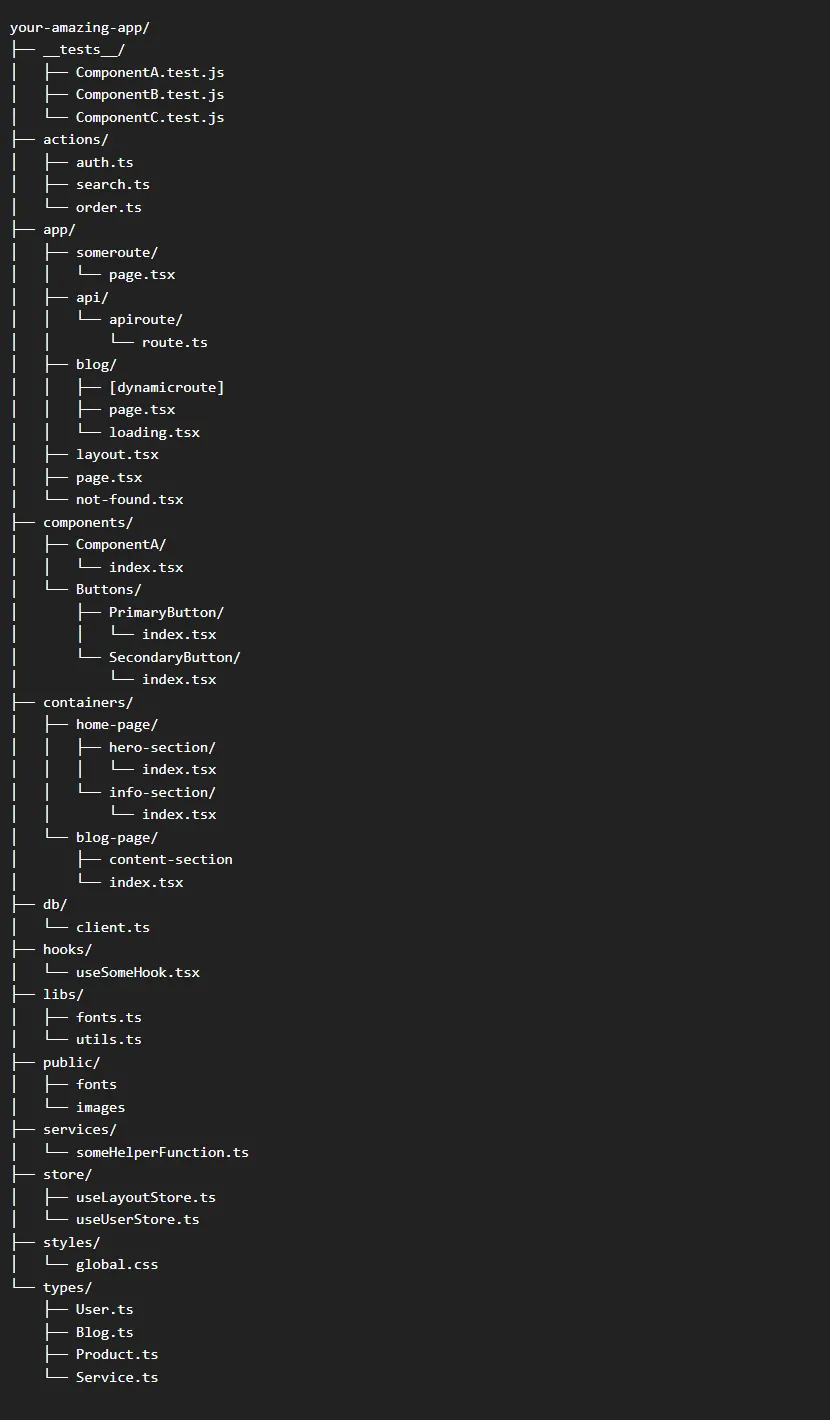
All pages should be in the app folder. All the components should be in the components folder. It's also a good practice to create a separate folder for each component with the same name.
All the tasks in the project should be put inside the issues tab in Github. The project should also use the Git WorkFlow, so you have to utilize different branches/task. This way it will reduce the amount of conflicts that could be faced.
This project could be the best, but if it lacks any form of project management then you won't learn anything. So get over your fears, if there are any, and work on your Git work skills. It will help you immensely in the long run.
This will also help you out when you apply to jobs because potential employers will look at this project and be able to surmise what you have done and the fact that you understand Git workflow as well.
On presentation day we will ask you to show us your Github
Pull Requests
- Go to the issues board and create a new issue with the task assigned to you.
- Assign the issue to yourself so others know who is working on this issue.
- Create a new pull request from that issue and also assign it to yourself, Github will automatically create a branch for you and give you instructions how to check it out.
- After finishing the work, push your code and assign the team leader on that pull request so they can review the code.
Commit Message Format
After you finish wrapping up the Setup of Commitizen inside the setup page, you will have to use git cz when you make a new commit to follow this convention.
Each commit message consists of a header, a body and a footer. The header has a special format that includes a type and a subject:
<type>: <subject>
<BLANK LINE>
<body>
The header is mandatory, while the body is optional but highly encouraged.
Type
Must be one of the following:
- Build: Changes that affect the build system or external dependencies (example scopes: gulp, broccoli, npm)
- CI: Changes to our CI configuration files and scripts (example scopes: Travis, Circle, BrowserStack, SauceLabs)
- Doc: Documentation only changes
- Feat: A new feature
- Fix: A bug fix
- Perf: A code change that improves performance
- Refactor: A code change that neither fixes a bug nor adds a feature
- Style: Changes that do not affect the meaning of the code (white-space, formatting, missing semi-colons, etc)
- Test: Adding missing tests or correcting existing tests
Subject
The subject contains a succinct description of the change:
- use the imperative, present tense: “change” not “changed” nor “changes”
- don’t capitalize the first letter
- no dot (.) at the end
Body
Just as in the subject, use the imperative, present tense: “change” not “changed” nor “changes”. The body should include the motivation for the change and contrast this with previous behavior.
All these things will already be handled for you using commitizen and commitlint (See the setup page)
After finishing the project, do the following:
- Deploy the project on netlify so you can have a link to use it in your portfolio. Don't forget to add a link in your website that points to this project.
- Remove everything from this README.md file and add the following content to it:
- A screenshot of the website.
- Your project's name.
- Description of the project.
- Tools used.
- Your names.