Day purposes
✔ Create your own User Interface (UI) with Svelte and Flowbite Svelte ✨
✔ Structure your UI 🚧
✔ Test your UI 🧑💻
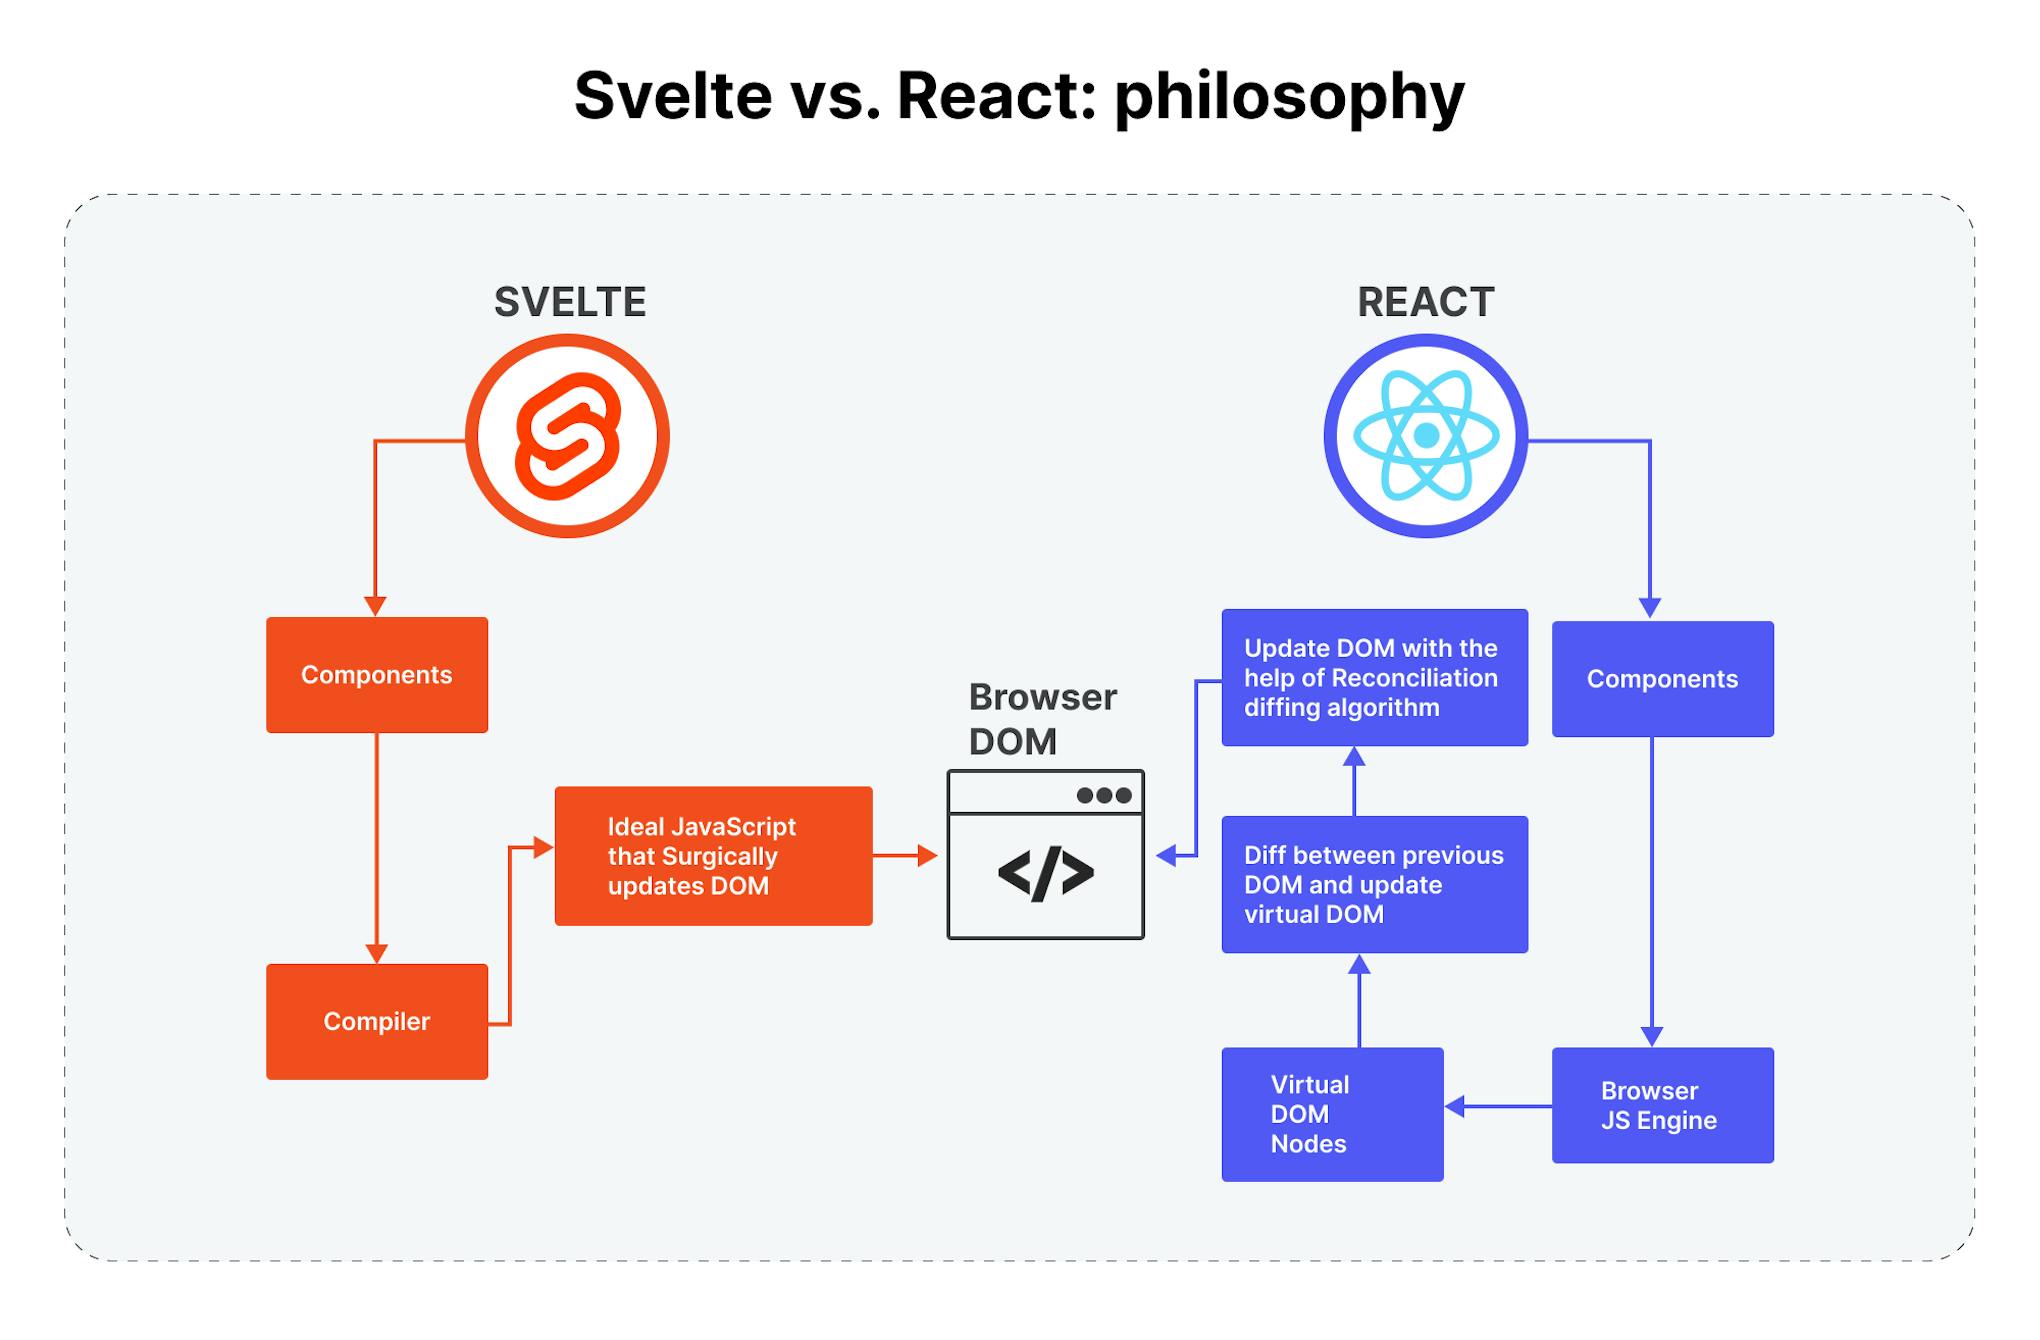
Svelte is a Javascript library to build user interfaces.
What is a user interface?
A user interface (UI) is the point at which humans interact with a computer, a website or an application. 💻
For instance, your terminal is a user interface.
What does this Javascript library allow us to do?
Thanks to Svelte, you can build components. A component is a Javascript function that returns a Javascript object representing a DOM element in memory.
💡 DOM stands for Document Object Model, which is the HTML representation of a web page. As a consequence, a DOM element is a part of the HTML representation of a web page.
However, unlike React, Svelte doesn't rely on a virtual DOM to update the actual DOM. Instead, it compiles your components into optimized Javascript code. This approach makes the rendering of your app more efficient. 🚀
The real DOM is the HTML representation of the web page that the user sees. It's updated by queries. The virtual DOM is a copy of the real DOM.
- In your pool repository, create a new directory for the
day05:
mkdir -p day05- Then, create a new Svelte project with Typescript:
npm create vite@latest artists-book -- --template svelte-ts- To verify that everything is ok, run the following commands:
# Move to your project
cd artists-book

# Install the required dependencies
npm install

# Start the server
npm run dev
If you get a page with the Vite and the Svelte logos, then you can continue 🚀
Before starting the tasks, let's prepare your project.
Install all the packages we're going to use for this day:
npm i svelte-routing cypress flowbite flowbite-svelteYou'll build your UI with Flowbite Svelte, which is a component library for Svelte.
Now that the foundations are laid for your project, it's time to dive into frontend development 🏊
Let's start by creating the Home page 😄
- Create the file
src/pages/Home.sveltewith a Svelte component representing your Home page inside. It must contain:- a title
Artists Book🧑🎤 - a subtitle
Manage your favorite artists⭐
- a title
- Update the file
src/app/App.tsxto call this component.
Remove the initial content of
src/App.svelteto start off fresh.
- Check what a Svelte component is made of 👀
- Take a look up at the Heading component in Flowbite Svelte 😉

Well done! You have created your first Svelte Component 🥳
💡 A great idea is to create a folder
src/componentsto store reusable components.
Now that you have your Home page, it's time to have Register and Login pages reachable at the /register and /login URLs 😉
-
Create the
src/pages/Register.sveltefile, which will contain the Register page. It must contain:- An
Inputto enter anemail. - An
Inputto enter apassword. - An
Inputto enter theconfirmed password.💡 Text for the password inputs mut be replace by dots
- A
Buttonthat when clicked, log the values of the email, the password and the confirmed password.
- An
-
Create the
src/pages/Login.sveltefile, which will contain the Login page.- An
Inputto enter anemail. - An
Inputto enter apasswordwith text replaced by dots again. - A
Buttonthat when clicked, log the values of the email and the password. - A
Buttonto the Register page.
- An
-
Create the
src/app/Routes.sveltefile, with a Svelte component containing the Routes inside, called insrc/App.svelte. -
Finally, update the home page, by adding:
- A
Buttonto the Register page. - And a
Buttonto the Login page.
- A
- Have a look at the Flowbite Svelte Button and Input components.
- Take also a look at the svelte-routing package.
- As well, check out what binding is in Svelte (that might be useful for the inputs 👀)
 The home page. 🏠
 The login page.
 The register page.
Great, you now have a nice UI, but how do you make sure it works well without manually testing?
A great tool for front-end testing is Cypress, mainly used for end-to-end and component tests.
To win time, we already created some tests for you, you'll just need to adapt them to your application 😄
- Since we've installed Cypress earlier, you can just add the necessary scripts in the
package.json:
"cypress:run": "cypress run",
"cypress:open": "cypress open",
You can run the tests directly in the CLI or open an UI to do so 😉
- Once this is done, extract the given files. You should have a
cypressfolder at the root of your project with the test files located incypress/e2e, and acypress.config.tsfile also at the root.
💡 You'll notice the
cypress/videosandcypress/screenshotsfolders, when you run the tests cypress will fill these directories with content to help you debug your tests if they fail. You can add them to your.gitignoreto avoid committing them.
- Lastly, you will need to add some
idto the components of your UI. They will be useful to find content of your UI, especially here for the cypress tests.
For example in home.cy.ts, you have this test for the title where we find the UI content based on the app-title id:
it('Good title', () => {
  cy.get('#app-title').should('contain', 'Artists Book');
});
When you're done, you can use npm run cypress:run and admire the passing tests 🚀
During the next steps, feel free to add tests for the new components and pages you create 😉
Now that you have solid foundations, it's time to go further 🔥
You have a Home page, a Register page and a Login page. What's missing? A Dashboard page!
Let's now play with artists 🚀
💡 To see what is an
Artist, check the API doc
- Create the
src/pages/Dashboard.svelte. It will conatin the Dashboard page listing some artists, with the/dashboardURL. The Dashboard page must contains:- A
Navbarin the top with:- A
Linkto the Dashboard page on the left. - A
ButtonAdd an Artiston the right, doing nothing for now.
- A
- A
Gallerylisting artists'scard.
- A
⚠️ For now, data is stored within the component. There is no real database and no interaction with the API.
- Update the Register
Buttonto redirect to the Dashboard page when clicked. - Update the Login
Buttonto redirect to the Dashboard page when clicked. - Add the following files:
src/types/artist.tswith theArtisttype inside. Be smart, take only the needed properties 😎src/components/Bar/TopBar.sveltewith the topNavbarinside.src/components/Button/AddArtistButton.sveltewith theAdd an ArtistButtoninside.src/components/Card/ArtistCard.sveltewith the artists'scardinside, displaying every information about an artist except from hisid.
Try to display the
ratingusing 5 stars ⭐
 The Dashboard page.
Now that you can list artists, what if you could add some?
As you can notice, your Add an artist button does nothing for now.
Let's add artists in a cool way 😎: when this button is clicked, a Modal appears with a form to create an artist.
- You must create the file
src/components/Modal/AddArtistModal.sveltewith theModalto add an artist inside, called insrc/components/Button/AddArtistButton.svelte
- Flowbite Svelte has a component perfectly fit for this use case: the Modal 🔥
 Modal to add an artist.
First, well done! You've worked hard to be here 👏
It's time to give you a gift: an advice 🎁
One of the most difficult thing when you build a User Interface with React (and other libraries of components / frameworks) is to manage the dozens of components you create.
But why is it difficult?
It's because your components are not stateless. There is logic inside them. For instance, sometimes you will copy-paste a whole component, just to change a condition, a function...
It's really difficult to build components that you can re-use in different parts of your project.
So how can you resolve this problem?
One of the best thing to do is to build stateless components.
Keep your logic, your function calling APIs... the higher in your tree component. Pass functions, conditions... as parameters to your components.
It might not seem important right now, but it will help you so much.
To set this up, here is a little challenge you can take: all your logic, keep it inside the pages components, and only there.
If you want to go further in frontend development, follow this principle as much as you can 😉
However, when you want to add an artist, you'll find out that the Dashboard isn't updated. It's because the array where you store your Artists is shared between multiple components. In order to fix this, let's implement stores! 😄
A store is an object with a subscribe method, that allows interested parties (such as components) to be notified whenever the store value changes. Thanks to stores, you can share data between different components without passing parameters to them.
Here, we want to create a store for the Artists list of the Dashboard, so that whenever we add a new Artist, the Dashboard updates!
- Create the
src/stores/Artists.tsfile, where you'll define theartistsstore. - Add the
susbscribemethod insrc/pages/Dashboard.ts, in order to update the list ofArtistswheneverartists's value is updated. - Change the way you're updating the list of
Artistsinsrc/components/Modal/AddArtistModal.svelte.
- Learn about stores here 👍
 The Dashboard page after adding a new artist.
Now that you have built your User Interface, it's time to call the API and interact with real data 🚀
Please take a moment to setup this.
Feel free to play with it with a tool like Postman or Insomnia.
Let's call the API when a user registers 🧔♂️
- Create functions that will call the API, inside the folder
src/services. In your Svelte components, you will call these functions. Be smart, you're free to organize this folder as you want.- These functions must:
- Notify the user with the appropriate message if the register action succeeds or fails.
- Make the Register button not clickable if the credentials are invalid.
- Redirect the user to the Dashboard page, on success.
- These functions must:
- You must have an env variable
VITE_APP_BACKEND_URL. - You must get the
VITE_APP_BACKEND_URLinside the filesrc/config/services.ts, and only here.
- Have a look at the axios package.
- Another step, another Flowbite UI component! This time, look at the toast component. (And its associated icons).
- Take a look at the localStorage, this is where you can keep the
accessToken. Try to mix it up with Svelte stores to have more control over this !
You will store the given accessToken inside the localStorage.
Note that this is a bad idea.
Please refer to the Security Bonus to understand why.
We ask you to do it this way because it's important to be aware of this.
Now that you know how to call an API from a User Interface, it's time to have a complete interaction with it!
- Update your code to follow the next requirements:
- On successful login, the user must be redirected to the Dashboard page.
- The user must be notified with the appropriate message on login.
- The user must be authenticated on the Dashboard page. If not, redirect him to the Home page.
- The user must be notified with the appropriate message on artist creation.
- Don't forget to structure your code.
You already have all you need, but you can ask the staff if you struggle 😄
Well, we have artists. What about musics?
Let's create an Artist page listing all of his musics. 🎵
- Create the
src/pages/ArtistPage.sveltefile, with the Artist page. It must contain:- The same top
navbaras the Dashboard page. - The photo / name / rating / nationality / music gender of the artist, displayed in a nice way.
- An
Add a musicbuttonopening amodalto add a music when clicked. - A
gridlisting his music'scard. - When an artist is created, redirect the user to this artist's page.
- The same top
- Create the following files:
src/components/Card/MusicCard.sveltewith the musics'scardinside, displaying every information about a music except from itsid.src/components/Button/AddMusicButton.sveltewith theAdd a Musicbuttoninside.src/components/Modal/AddMusicModal.sveltewith themodalto add a music inside, called insrc/components/Button/AddMusicButton.svelte.
This is not the time to optimize your number of requests to the API. Keep it logical.
Congratulations for completing this day, you're now able to create a beautiful frontend for your own project 🤩
Here are some bonuses for you if you still have time:
Take a look at SvelteKit, an app framework built on top of Svelte, which allows developers to build full-stack applications with Svelte.
Implement a Dark and Light Mode thanks to Flowbite 🕶️
As stated earlier, storing a JWT inside the localStorage is a bad idea. Here is how to solve this problem 😉
Your turn!
🚀 Don't hesitate to follow us on our different networks, and put a star 🌟 on
PoC'srepositories.