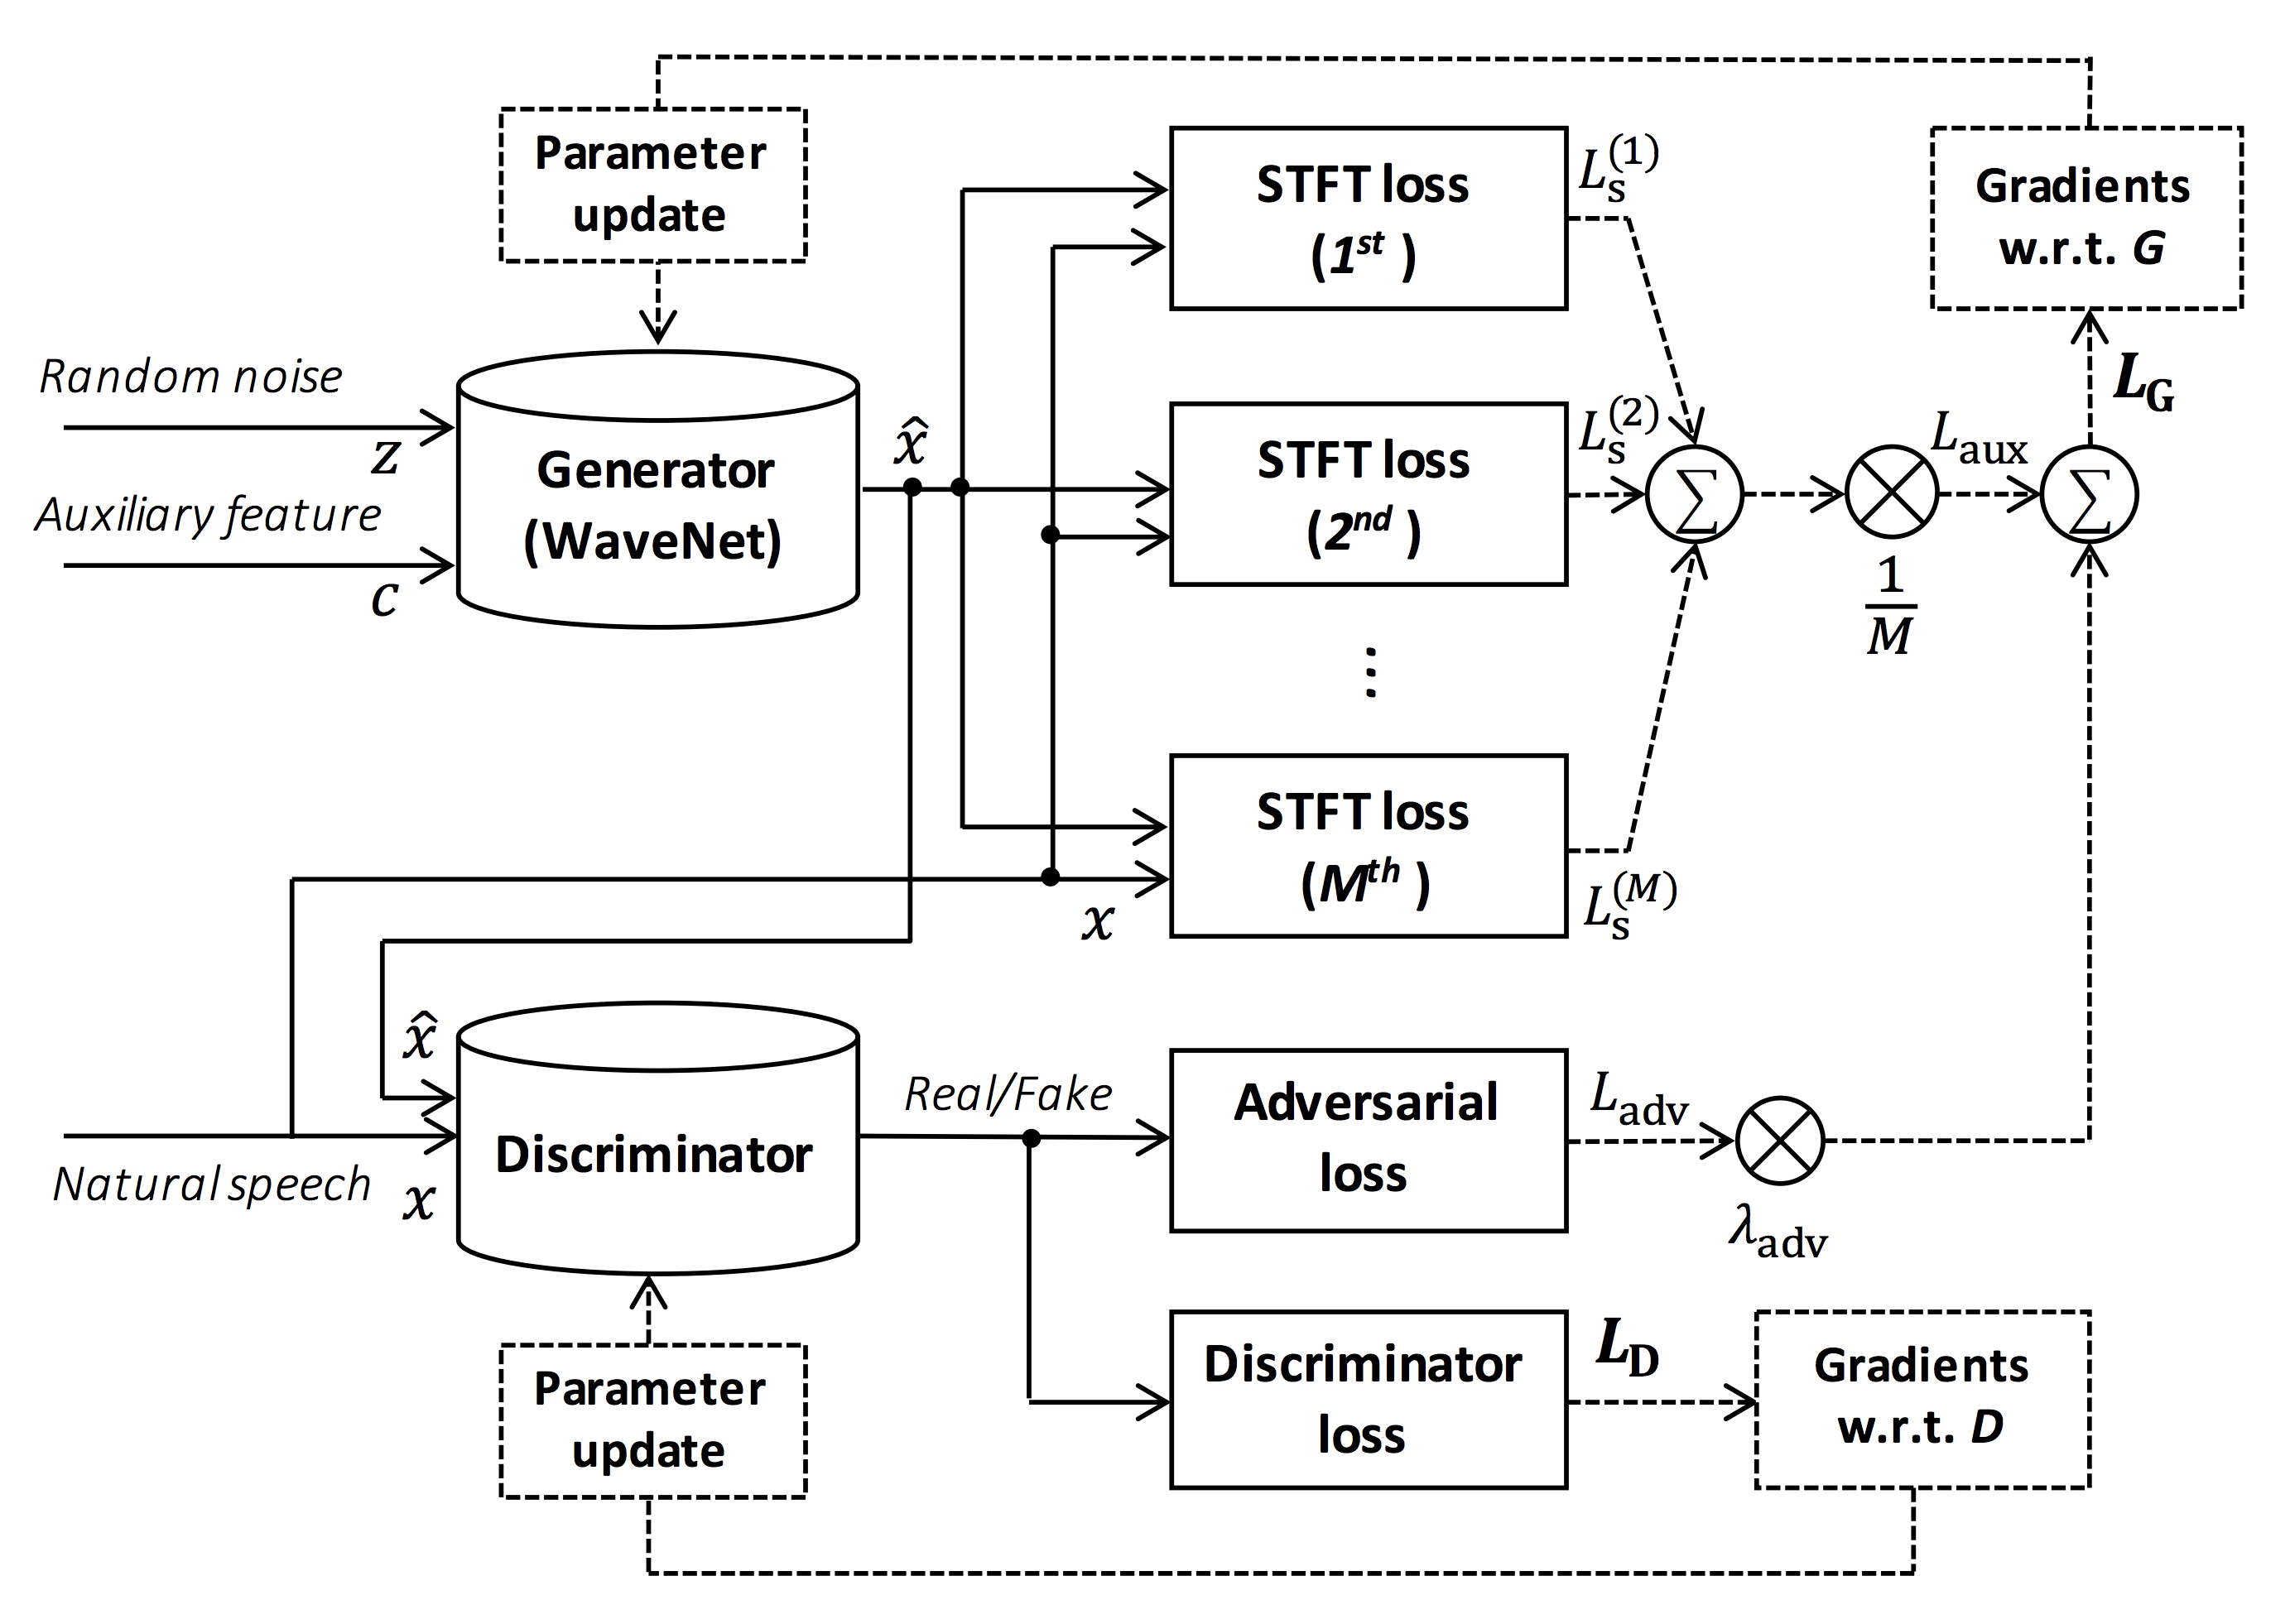
This repository provides UNOFFICIAL Parallel WaveGAN implementation with Pytorch.
You can check our samples in our demo HP!
Source of the figure: https://arxiv.org/pdf/1910.11480.pdf
The goal of this repository is to provide the real-time neural vocoder which is compatible with ESPnet-TTS.
You can try the realtime end-to-end text-to-speech demonstraion in Google Colab!
This repository is tested on Ubuntu 16.04 with a GPU Titan V.
- Python 3.6+
- Cuda 10.0
- CuDNN 7+
- NCCL 2+ (for distributed multi-gpu training)
Different cuda version should be working but not explicitly tested.
All of the codes are tested on Pytorch 1.0.1, 1.1, 1.2, 1.3 and 1.3.1.
You can select the installation method from two alternatives.
$ git clone https://github.com/kan-bayashi/ParallelWaveGAN.git
$ cd ParallelWaveGAN
$ pip install -e .
# If you want to use distributed training, please install
# apex manually by following https://github.com/NVIDIA/apex
$ ...
Note that your cuda version must be exactly matched with the version used for pytorch binary to install apex.
To install pytorch compiled with different cuda version, see tools/Makefile.
$ git clone https://github.com/kan-bayashi/ParallelWaveGAN.git
$ cd ParallelWaveGAN/tools
$ make
# If you want to use distributed training, please run following
# command to install apex.
$ make apex
Note that we specify cuda version used to compile pytorch wheel.
If you want to use different cuda version, please check tools/Makefile to change the pytorch wheel to be installed.
This repository provides Kaldi-style recipes, as the same as ESPnet.
Currently, four recipes are supported.
- CMU Arctic: English speakers
- LJSpeech: English female speaker
- JSUT: Japanese female speaker
- CSMSC: Mandarin female speaker
To run the recipe, please follow the below instruction.
# Let us move on the recipe directory
$ cd egs/ljspeech/voc1

# Run the recipe from scratch
$ ./run.sh

# You can change config via command line
$ ./run.sh --conf <your_customized_yaml_config>

# You can select the stage to start and stop
$ ./run.sh --stage 2 --stop_stage 2

# If you want to specify the gpu
$ CUDA_VISIBLE_DEVICES=1 ./run.sh --stage 2
The integration with job schedulers such as slurm can be done via cmd.sh and conf/slurm.conf.
If you want to use it, please check this page.
All of the hyperparameters is written in a single yaml format configuration file.
Please check this example in ljspeech recipe.
The training requires ~3 days with a single GPU (TITAN V).
The speed of the training is 0.5 seconds per an iteration, in total ~ 200000 sec (= 2.31 days).
You can monitor the training progress via tensorboard.
$ tensorboard --logdir expIf you want to accelerate the training, you can try distributed multi-gpu training based on apex.
You need to install apex for distributed training. Please make sure you already installed it.
Then you can run distributed multi-gpu training via following command:
# in the case of the number of gpus = 8
$ CUDA_VISIBLE_DEVICES="0,1,2,3,4,5,6,7" ./run.sh --stage 2 --n_gpus 8
In the case of distributed training, batch size will be automatically multiplied by the number of gpus.
Please be careful.
The decoding speed is RTF = 0.016 with TITAN V, much faster than the real-time.
[decode]: 100%|██████████| 250/250 [00:30<00:00,  8.31it/s, RTF=0.0156]
2019-11-03 09:07:40,480 (decode:127) INFO: finished generation of 250 utterances (RTF = 0.016).
Even on the CPU (Intel(R) Xeon(R) Gold 6154 CPU @ 3.00GHz 16 threads), it can generate less than the real-time.
[decode]: 100%|██████████| 250/250 [22:16<00:00,  5.35s/it, RTF=0.841]
2019-11-06 09:04:56,697 (decode:129) INFO: finished generation of 250 utterances (RTF = 0.734).Here the results are summarized in the table.
You can listen to the samples and download pretrained models from the link to our google drive.
| Model link | Lang | Fs [Hz] | Mel range [Hz] | FFT / Hop / Win [pt] | # iters |
|---|---|---|---|---|---|
| ljspeech_parallel_wavegan.v1 | EN | 22.05k | 80-7600 | 1024 / 256 / None | 400k |
| ljspeech_parallel_wavegan.v1.long | EN | 22.05k | 80-7600 | 1024 / 256 / None | 1000k |
| ljspeech_parallel_wavegan.v1.no_limit | EN | 22.05k | None | 1024 / 256 / None | 400k |
| jsut_parallel_wavegan.v1 | JP | 24k | 80-7600 | 2048 / 300 / 1200 | 400k |
| csmsc_parallel_wavegan.v1 | ZH | 24k | 80-7600 | 2048 / 300 / 1200 | 400k |
| arctic_slt_parallel_wavegan.v1 | EN | 16k | 80-7600 | 1024 / 256 / None | 400k |
If you want to check more results, please access at our google drive.
If you want to know the latest progress, please check kan-bayashi#1.
Here the minimal code is shown to perform analysis-synthesis using the pretrained model.
# Please make sure you installed `parallel_wavegan`
# If not, please install via pip
$ pip install parallel_wavegan
# Please download pretrained models and put them in `pretrain_model` directory
$ ls pretrain_model
checkpoint-400000steps.pkl config.yml stats.h5
# Please put an audio file in `sample` directory to perform analysis-synthesis
$ ls sample/
sample.wav
# Then perform feature extraction -> feature normalization -> sysnthesis
$ parallel-wavegan-preprocess \
--config pretrain_model/config.yml \
--rootdir sample \
--dumpdir dump/sample/raw
100%|████████████████████████████████████████| 1/1 [00:00<00:00, 914.19it/s]
[Parallel(n_jobs=16)]: Using backend LokyBackend with 16 concurrent workers.
[Parallel(n_jobs=16)]: Done 1 out of 1 | elapsed: 1.2s finished
$ parallel-wavegan-normalize \
--config pretrain_model/config.yml \
--rootdir dump/sample/raw \
--dumpdir dump/sample/norm \
--stats pretrain_model/stats.h5
2019-11-13 13:44:29,574 (normalize:87) INFO: the number of files = 1.
100%|████████████████████████████████████████| 1/1 [00:00<00:00, 513.13it/s]
[Parallel(n_jobs=16)]: Using backend LokyBackend with 16 concurrent workers.
[Parallel(n_jobs=16)]: Done 1 out of 1 | elapsed: 0.6s finished
$ parallel-wavegan-decode \
--checkpoint pretrain_model/checkpoint-400000steps.pkl \
--dumpdir dump/sample/norm \
--outdir sample
2019-11-13 13:44:31,229 (decode:91) INFO: the number of features to be decoded = 1.
2019-11-13 13:44:37,074 (decode:105) INFO: loaded model parameters from pretrain_model/checkpoint-400000steps.pkl.
[decode]: 100%|███████████████████| 1/1 [00:00<00:00, 18.33it/s, RTF=0.0146]
2019-11-13 13:44:37,132 (decode:129) INFO: finished generation of 1 utterances (RTF = 0.015).
# you can find the generated speech in `sample` directory
$ ls sample
sample.wav sample_gen.wavIf you want to combine with TTS models, you can try the realtime demonstraion in Google Colab!
The author would like to thank Ryuichi Yamamoto (@r9y9) for his great repository, paper and valuable discussions.
Tomoki Hayashi (@kan-bayashi)
E-mail: hayashi.tomoki<at>g.sp.m.is.nagoya-u.ac.jp


