This is a walkthrough for importing custom weapon models into Genshin Impact.
For this tutorial, I am assuming you are familiar with the basics of using GIMI (how to set it up/import/export/load); if not, please read through Mona Hat Removal. I am also assuming basic Blender knowledge – for questions on Blender basics like how to change modes, select vertices and open certain menus please search the knowledge you need on Google/Youtube.
Weapon mods are more complicated than basic mesh edits, but less complicated than importing custom characters. ~90% of the steps remain the same for custom characters, but characters involve much more complicated vertex group/bone structures than weapons.
I will be demonstrating three different weapon models, ordered by complexity. Generally speaking, for weapons the order of difficulty from easiest to hardest is Swords/Spears/Claymores without tassels → Swords/Spears/Claymores with tassels → Bows → Catalysts. Each weapon builds on the last in terms of complexity, so please read through in order.
I will be using this model of a Banana for all three mods (credits to Marc Ed).
First model: Banana Blade (jump to section)
Second model: Bownana (jump to section)
Third model: Ripe Catalyst (jump to section)
Let’s start with the one of the simplest types of weapons, a claymore without tassels - I am going to be replacing Serpent Spine with a giant banana
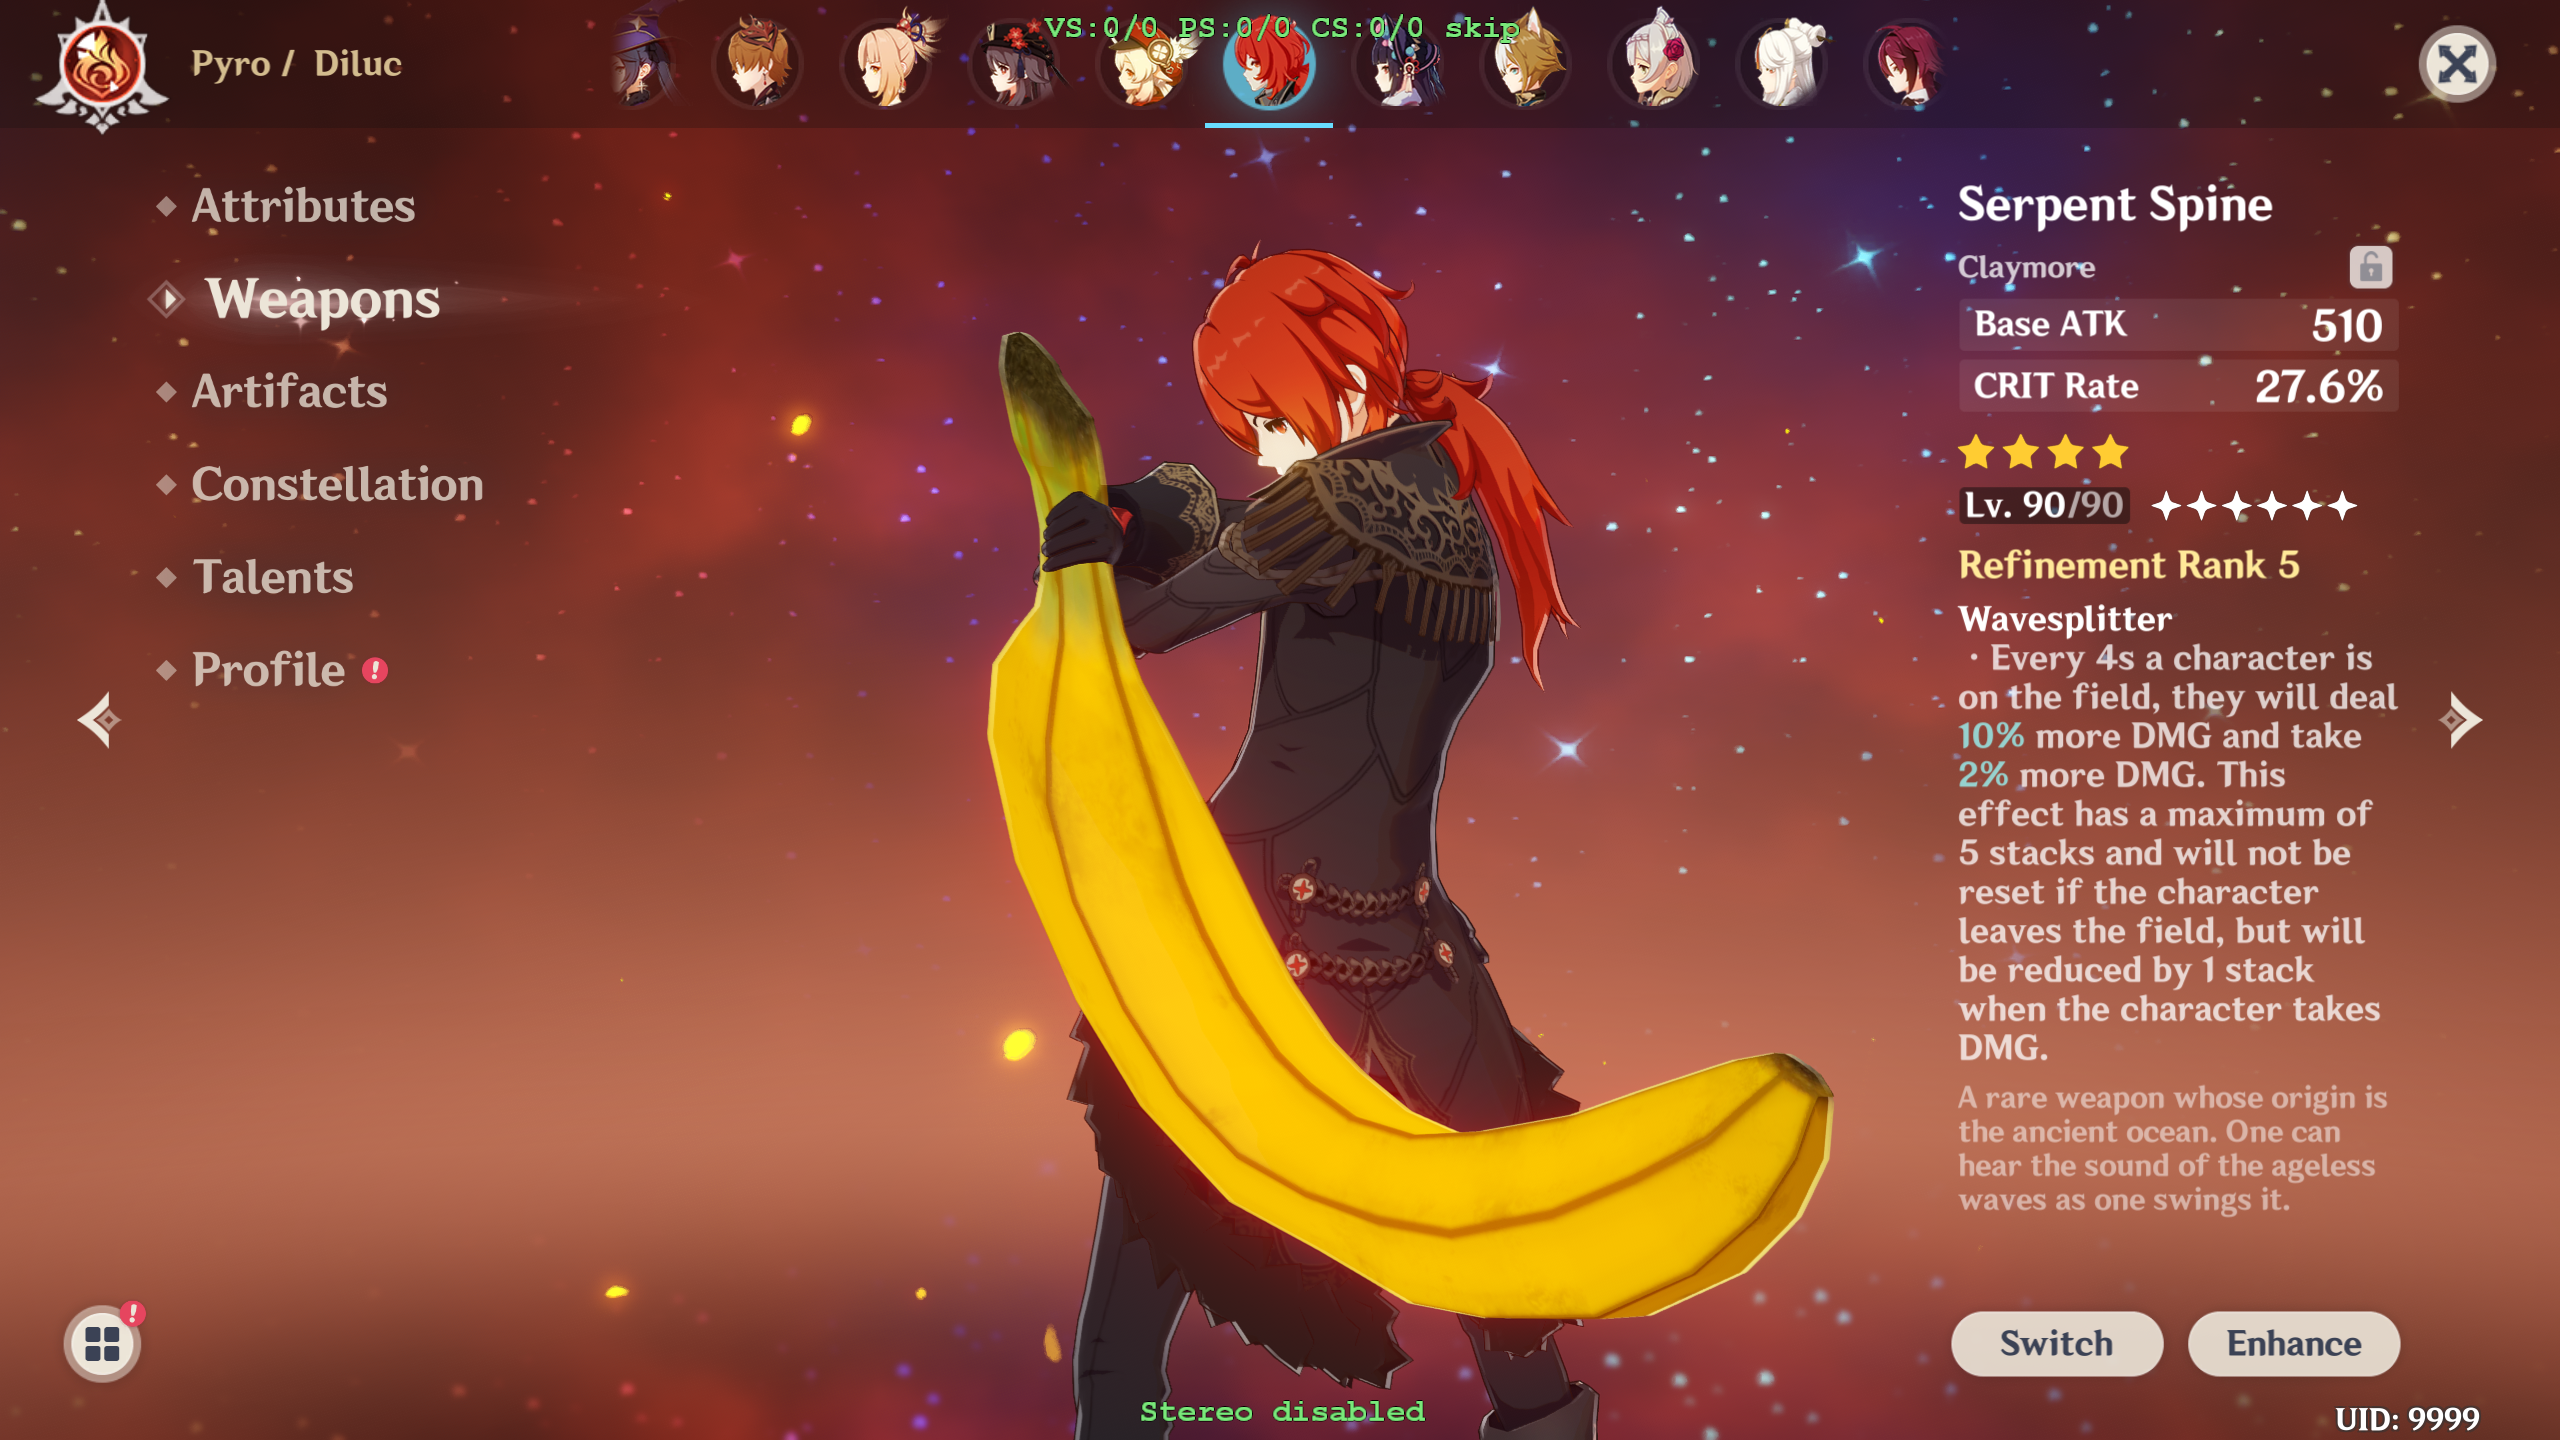
- Start by importing Serpent Spine 3dmigoto data from the GI-Model-Importer-Asset Repo

- As a sanity check to make sure we are in the simplest category of weapons, check to make sure the weapon does not have any vertex groups. If it does, you can continue to follow along but you will need to also refer to the next two sections on how to handle the groups

- Import the banana using File→Import→FBX. I chose a simple model with only a single texture and component on purpose to demonstrate how the process works – more complicated models may require you to merge multiple textures and components together, and requires more advanced Blender knowledge


- As you can tell, the banana model and sword models are misaligned in both location and size. Translate, rotate and scale the banana until the two models overlap. The most important parts to consider are the hilts (since that is where the character will be holding the weapon) and to make sure the new weapon isn’t significantly larger/smaller than the old one (since you can potentially end up with clipping or misalignment with the actual hitbox).

- While this will work, we really want the models to overlap a little bit more so it actually matches up closer with the movement of the sword – we can turn on proportional editing and drag and rotate the tip of the banana to straighten it out a bit to improve the result


Note that for these types of weapons, the new object does not need to overlap exactly with the old one.
-
Now, we need add the custom 3dmigoto properties on to the new object. There are two ways to do this – you could delete all the vertices of the old model then merge the new one into it, or you could use the custom properties transfer script. I’m going to use the latter method in this tutorial
-
Open up the scripting tab, and copy the transfer script into the text box. Click on the object you are transferring properties TO first, then CTRL+Click the object you are transferring the properties FROM second. Click the play button/triangle on the top bar to run the script (OLD METHOD: Uncomment out the ORIGINAL USAGE section, then replace “transfer_to” and “transfer_from” with the objects you are transferring to (new object) and from (original 3dmigoto object) respectively)
-
Double check the properties show up in the Custom Properties section of the new object

- Now, we need to make sure that the new objects UV maps and color data will be exported correctly. Use the original object as a guide – SerpentSpine has two UV maps TEXCOORD.xy and TEXCOORD1.xy, along with a vertex color called COLOR

For weapons, the first TEXCOORD is for the textures:

While the second controls the how the weapon appears and disappears:

The vertex COLOR has four components: RGB and A. What exactly each component controls is outside the scope of this tutorial, but in brief A is primarily used for outline thickness while RGB is used for ambient occlusion, specular and metallic.
NOTE: If your model has multiple UV maps and textures, you will need to merge them into one before continuing. You can do this by lining the textures up side-by-side and then scaling the UV maps to match up with each component. Make sure the width and height of the final texture are powers of 2 (i.e. 1024 x 1024 or 1024x2048 or 2048x2048 etc.)
- The banana model we are using only has 1 UV map, which we rename to TEXCOORD.xy in order to match up with the Serpent Spine model

- For the second TEXCOORD, we create a new UV map called TEXCOORD1.xy, go to the top view by pressing 7 on the numpad, select the entire mesh and then press UV→Project From View


We then scale and rotate the banana so it matches up with how the TEXCOORD1 of SerpentSpine originally looked. This will cause the weapon to phase in starting from the stem of the banana

(Note: Older version of the plugin have an issue related to TEXCOORD1 where the model outline disappears. While there are several causes for this, the most common is due to the game re-using a texture slot for both fading and outlines. Try deleting the ps-t2 and ps-t3 lines in the .ini file and see if that resolves the issue).
- Finally, we deal with the color. If your model already came with vertex colors, you can rename them to COLOR and be done (though note that wherever you got the model from might not be using the same values for COLOR as Genshin does, so it still might be safer to delete them and transfer over ones from a 3dmigoto mesh).
This banana model does not have vertex colors, so we first need to add a color variable. Do so by going to the data properties tab and pressing the + button. We want the name to be COLOR, the domain to be Face Corner and the Data Type to be Byte Color. You can leave the color as black for now, we will be transferring it from the original object in the next step.

- Now that we have a COLOR, we need to transfer the correct values from the Serpent Spine. Select the banana, go to the modifiers tab, select add modifier→data transfer


Set the source as SerpentSpine, check the Face Corner Data box and Colors tab and make sure the options are All Layers and By Name for Colors:

(Note: for more complicated models with multiple vertex colors, you can use the eyedropper to copy the color data from a specific part of the component instead of selecting the entire object)
Finally, press the down arrow and click Apply

You can double check it worked correctly by going into vertex paint mode and checking that the colors match up:

- Next, we need to rotate the model relative to the original and apply transforms. Even though the models look like they overlap, Genshin rotates them during the process of drawing to the screen so we need to do so in Blender as well to counteract the effect. Select the object and rotate 90 degrees relative to the original like so:

And select the object and apply all transforms (IMPORTANT! If you don’t apply transforms, the weapon will appear in a completely different orientation and scale than you might expect)

(Note: Orientation can get confusing, so when in doubt about which direction is correct just try rotating both ways to see which works)
- We are almost done! The last part is to change the name to have “SerpentSpineHead” and remove that text from the original object so the plugin knows which object to export. Once you have named things correctly, export using the Export Genshin Mod Folder back to SerpentSpine data folder (see Mona tutorial for full steps)
If you have any issues with exporting, please refer to the GIMI troubleshooting guide to see if your issue shows up.
- At this point, it is a good idea to confirm that your model is loading into the game correctly before we start working on textures. Copy over the Mod folder and reload:

It looks like the shape and position are correct, so we now move on to fixing the textures.
- We start with the diffuse texture. Diffuse textures in genshin are .dds with type BC7 SRGB which use the alpha layer for emission. Example of the original SerpentSpine texture (part above alpha layer on left, part below on right):

We now want to replace this texture with the banana texture:

For this part, we won’t be doing anything too fancy with the banana texture: we just invert the alpha channel, save as a .dds and replace the original SerpentSpineHeadDiffuse.dds (see Mona tutorial for more details on basic genshin texture editing).

Note1: Make sure that the width and height are powers of 2 (1024x1024, 2048x2048, 1024x2048, etc.), or else you might run into issues
Note2: Not all diffuse textures have emission – some don’t have an alpha channel at all. In those cases, you do not need to invert the channel and can just use the texture as is. When in doubt, check the original texture to see what it looks like and mimic it
- Replacing the diffuse texture and reloading:

Looking much better, but we can still see some reflection and shadow issues. These are being caused by the lightmap, which we will need to edit as well.
- If your model came with a lightmap, you can just repeat the above and save it as BC7 Linear and replace the original. This model did not come with one, however, so we need to create a basic light map. The original lightmap looked like this above and below the alpha layer:

Details of how exactly lightmaps work is beyond the scope of this tutorial and will be covered in later ones – for now, by comparison with the diffuse textures we can see that the map seems to be using purple above the alpha layer for the beige part of the sword, which is the most similar to our model. So we can just pain the entire texture that color to get a reasonable result:

- After replacing the lightmap texture, reload the game. Banana blade complete!

Moving on to more complex models, I am going to demonstrate how to create a Bownana by replacing Prototype Crescent. This method also applies to any swords/spears/claymores with vertex groups (e.g. tassels usually). Most of the steps remain the same as the Banana Blade, but there are a few additional complexities we need to worry about.
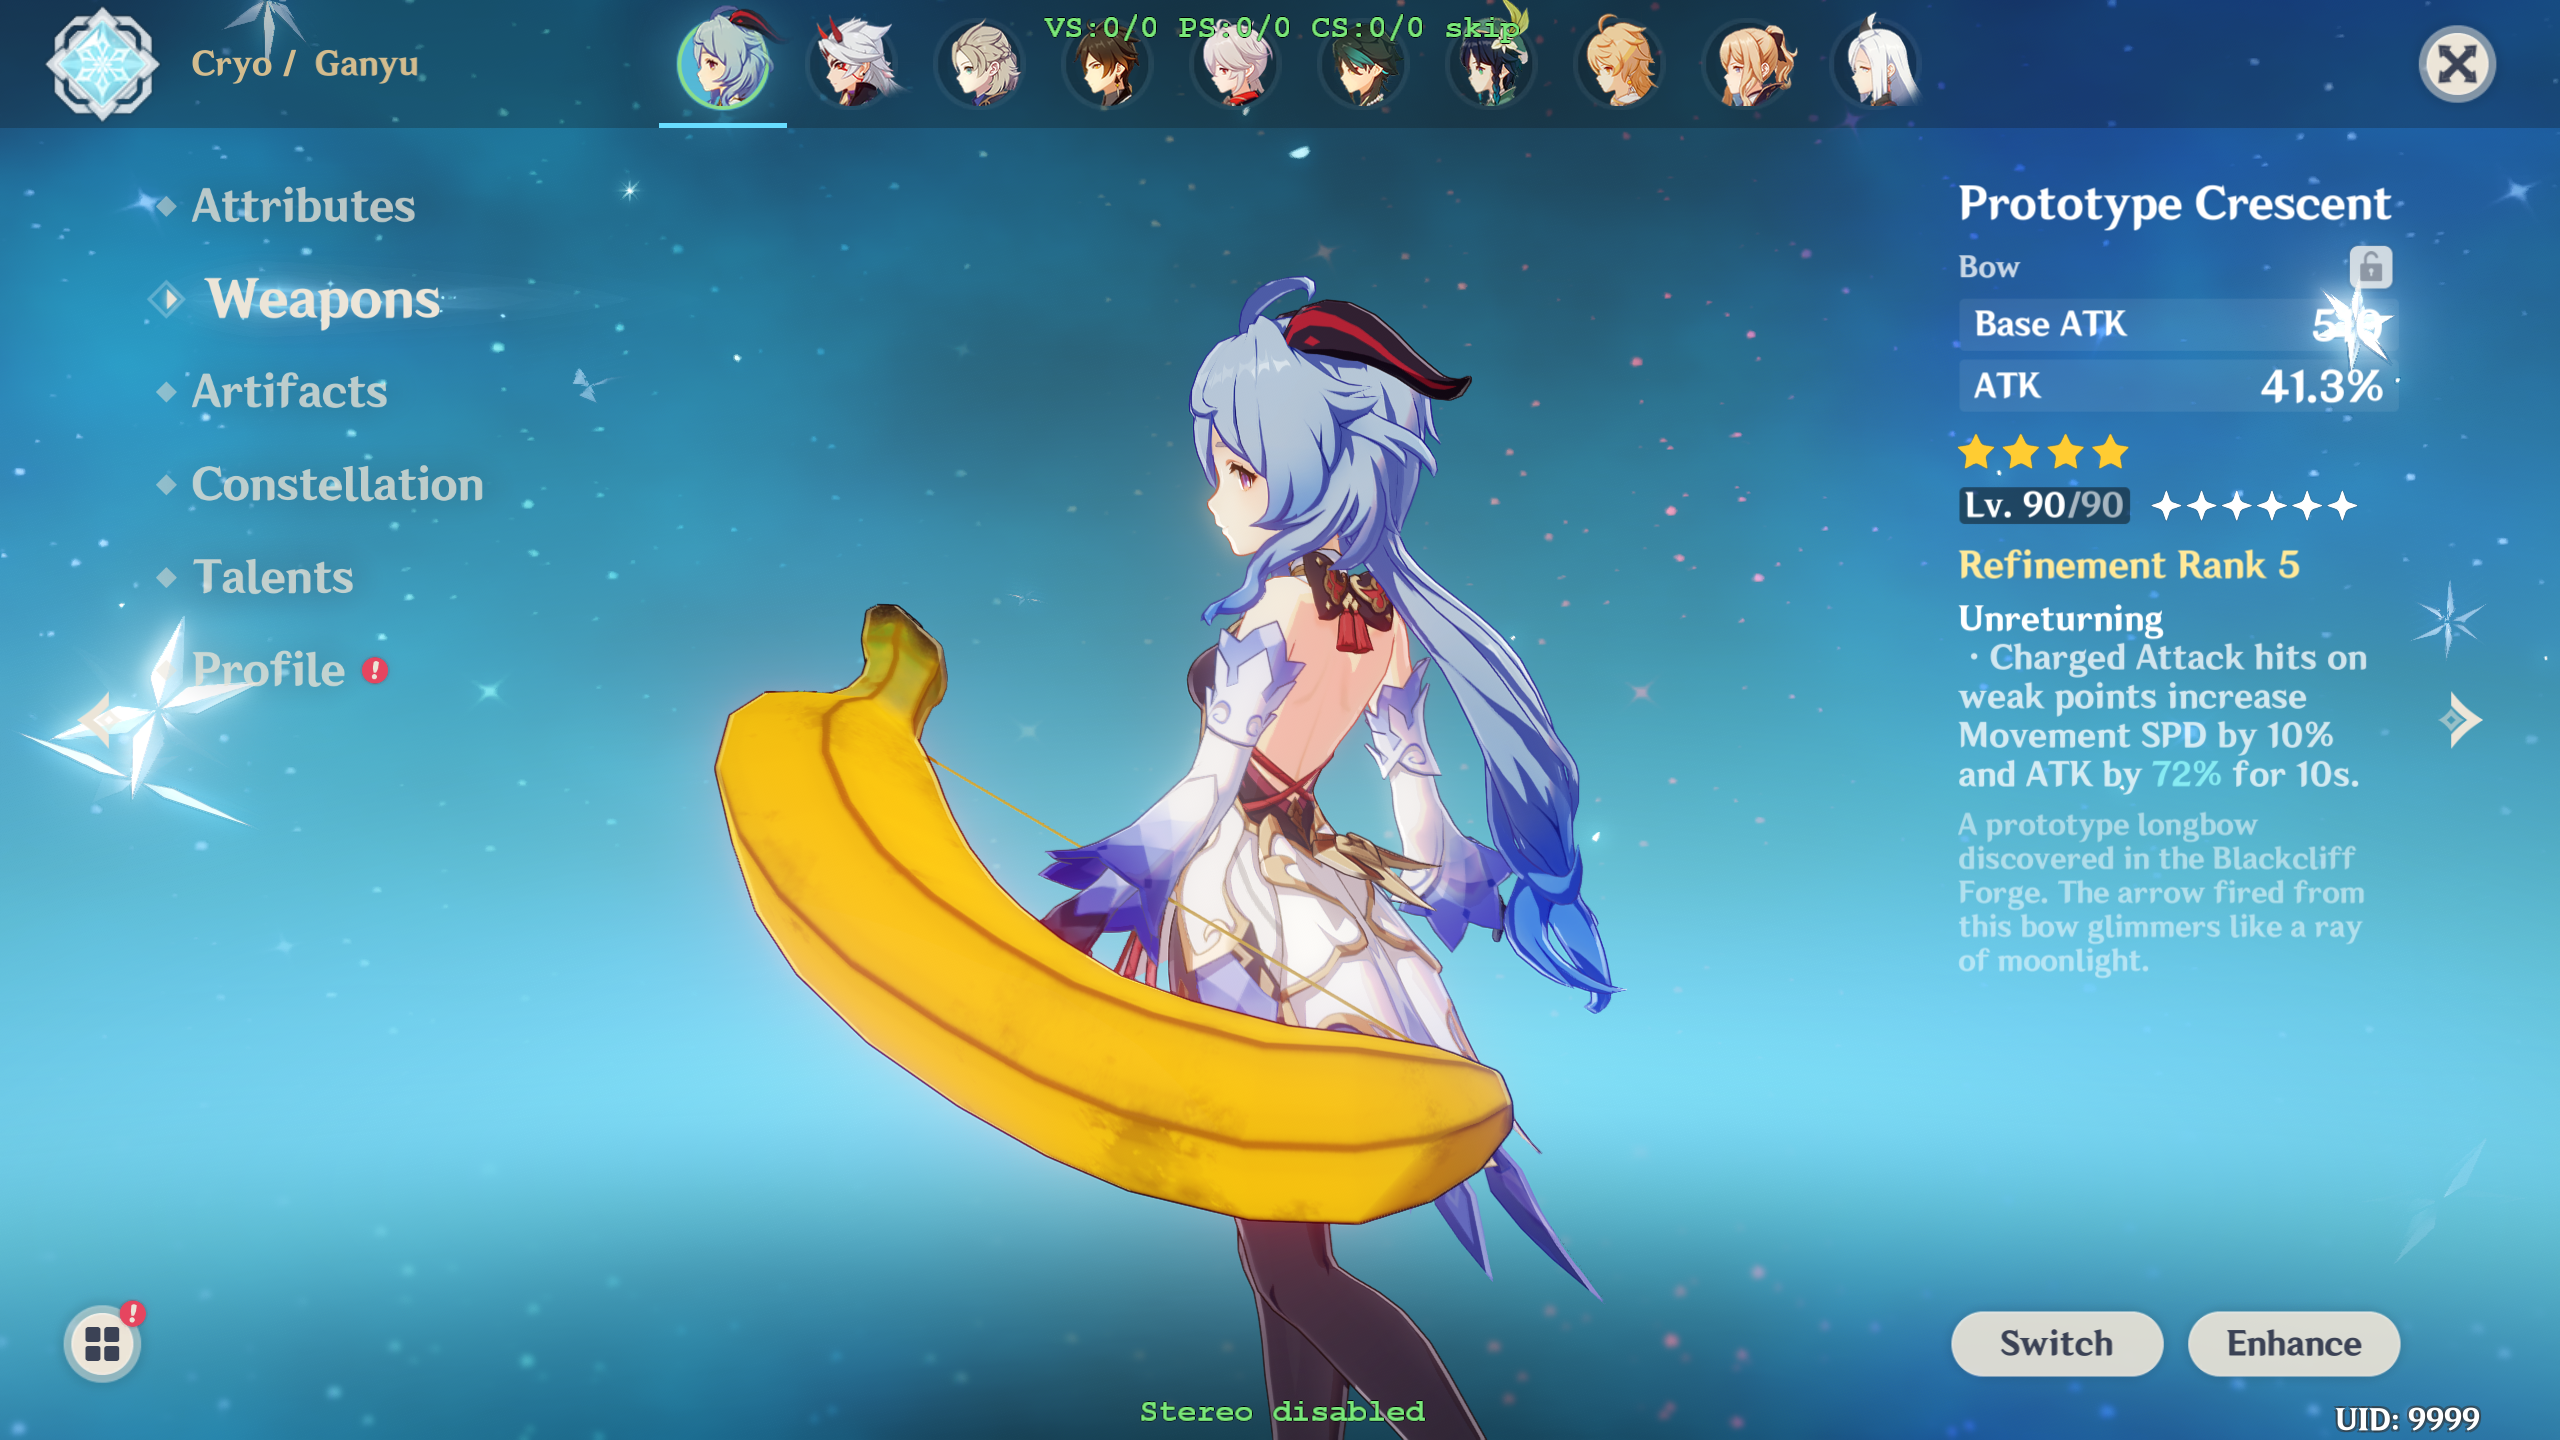
- Import the Bow and Banana model the same way as the previous section (steps 1-3). We can confirm that the original model we are replacing falls into this section by checking if it has vertex groups


- Since the shape we are replacing is different, we need to also change how we modify the model so it is placed correctly:

-
Setting the 3dmigoto custom properties, TEXCOORDs and COLORs remains the same as the previous section (steps 6-13)
-
The first major difference occurs when we need handle the original’s vertex groups. These are responsible for things like the bowstring being pulled and how the bow deforms. The bow has a total of five groups (note: group 0 has no weight at all but still must be included in order to export properly; in practice, there are only four groups you need to worry about)

- If the model we are using does not need the bow string pull animation, we can just use a single group vertex group and full paint on only group 1. To do this, we go to Object data properties and add 5 vertex groups named 0,1,2,3,4 and then go to weight paint to fully paint the object on group 1:


(Note: you still need to include all five groups in order for the new object to export properly)
-
While this works, it isn’t great unless you are replacing the model with something like a gun – ideally, we still want the bownana to have a string and deform properly. If the model you are using already came with vertex groups that are similar to the ones Genshin uses, you can merge and rename them until they match up with the original. This banana model does not have any, so we need to perform an auto-weight transfer
-
We need to give the banana a bowstring. We can either make a new one, or re-use the original string – I will be doing the latter in this tutorial. Copy the original bow, and delete everything but the string:

- Make sure the UV map name of the string and banana object match up (TEXCOORD.xy, in order for the UV maps to merge as well), then merge the two objects together by CTRL+clicking both and using CTRL+J. Also make sure the string UV map is over a region of the texture that has the correct colors. If you previously created TEXCOORD1.xy, you will need to either recreate it or move the string to the correct position.


- Now that we have our bow string, it is time to assign the weights. Make sure the banana has 5 vertex groups named 0, 1, 2, 3, 4, then create a DataTransfer modifier. Select the Prototype Crescent as the source, and select the Vertex Data object and Vertex Groups tab:

Click the arrow and press Apply.

If everything was done correctly, the bownana should now have approximately the same weights as the original:

And double checking, it looks like the string has proper physics in-game:

(Note: there is an alternate method of transferring weights using the Transfer Weights option in weight paint mode – both methods should give similar results)
- From this point on, the rest of the steps are the same as the banana blade (steps 14-20 in previous section): rotate and apply transforms, rename, export, fix the textures, and load into game:


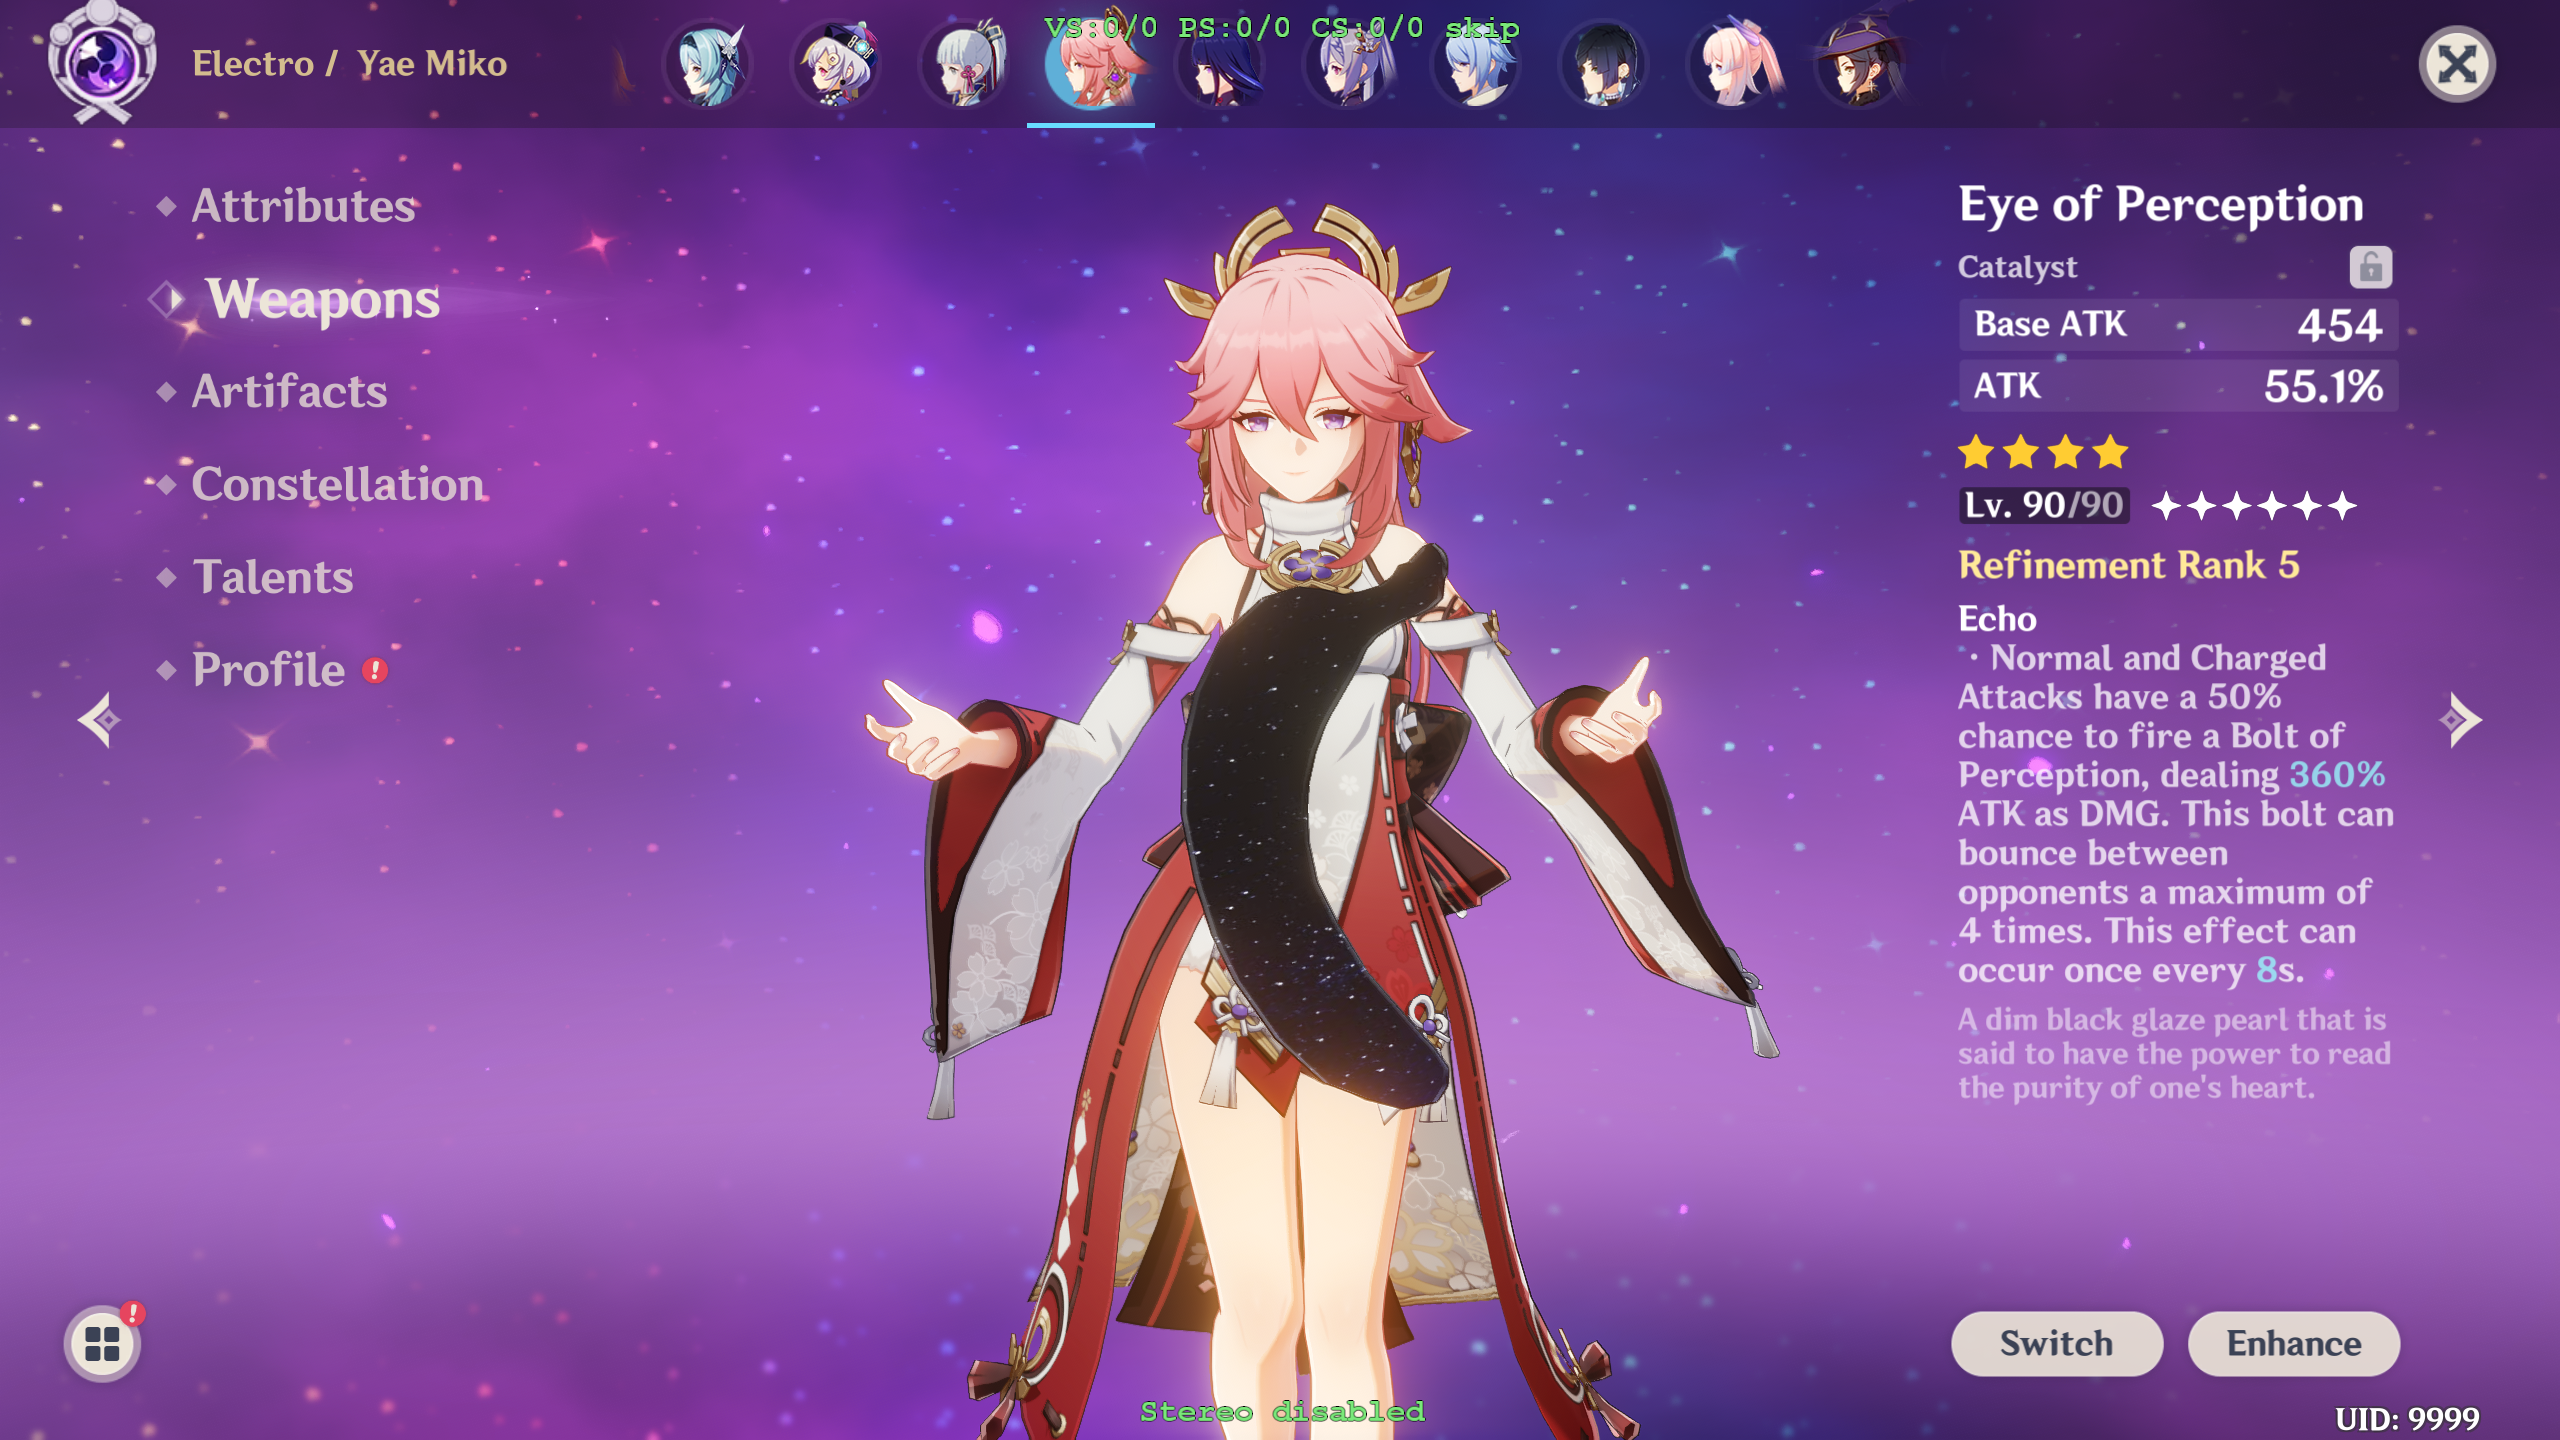
Finally, I am going to demonstrate replacing a catalyst weapon (Eye of Perception) which has continuous motion. This is fundamentally very similar to how Bows work, but catalysts use vertex groups in different ways. I am also going to demonstrate some more advanced techniques during the process as well.
I am assuming you have read the previous two sections, so I will be skipping most of the basic steps and focusing on what makes catalysts different from bows and swords.
- Catalysts have vertex groups like bows, but unlike bows catalysts use them to control motion. Eye of perception has 5 groups in total, but only 2 of them are non-empty: vertex group 1, which is assigned to the inner ball, and vertex group 4 which has the outer ring:

Both rotate counter-clockwise when faced from above. Anything that is painted with vertex group1 will spin rapidly around its center, while anything painted with vertex group 4 will spin more slowly.
- Like before, we import and position the banana. This time, I want to have it spin in the center:

- Set the 3dmigoto custom properties, TEXCOORDs and COLORs.
- Since we want it to spin rapidly, we paint the entire banana with vertex group 1:

- Rotate, apply transforms, rename and export (I scaled up the banana’s size slightly so it would make more of an impact). Replace the diffuse and lightmap with the banana textures from the previous parts


The banana should now load and be spinning at the same rate the original center part of the catalyst was.
-
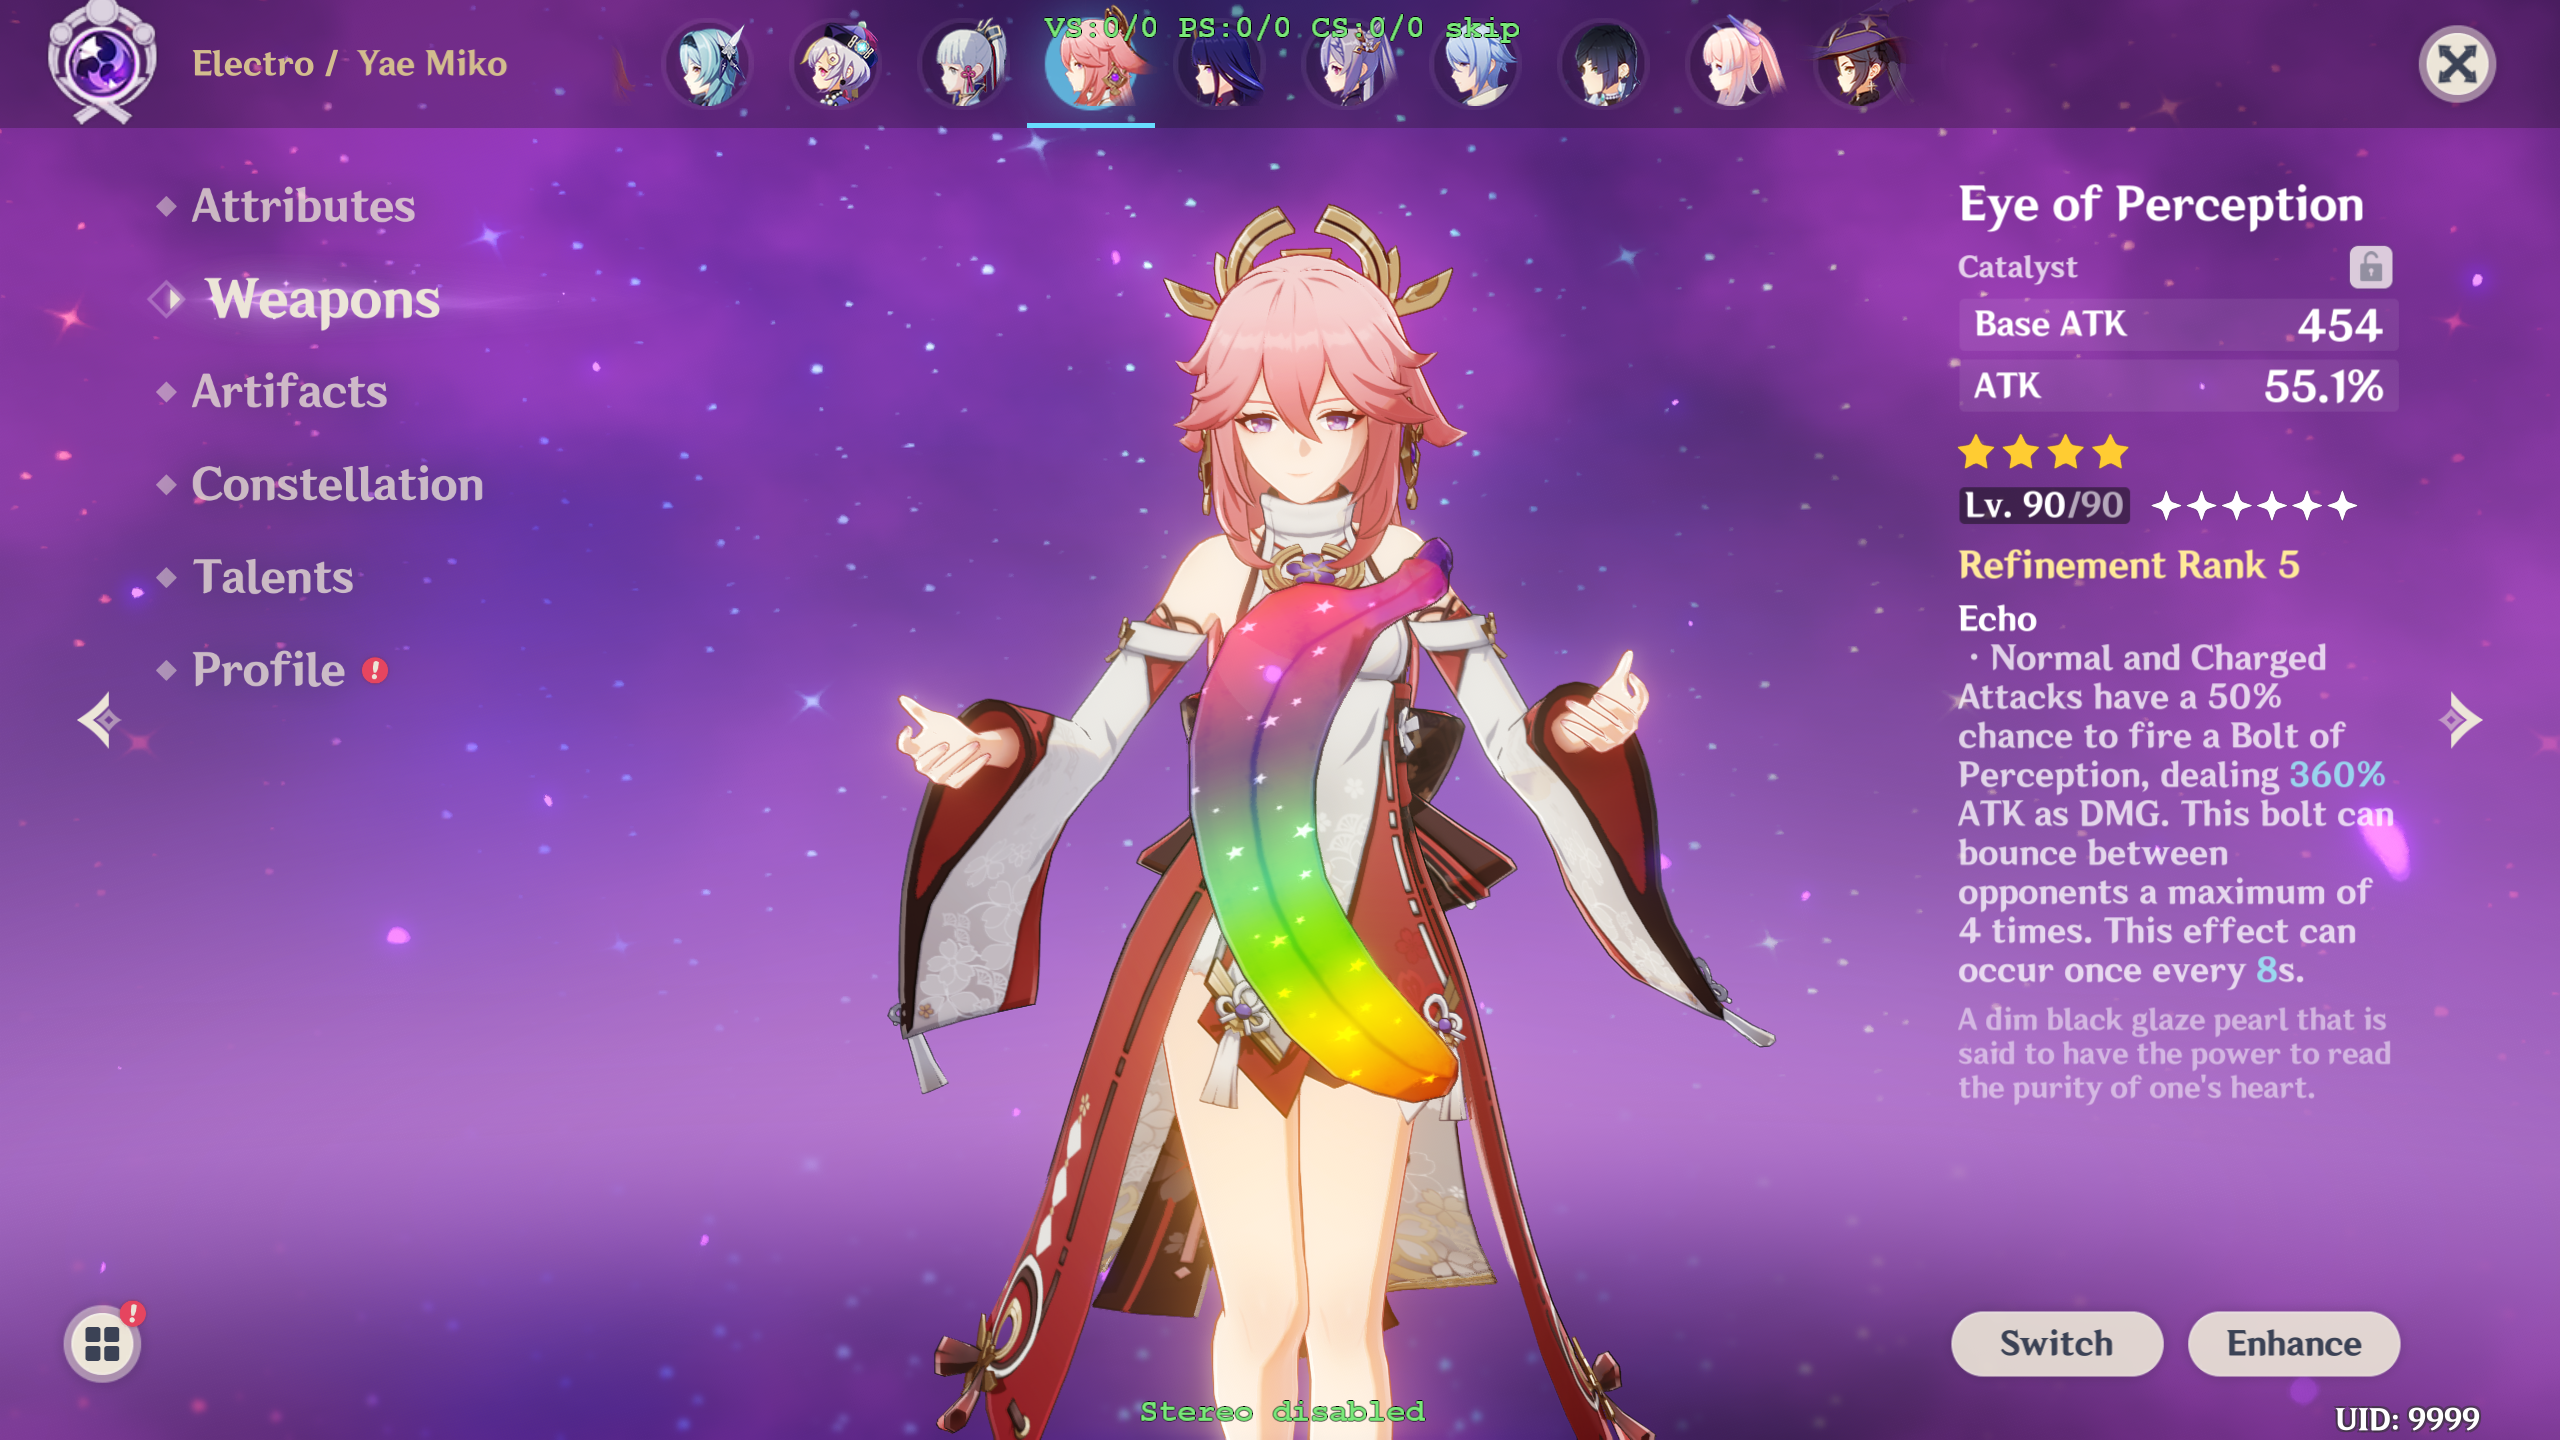
While we are now technically done, lets play around with some effects to demonstrate what you can do with textures. Let’s start by making a rainbow banana.
-
Get a rainbow image from somewhere, then create a new layer on the banana texture. Place the rainbow image over the banana, applying 50% transparency. Be careful of the seam, and make sure the color is consistent across along the length


(The banana getting bigger is just your imagination)
- Now, we can play with emission as well. I’m going to use this picture of the starry pattern:

By overlaying this on top of the alpha layer, you get a glowing star pattern on the banana:


- Finally, lets play with the fading pattern. Previously, we just set TEXCOORD1.xy to be along the length of the weapon so it fades in linearly but we aren’t actually limited to doing that.
If we set the TEXCOORD1 to something like this, the weapon will fade in in three parts:

If we set it like this, it will fade in all at once about halfway through:

And last but not least, if set it like this it will fade in chaotically:

(Bonus for reaching the end: galaxy banana)