This script allows you to build your cube terrain in Blender alone, without having to use the Krunker editor. This tool is NOT A REPLACEMENT for the Krunker map editor, but is meant to accelerate the creation of complex terrain before adding props and other non-cube entities.
It's primarily built for advanced map creators.
- Any tool that Blender natively features can be used to assist with your level terrain, notably including: functional multi-object rotation (still subject to Krunker engine limitations), easy selection of multiple objects/easy grouping, and single-face scaling (like Krunker up-axis scaling, except on any axis).
- Texture and color multiple objects at once
- Set collision, visibility, and penetrability settings for objects
- Optionally disable the collision of all rotated objects on export for convenience
- Adjust the height of all terrain if desired on export
- Not reliant on Krunker server availability
- And more! Probably
- This script is not a replacement for the Krunker editor in its entirety
- No support for importing existing Krunker levels. This would be quite a lot of extra work and doesn't currently support my personal workflow
- This exporter script is designed for a workflow of developing the majority of your cubework terrain, texturing and coloring it, importing the resulting terrain into the Krunker editor, and then applying finishing details in the Krunker editor. It does not and will not support all Krunker features, although a few features may be able to be added (in particular, prop support is something I'm interested in)
- The script doesn't overcome Krunker engine limitations. Rotations greater than 0 on multiple axes at once have an extremely high chance to cause object misalignment. Exporting objects of inappropriate sizes may result in mispositioned objects. No, you can't make anything aside from rectangular prisms
- A Grid Scale of 1 unit technically works, but often ends up misaligned on export. Default settings have the Grid Scale set to 2, and only Grid Scales that are multiples of 2 (4, 6, 8, 10, etc.) are officially supported. Make adjustments in the Krunker editor if you need 1 unit level of precision
- Scaled objects frequently get displaced off-grid in Blender, but I've packaged a separate script to help with this. Check the tutorial section below
You'll obviously need to install Blender. Do this first.
A general prerequisite knowledge of Blender is required in advanced. However, you do not need to know much more than the following basics for cube manipulation:
- Left Click selects objects
- Shift Left Click selects multiple objects
- Use the Gizmo (the thing with arrows on top of a selection) to manipulate it, or use the options below
- G key Grabs the selection and moves it, ignoring axis
- R key Rotates the selection, ignoring axis
- S key Scales the selection, ignoring axis
- Press X, Y, or Z after pressing one of the above manipulation keys to perform the action only on that axis (G followed by X will move the selection on the X axis)
- Press Shift-X, Shift-Y, or Shift-Z after pressing one of the above manipulation keys to shift the selection IGNORING the axis you pressed (S followed by Shift-Z will scale the selection on the X and Y axes)
- Typing a numerical value after doing any combination of the above allows you to shift the selection by that value (S followed by Y followed by -1 will mirror the selection along the Y axis)
- Shift-D Duplicates the selection
- Middle Mouse rotates the camera
- Shift Middle Mouse pans the camera
- Scroll Wheel zooms the camera
- Tab shifts between Object Mode and Edit Mode
Install the two addon scripts packaged in the Scripts folder. Go to Edit > Preferences > Add-ons and press the Install button on the top right of the page. After doing so, tick the checkbox next to Krunker Level Exporter and Krunker Object Fit to Grid to enable them in Blender. You may have to restart Blender after this.
The Krunker Level Exporter script adds a dialog to File > Export called "Krunker Level Data (.txt)". This will generate a valid Krunker level out of the Blender file data, with a couple of additional options available to you in the bottom left of the screen.
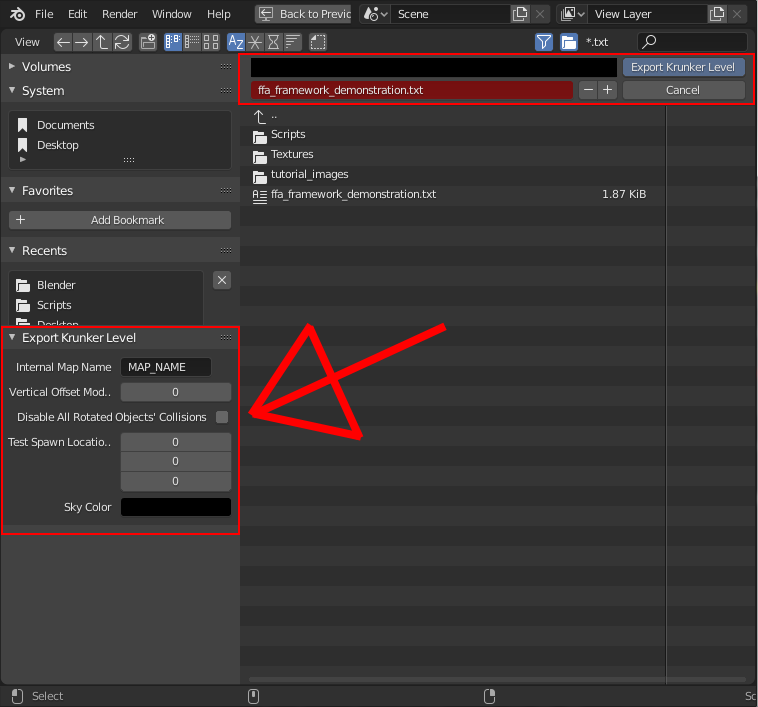
The options are mostly self-explanatory, and you can hover over the value for each one to see more detail about what each one does.
The Krunker Object Fit to Grid script is a band-aid fix for misaligned and scaled objects. Any time that you scale an object in Object Mode or your object has a location or dimension value that is not a series of whole numbers, press Shift-F to re-align the object to a proper location and fix any off-grid faces. You can select multiple objects at once and perform this operation on all of them simultaneously. Ideally this would be done automatically without this keybind, but at present you have to do this manually. Sorry.
Failing to use Fit to Grid may cause your terrain to be improperly sized or misplaced in Krunker compared to its location in Blender.
First, make a duplicate of the "Krunker_Level_Framework.blend" file, and rename it to whatever you'd like. This will be your default map state to work with.
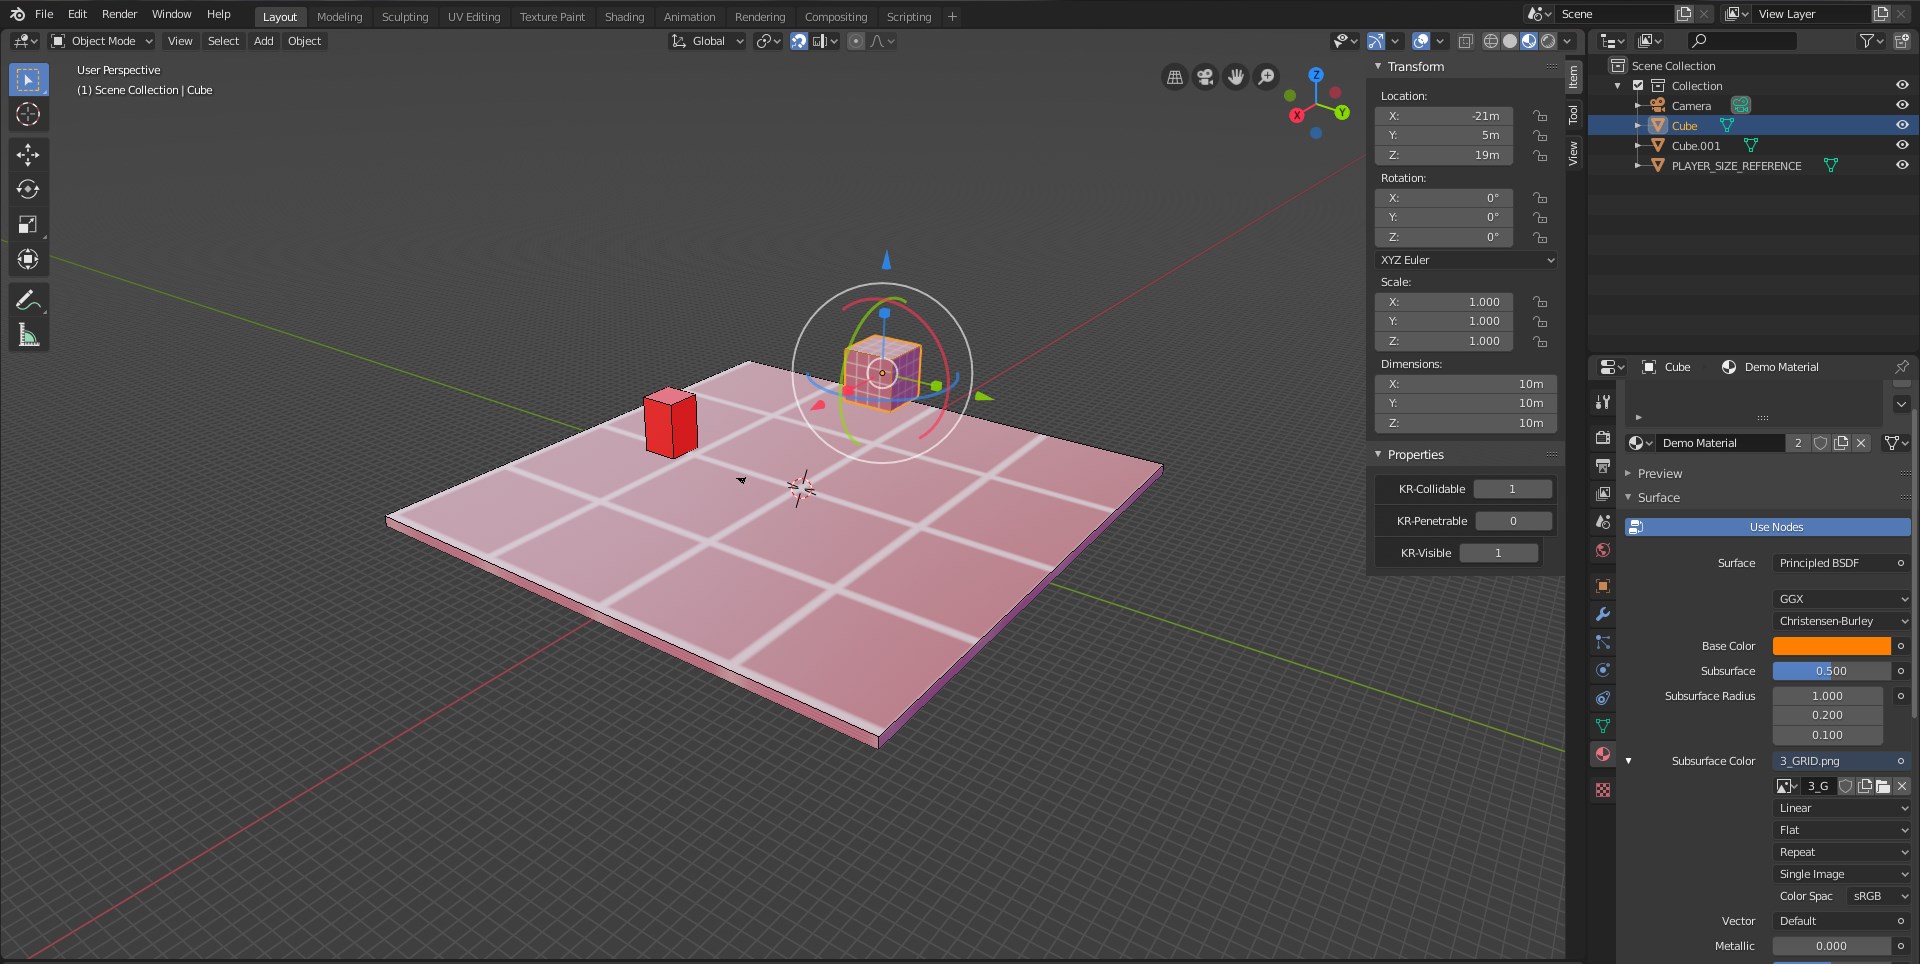
Opening your new map will show show you a Blender model with a couple of objects: a floor, a floating cube, and a PLAYER_SIZE_REFERENCE object (the red object shown in the image below).
Create duplicates of either the floor or the floating cube IN OBJECT MODE (do not copy objects while in edit mode), and scale or shift their faces around however you'd like, making sure to remember that they need to be rectangular prisms (Krunker cubes!) DO NOT COPY FROM THE PLAYER_SIZE_REFERENCE OBJECT (this object is a reference to a Krunker player's exact size, and is not meant to be copied). You can create copies of your copies without any issue as well. Remember to use the Shift-F keybind after scaling an object to make sure that it's on-grid. This does not need to be done if you only move an object's faces one at a time.
It's highly recommended that you do not disable snapping.
Click on a cube, and then click on the Materials tab
The cube should have a default material called Demo Material. This material contains the Color, Emission Color, and Texture value typically used by Krunker.
-Base Color is equivalent to Krunker's Color value
-Emission is equivalent to Krunker's Emission Color
-Subsurface Color is equivalent to the Texture value (this one's a bit more convoluted)
For colors, simply click the respective color and change it accordingly.
To change the texture of an object, click the Open Image button below the Subsurface Color. If this option isn't available, first press the "o" next to Subsurface Color and click "Image Texture". Open the "Texture" folder and select the texture you want to use on the object. If you want to use the "Default" texture, press the X next to the texture you selected. (Default actually means no texture at all)
To see the changes on screen, you may have to change the 3D viewports display mode to Lookdev. This option is in the top-right of the screen to the right of the "Global" orientation drop-down.
You can make new materials by pressing the + sign next to "Demo Material" and then pressing "New", making sure that it is a "Principled BSDF". Click on the new material to set it to active on the object. Even though it's active, it may still not display on the object. To fix this, remove any other materials in the material list with the - sign.
To assign a material to multiple objects, select multiple objects with Shift-Left-Click and then Shift-Left-Click the specific object you want to copy the material from. Press Control-L, and then press materials to link the material to other objects. If this doesn't work, also go to the materials tab, right click on the material you want to copy, and press "Copy to Selected".
Any change to a material's colors or texture will cause the change to apply to every object that has that material.
Keep in mind that textures and colors won't look exactly the same in Blender as they will in-game.
The tab on the right side of the screen shows some helpful information, including location, rotation, dimensions, and Krunker specific custom properties. You can edit these values on this tab, but make sure they are whole numbers. If you don't see this tab, press N.
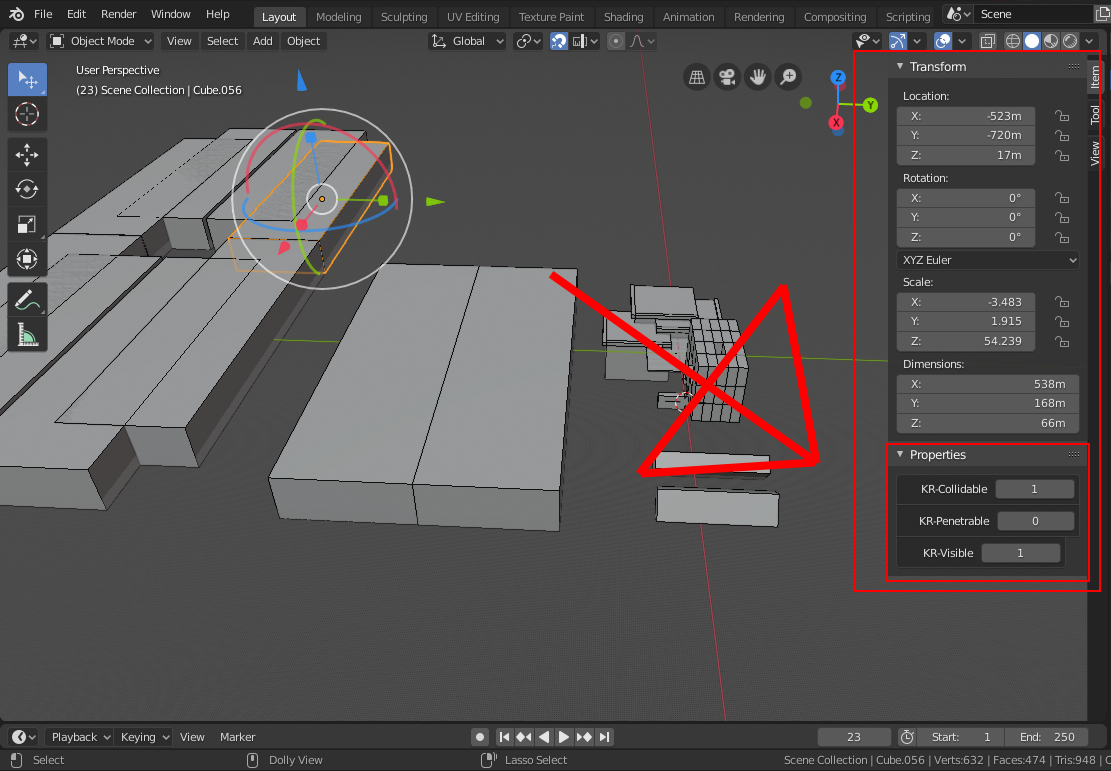
You can change a few of a Cube's Krunker engine properties from this menu, presently the following:
-KR-Collidable: 0 means no collision, 1 means collision
-KR-Penetrable: 0 means cannot be shot through, 1 means can be shot through
-KR-Visible: 0 means invisible, 1 means visible
Any non-listed properties are set to their defaults and must be adjusted in the Krunker map editor.
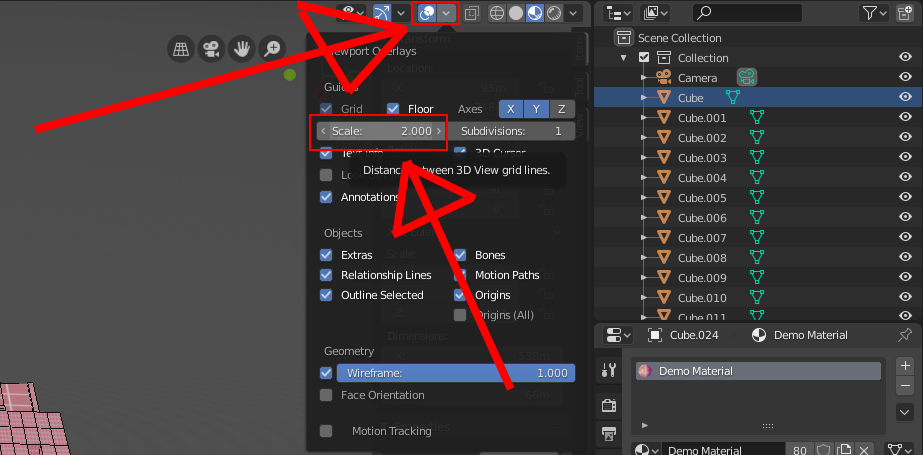
You can adjust the Grid Scale from the following menu. Make sure that the value is a whole number that is a multiple of 2 (4, 6, 8, 10, etc.)
You can flip an object or group of objects by pressing S to scale, pressing a key to choose an axis (X, Y, or Z), and typing -1. This maintains collision as the object is not rotated.
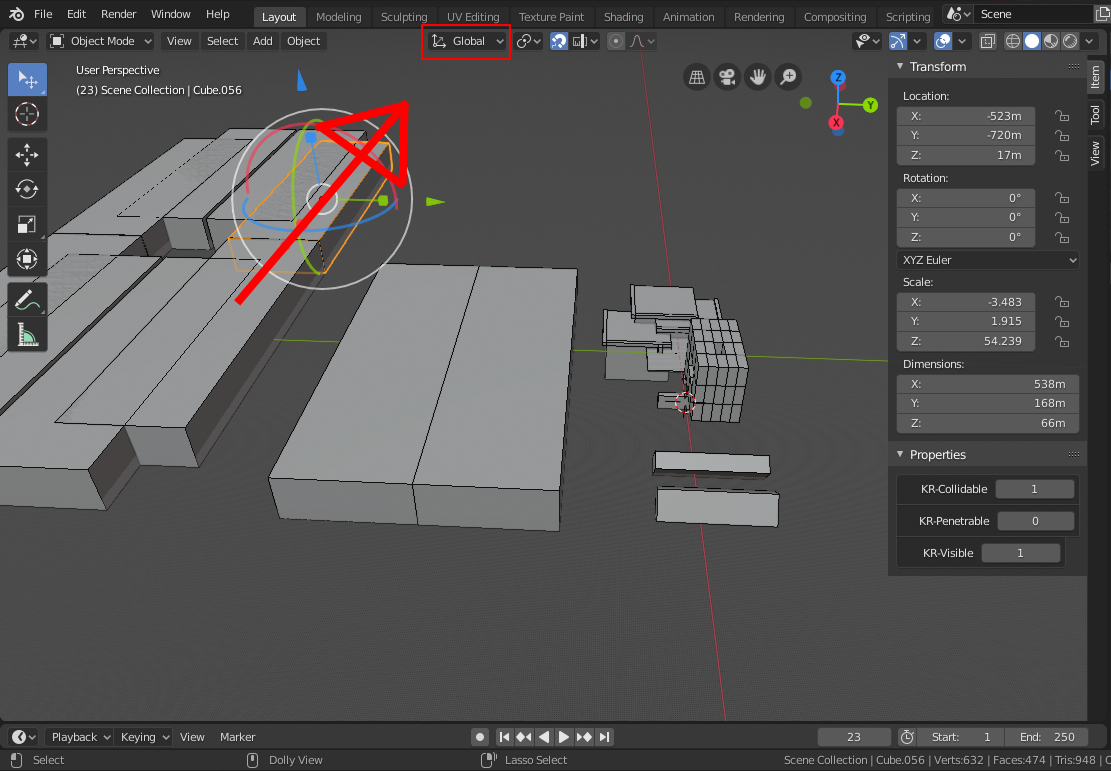
You can change between Global and Local object orientation by pressing the Comma (,) key or through this menu:
You may want to look up how to use pivot points within Blender, as they can make complex design much easier.
- Deleting an object and then trying to export will cause the export to fail. Select any random object and then try exporting again. I'm probably not fixing this one.
- Grid Scale of 1 or not a multiple of 2 is very dangerous, don't use them.