| title | category | tag | |
|---|---|---|---|
CompletableFuture入门 |
Java |
|
自己在项目中使用 CompletableFuture 比较多,看到很多开源框架中也大量使用到了 CompletableFuture 。
因此,专门写一篇文章来介绍这个 Java 8 才被引入的一个非常有用的用于异步编程的类。
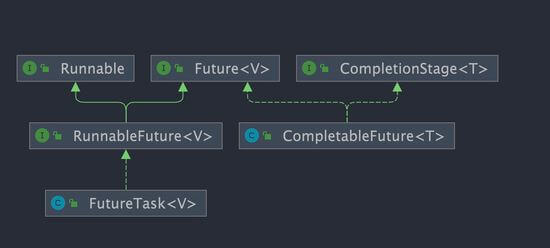
CompletableFuture 同时实现了 Future 和 CompletionStage 接口。
public class CompletableFuture<T> implements Future<T>, CompletionStage<T> {
}
CompletableFuture 除了提供了更为好用和强大的 Future 特性之外,还提供了函数式编程的能力。
Future 接口有 5 个方法:
boolean cancel(boolean mayInterruptIfRunning):尝试取消执行任务。boolean isCancelled():判断任务是否被取消。boolean isDone(): 判断任务是否已经被执行完成。get():等待任务执行完成并获取运算结果。get(long timeout, TimeUnit unit):多了一个超时时间。
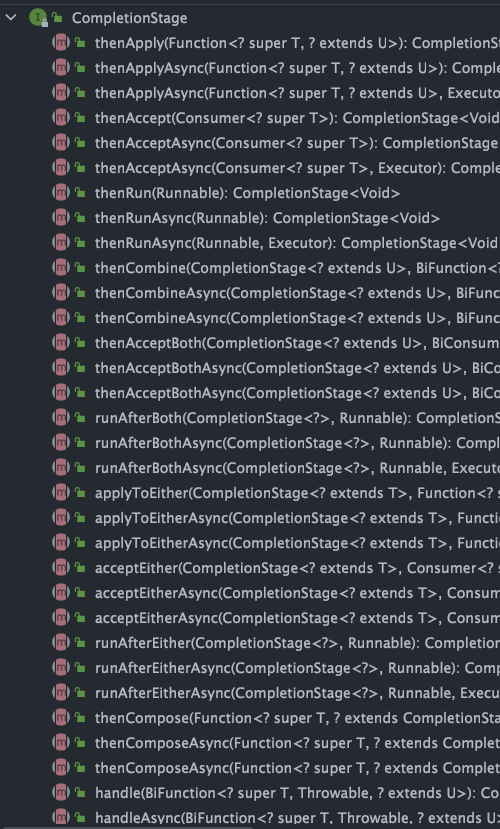
CompletionStage 接口描述了一个异步计算的阶段。很多计算可以分成多个阶段或步骤,此时可以通过它将所有步骤组合起来,形成异步计算的流水线。
CompletionStage 接口中的方法比较多,CompletableFuture 的函数式能力就是这个接口赋予的。从这个接口的方法参数你就可以发现其大量使用了 Java8 引入的函数式编程。
由于方法众多,所以这里不能一一讲解,下文中我会介绍大部分常见方法的使用。
常见的创建 CompletableFuture 对象的方法如下:
- 通过 new 关键字。
- 基于
CompletableFuture自带的静态工厂方法:runAsync()、supplyAsync()。
通过 new 关键字创建 CompletableFuture 对象这种使用方式可以看作是将 CompletableFuture 当做 Future 来使用。
我在我的开源项目 guide-rpc-framework 中就是这种方式创建的 CompletableFuture 对象。
下面咱们来看一个简单的案例。
我们通过创建了一个结果值类型为 RpcResponse<Object> 的 CompletableFuture,你可以把 resultFuture 看作是异步运算结果的载体。
CompletableFuture<RpcResponse<Object>> resultFuture = new CompletableFuture<>();假设在未来的某个时刻,我们得到了最终的结果。这时,我们可以调用 complete() 方法为其传入结果,这表示 resultFuture 已经被完成了。
// complete() 方法只能调用一次,后续调用将被忽略。
resultFuture.complete(rpcResponse);
你可以通过 isDone() 方法来检查是否已经完成。
public boolean isDone() {
    return result != null;
}
获取异步计算的结果也非常简单,直接调用 get() 方法即可。调用 get() 方法的线程会阻塞直到 CompletableFuture 完成运算。
rpcResponse = completableFuture.get();如果你已经知道计算的结果的话,可以使用静态方法 completedFuture() 来创建 CompletableFuture 。
CompletableFuture<String> future = CompletableFuture.completedFuture("hello!");
assertEquals("hello!", future.get());
completedFuture() 方法底层调用的是带参数的 new 方法,只不过,这个方法不对外暴露。
public static <U> CompletableFuture<U> completedFuture(U value) {
    return new CompletableFuture<U>((value == null) ? NIL : value);
}这两个方法可以帮助我们封装计算逻辑。
static <U> CompletableFuture<U> supplyAsync(Supplier<U> supplier);
// 使用自定义线程池(推荐)
static <U> CompletableFuture<U> supplyAsync(Supplier<U> supplier, Executor executor);
static CompletableFuture<Void> runAsync(Runnable runnable);
// 使用自定义线程池(推荐)
static CompletableFuture<Void> runAsync(Runnable runnable, Executor executor);
runAsync() 方法接受的参数是 Runnable ,这是一个函数式接口,不允许返回值。当你需要异步操作且不关心返回结果的时候可以使用 runAsync() 方法。
@FunctionalInterface
public interface Runnable {
    public abstract void run();
}
supplyAsync() 方法接受的参数是 Supplier<U> ,这也是一个函数式接口,U 是返回结果值的类型。
@FunctionalInterface
public interface Supplier<T> {

    /**
     * Gets a result.
     *
     * @return a result
     */
    T get();
}
当你需要异步操作且关心返回结果的时候,可以使用 supplyAsync() 方法。
CompletableFuture<Void> future = CompletableFuture.runAsync(() -> System.out.println("hello!"));
future.get();// 输出 "hello!"
CompletableFuture<String> future2 = CompletableFuture.supplyAsync(() -> "hello!");
assertEquals("hello!", future2.get());当我们获取到异步计算的结果之后,还可以对其进行进一步的处理,比较常用的方法有下面几个:
thenApply()thenAccept()thenRun()whenComplete()
thenApply() 方法接受一个 Function 实例,用它来处理结果。
// 沿用上一个任务的线程池
public <U> CompletableFuture<U> thenApply(
    Function<? super T,? extends U> fn) {
    return uniApplyStage(null, fn);
}

//使用默认的 ForkJoinPool 线程池(不推荐)
public <U> CompletableFuture<U> thenApplyAsync(
    Function<? super T,? extends U> fn) {
    return uniApplyStage(defaultExecutor(), fn);
}
// 使用自定义线程池(推荐)
public <U> CompletableFuture<U> thenApplyAsync(
    Function<? super T,? extends U> fn, Executor executor) {
    return uniApplyStage(screenExecutor(executor), fn);
}
thenApply() 方法使用示例如下:
CompletableFuture<String> future = CompletableFuture.completedFuture("hello!")
        .thenApply(s -> s + "world!");
assertEquals("hello!world!", future.get());
// 这次调用将被忽略。
future.thenApply(s -> s + "nice!");
assertEquals("hello!world!", future.get());
你还可以进行 流式调用:
CompletableFuture<String> future = CompletableFuture.completedFuture("hello!")
        .thenApply(s -> s + "world!").thenApply(s -> s + "nice!");
assertEquals("hello!world!nice!", future.get());
如果你不需要从回调函数中获取返回结果,可以使用 thenAccept() 或者 thenRun()。这两个方法的区别在于 thenRun() 不能访问异步计算的结果。
thenAccept() 方法的参数是 Consumer<? super T> 。
public CompletableFuture<Void> thenAccept(Consumer<? super T> action) {
    return uniAcceptStage(null, action);
}

public CompletableFuture<Void> thenAcceptAsync(Consumer<? super T> action) {
    return uniAcceptStage(defaultExecutor(), action);
}

public CompletableFuture<Void> thenAcceptAsync(Consumer<? super T> action,
                                               Executor executor) {
    return uniAcceptStage(screenExecutor(executor), action);
}顾名思义,Consumer 属于消费型接口,它可以接收 1 个输入对象然后进行“消费”。
@FunctionalInterface
public interface Consumer<T> {

    void accept(T t);

    default Consumer<T> andThen(Consumer<? super T> after) {
        Objects.requireNonNull(after);
        return (T t) -> { accept(t); after.accept(t); };
    }
}
thenRun() 的方法是的参数是 Runnable 。
public CompletableFuture<Void> thenRun(Runnable action) {
    return uniRunStage(null, action);
}

public CompletableFuture<Void> thenRunAsync(Runnable action) {
    return uniRunStage(defaultExecutor(), action);
}

public CompletableFuture<Void> thenRunAsync(Runnable action,
                                            Executor executor) {
    return uniRunStage(screenExecutor(executor), action);
}
thenAccept() 和 thenRun() 使用示例如下:
CompletableFuture.completedFuture("hello!")
        .thenApply(s -> s + "world!").thenApply(s -> s + "nice!").thenAccept(System.out::println);//hello!world!nice!

CompletableFuture.completedFuture("hello!")
        .thenApply(s -> s + "world!").thenApply(s -> s + "nice!").thenRun(() -> System.out.println("hello!"));//hello!
whenComplete() 的方法的参数是 BiConsumer<? super T, ? super Throwable> 。
public CompletableFuture<T> whenComplete(
    BiConsumer<? super T, ? super Throwable> action) {
    return uniWhenCompleteStage(null, action);
}


public CompletableFuture<T> whenCompleteAsync(
    BiConsumer<? super T, ? super Throwable> action) {
    return uniWhenCompleteStage(defaultExecutor(), action);
}
// 使用自定义线程池(推荐)
public CompletableFuture<T> whenCompleteAsync(
    BiConsumer<? super T, ? super Throwable> action, Executor executor) {
    return uniWhenCompleteStage(screenExecutor(executor), action);
}
相对于 Consumer , BiConsumer 可以接收 2 个输入对象然后进行“消费”。
@FunctionalInterface
public interface BiConsumer<T, U> {
    void accept(T t, U u);

    default BiConsumer<T, U> andThen(BiConsumer<? super T, ? super U> after) {
        Objects.requireNonNull(after);

        return (l, r) -> {
            accept(l, r);
            after.accept(l, r);
        };
    }
}
whenComplete() 使用示例如下:
CompletableFuture<String> future = CompletableFuture.supplyAsync(() -> "hello!")
        .whenComplete((res, ex) -> {
            // res 代表返回的结果
            // ex 的类型为 Throwable ,代表抛出的异常
            System.out.println(res);
            // 这里没有抛出异常所有为 null
            assertNull(ex);
        });
assertEquals("hello!", future.get());你可以通过 handle() 方法来处理任务执行过程中可能出现的抛出异常的情况。
public <U> CompletableFuture<U> handle(
    BiFunction<? super T, Throwable, ? extends U> fn) {
    return uniHandleStage(null, fn);
}

public <U> CompletableFuture<U> handleAsync(
    BiFunction<? super T, Throwable, ? extends U> fn) {
    return uniHandleStage(defaultExecutor(), fn);
}

public <U> CompletableFuture<U> handleAsync(
    BiFunction<? super T, Throwable, ? extends U> fn, Executor executor) {
    return uniHandleStage(screenExecutor(executor), fn);
}
示例代码如下:
CompletableFuture<String> future
        = CompletableFuture.supplyAsync(() -> {
    if (true) {
        throw new RuntimeException("Computation error!");
    }
    return "hello!";
}).handle((res, ex) -> {
    // res 代表返回的结果
    // ex 的类型为 Throwable ,代表抛出的异常
    return res != null ? res : "world!";
});
assertEquals("world!", future.get());
你还可以通过 exceptionally() 方法来处理异常情况。
CompletableFuture<String> future
        = CompletableFuture.supplyAsync(() -> {
    if (true) {
        throw new RuntimeException("Computation error!");
    }
    return "hello!";
}).exceptionally(ex -> {
    System.out.println(ex.toString());// CompletionException
    return "world!";
});
assertEquals("world!", future.get());
如果你想让 CompletableFuture 的结果就是异常的话,可以使用 completeExceptionally() 方法为其赋值。
CompletableFuture<String> completableFuture = new CompletableFuture<>();
// ...
completableFuture.completeExceptionally(
  new RuntimeException("Calculation failed!"));
// ...
completableFuture.get(); // ExecutionException你可以使用 thenCompose() 按顺序链接两个 CompletableFuture 对象。
public <U> CompletableFuture<U> thenCompose(
    Function<? super T, ? extends CompletionStage<U>> fn) {
    return uniComposeStage(null, fn);
}

public <U> CompletableFuture<U> thenComposeAsync(
    Function<? super T, ? extends CompletionStage<U>> fn) {
    return uniComposeStage(defaultExecutor(), fn);
}

public <U> CompletableFuture<U> thenComposeAsync(
    Function<? super T, ? extends CompletionStage<U>> fn,
    Executor executor) {
    return uniComposeStage(screenExecutor(executor), fn);
}
thenCompose() 方法会使用示例如下:
CompletableFuture<String> future
        = CompletableFuture.supplyAsync(() -> "hello!")
        .thenCompose(s -> CompletableFuture.supplyAsync(() -> s + "world!"));
assertEquals("hello!world!", future.get());
在实际开发中,这个方法还是非常有用的。比如说,我们先要获取用户信息然后再用用户信息去做其他事情。
和 thenCompose() 方法类似的还有 thenCombine() 方法, thenCombine() 同样可以组合两个 CompletableFuture 对象。
CompletableFuture<String> completableFuture
        = CompletableFuture.supplyAsync(() -> "hello!")
        .thenCombine(CompletableFuture.supplyAsync(
                () -> "world!"), (s1, s2) -> s1 + s2)
        .thenCompose(s -> CompletableFuture.supplyAsync(() -> s + "nice!"));
assertEquals("hello!world!nice!", completableFuture.get());
那 thenCompose() 和 thenCombine() 有什么区别呢?
thenCompose()可以两个CompletableFuture对象,并将前一个任务的返回结果作为下一个任务的参数,它们之间存在着先后顺序。thenCombine()会在两个任务都执行完成后,把两个任务的结果合并。两个任务是并行执行的,它们之间并没有先后依赖顺序。
你可以通过 CompletableFuture 的 allOf()这个静态方法来并行运行多个 CompletableFuture 。
实际项目中,我们经常需要并行运行多个互不相关的任务,这些任务之间没有依赖关系,可以互相独立地运行。
比说我们要读取处理 6 个文件,这 6 个任务都是没有执行顺序依赖的任务,但是我们需要返回给用户的时候将这几个文件的处理的结果进行统计整理。像这种情况我们就可以使用并行运行多个 CompletableFuture 来处理。
示例代码如下:
CompletableFuture<Void> task1 =
  CompletableFuture.supplyAsync(()->{
    //自定义业务操作
  });
......
CompletableFuture<Void> task6 =
  CompletableFuture.supplyAsync(()->{
    //自定义业务操作
  });
......
 CompletableFuture<Void> headerFuture=CompletableFuture.allOf(task1,.....,task6);

  try {
    headerFuture.join();
  } catch (Exception ex) {
    ......
  }
System.out.println("all done. ");
经常和 allOf() 方法拿来对比的是 anyOf() 方法。
allOf() 方法会等到所有的 CompletableFuture 都运行完成之后再返回
Random rand = new Random();
CompletableFuture<String> future1 = CompletableFuture.supplyAsync(() -> {
    try {
        Thread.sleep(1000 + rand.nextInt(1000));
    } catch (InterruptedException e) {
        e.printStackTrace();
    } finally {
        System.out.println("future1 done...");
    }
    return "abc";
});
CompletableFuture<String> future2 = CompletableFuture.supplyAsync(() -> {
    try {
        Thread.sleep(1000 + rand.nextInt(1000));
    } catch (InterruptedException e) {
        e.printStackTrace();
    } finally {
        System.out.println("future2 done...");
    }
    return "efg";
});
调用 join() 可以让程序等future1 和 future2 都运行完了之后再继续执行。
CompletableFuture<Void> completableFuture = CompletableFuture.allOf(future1, future2);
completableFuture.join();
assertTrue(completableFuture.isDone());
System.out.println("all futures done...");
输出:
future1 done...
future2 done...
all futures done...
anyOf() 方法不会等待所有的 CompletableFuture 都运行完成之后再返回,只要有一个执行完成即可!
CompletableFuture<Object> f = CompletableFuture.anyOf(future1, future2);
System.out.println(f.get());
输出结果可能是:
future2 done...
efg
也可能是:
future1 done...
abc
这篇文章只是简单介绍了 CompletableFuture 比较常用的一些 API 。
如果想要深入学习的话,可以多找一些书籍和博客看。
另外,建议G友们可以看看京东的 asyncTool 这个并发框架,里面大量使用到了 CompletableFuture 。


