| ML.NET version | API type | Status | App Type | Data type | Scenario | ML Task | Algorithms |
|---|---|---|---|---|---|---|---|
| Microsoft.ML 1.4 | Dynamic API | Up-to-date | Console app | Image files | Image classification | Image classification with TensorFlow model retrain based on transfer learning | DNN architecture: ResNet |
Image classification is a common problem within the Deep Learning subject. This sample shows how to create your own custom image classifier by training your model based on the transfer learning approach which is basically retraining a pre-trained model (architecture such as InceptionV3 or ResNet) so you get a custom model trained on your own images.
In this sample app you create your own custom image classifier model by natively training a TensorFlow model from ML.NET API with your own images.
Image classifier scenario – Train your own custom deep learning model with ML.NET
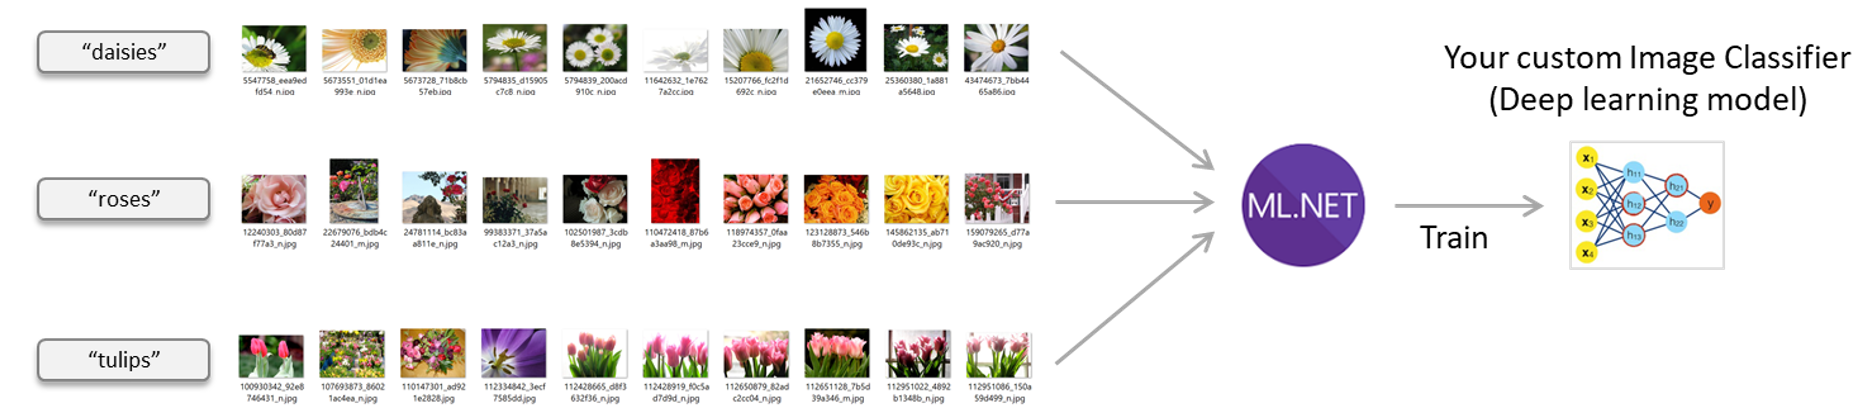
Image set license
This sample's dataset is based on the 'flower_photos imageset' available from Tensorflow at this URL. All images in this archive are licensed under the Creative Commons By-Attribution License, available at: https://creativecommons.org/licenses/by/2.0/
The full license information is provided in the LICENSE.txt file which is included as part of the same image set downloaded as a .zip file.
The by default imageset being downloaded by the sample has 200 images evenly distributed across 5 flower classes:
Images --> flower_photos_small_set -->
           |
           daisy
           |
           dandelion
           |
           roses
           |
           sunflowers
           |
           tulips
The name of each sub-folder is important because that'll be the name of each class/label the model is going to use to classify the images.
To solve this problem, first we will build an ML model. Then we will train the model on existing data, evaluate how good it is, and lastly we'll consume the model to classify a new image.
By default this solution uses CPU for training and scoring. But if your machine has a compatible GPU available (basically most NVIDIA GPU graphics cards), you can configure the project to use GPU.
When using CPU, your project has to reference the following redist library:
SciSharp.TensorFlow.Redist(CPU training)
Sample references screenshot in training project using CPU:

Building the model includes the following steps:
- Loading the image files (file paths in this case) into an
IDataView - Image classification using the ImageClassification estimator (high level API)
Define the schema of your data as Records. ImageData is the original data format and ImagePrediction is the output generated by the trained model which contains the original properties of the ImageData record as well as the PredictedLabel.
// Define input and output schema
[<CLIMutable>]
type ImageData = {
    ImagePath:string
    Label:string
}

[<CLIMutable>]
type ImagePrediction = {
    ImagePath:string
    Label: string
    PredictedLabel:string
}
Download the image dataset and load its information by using the LoadImagesFromDirectory and LoadFromEnumerable methods.
// Download Data
let datasetPath =
    __SOURCE_DIRECTORY__
    |> downloadZippedImageSetAsync fileName downloadUrl
    |> Async.RunSynchronously

// Initialize MLContext
let mlContext = MLContext()

// Get List of Images
let images = loadImagesFromDirectory datasetPath true

// Load Data into IDataView and Shuffle
let data =
    images
    |> mlContext.Data.LoadFromEnumerable
    |> mlContext.Data.ShuffleRows
Once it's loaded into the IDataView, the rows are shuffled so the dataset is better balanced before spliting into the training/test datasets.
Before the model is trained, the data has to be preprocessed. The ImageClassificationTrainer expects the data as raw bytes. Using the LoadRawImageBytes method, the values of the ImagePath are used to get the bytes for each of the images. Additionally, the Label categorical data is transformed using the MapValueToKey transform.
// Define preprocessing pipeline
let preprocessingPipeline =
    EstimatorChain()
        .Append(mlContext.Transforms.Conversion.MapValueToKey("LabelAsKey","Label"))
        .Append(mlContext.Transforms.LoadRawImageBytes("Image", null, "ImagePath"))

// Preprocess the data
let preprocessedData =
    let processingTransformer = data |> preprocessingPipeline.Fit
    data |> processingTransformer.Transform
Now, using the preprocessed data, let's split the dataset in three datasets: one for training, the second to tune model performance and finally a test set to make predictions.
let train, validation, test =
    preprocessedData
    |> ( fun originalData ->
            let trainValSplit = mlContext.Data.TrainTestSplit(originalData, testFraction=0.7)
            let testValSplit = mlContext.Data.TrainTestSplit(trainValSplit.TestSet)
            (trainValSplit.TrainSet, testValSplit.TrainSet, testValSplit.TestSet))
70% of the data is used to train the model. From the remaining 30%, 90% of it is used for validation and the remaining 10% is used for testing.
Once the data has been split, define the classifier options along with the model training pipeline. In this example, the 101-layer variant of the ResNet architecture is used.
// Define ImageClassificationTrainer Options
let classifierOptions = ImageClassificationTrainer.Options()
classifierOptions.FeatureColumnName <- "Image"
classifierOptions.LabelColumnName <- "LabelAsKey"
classifierOptions.ValidationSet <- validation
classifierOptions.Arch <- ImageClassificationTrainer.Architecture.ResnetV2101
classifierOptions.MetricsCallback <- Action<ImageClassificationTrainer.ImageClassificationMetrics>(fun x -> printfn "%s" (x.ToString()))

// Define model training pipeline
let trainingPipeline =
    EstimatorChain()
        .Append(mlContext.MulticlassClassification.Trainers.ImageClassification(classifierOptions))
        .Append(mlContext.Transforms.Conversion.MapKeyToValue("PredictedLabel","LabelAsKey"))
The mlContext.MulticlassClassification.Trainers.ImageClassification high level API trains a native TensorFlow Deep Neural Network image classification model using the ResNet V2 101 architecture and performs transfer learning on the newly provided dataset.
In order to begin the training process you run Fit on the built pipeline:
// Train the model
let trainedModel =
    train
|> trainingPipeline.FitAfter the training, we evaluate the model's quality by using the test dataset.
The Evaluate function needs an IDataView with the predictions generated from the test dataset by calling Transform.
// Get Prediction IDataView
let predictions = test |> trainedModel.Transform

// Evaluate the model
let metrics = mlContext.MulticlassClassification.Evaluate(predictions,labelColumnName="LabelAsKey")
printfn "MacroAccurracy: %f | LogLoss: %f" metrics.MacroAccuracy metrics.LogLoss
If you're satisfied, save the model:
// Save Model
mlContext.Model.Save(trainedModel, preprocessedData.Schema, Path.Join(__SOURCE_DIRECTORY__,"model.zip"))
To get a sense of the predictions being made, create an IEnumerable from the IDataView containing the predictions by calling CreateFromEnumerable and display the original label as well as the predicted label in the console
mlContext.Data.CreateEnumerable<ImagePrediction>(predictions, reuseRowObject=true)
|> Seq.take 5
|> Seq.iter(fun prediction -> printfn "Original: %s | Predicted: %s" prediction.Label prediction.PredictedLabel) This sample app is retraining a TensorFlow model for image classification. As a user, you could think it is pretty similar to this other sample Image classifier using the TensorFlow Estimator featurizer. However, the internal implementation is very different under the covers. In that mentioned sample, it is using a 'model composition approach' where an initial TensorFlow model (i.e. InceptionV3 or ResNet) is only used to featurize the images and produce the binary information per image to be used by another ML.NET classifier trainer added on top (such as LbfgsMaximumEntropy). Therefore, even when that sample is using a TensorFlow model, you are training only with a ML.NET trainer, you don't retrain a new TensorFlow model but train an ML.NET model. That's why the output of that sample is only an ML.NET model (.zip file).
In contrast, this sample is natively retraining a new TensorFlow model based on a Transfer Learning approach but training a new TensorFlow model derived from the specified pre-trained model (Inception V3 or ResNet).
Benefits:
-
Train and inference using GPU: When using this native DNN approach based on TensorFlow you can either use the CPU or GPU (if available) for a better performance (less time needed for training and scoring).
-
Reuse across multiple frameworks and platforms: This ultimately means that since you natively trained a Tensorflow model, in addition to being able to run/consume that model with the ML.NET 'wrapper' model (.zip file), you could also take the .pb TensorFlow frozen model and run it on any other framework such as Python/Keras/TensorFlow, or a Java/Android app or any framework that supports TensorFlow.
-
Flexibility and performace: Since ML.NET is internally retraining natively on Tensorflow layers, the ML.NET team will be able to optimize further and take multiple approaches like training on the last layer or training on multiple layers across the TensorFlow model and achieve better quality levels.