| page_type | description | products | languages | extensions | urlFragment | ||||||||
|---|---|---|---|---|---|---|---|---|---|---|---|---|---|
sample |
This sample demonstrates how to send task notifications to a Teams channel using an Office 365 Connector. |
|
|
|
officedev-microsoft-teams-samples-connector-todo-notification-nodejs |
Important
The existing Microsoft 365 (previously called Office 365) connectors across all cloud platforms are nearing deprecation, and the creation of new Microsoft 365 connectors will soon be blocked. For more information on the schedule and how the Workflows app provides a more flexible and secure experience, see retirement of Microsoft 365 connectors within Microsoft Teams.
This sample provides a comprehensive guide to building an Office 365 Connector that sends task notifications to a Microsoft Teams channel. The app simulates a task management system where users can create, view, and update tasks, showcasing how to send notifications through connectors to enhance productivity in Teams.
- Connectors
- Microsoft Teams is installed and you have an account (not a guest account)
- NodeJS
- dev tunnel or ngrok latest version or equivalent tunneling solution
- M365 developer account or access to a Teams account with the appropriate permissions to install an app.
Note these instructions are for running the sample on your local machine.
-
Run ngrok - point to port 3978
ngrok http 3978 --host-header="localhost:3978"Alternatively, you can also use the
dev tunnels. Please follow Create and host a dev tunnel and host the tunnel with anonymous user access command as shown below:devtunnel host -p 3978 --allow-anonymous
-
Clone the repository
git clone https://github.com/OfficeDev/Microsoft-Teams-Samples.git
-
Install node modules
Navigate to
samples/connector-todo-notification/nodejsInside node js folder, open your local terminal and run the below command to install node modules. You can do the same in Visual Studio code terminal by opening the project in Visual Studio code.
npm install
-
Configure your own connector :
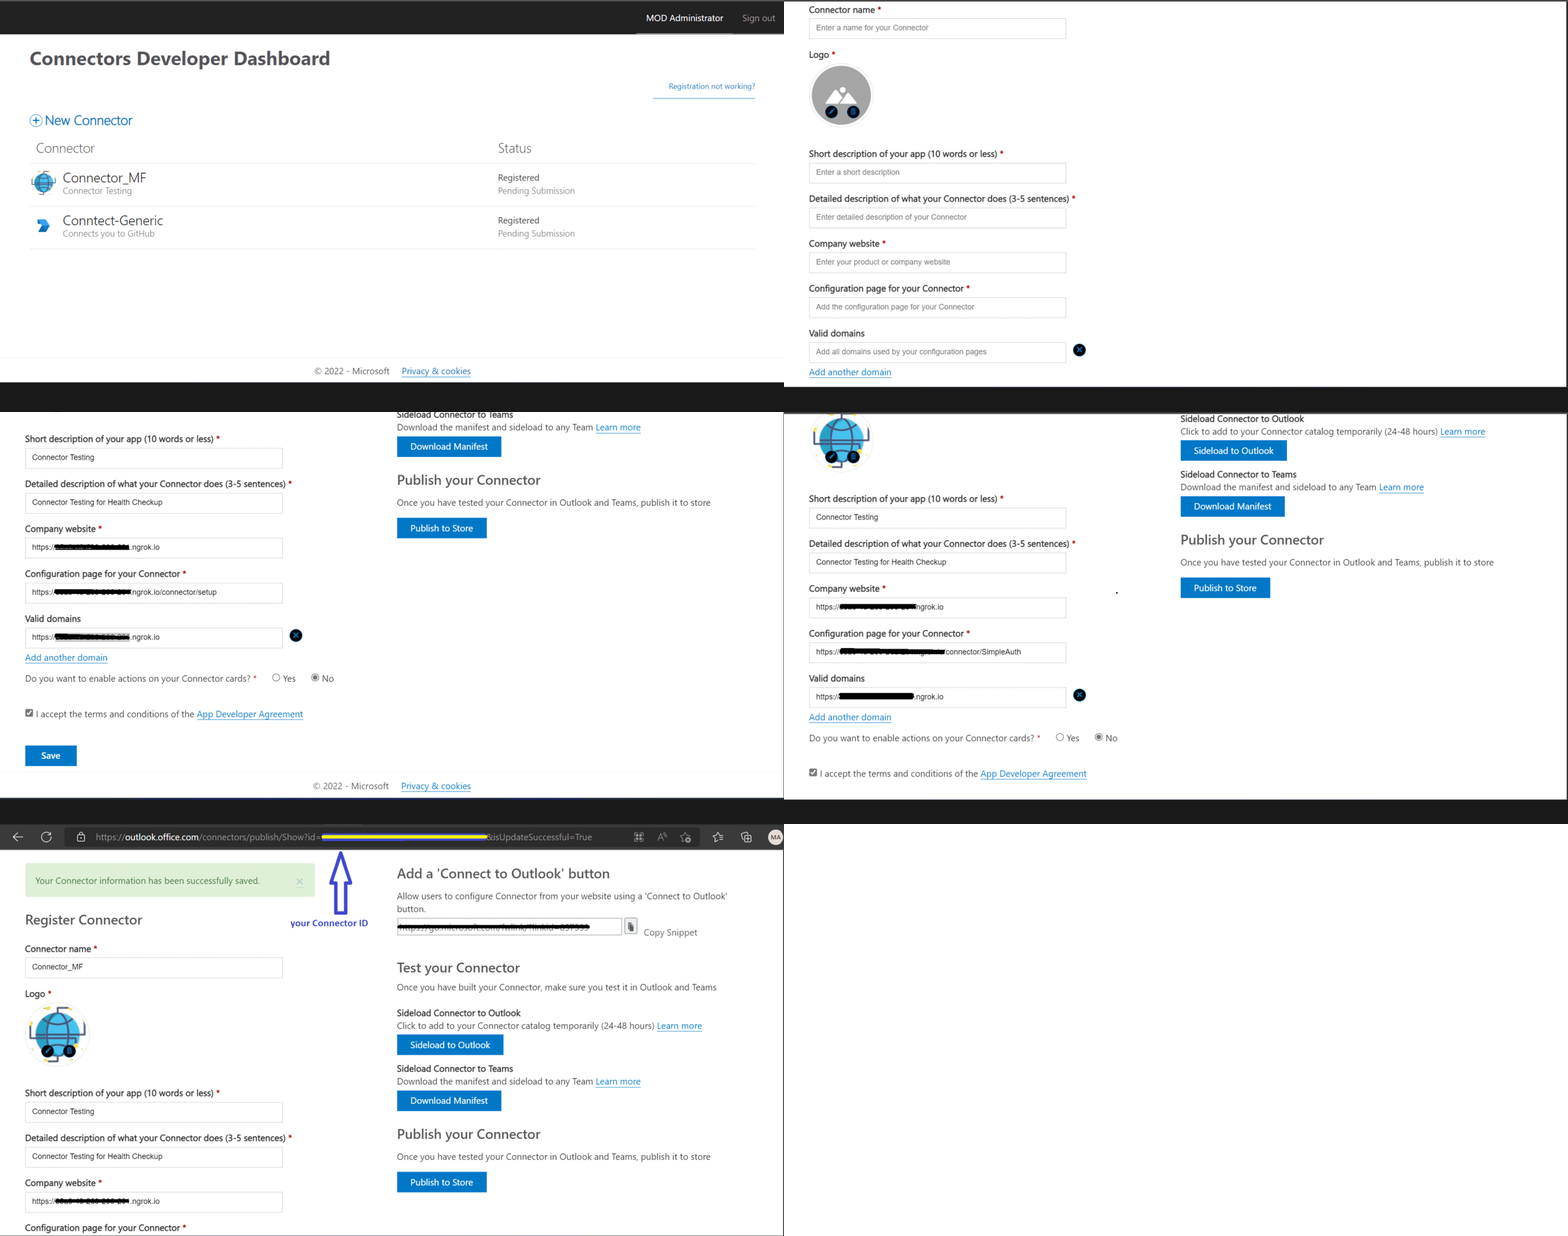
Note:The below gif file shows a simple implementation of a connector registration implementation. It also sends a connector card to the registered connector via a process triggered "externally".
-
Register a new connector in the Connector Developer Portal
-
Fill in all the basic details such as name, logo, descriptions etc. for the new connector.
-
For the configuration page, you'll use our sample code's setup endpoint:
https://[BASE_URI]/connector/SimpleAuth -
For Valid domains, make entery of your domain's https URL, e.g. XXXXXXXX.ngrok-free.app.
-
Click on Save. After the save completes, you will see your connector id.
-
-
Go to the Application Registration Portal and sign in with the your account to create an application.
-
Navigate to Authentication under Manage and add the following redirect URLs:
-
https://<your_tunnel_domain>/SimpleEnd -
Additionally, under the Implicit grant subsection select Access tokens and ID tokens
-
Click on Expose an API under Manage. Select the Set link to generate the Application ID URI in the form of api://{AppID}. Insert your fully qualified domain name (with a forward slash "/" appended to the end) between the double forward slashes and the GUID. The entire ID should have the form of: api://<your_ngrok_domain>/{AppID}
-
Navigate to API Permissions, and make sure to add the following delegated permissions:
- User.Read
- offline_access
- openid
- profile
-
Scroll to the bottom of the page and click on "Add Permissions".
-
-
Setting up .env configuration
- Update the
.envconfiguration with theClientIdandBaseUrl
Note:
ClientIdis your Microsoft-App-ID andBaseUrlif you are using ngrok it would behttps://1234.ngrok-free.appand if you are using dev tunnels, your URL will be like: https://12345.devtunnels.ms. - Update the
-
Run your app for server and client
npm start
-
This step is specific to Teams.
- Edit the
manifest.jsoncontained in theappManifestfolder to replace yourConnectorIdfield in~/appManifest/manifest.jsonfile with your ConnectorId inconnectorssection.-
Edit the
manifest.jsonforvalidDomains. if you are using ngrok it would behttps://1234.ngrok-free.appthen your domain-name will be1234.ngrok-free.appand if you are using dev tunnels then your domain will be12345.devtunnels.ms.Example :
  "connectors": [
  {
    "connectorId": "<<CONNECTOR_ID>>",
    "configurationUrl": "https://<<VALID-DOMAIN>>/Connector/Setup"
  }
]
-
Zip up the contents of the
appManifestfolder to create amanifest.zip(Make sure that zip file does not contains any subfolder otherwise you will get error while uploading your .zip package) -
Upload the
manifest.zipto Teams (In Teams Apps/Manage your apps click "Upload an app". Browse to and Open the .zip file. At the next dialog, click the Add button.) -
Add the app to personal/team/groupChat scope (Supported scopes)
-
Click to Setup a Connector as given in the below image.

Welcome message after successfull SignIn

Now connector todo is configured.

Click Create button to create a new task.

Created task list will displayed as below image shows.

This is notify you in the channel group.

- For more information on developing apps for Microsoft Teams, please review the Microsoft Teams developer documentation.**
- For more information about getting started with Teams, please review the following resources:
- Review Getting Started with Authentications for Tabs
- Review Getting Started with Teams


