The first order of business will be to flash the provided firmware to the ESP8266. You can do this using the NodeMCU Flasher (easy, Windows-only) or the Arduino IDE (less easy, but cross-platform). You should only need to run through this process once as future firmware updates can be applied through the provided web interface.
If you're running Windows and you just want to get started without dealing with Arduino this is probably going to be your best option.
- NodeMCU Flasher: Win32 / Win64
- HASwitchPlate Firmware
- Plug your WeMos D1 into an available USB port on your PC
- Launch the NodeMCU flasher and select the COM port for your device from the
COM Portdrop-down menu - Select the
Configtab(1), then click the top-most gear icon to the right(2) to open a file browser.
- Navigate to the HASP firmware image you downloaded and click
Opento select it - Switch back to the
Operationtab and clickFlash(F)

Now proceed to First-time Setup to connect to your wireless network.
Download the IDE for your platform and follow these instructions to add support for the ESP8266 platform. HASP is currently compiled with Arduino core for ESP8266 version 2.5.0. Once this is installed, select the board LOLIN(WEMOS) D1 R2 & mini from 'Tools' > 'Board'
Next you will need to add several libraries to your Arduino environment. Follow this guide for the general process and add the following libraries to your IDE:
- ArduinoJson by Benoit Blanchon version 6.15
- MQTT by Joel Gaehwiler version 2.4.7
- WiFiManager by tzapu version 0.15.0
To enable future firmware updates you'll need to modify settings in the Arudino IDE for 1M SPIFFs, leaving 3M free for code and updates. In the Arduino IDE select Tools > Flash Size: > 4M (1M SPIFFS). If you're using PlatformIO instead of Arduino, modify the build flags to include -Wl,-Teagle.flash.4m1m.ld

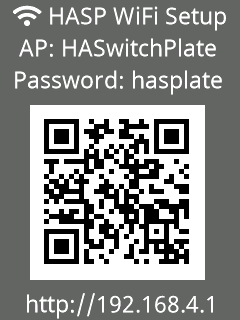
Once your device has been flashed, restart it and connect to the WiFi SSID and password displayed on the LCD panel (or serial output if you don't have the LCD ready). You should be prompted to open a configuration website to find your WiFi network and password. You can set the MQTT broker information and admin credentials now, or use the web interface to do so later. Once you save settings the device will connect to your network. Congratulations, you are now online!


After the initial firmware deployment you should be able to upload new firmware through the web admin interface or using Arduino OTA updates without connecting to your device via USB.