We read every piece of feedback, and take your input very seriously.
To see all available qualifiers, see our documentation.
Have a question about this project? Sign up for a free GitHub account to open an issue and contact its maintainers and the community.
By clicking “Sign up for GitHub”, you agree to our terms of service and privacy statement. We’ll occasionally send you account related emails.
Already on GitHub? Sign in to your account
平时项目中我们绝大部分都是用bash命令行,或者用GUI可视化工具,无论是小乌龟还是gui工具,如果是工具比较推荐sourceTree,但是我更推荐git-fork,工具因人而已,无论习惯命令行还是工具,寻得自己喜欢的方式就行,没有好坏之分,也没有高低之分。
bash
GUI
gui
sourceTree
如果你常常用gui,或者你常常用命令行,那么不妨用用脚本来解放你的双手。
命令行
正文开始...
正常情况下,我们知道我们bash中,我们使用git pull、git add .、git commit、git push等这些命令实际是在git bash环境下执行的命令。相当于DOS环境或者shell执行git命令。
git pull
git add .
git commit
git push
git bash
DOS
shell
git
在git bash也是可以执行.sh的xshell脚本
.sh
xshell
我们在bash新建一个index.sh文件测试一下
index.sh
touch index.sh
在index.sh中输入一段打印脚本
echo 'hello bash'
在命令行中输入bash index.sh
bash index.sh
我们在index.sh中新增一个命令
echo 'hello bash'
# 删除test.txt
rm test.txt

# 删除test目录
rm -rf test
# 打开xx文件修改
vim test2.txt
在终端中你需要用i插入,修改后执行:wq!就可以保存退出了
i
:wq!
ls -a
# 将当前的test2.txt复制成test2_blank.txt
cp test2.txt test2_blank.txt
以上是一些常用的xshell命令,更多命令可以参考xshell
以上基础的了解一些常用的xshell命令,现在我们可以编写一个xshell脚本了
首先我们在我们项目根目录新建一个deplop.sh文件
deplop.sh
touch deplop.sh
对应的deplop.sh
# 如果项目已经初始化后,已经init 那么不用加这个
# git init
# 更新your对应分支
git pull origin your_branch
# 查看本地状态
git status
# 添加本地修改的文件
git add .

# 提交
git commit -m 'add xx'
# 添加远程remote 如果项目已经remote,可以省略
# git remote add origin https://github.com/xx.git
# 推送到指定分支
git push origin your_branch
然后我们在根目录下创建一个package.json
package.json
npm init -y
然后在package.json中,添加命令
{
    "name": "lessonNote",
    "version": "1.0.0",
    "description": "lessonNote-js 学习笔记",
    "main": "index.js",
    "scripts": {
        "test": "echo \"Error: no test specified\" && exit 1",
        "push": "bash deplop.sh"
    },
    ...
}
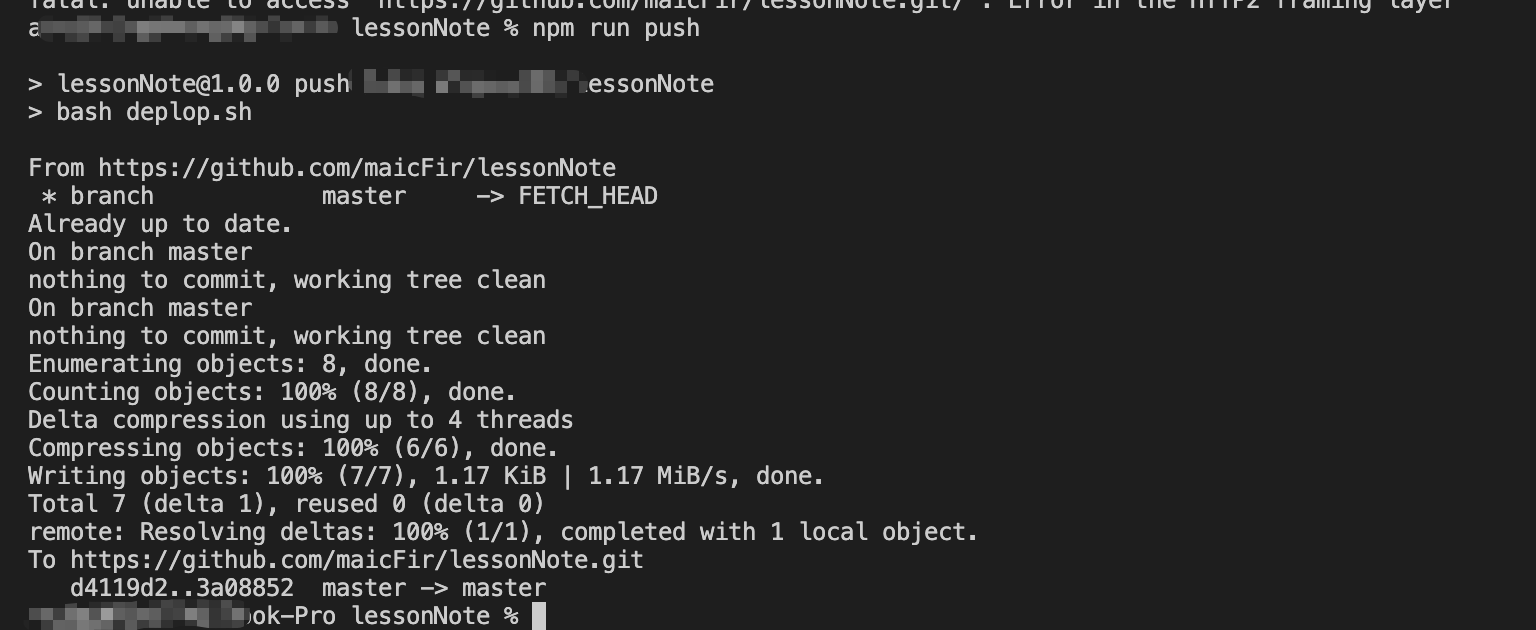
然后我们运行命令npm run push
npm run push
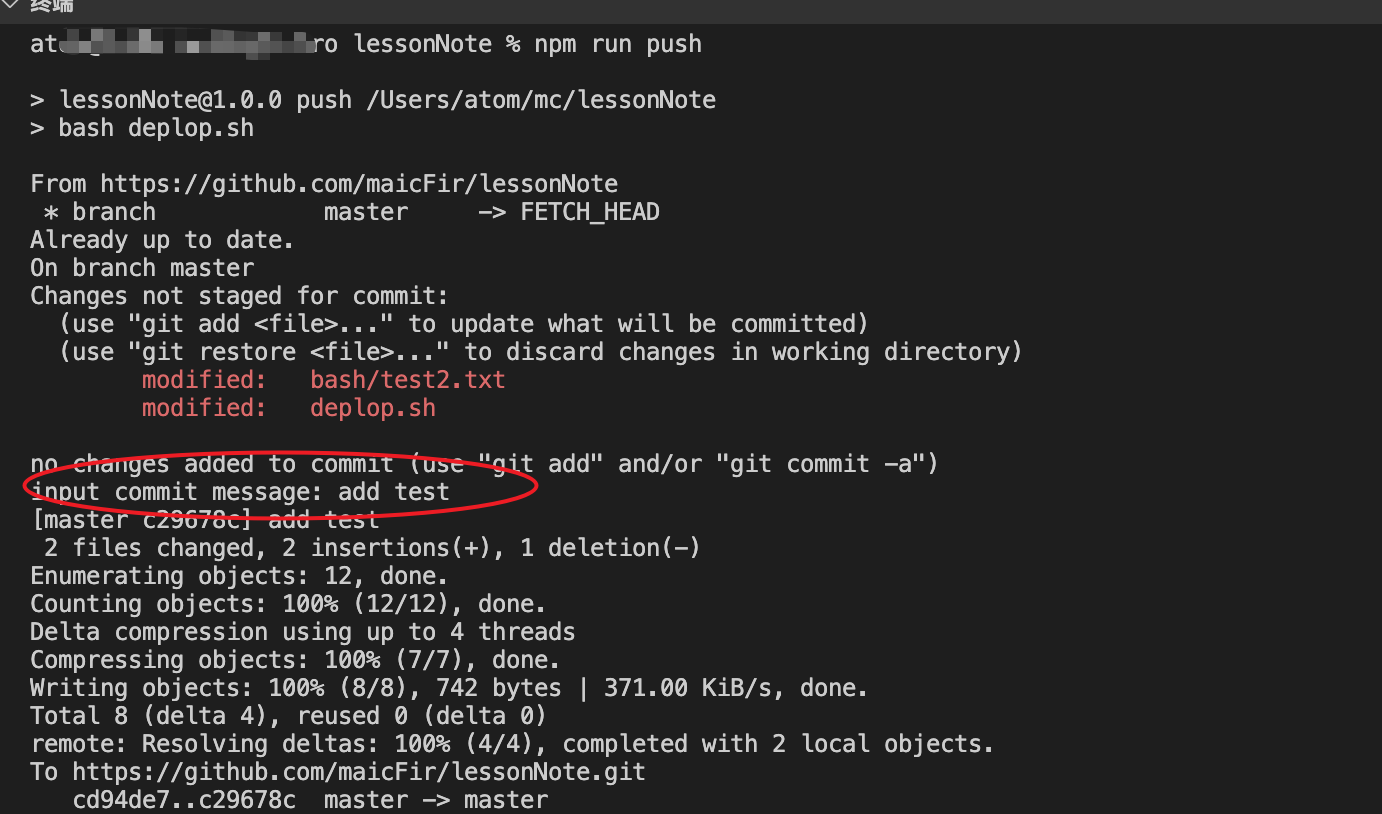
至此你就可以愉快的用一行命令了,但是正常情况下你每次得修改commit的信息,而不是写死在deplop.sh脚本里面
commit
于是你可以这样
# 如果项目已经初始化后,已经init 那么不用
# git init
# 更新your_branch
git pull origin your_branch
# 查看本地状态
git status
# 添加本地修改的文件
git add .

# 读取终端输入的信息
read -p "input your commit message: " msg
# 提交
git commit -m "$msg"
# 添加远程remote 如果项目已经remote,可以省略
# git remote add origin https://github.com/xx.git
# 推送到指定分支
git push origin your_branch
当你运行npm run push后,就会执行上面你编辑的脚本,就可以快速的提交到自己仓库了
如果你是想推一个你打包后的项目到指定仓库,可以参考deplop.sh
# deploy.sh
#!/usr/bin/env sh
# 确保脚本抛出遇到的错误
set -e
# 生成静态文件
npm run build
# 进入生成的文件夹目录
cd docs/.vuepress/dist
git init
# 添加当前文件
git add .
# 读取终端输入的信息
read -p "input commit message: " msg
git commit -m "$msg"
# remote 指定仓库
git remote add origin https://github.com/xxx.git
# 推送到指定仓库
git push -f origin your_branch
echo 'push success'
然后执行npm run push这样就可以一行命令替代你提交的所有操作了
了解一些常用的xshell脚本命令,在xx.sh这样的文件,你可以编写一些脚本,对文件进行删除,修改等操作
xx.sh
新建一个deplop.sh文件,编写git提交本地文件,解放git add 、git commit、git push操作
git add
本文示例code example
The text was updated successfully, but these errors were encountered:
No branches or pull requests
平时项目中我们绝大部分都是用
bash命令行,或者用GUI可视化工具,无论是小乌龟还是gui工具,如果是工具比较推荐sourceTree,但是我更推荐git-fork,工具因人而已,无论习惯命令行还是工具,寻得自己喜欢的方式就行,没有好坏之分,也没有高低之分。如果你常常用
gui,或者你常常用命令行,那么不妨用用脚本来解放你的双手。正文开始...
前置
正常情况下,我们知道我们
bash中,我们使用git pull、git add .、git commit、git push等这些命令实际是在git bash环境下执行的命令。相当于DOS环境或者shell执行git命令。在
git bash也是可以执行.sh的xshell脚本bash中的xshell命令
我们在
bash新建一个index.sh文件测试一下在
index.sh中输入一段打印脚本在命令行中输入

bash index.sh我们在
index.sh中新增一个命令# 打开xx文件修改 vim test2.txt在终端中你需要用

i插入,修改后执行:wq!就可以保存退出了# 将当前的test2.txt复制成test2_blank.txt cp test2.txt test2_blank.txt以上是一些常用的
xshell命令,更多命令可以参考xshellgit 提交本地代码
以上基础的了解一些常用的
xshell命令,现在我们可以编写一个xshell脚本了首先我们在我们项目根目录新建一个
deplop.sh文件对应的
deplop.sh然后我们在根目录下创建一个
package.json然后在
package.json中,添加命令{ "name": "lessonNote", "version": "1.0.0", "description": "lessonNote-js 学习笔记", "main": "index.js", "scripts": { "test": "echo \"Error: no test specified\" && exit 1", "push": "bash deplop.sh" }, ... }然后我们运行命令

npm run push至此你就可以愉快的用一行命令了,但是正常情况下你每次得修改
commit的信息,而不是写死在deplop.sh脚本里面于是你可以这样
当你运行

npm run push后,就会执行上面你编辑的脚本,就可以快速的提交到自己仓库了如果你是想推一个你打包后的项目到指定仓库,可以参考deplop.sh
然后执行
npm run push这样就可以一行命令替代你提交的所有操作了总结
了解一些常用的
xshell脚本命令,在xx.sh这样的文件,你可以编写一些脚本,对文件进行删除,修改等操作新建一个
deplop.sh文件,编写git提交本地文件,解放git add、git commit、git push操作本文示例code example
The text was updated successfully, but these errors were encountered: