Home
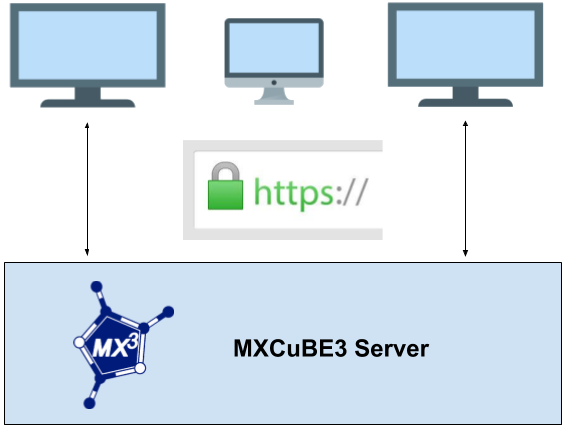
MXCuBE-Web is the latest generation of the data acquisition software MXCuBE. It is developed as a web application and runs in any recent browser. The application is built using standard web technologies and does not require any third party plugins to be installed in order to function. Being a web application, it's naturally divided into a server and client part. The communication between the client and server are made using HTTP/HTTPS and web-sockets. It's strongly recommended to use HTTPS, SSL/TLS encrypted HTTP. The traffic passes through the conventional HTTP/HTTPS ports minimizing the need for special firewall or proxy settings to get the application to work.
The underlying beamline control layer is implemented using the library mxcubecore previously known as HardwareRepository. The mxcubecore module is compatible with both MXCuBE3 also known as MXCuBE-Web and the MXCuBE-Qt application. The earlier versions of MXCuBE3 (upto 3.2.x) uses HardwareRepository while versions after 4.x uses mxcubecore.
The install instructions for version 3 of MXCUBE-Web can be found here (instructions 3.x)
The install instructions for version 4 can be found below.
We recommend using conda to create an isolated environment, conda can be downloaded here. All Python 3.x versions are supported.
mkdir mxcube
cd mxcube
git clone https://github.com/mxcube/mxcubeweb.git
git clone https://github.com/mxcube/mxcubecore.git
conda env create -f conda-environment.yml
The installation of the dependencies in the environment takes a few minutes.
The name of the environment is located at the top of file
conda-environment.yml. It can be changed from the command line with--name <env-name>.
conda activate mxcubeweb
poetry install
If you just want to test the application and not perform any development skip a head to point 6. Otherwise, you need the complete development environment in order to develop.
cd mxcube3/ui
npm install
npm run build
npm run start
Make sure to be in the mxcube3 root folder
./mxcube3-server -r test/HardwareObjectsMockup.xml/ --static-folder <absoulte-path (ie. /home/<user>/mxcube)>/ui/build/
For the production build open your browser and navigate to localhost:8081
google-chrome localhost:8081
For the development build open your browser and navigate to localhost:3000
google-chrome localhost:3000
All that is needed to run the application is to start the server and point your browser to http://localhost:8081, which will serve the prebuilt client (if any). The client is not built if nothing appears or you get a "404 page not found" error when browsing localhost:8081. Follow the steps in running the client to build a client or to run a development version of the client
./mxcube3-server -r test/HardwareObjectsMockup.xml/ --static-folder <absoulte-path (ie. /home/<user>/mxcube)>/ui/build/