Home
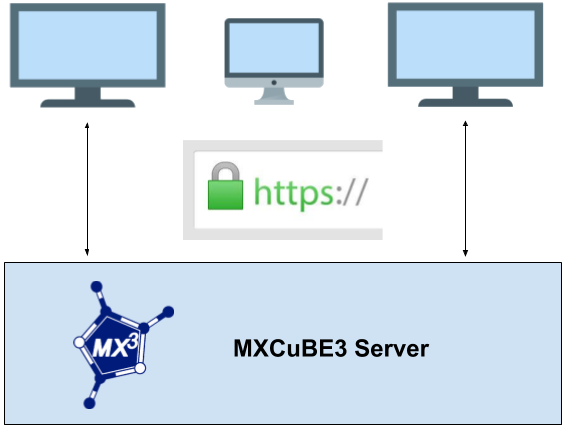
MXCuBE-Web is the latest generation of the data acquisition software MXCuBE. It is developed as a web application and runs in any recent browser. The application is built using standard web technologies and does not require any third party plugins to be installed in order to function. Being a web application, it's naturally divided into a server and client part. The communication between the client and server are made using HTTP/HTTPS and web-sockets. It's strongly recommended to use HTTPS, SSL/TLS encrypted HTTP. The traffic passes through the conventional HTTP/HTTPS ports minimizing the need for special firewall or proxy settings to get the application to work.
The underlying beamline control layer is implemented using the library mxcubecore previously known as HardwareRepository. The mxcubecore module is compatible with both MXCuBE-WEB the MXCuBE-Qt application.
We recommend using conda to create an isolated environment, conda can be downloaded here.
mkdir mxcube
cd mxcube
git clone https://github.com/mxcube/mxcubeweb.git
git clone https://github.com/mxcube/mxcubecore.git
Create Conda environment mxcubeweb using the conda environment file in mxcubeweb. The installation of the dependencies in the environment takes a few minutes.
The name of the environment is located at the top of file conda-environment.yml. It can be changed from the command line with --name <env-name>.
cd mxcubeweb
conda env create -f conda-environment.yml
# or (to pass a different name)
conda env create -f conda-environment.yml --name another_name
conda activate mxcubeweb
poetry install
npm install --legacy-peer-deps
# (NB --legacy-peer-deps is for the moment needed for the testing library Cypress)
npm run build
# Start redis-server (if not already running)
# Open a new terminal:
conda activate mxcubeweb
redis-server

# In the previous terminal:
# The paths passed below needs to be the full path to the HardwareObjectsMockup.xml
# and build directories.
mxcubeweb-server -r <full path>/mxcubeweb/test/HardwareObjectsMockup.xml/ --static-folder <full path>/mxcubeweb/ui/build/ -L debug
Running the above should give something similar to

All that is needed to run the application is to start the server and point your browser to http://localhost:8081, which will serve the prebuilt client (if any).
The test username is idtest0 and the password can be any string i.e "test".

The client is not built if nothing appears or you get a "404 page not found" error when browsing localhost:8081. Follow the instructions in step 6 "Install front-end dependencies and build the UI" to build a client .
Please read the contributing guidelines before getting started with the development.
The additional tools for development are in the conda-environment-dev.yml file, the environment created above needs to be updated with this.
# Make sure the environment created above is activated
conda activate mxcubeweb

# To install the additional dependencies run:
conda env update --file conda-environment-dev.yml
Its recommended to install mxcubeweb and mxcubecore as links to be able to add breakpoints and debug the application easier.
This can be done with pip.
# In the project root of mxcubeweb (please note that the . (period) is important):
pip install -e .

# In the project root of mxcubecore:
pip install -e .
The above makes it possible to add break points directly in the "checked out code"
The tests are located in the test folder and are executed with pytest
# Run pytest In the root of the mxcubeweb directory
cd mxcubeweb
pytest
The output should look something like the following:

The front end development server, webpack development server, listens to changes on the filesystem and builds (re-builds) the UI when a change are made. This makes it very easy and fast to see how a change effects the UI and makes debugging alot easier. The developmen server listens on port 3000
# The front-end needs the backend to run so before starting the
# development server open a new terminal and run (as in step 7):

conda activate mxcubeweb
mxcubeweb-server -r <full path>/mxcubeweb/test/HardwareObjectsMockup.xml/ --static-folder <full path>/mxcubeweb/ui/build/ -L debug

# Enter the `ui` folder and issue:
npm run start
The above will automatically open a browser with the URL: http://localhost:3000
# Keep the backend running, and issue in the mxcubeweb root:
npm run --prefix ./ui e2e
This should give a result looking something like:

Use your favorite editor to start working with the code. Read the contributing guidelines and check that linting tools are setup correctly. There are settings files for visual studio code in the repository.