Building Your First OpenRasta Website
If you have installed OpenRasta (beta 2 and above), you’ll have a project that sets-up all the defaults for OpenRasta for you.
First, follow the instructions in Downloading and Compiling OpenRasta. You should now have the compiled version of OpenRasta ready for use.
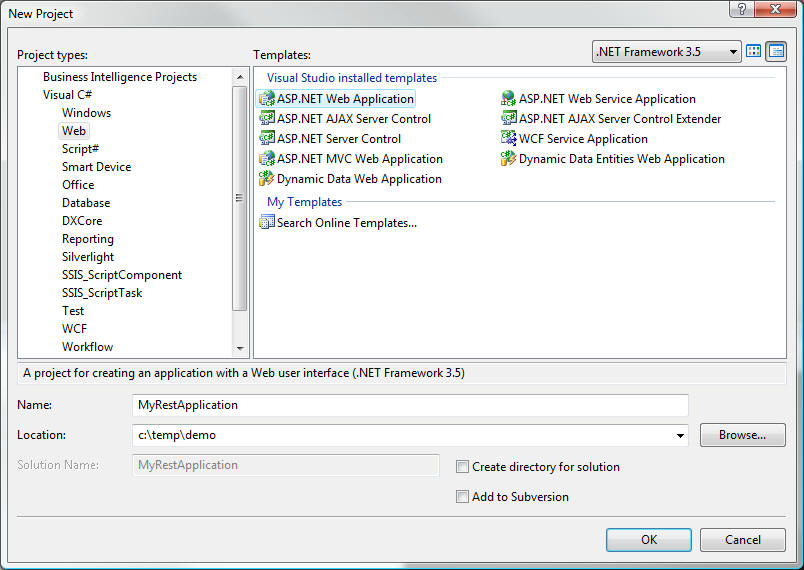
Open Visual Studio 2008 and create a new Web Application project.
Once the project is created, add references to the 3.5 versions of OpenRasta.dll, OpenRasta.Hosting.AspNet.dll & OpenRasta.Codecs.WebForms.dll. They should be in \openrasta\bin\release\net-35\.
Now, edit the web.config file to point to the OpenRasta HTTP handlers and modules. They’re the two components required for OpenRasta to serve requests made against your server.
In the <system.web> section, in <httpHandlers>, add the following line.
<add verb="*" path="*.rastahook" type="OpenRasta.Hosting.AspNet.OpenRastaHandler, OpenRasta.Hosting.AspNet"/>In <httpModules>, add the following.
<add name="OpenRastaModule" type="OpenRasta.Hosting.AspNet.OpenRastaModule, OpenRasta.Hosting.AspNet"/>In <pages><namespaces>, add the following.
<add namespace="OpenRasta.Web"/>
<add namespace="OpenRasta.Web.Markup"/>
<add namespace="OpenRasta.Codecs.WebForms"/>
<add namespace="OpenRasta"/>
If you’re using IIS7, the http handlers and modules need to be defined in the
<system.webServer> section, as follows:
<system.webServer>
  <validation validateIntegratedModeConfiguration="false"/>
  <modules>
    <add name="OpenRastaModule" type="OpenRasta.Hosting.AspNet.OpenRastaModule, OpenRasta.Hosting.AspNet"/>
  </modules>
  <handlers>
    <add name="OpenRastaHandler" verb="*" path="*.rastahook" type="OpenRasta.Hosting.AspNet.OpenRastaHandler, OpenRasta.Hosting.AspNet" />
  </handlers>
</system.webServer>The next step is to get rid of the content in the automatically generated default.aspx page. You need to keep that page at the root of the site, otherwise asp.net won’t recognize OpenRasta. Simply remove all the content until your default.aspx looks like the following:
<%@ Page Language="C#" AutoEventWireup="true" CodeBehind="default.aspx.cs" Inherits="MyRestApplication.default" %>
<!-- Nothing to see here. -->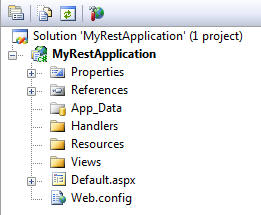
The first step in designing your web site is to define what resources you want to serve. One of the first resources you will need is a home page.
First, create three folders at the root of your project:
| Handlers | Handlers are the objects responsible to act upon resources through the HTTP uniform interface and will always get called first. They’re the equivalent of Controllers in other MVC frameworks. |
| Resources | Your resources are what you expose on various Uris. In OpenRasta, each thing you want to expose on the web needs to have a Resource class associated with it. |
| Views | Views are responsible for rendering what the handler returned. Often it will be the resource that was requested. |
Update the web.config’s <pages><namespaces> section to contain the following.
<add namespace="MyRestApplication.Handlers"/>
<add namespace="MyRestApplication.Resources"/>
Then, create a class in the Resources folder, and call it Home, and add a few properties that will be needed for future rendering.
namespace MyRestApplication.Resources
{
    public class Home
    {
        public string Title { get; set; }
    }
}
The next step is to create a handler that will generate the Home resource. Go ahead and create an empty HomeHandler class in the Handlers folder.
All the elements are now in place to create the configuration. OpenRasta is configured through the use of a fluent API.
If you’ve used the Visual Studio project, you already have a Configuration.cs file at the root of your project, go a head and open it.
If not, you can either add the configuration to your global.asax, or create a specific class. Do the latter, and add a Configuration class at the root of the site, and implement the IConfigurationSource interface.
using System;
using OpenRasta.Configuration;

namespace MyRestApplication
{
    public class Configuration : IConfigurationSource
    {
        public void Configure()
        {
            // the configuration goes here
        }
    }
}
The Configure method is where all your resources will be declared. Let’s define the resource first, using a manual configuration. to do so, declare a ’’using’’ block and use the ResourceSpace static class to start your configuration.
using (OpenRastaConfiguration.Manual)
{
    ResourceSpace.Has.
}
The Has word is the root of the configuration options. You’ll find a few options in there, depending on which version of OpenRasta you’re using, and any third-party code that may attach to this word to add their own configuration options.
First, define the resource Home we created earlier by using the ResourcesOfType generic method. Attach the resource to the /home uri by using the AtUri method. Finally, define that the HomeHandler will be responsible for instantiating (a process called ’’dereferencing’’) the Home resource. You should now have a configuration looking like the following:
ResourceSpace.Has.ResourcesOfType<Home>()
    .AtUri("/home")
.HandledBy<HomeHandler>();If you now try to run this website, you’ll end up with an HTTP 405 error. * Note that URIs are case sensitive. If you run this from a folder in your web root or a virtual directory named MyRestApplication you must use http://localhost/MyRestApplication/home. Anything else, like http://localhost/myRestApplication/home will return a 404 error.

OpenRasta leverages the status codes defined in HTTP. A 405 error means that the method used to access the URI is not allowed on the resource.
Whenever you access any URI over HTTP, a method is used to define what action is to be executed against the resource. Here, the method GET was used to access /home, but OpenRasta didn’t find any matching method. And indeed, your
HomeHandler doesn’t have any method defined!
Let’s create a Get method on the HomeHandler class, and return a new instance of the Home resource.
using MyRestApplication.Resources;

namespace MyRestApplication.Handlers
{
    public class HomeHandler
    {
        public object Get()
        {
            return new Home { Title = "Welcome home." };
        }
    }
}
We simply return a new home instance from the handler. Let’s try to run the page again.

New error, at least we made some progress. 406 is the status code a server returns when it cannot find a compatible media type as requested by the browser.
OpenRasta leverages content negotiation. Whenever your browser (or any other HTTP client) sends a request, it can include an Accept header defining what formats it understands. Those usually include html and most of the plugin-supported types a browser can render. These types are called representations.
In our configuration, we haven’t specified specified yet what representations we support for our Home resource, and OpenRasta returns a 406 to let the client know that no compatible representation was found. To enable generating representations, OpenRasta uses codecs, objects that can turn the bytes sent over the wire into objects and back.
When you use an aspx page as a view in OpenRasta, you essentially create a template to generate content. As such, postbacks and events are not supported.
There are several ways you can create such a template.
If you use the Visual Studio integration, add a new Resource View and name it HomeView.aspx.
Open the view, and modify the inherit clause to the following.
<%@ Page Language="C#" AutoEventWireup="true" Inherits="OpenRasta.Codecs.WebForms.ResourceView<Home>" %>The above syntax requires additional configuration or alternatively use the CLR @1 generic syntax.
<configuration>
  <system.web>
    <pages pageParserFilterType="OpenRasta.Codecs.WebForms.OpenRastaPageParserFilter, OpenRasta.Codecs.WebForms">
  </system.web>
</configuration>You’ll first need to create a traditional webforms page. It is recommended that you use templates without code-behind. Replace the page directive with the one in the previous example, and delete the two code-behind files (HomeView.aspx.cs and HomeView.aspx.desiger.cs). If you don’t delete them, you may get an fatal error running the page. Looking at the output will reveal a message that says “The type ResourceView exists in both OpenRasta.Codecs.WebForms.dll and MyRestApplication.dll”
Finally, we’re going to add this view to our configuration. Import the configuration elements for webforms by importing the
OpenRasta.Configuration.WebForms namespace, and use the RenderedByAspx method to define your view. Your configuration should now be looking like this:
using MyRestApplication.Handlers;
using MyRestApplication.Resources;
using OpenRasta.Configuration;

namespace MyRestApplication
{
    public class Configuration : IConfigurationSource
    {
        public void Configure()
        {
            using (OpenRastaConfiguration.Manual)
            {
                ResourceSpace.Has.ResourcesOfType<Home>()
                        .AtUri("/home")
                        .HandledBy<HomeHandler>()
                        .RenderedByAspx("~/Views/HomeView.aspx");
            }
        }
    }
}
If you now go the the /home URI, you’ll notice that we have our content showing! But so far, we’ve only rendered static text.
The handler created an instance of the Home type. It’s now time to put it to good use.
If your page inherits from ResourceView<T> as in the previous examples, you already have a Resource property that you can use. We can now that Resource to access the Title property of our Home:
<%@ Page Language="C#" AutoEventWireup="true" Inherits="OpenRasta.Codecs.WebForms.ResourceView<Home>" %>
<!DOCTYPE html PUBLIC "-//W3C//DTD XHTML 1.0 Transitional//EN" "http://www.w3.org/TR/xhtml1/DTD/xhtml1-transitional.dtd">

<html xmlns="http://www.w3.org/1999/xhtml" >
<head runat="server">
    <title><%= Resource.Title %></title>
</head>
<body>
    <div>
        <%= Resource.Title %>
    </div>
</body>
</html>
If you decided on using another type of page, simply add a property of a compatible type in your code-behind. OpenRasta will associate that property automatically with the value returned by your handler.
In such case the code behind file HomeView.aspx.cs would for example look like this:
using OpenRasta.Codecs.Webforms;
using MyRestApplication.Resources;

namespace MyRestApplication.Views
{
    public partial class HomeView : ResourceView<Home>
    {
        public Home MyHome
        {
            get { return Resource; }
        }
    }
}
By leveraging the aspx syntax, you can now use the property we defined earlier. Compile the application for visual studio to pick-up our new property in Intellisense, and modify the aspx page to render the title property in both the head title tag and the content.
<%@ Page Language="C#" AutoEventWireup="true" CodeBehind="HomeView.aspx.cs" Inherits="MyRestApplication.Views.HomeView" %>
<!DOCTYPE html PUBLIC "-//W3C//DTD XHTML 1.0 Transitional//EN" "http://www.w3.org/TR/xhtml1/DTD/xhtml1-transitional.dtd">

<html xmlns="http://www.w3.org/1999/xhtml" >
<head runat="server">
    <title><%= MyHome.Title %></title>
</head>
<body>
    <div>
        <%= MyHome.Title %>
    </div>
</body>
</html>
Run the page, and you should be greeted by our page, with the correct data being displayed.