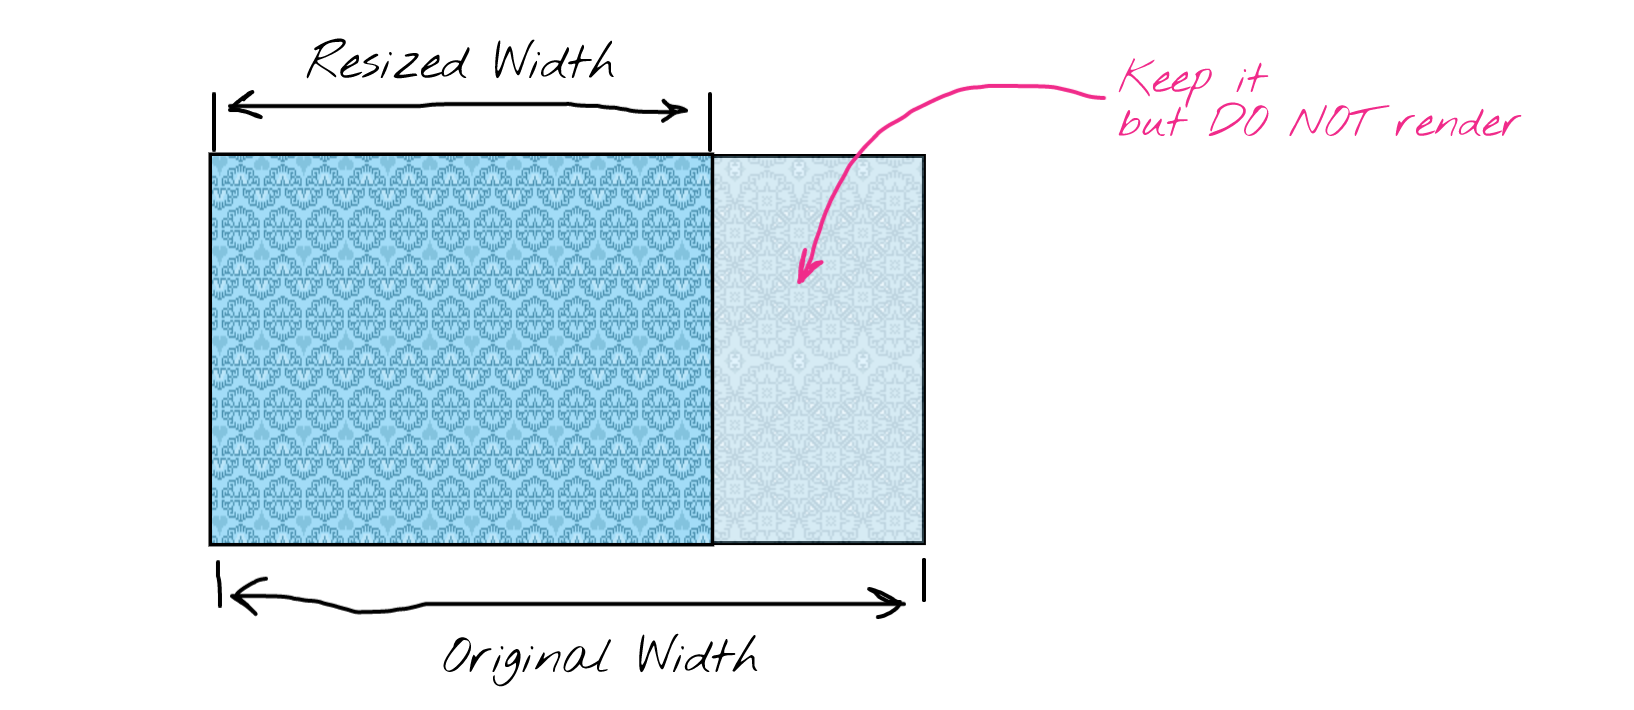
There is an interactive version of this post available where you can upload and resize your custom images.
There are many great articles written about the Seam Carving algorithm already, but I couldn't resist the temptation to explore this elegant, powerful, and yet simple algorithm on my own, and to write about my personal experience with it. Another point that drew my attention (as a creator of javascript-algorithms repo) was the fact that Dynamic Programming (DP) approach might be smoothly applied to solve it. And, if you're like me and still on your "learning algorithms" journey, this algorithmic solution may enrich your personal DP arsenal.
So, with this article I want to do three things:
- Provide you with an interactive content-aware resizer so that you could play around with resizing your own images
- Explain the idea behind the Seam Carving algorithm
- Explain the dynamic programming approach to implement the algorithm (we'll be using TypeScript for it)
Content-aware image resizing might be applied when it comes to changing the image proportions (i.e. reducing the width while keeping the height) and when losing some parts of the image is not desirable. Doing the straightforward image scaling in this case would distort the objects in it. To preserve the proportions of the objects while changing the image proportions we may use the Seam Carving algorithm that was introduced by Shai Avidan and Ariel Shamir.
The example below shows how the original image width was reduced by 50% using content-aware resizing (left image) and straightforward scaling (right image). In this particular case, the left image looks more natural since the proportions of the balloons were preserved.
The Seam Carving algorithm's idea is to find the seam (continuous sequence of pixels) with the lowest contribution to the image content and then carve (remove) it. This process repeats over and over again until we get the required image width or height. In the example below you may see that the hot air balloon pixels contribute more to the content of the image than the sky pixels. Thus, the sky pixels are being removed first.
Finding the seam with the lowest energy is a computationally expensive task (especially for large images). To make the seam search faster the dynamic programming approach might be applied (we will go through the implementation details below).
The importance of each pixel (so-called pixel's energy) is being calculated based on its color (R, G, B, A) difference between two neighbor pixels. Now, if we set the pixel energy to some really low level artificially (i.e. by drawing a mask on top of them), the Seam Carving algorithm would perform an object removal for us for free.
I've created the JS IMAGE CARVER web-app (and also open-sourced it on GitHub) that you may use to play around with resizing of your custom images.
Here are some more examples of how the algorithm copes with more complex backgrounds.
Mountains on the background are being shrunk smoothly without visible seams.
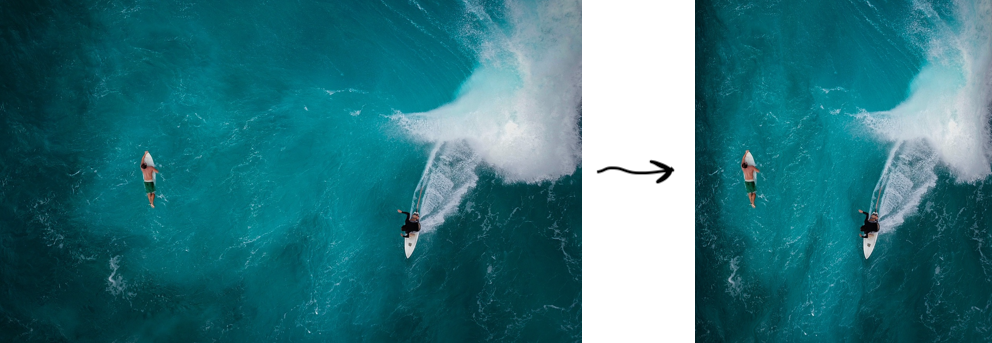
The same goes for the ocean waves. The algorithm preserved the wave structure without distorting the surfers.
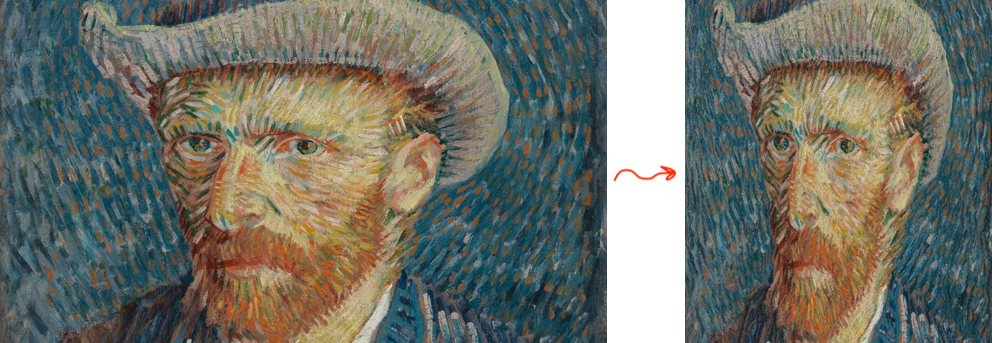
We need to keep in mind that the Seam Carving algorithm is not a silver bullet, and it may fail to resize the images where most of the pixels are edges (look important to the algorithm). In this case, it starts distorting even the important parts of the image. In the example below the content-aware image resizing looks pretty similar to a straightforward scaling since for the algorithm all the pixels look important, and it is hard for it to distinguish Van Gogh's face from the background.
Imagine we have a 1000 x 500 px picture, and we want to change its size to 500 x 500 px to make it square (let's say the square ratio would better fit the Instagram feed). We might want to set up several requirements to the resizing process in this case:
- Preserve the important parts of the image (i.e. if there were 5 trees before the resizing we want to have 5 trees after resizing as well).
- Preserve the proportions of the important parts of the image (i.e. circle car wheels should not be squeezed to the ellipse wheels)
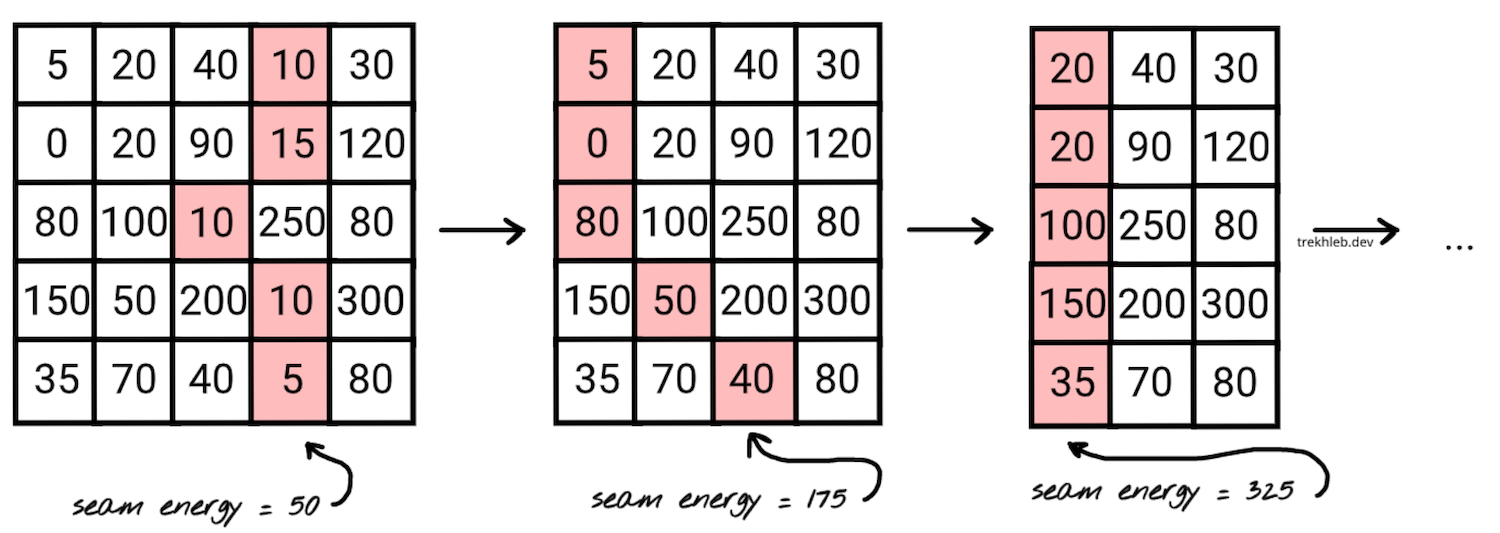
To avoid changing the important parts of the image we may find the continuous sequence of pixels (the seam), that goes from top to bottom and has the lowest contribution to the content of the image (avoids important parts) and then remove it. The seam removal will shrink the image by 1 pixel. We will then repeat this step until the image will get the desired width.
The question is how to define the importance of the pixel and its contribution to the content (in the original paper the authors are using the term energy of the pixel). One of the ways to do it is to treat all the pixels that form the edges as important ones. In case if a pixel is a part of the edge its color would have a greater difference between the neighbors (left and right pixels) than the pixel that isn't a part of the edge.
Assuming that the color of a pixel is represented by 4 numbers (R - red, G - green, B - blue, A - alpha) we may use the following formula to calculate the color difference (the pixel energy):
Where:
mEnergy- Energy (importance) of the middle pixel ([0..626]if rounded)lR- Red channel value for the left pixel ([0..255])mR- Red channel value for the middle pixel ([0..255])rR- Red channel value for the right pixel ([0..255])lG- Green channel value for the left pixel ([0..255])- and so on...
In the formula above we're omitting the alpha (transparency) channel, for now, assuming that there are no transparent pixels in the image. Later we will use the alpha channel for masking and for object removal.
Now, since we know how to find the energy of one pixel, we can calculate, so-called, energy map which will contain the energies of each pixel of the image. On each resizing step the energy map should be re-calculated (at least partially, more about it below) and would have the same size as the image.
For example, on the 1st resizing step we will have a 1000 x 500 image and a 1000 x 500 energy map. On the 2nd resizing step we will remove the seam from the image and re-calculate the energy map based on the new shrunk image. Thus, we will get a 999 x 500 image and a 999 x 500 energy map.
The higher the energy of the pixel the more likely it is a part of an edge, and it is important for the image content and the less likely that we need to remove it.
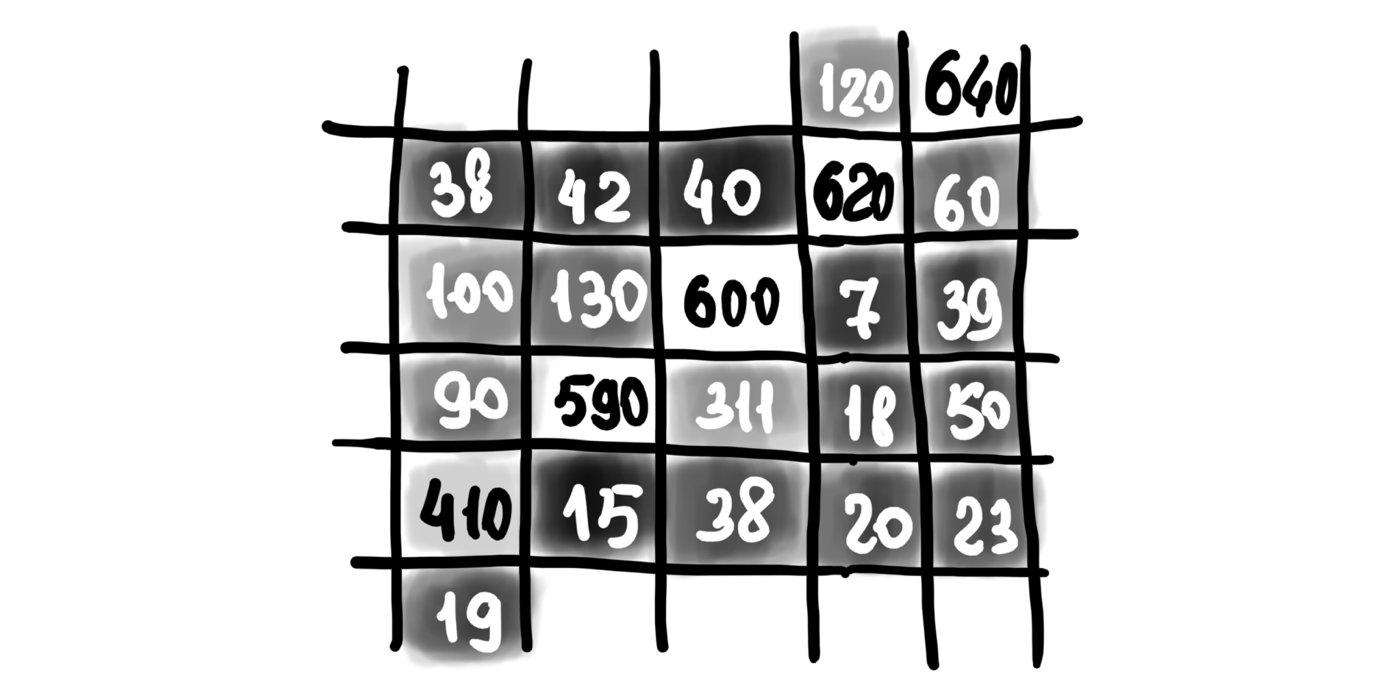
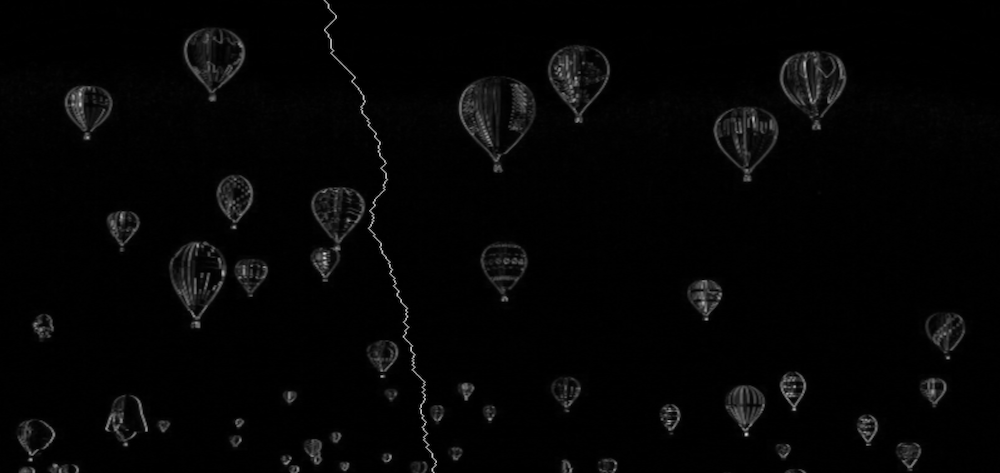
To visualize the energy map we may assign a brighter color to the pixels with the higher energy and darker colors to the pixels with the lower energy. Here is an artificial example of how the random part of the energy map might look like. You may see the bright line which represents the edge and which we want to preserve during the resizing.
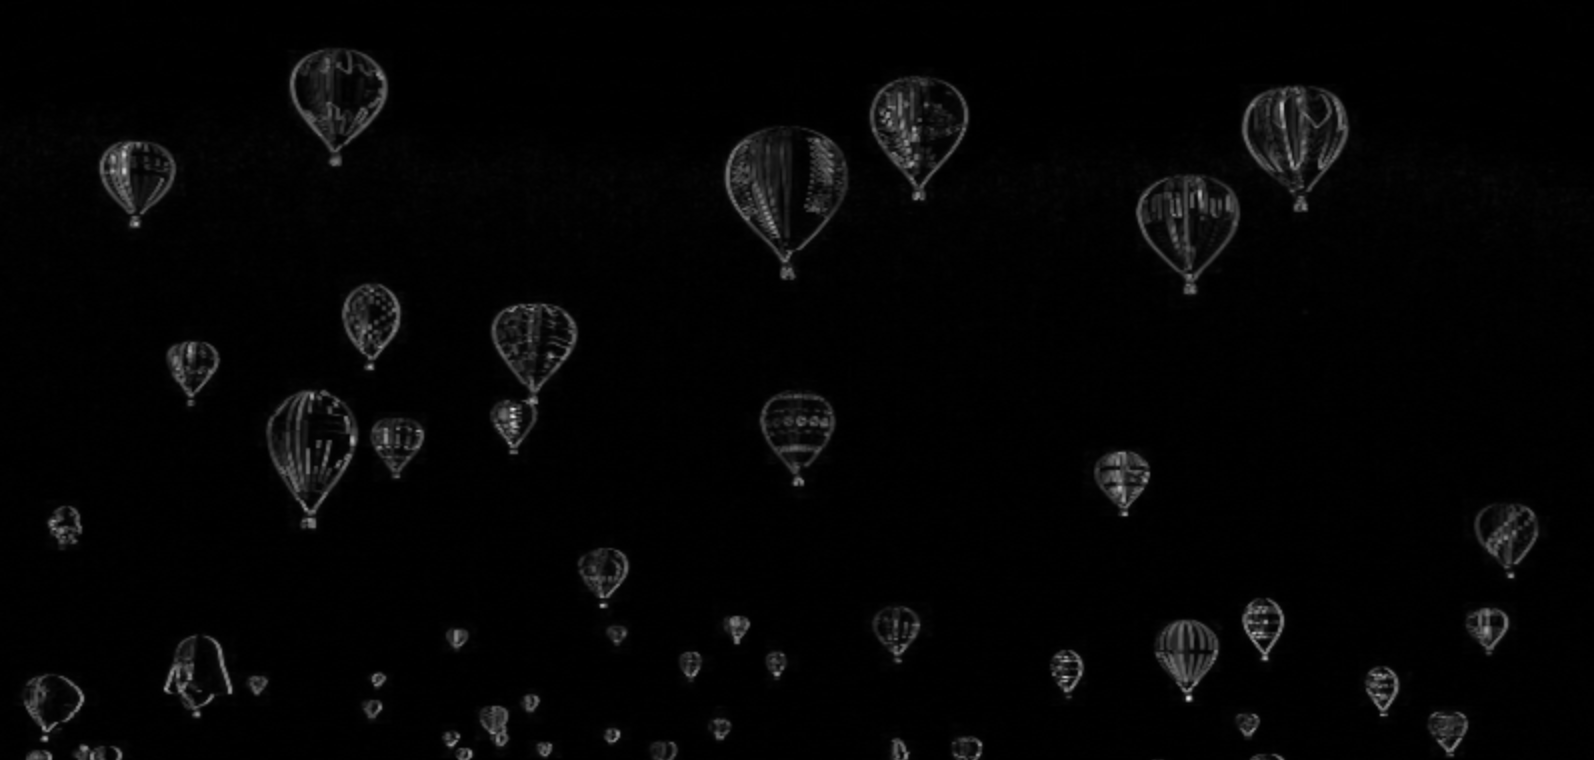
Here is a real example of the energy map for the demo image you saw above (with hot air balloons).
You may play around with your custom images and see how the energy map would look like in the interactive version of the post.
We may use the energy map to find the seams (one after another) with the lowest energy and by doing this to decide which pixels should be ultimately deleted.
Finding the seam with the lowest energy is not a trivial task and requires exploring many possible pixel combinations before making the decision. We will apply the dynamic programming approach to speed it up.
In the example below, you may see the energy map with the first lowest energy seam that was found for it.
In the examples above we were reducing the width of the image. A similar approach may be taken to reduce the image height. We need to "rotate" the approach though:
- start using top and bottom pixel neighbors (instead of left and right ones) to calculate the pixel energy
- when searching for a seam we need to move from left to right (instead of from up to bottom)
You may find the source code, and the functions mentioned below in the js-image-carver repository.
To implement the algorithm we will be using TypeScript. If you want a JavaScript version, you may ignore (remove) type definitions and their usages.
For simplicity reasons let's implement the seam carving algorithm only for the image width reduction.
First, let's define some common types that we're going to use while implementing the algorithm.
// Type that describes the image size (width and height).
type ImageSize = { w: number, h: number };

// The coordinate of the pixel.
type Coordinate = { x: number, y: number };

// The seam is a sequence of pixels (coordinates).
type Seam = Coordinate[];

// Energy map is a 2D array that has the same width and height
// as the image the map is being calculated for.
type EnergyMap = number[][];

// Type that describes the image pixel's RGBA color.
type Color = [
  r: number, // Red
  g: number, // Green
  b: number, // Blue
  a: number, // Alpha (transparency)
] | Uint8ClampedArray;
On the high level the algorithm consists of the following steps:
- Calculate the energy map for the current version of the image.
- Find the seam with the lowest energy based on the energy map (this is where we will apply Dynamic Programming).
- Delete the seam with the lowest energy seam from the image.
- Repeat until the image width is reduced to the desired value.
type ResizeImageWidthArgs = {
  img: ImageData, // Image data we want to resize.
  toWidth: number, // Final image width we want the image to shrink to.
};

type ResizeImageWidthResult = {
  img: ImageData, // Resized image data.
  size: ImageSize, // Resized image size (w x h).
};

// Performs the content-aware image width resizing using the seam carving method.
export const resizeImageWidth = (
  { img, toWidth }: ResizeImageWidthArgs,
): ResizeImageWidthResult => {
  // For performance reasons we want to avoid changing the img data array size.
  // Instead we'll just keep the record of the resized image width and height separately.
  const size: ImageSize = { w: img.width, h: img.height };

  // Calculating the number of pixels to remove.
  const pxToRemove = img.width - toWidth;
  if (pxToRemove < 0) {
    throw new Error('Upsizing is not supported for now');
  }

  let energyMap: EnergyMap | null = null;
  let seam: Seam | null = null;

  // Removing the lowest energy seams one by one.
  for (let i = 0; i < pxToRemove; i += 1) {
    // 1. Calculate the energy map for the current version of the image.
    energyMap = calculateEnergyMap(img, size);

    // 2. Find the seam with the lowest energy based on the energy map.
    seam = findLowEnergySeam(energyMap, size);

    // 3. Delete the seam with the lowest energy seam from the image.
    deleteSeam(img, seam, size);

    // Reduce the image width, and continue iterations.
    size.w -= 1;
  }

  // Returning the resized image and its final size.
  // The img is actually a reference to the ImageData, so technically
  // the caller of the function already has this pointer. But let's
  // still return it for better code readability.
  return { img, size };
};
The image that needs to be resized is being passed to the function in ImageData format. You may draw the image on the canvas and then extract the ImageData from the canvas like this:
const ctx = canvas.getContext('2d');
const imgData = ctx.getImageData(0, 0, imgWidth, imgHeight);
The way of uploading and drawing images in JavaScript is out of scope for this article, but you may find the complete source code of how it may be done using React in js-image-carver repo.
Let's break down each step ony be one and implement the calculateEnergyMap(), findLowEnergySeam() and deleteSeam() functions.
Here we apply the color difference formula described above. For the left and right borders (when there are no left or right neighbors), we ignore the neighbors and don't take them into account during the energy calculation.
// Calculates the energy of a pixel.
const getPixelEnergy = (left: Color | null, middle: Color, right: Color | null): number => {
  // Middle pixel is the pixel we're calculating the energy for.
  const [mR, mG, mB] = middle;

  // Energy from the left pixel (if it exists).
  let lEnergy = 0;
  if (left) {
    const [lR, lG, lB] = left;
    lEnergy = (lR - mR) ** 2 + (lG - mG) ** 2 + (lB - mB) ** 2;
  }

  // Energy from the right pixel (if it exists).
  let rEnergy = 0;
  if (right) {
    const [rR, rG, rB] = right;
    rEnergy = (rR - mR) ** 2 + (rG - mG) ** 2 + (rB - mB) ** 2;
  }

  // Resulting pixel energy.
  return Math.sqrt(lEnergy + rEnergy);
};The image we're working with has the ImageData format. It means that all the pixels (and their colors) are stored in a flat (1D) Uint8ClampedArray array. For readability purposes let's introduce the couple of helper functions that will allow us to work with the Uint8ClampedArray array as with a 2D matrix instead.
// Helper function that returns the color of the pixel.
const getPixel = (img: ImageData, { x, y }: Coordinate): Color => {
  // The ImageData data array is a flat 1D array.
  // Thus we need to convert x and y coordinates to the linear index.
  const i = y * img.width + x;
  const cellsPerColor = 4; // RGBA
  // For better efficiency, instead of creating a new sub-array we return
  // a pointer to the part of the ImageData array.
  return img.data.subarray(i * cellsPerColor, i * cellsPerColor + cellsPerColor);
};

// Helper function that sets the color of the pixel.
const setPixel = (img: ImageData, { x, y }: Coordinate, color: Color): void => {
  // The ImageData data array is a flat 1D array.
  // Thus we need to convert x and y coordinates to the linear index.
  const i = y * img.width + x;
  const cellsPerColor = 4; // RGBA
  img.data.set(color, i * cellsPerColor);
};
To calculate the energy map we go through each image pixel and call the previously described getPixelEnergy() function against it.
// Helper function that creates a matrix (2D array) of specific
// size (w x h) and fills it with specified value.
const matrix = <T>(w: number, h: number, filler: T): T[][] => {
  return new Array(h)
    .fill(null)
    .map(() => {
      return new Array(w).fill(filler);
    });
};

// Calculates the energy of each pixel of the image.
const calculateEnergyMap = (img: ImageData, { w, h }: ImageSize): EnergyMap => {
  // Create an empty energy map where each pixel has infinitely high energy.
  // We will update the energy of each pixel.
  const energyMap: number[][] = matrix<number>(w, h, Infinity);
  for (let y = 0; y < h; y += 1) {
    for (let x = 0; x < w; x += 1) {
      // Left pixel might not exist if we're on the very left edge of the image.
      const left = (x - 1) >= 0 ? getPixel(img, { x: x - 1, y }) : null;
      // The color of the middle pixel that we're calculating the energy for.
      const middle = getPixel(img, { x, y });
      // Right pixel might not exist if we're on the very right edge of the image.
      const right = (x + 1) < w ? getPixel(img, { x: x + 1, y }) : null;
      energyMap[y][x] = getPixelEnergy(left, middle, right);
    }
  }
  return energyMap;
};
The energy map is going to be recalculated on every resize iteration. It means that it will be recalculated, let's say, 500 times if we need to shrink the image by 500 pixels which is not optimal. To speed up the energy map calculation on the 2nd, 3rd, and further steps, we may re-calculate the energy only for those pixels that are placed around the seam that is going to be removed. For simplicity reasons this optimization is omitted here, but you may find the example source-code in js-image-carver repo.
I've described some Dynamic Programming basics in Dynamic Programming vs Divide-and-Conquer article before. There is a DP example based on the minimum edit distance problem. You might want to check it out to get some more context.
The issue we need to solve now is to find the path (the seam) on the energy map that goes from top to bottom and has the minimum sum of pixel energies.
The naive approach would be to check all possible paths one after another.
Going from top to bottom, for each pixel, we have 3 options (↙︎ go down-left, ↓ go down, ↘︎ go down-right). This gives us the time complexity of O(w * 3^h) or simply O(3^h), where w and h are the width and the height of the image. This approach looks slow.
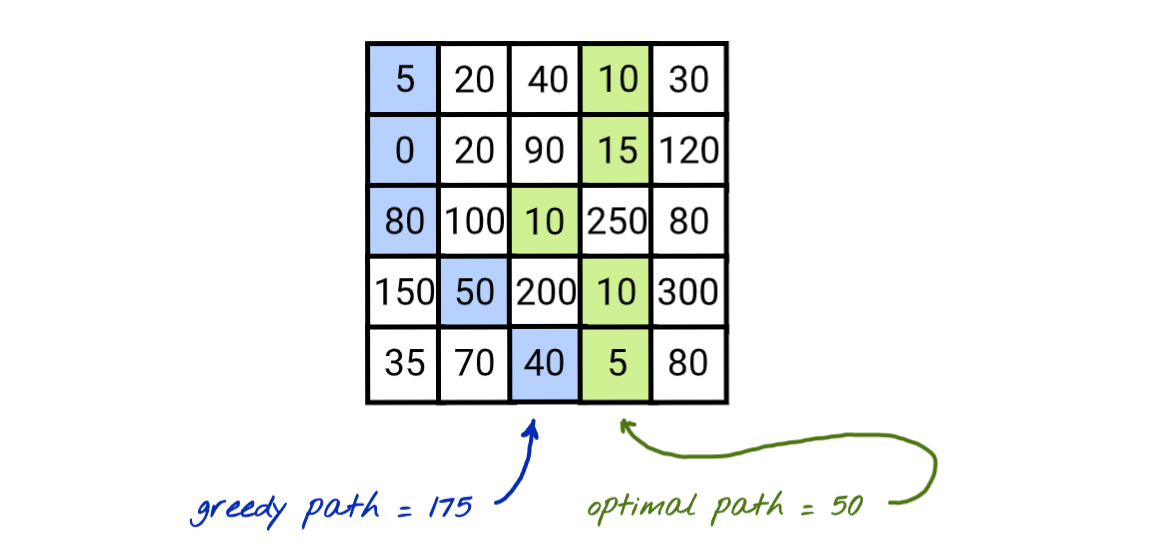
We may also try to choose the next pixel as a pixel with the lowest energy, hoping that the resulting seam energy will be the smallest one.
This approach gives not the worst solution, but it cannot guarantee that we will find the best available solution. On the image above you may see how the greedy approach chose 5 instead of 10 at first and missed the chain of optimal pixels.
The good part about this approach is that it is fast, and it has a time complexity of O(w + h), where w and h are the width and the height of the image. In this case, the cost of the speed is the low quality of resizing. We need to find a minimum value in the first row (traversing w cells) and then we explore only 3 neighbor pixels for each row (traversing h rows).
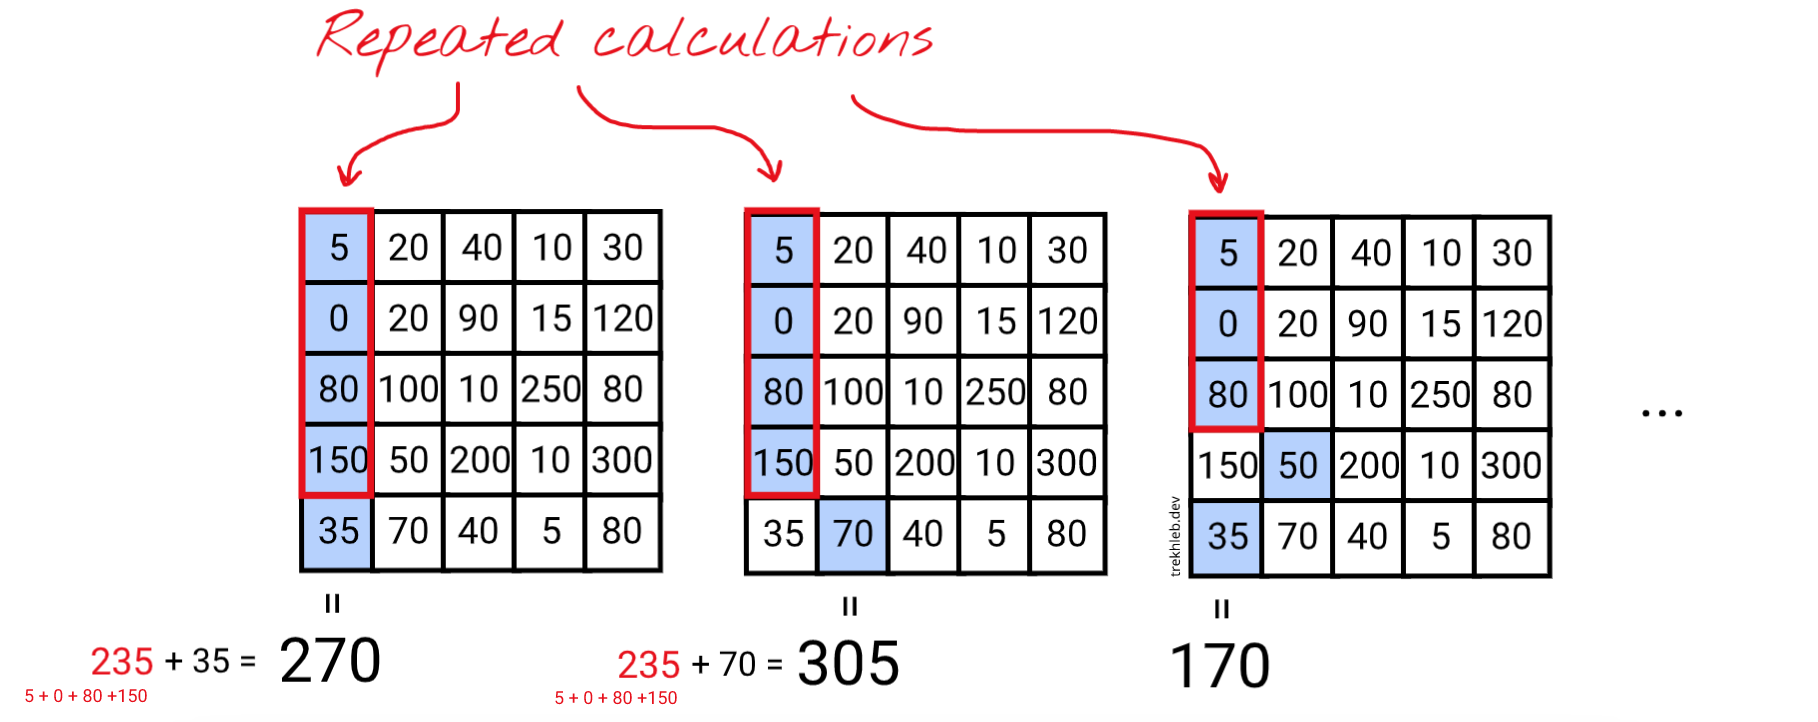
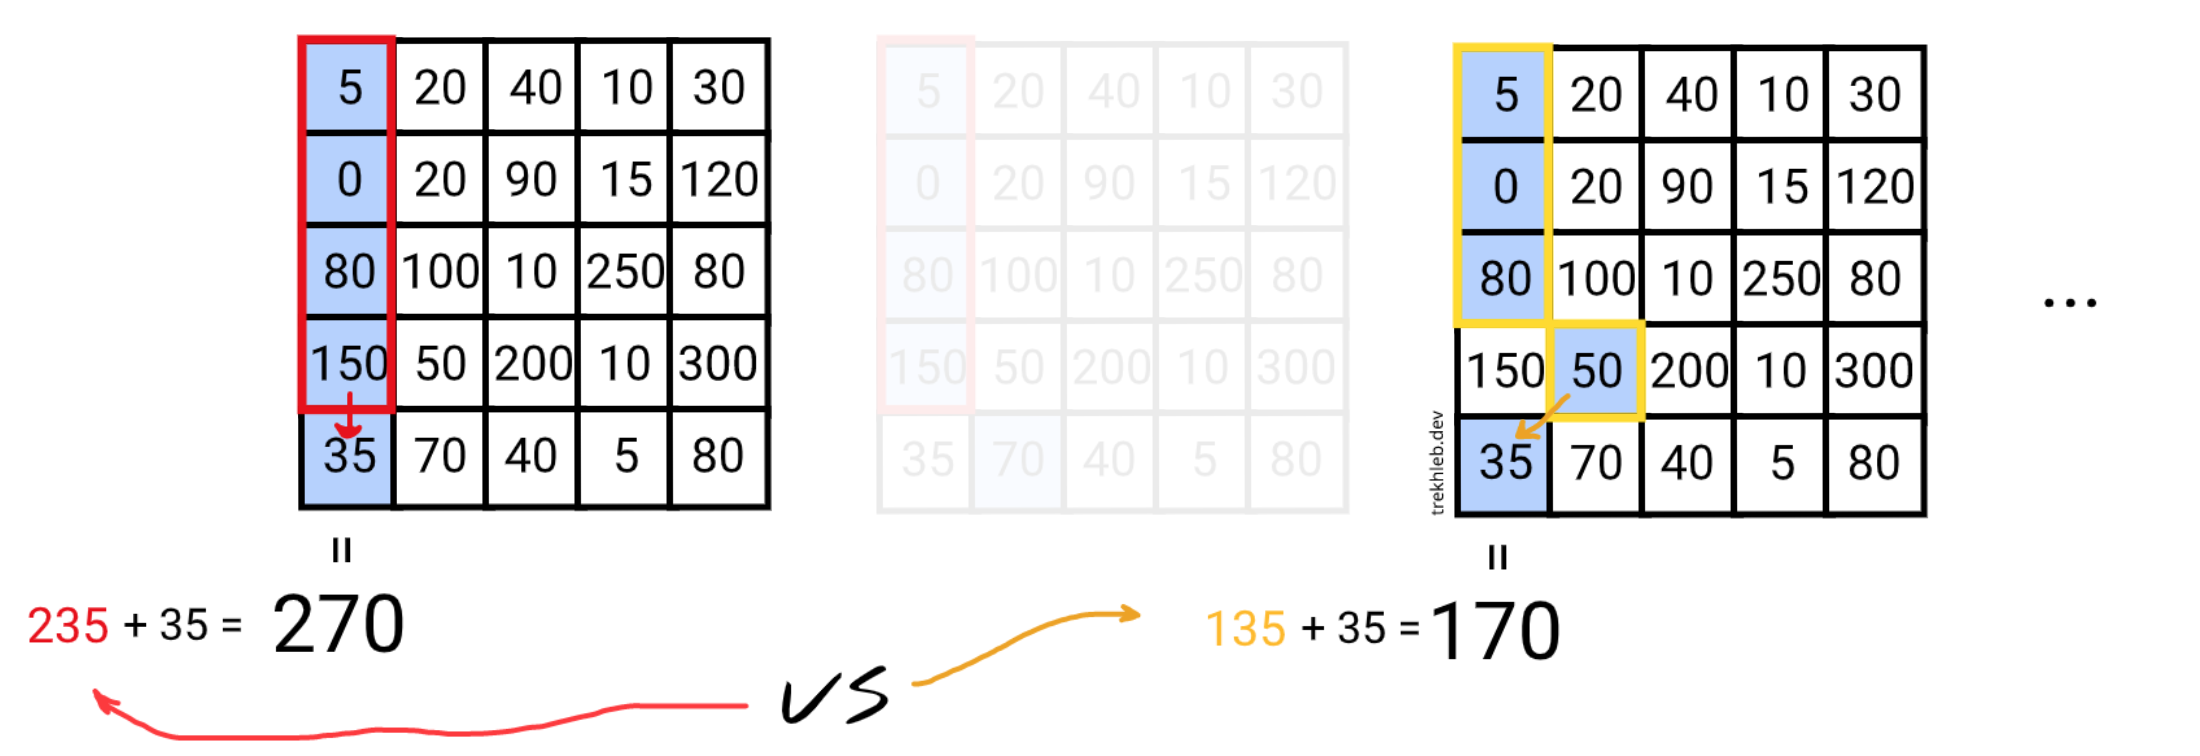
You might have noticed that in the naive approach we summed up the same pixel energies over and over again while calculating the resulting seams' energy.
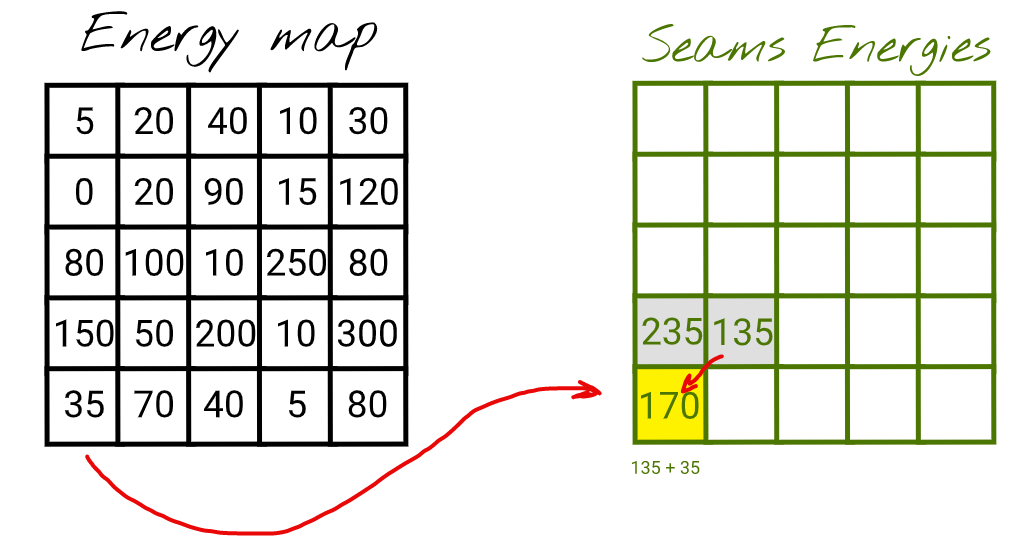
In the example above you see that for the first two seams we are re-using the energy of the shorter seam (which has the energy of 235). Instead of doing just one operation 235 + 70 to calculate the energy of the 2nd seam we're doing four operations (5 + 0 + 80 + 150) + 70.
This fact that we're re-using the energy of the previous seam to calculate the current seam's energy might be applied recursively to all the shorter seams up to the very top 1st row seam. When we have such overlapping sub-problems, it is a sign that the general problem might be optimized by dynamic programming approach.
So, we may save the energy of the current seam at the particular pixel in an additional seamsEnergies table to make it re-usable for calculating the next seams faster (the seamsEnergies table will have the same size as the energy map and the image itself).
Let's also keep in mind that for one particular pixel on the image (i.e. the bottom left one) we may have several values of the previous seams energies.
Since we're looking for a seam with the lowest resulting energy it would make sense to pick the previous seam with the lowest resulting energy as well.
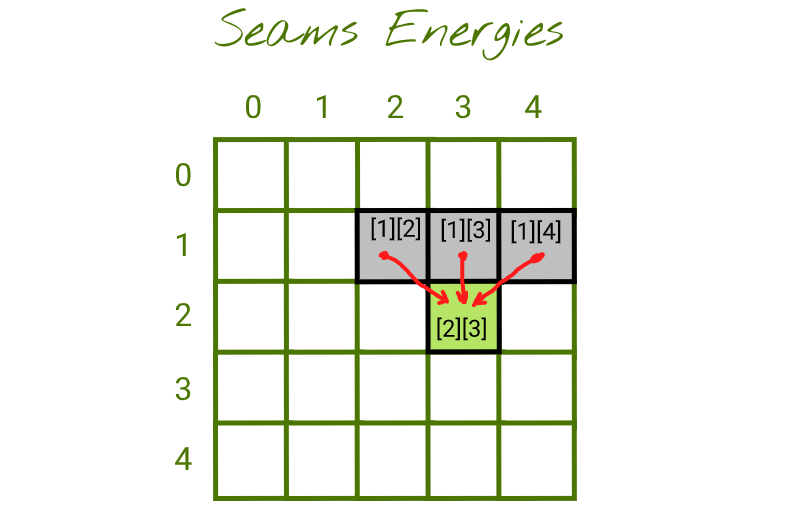
In general, we have three possible previous seems to choose from:
You may think about it this way:
- The cell
[1][x]: contains the lowest possible energy of the seam that starts somewhere on the row[0][?]and ends up at cell[1][x] - The current cell
[2][3]: contains the lowest possible energy of the seam that starts somewhere on the row[0][?]and ends up at cell[2][3]. To calculate it we need to sum up the energy of the current pixel[2][3](from the energy map) with themin(seam_energy_1_2, seam_energy_1_3, seam_energy_1_4)
If we fill the seamsEnergies table completely, then the minimum number in the lowest row would be the lowest possible seam energy.
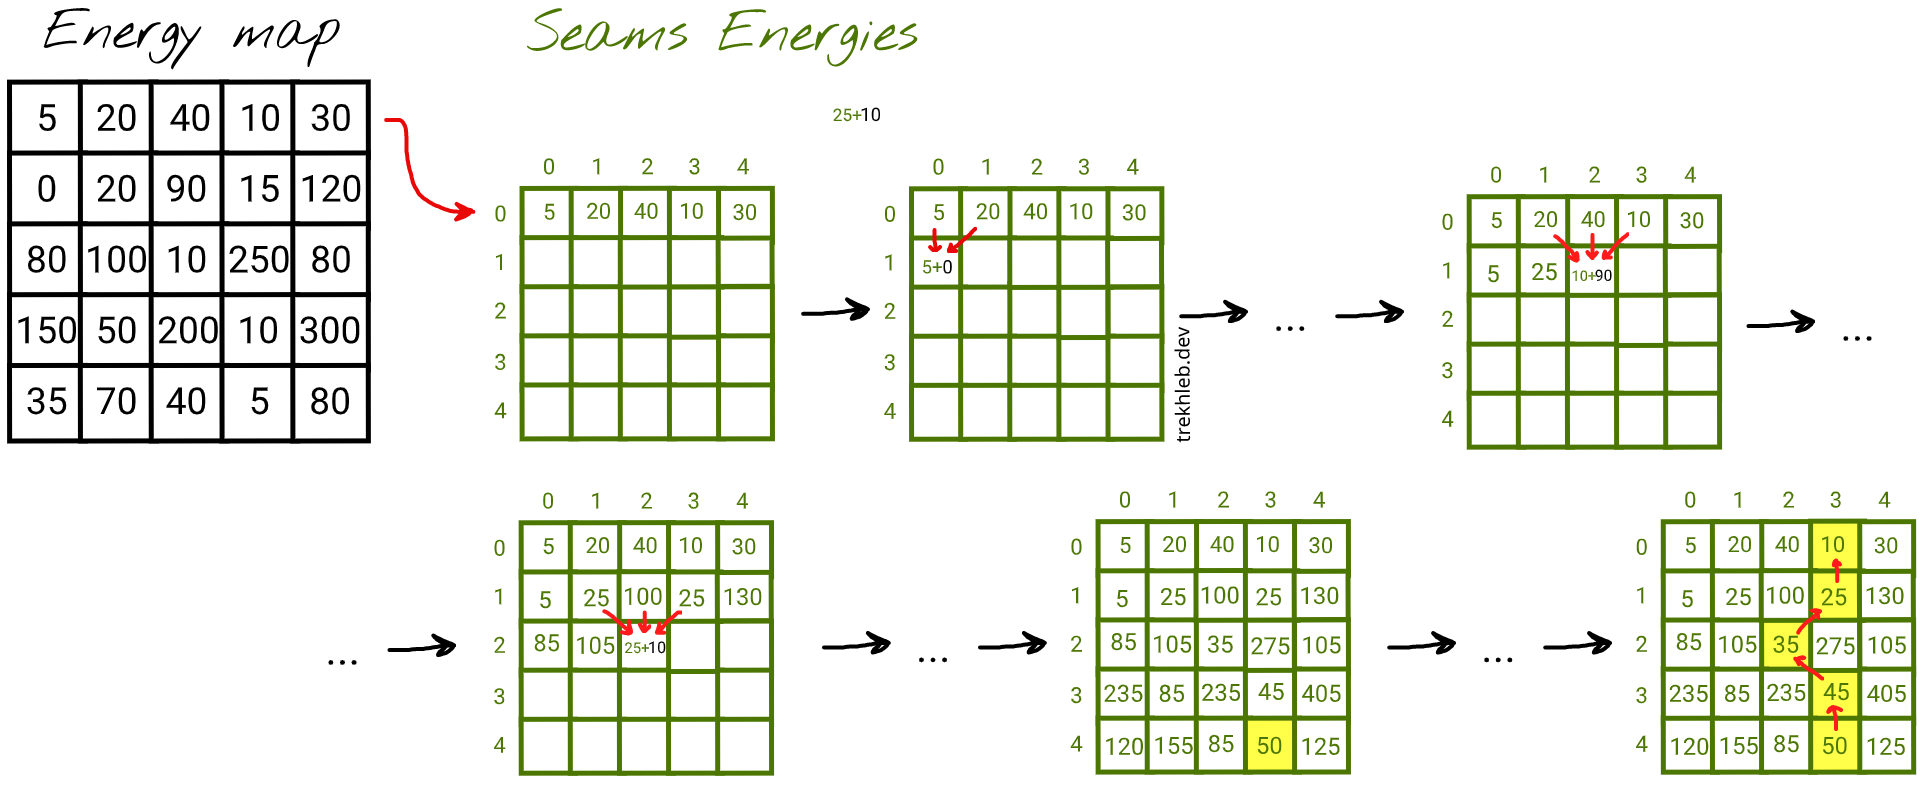
Let's try to fill several cells of this table to see how it works.
After filling out the seamsEnergies table we may see that the lowest energy pixel has an energy of 50. For convenience, during the seamsEnergies generation for each pixel, we may save not only the energy of the seam but also the coordinates of the previous lowest energy seam. This will give us the possibility to reconstruct the seam path from the bottom to the top easily.
The time complexity of DP approach would be O(w * h), where w and h are the width and the height of the image. We need to calculate energies for every pixel of the image.
Here is an example of how this logic might be implemented:
// The metadata for the pixels in the seam.
type SeamPixelMeta = {
  energy: number, // The energy of the pixel.
  coordinate: Coordinate, // The coordinate of the pixel.
  previous: Coordinate | null, // The previous pixel in a seam.
};

// Finds the seam (the sequence of pixels from top to bottom) that has the
// lowest resulting energy using the Dynamic Programming approach.
const findLowEnergySeam = (energyMap: EnergyMap, { w, h }: ImageSize): Seam => {
  // The 2D array of the size of w and h, where each pixel contains the
  // seam metadata (pixel energy, pixel coordinate and previous pixel from
  // the lowest energy seam at this point).
  const seamsEnergies: (SeamPixelMeta | null)[][] = matrix<SeamPixelMeta | null>(w, h, null);

  // Populate the first row of the map by just copying the energies
  // from the energy map.
  for (let x = 0; x < w; x += 1) {
    const y = 0;
    seamsEnergies[y][x] = {
      energy: energyMap[y][x],
      coordinate: { x, y },
      previous: null,
    };
  }

  // Populate the rest of the rows.
  for (let y = 1; y < h; y += 1) {
    for (let x = 0; x < w; x += 1) {
      // Find the top adjacent cell with minimum energy.
      // This cell would be the tail of a seam with lowest energy at this point.
      // It doesn't mean that this seam (path) has lowest energy globally.
      // Instead, it means that we found a path with the lowest energy that may lead
      // us to the current pixel with the coordinates x and y.
      let minPrevEnergy = Infinity;
      let minPrevX: number = x;
      for (let i = (x - 1); i <= (x + 1); i += 1) {
        if (i >= 0 && i < w && seamsEnergies[y - 1][i].energy < minPrevEnergy) {
          minPrevEnergy = seamsEnergies[y - 1][i].energy;
          minPrevX = i;
        }
      }

      // Update the current cell.
      seamsEnergies[y][x] = {
        energy: minPrevEnergy + energyMap[y][x],
        coordinate: { x, y },
        previous: { x: minPrevX, y: y - 1 },
      };
    }
  }

  // Find where the minimum energy seam ends.
  // We need to find the tail of the lowest energy seam to start
  // traversing it from its tail to its head (from the bottom to the top).
  let lastMinCoordinate: Coordinate | null = null;
  let minSeamEnergy = Infinity;
  for (let x = 0; x < w; x += 1) {
    const y = h - 1;
    if (seamsEnergies[y][x].energy < minSeamEnergy) {
      minSeamEnergy = seamsEnergies[y][x].energy;
      lastMinCoordinate = { x, y };
    }
  }

  // Find the lowest energy energy seam.
  // Once we know where the tail is we may traverse and assemble the lowest
  // energy seam based on the "previous" value of the seam pixel metadata.
  const seam: Seam = [];
  if (!lastMinCoordinate) {
    return seam;
  }

  const { x: lastMinX, y: lastMinY } = lastMinCoordinate;

  // Adding new pixel to the seam path one by one until we reach the top.
  let currentSeam = seamsEnergies[lastMinY][lastMinX];
  while (currentSeam) {
    seam.push(currentSeam.coordinate);
    const prevMinCoordinates = currentSeam.previous;
    if (!prevMinCoordinates) {
      currentSeam = null;
    } else {
      const { x: prevMinX, y: prevMinY } = prevMinCoordinates;
      currentSeam = seamsEnergies[prevMinY][prevMinX];
    }
  }

  return seam;
};Once we found the lowest energy seam, we need to remove (to carve) the pixels that form it from the image. The removal is happening by shifting the pixels to the right of the seam by 1px to the left. For performance reasons, we don't actually delete the last columns. Instead, the rendering component will just ignore the part of the image that lays beyond the resized image width.
// Deletes the seam from the image data.
// We delete the pixel in each row and then shift the rest of the row pixels to the left.
const deleteSeam = (img: ImageData, seam: Seam, { w }: ImageSize): void => {
  seam.forEach(({ x: seamX, y: seamY }: Coordinate) => {
    for (let x = seamX; x < (w - 1); x += 1) {
      const nextPixel = getPixel(img, { x: x + 1, y: seamY });
      setPixel(img, { x, y: seamY }, nextPixel);
    }
  });
};The Seam Carving algorithm tries to remove the seams which consist of low energy pixels first. We could leverage this fact and by assigning low energy to some pixels manually (i.e. by drawing on the image and masking out some areas of it) we could make the Seam Carving algorithm to do objects removal for us for free.
Currently, in getPixelEnergy() function we were using only the R, G, B color channels to calculate the pixel's energy. But there is also the A (alpha, transparency) parameter of the color that we didn't use yet. We may use the transparency channel to tell the algorithm that transparent pixels are the pixels we want to remove. You may check the source-code of the energy function that takes transparency into account.
Here is how the algorithm works for object removal.
The JS IMAGE CARVER web app is far from being a production ready resizer of course. Its main purpose was to experiment with the Seam Carving algorithm interactively. So the plan for the future is to continue experimentation.
The original paper describes how the Seam Carving algorithm might be used not only for the downscaling but also for the upscaling of the images. The upscaling, in turn, might be used to upscale the image back to its original width after the objects' removal.
Another interesting area of experimentation might be to make the algorithm work in a real-time.
Those are the plans for the future, but for now, I hope that the example with image downsizing was interesting and useful for you. I also hope that you've got the idea of using dynamic programming to implement it.
So, good luck with your own experiments!


