- 比赛官网https://gslab.qq.com/html/competition/2022/race-pre.htm,题目下载地址https://gslab.qq.com/html/competition/2022/doc/PC%E5%AE%A2%E6%88%B7%E7%AB%AF%E5%AE%89%E5%85%A8-%E5%88%9D%E8%B5%9B%E8%B5%9B%E9%A2%98.zip
-
打开程序,发现程序开启了ASLR。于是先使用cffexplorer将ASLR关闭,便于之后的调试。
-
发现程序在绘制一次图案后便不再绘制了。怀疑代码只会运行一次。将程序拖入IDA进行分析。
-
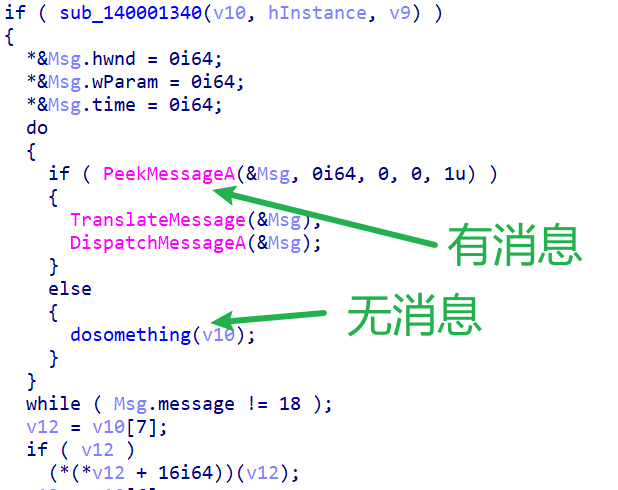
打开IDA,首先进入winmain,看到消息的处理逻辑中。对于没有消息时,会调用
sub_1400015E0函数。 -
将该函数重命名为
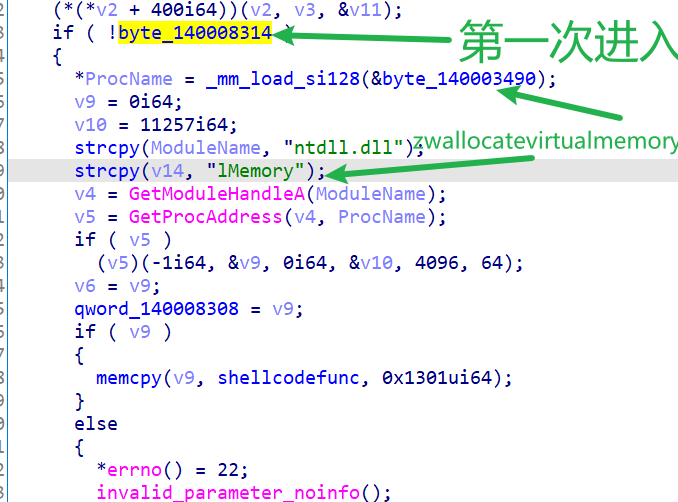
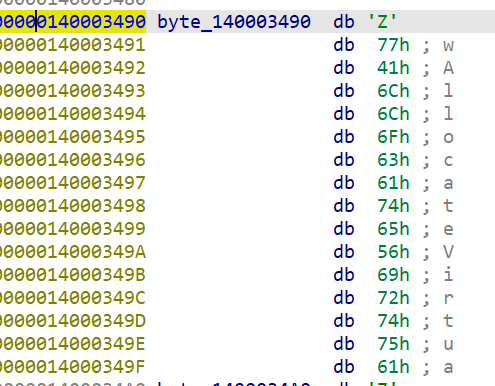
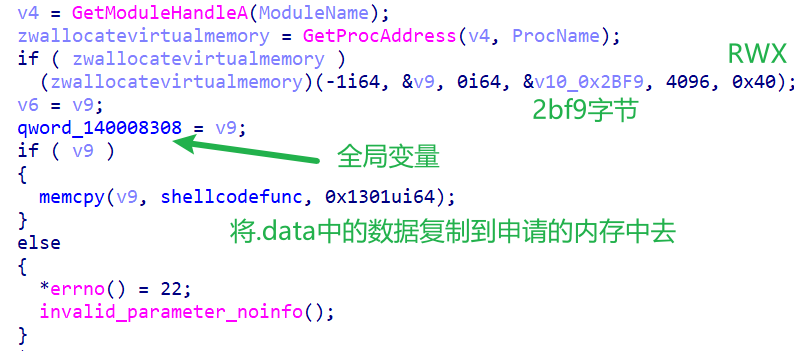
dosomething,进入函数中进行分析。如果当前是第一次进入,则使用ZwAllocateVirtualMemory函数申请一块RWX属性的内存,大小为0x2BF9字节。由于页对齐,操作系统会申请一块3个页面大小的内存。跟进.data这块数据,发现其是一段代码。因此将这块数据命名为
shellcodefunc。可以看到之后对这块shellcode进行了相应参数的填充。 -
在完成了对shellcode的初始化之后,如果shellcode的内存还存在,则会对shellcode进行调用。这里可以发现,使用了
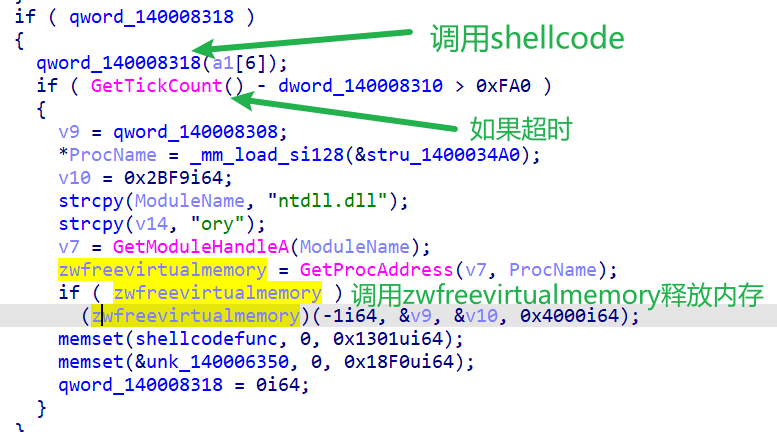
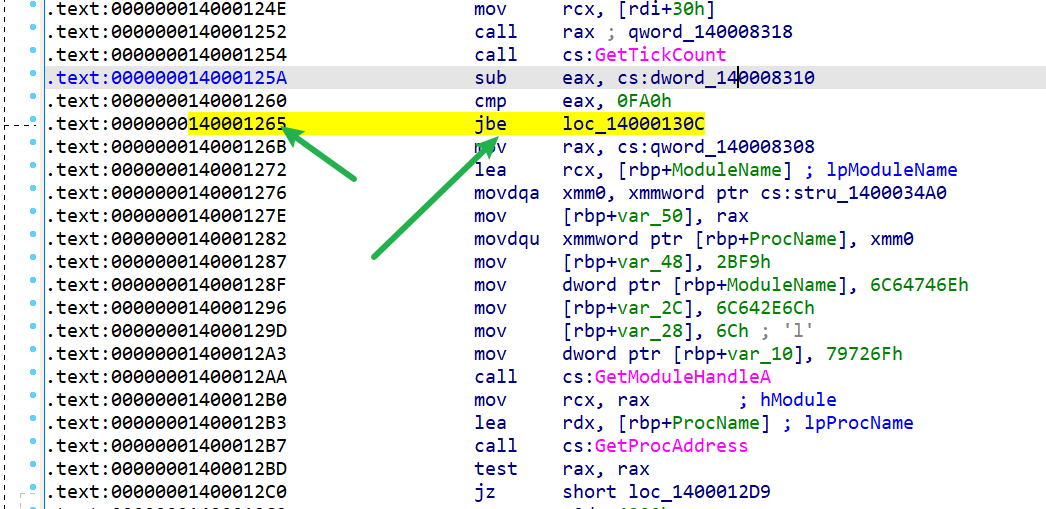
GetTickCount函数。如果运行时间超过4000毫秒,就使用ZwFreeVirtualMemory 释放内存。因此这里直接将140001265位置的jbe改为jmp,实现可以一直显示图像的功能,方便调试。
-
考虑到在将shellcode复制到申请的内存中之后程序还对其中一些内容进行了修改,因此直接对源程序进行分析不太合适。这里首先对
.text:000000014000119F call memcpy
处下断,得到申请的shellcode的地址,然后待其填充完毕后再将已经填充了相应参数的shellcode从内存中dump下来进行分析。dump下来之后可以看到这是一块0x3000大小的内存。
-
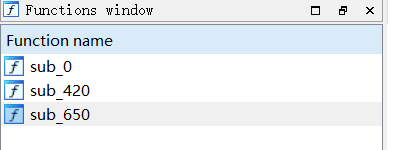
将dump下来的内存拖入ida进行分析,可以看到其中有三个函数,分别在+0、+420、+650的位置。
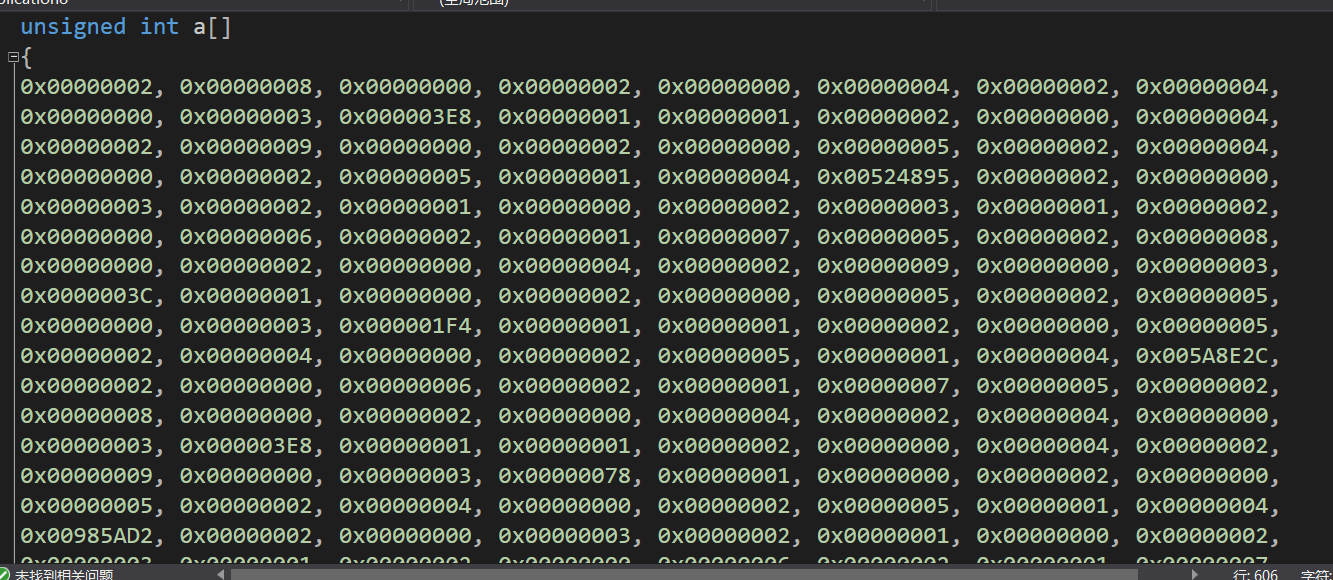
而在这三个函数后面,跟随了大段数据。全部dump下来可以看到数据格式如下
-
每一个数据单元是4个字节,其中存储了一个数字,大多为1~7,但也有一些例外。
-
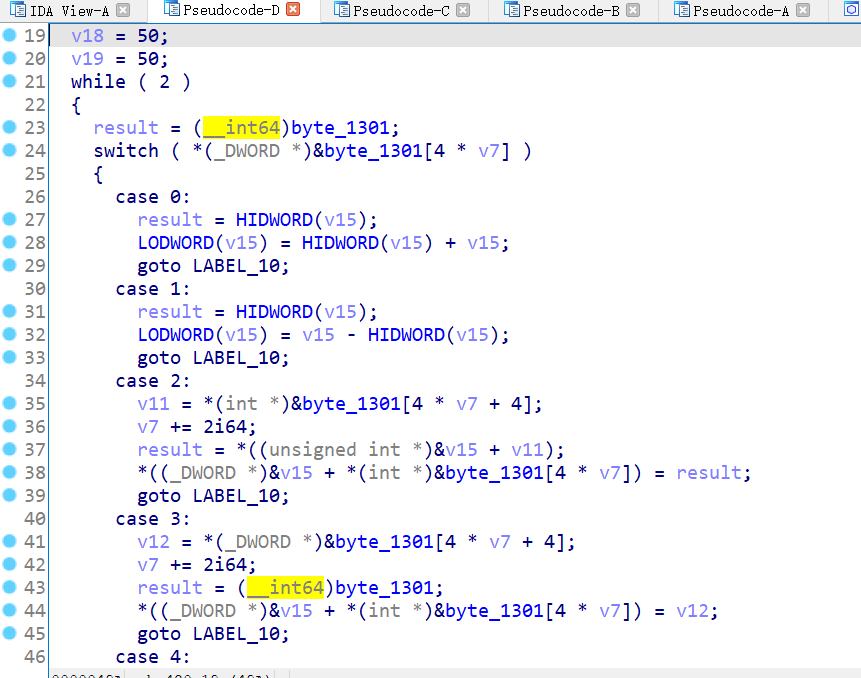
在对shellcode的三个函数进行分析之后,发现sub_420中有一个switch-case结构,根据存储的数据的不同进行不同的处理。
-
可以看到,如果当前数据为5或者6的话,会调用sub_0函数。而调用时的这个参数非常像一个RGBA的数据。
-
调用时如果数据为5,则使用ebx中的值作为第五个参数,如果为6,则使用edi中的值作为第五个参数。这里跟到前面,把给edi赋值的代码进行patch,将其颜色替换为
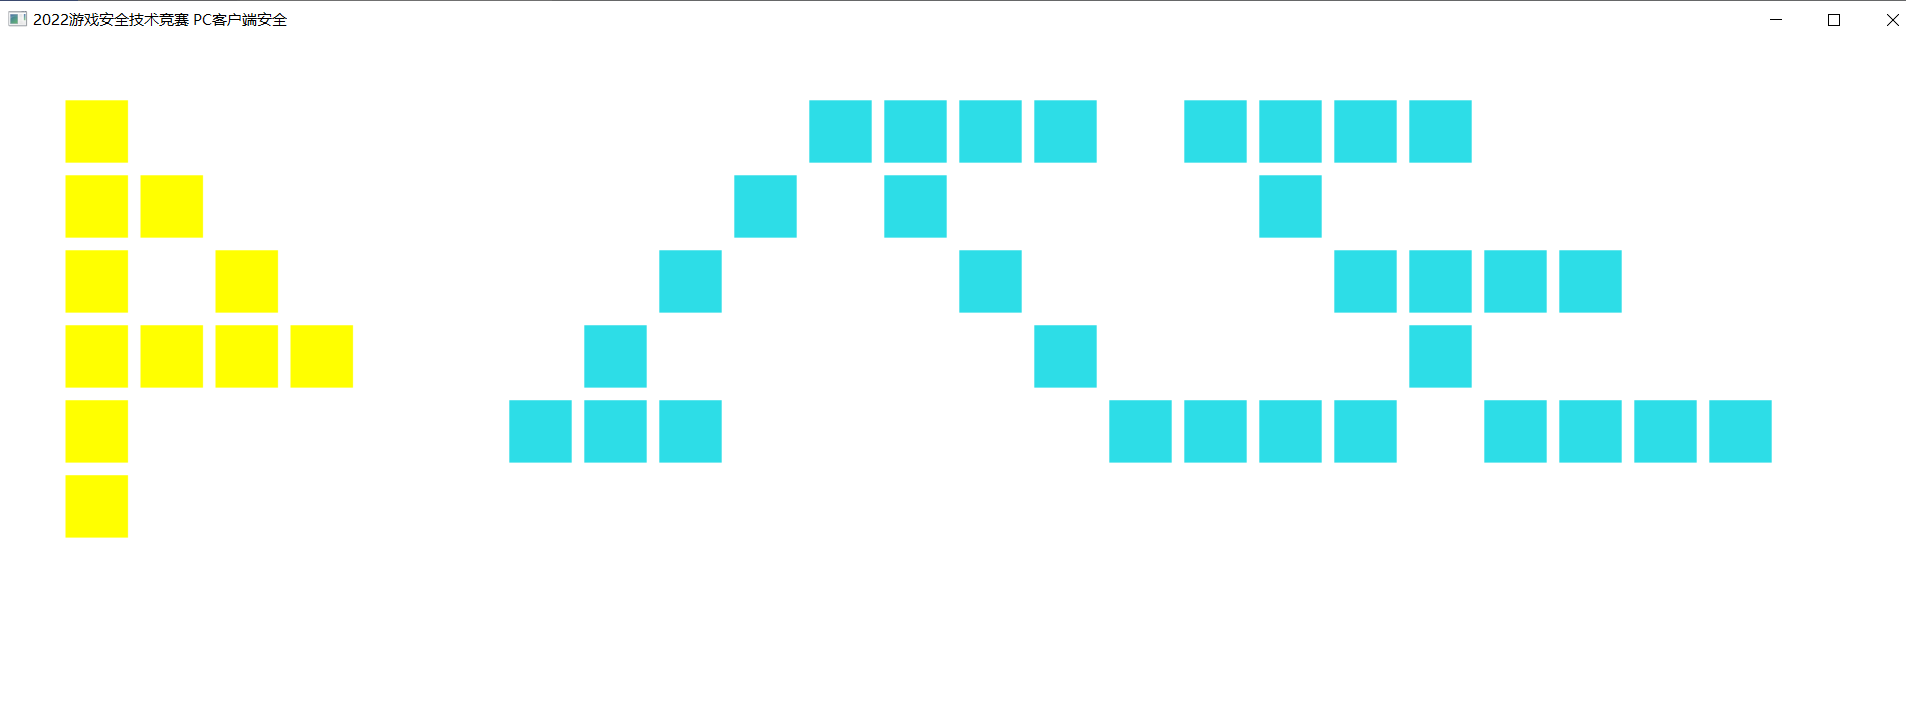
ffffff00,重新运行程序,可以看到绘制出来的方块颜色与旗子的方块颜色相同。由此可以推断,当数据为5时,绘制的是旗子的黄色方块,数据为6时,绘制的是右边的的蓝色方块。但不知为何数据为5时黄色的方块没有被正常绘制出来。
实在太菜了,用了很笨的办法来达到目的,我猜正解肯定是修改数据来让方块正确绘制,不过我逆向能力还是不行,逆不出来。。
-
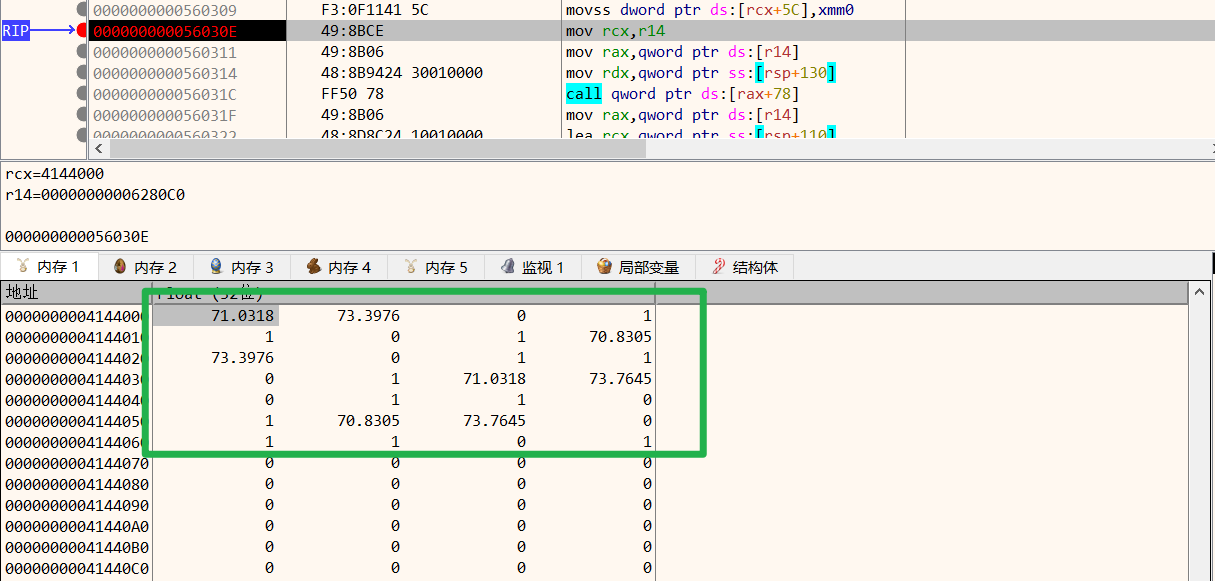
对switch-case中的算法进行了一段时间的分析,还是没有找到能构造出成功绘制旗子的方法。于是对shellcode中的其他代码进行了探索。由于绘制时要调用sub_0,因此对sub_0中各个call进行了分析,发现在shellcode+31c这个call之前进行对[rcx+xxx]的填充时,内存中的数据很像坐标。
每一次对这里的调用都会让内存中的对应区域多出一块28*4字节大小的数据。数据的格式很有规律,像是x,y,z+rgba的结构。在对其进行进一步的分析之后发现其结构如下
typedef struct _v3
{
	float x, y, z;
}v3, * pv3;

typedef struct _v4
{
	DWORD r, g, b, a;
}v4, * pv4;

typedef struct _Info
{
	v3 a1;
	v4 b1;

	v3 a2;
	v4 b2;

	v3 a3;
	v4 b3;

	v3 a4;
	v4 b4;
} Info, * PInfo;
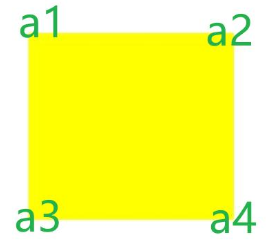
可以看出,a1,a2,a3,a4有点像是正方形的四个顶点。对其中数据进行进一步分析可以证实这一推断。
最后分析得出该结构对应的四个点如下
a1,a2,a3,a4分别为左上、右上、左下、右下四个点。
-
在对5和6的处理代码单步跟踪计数之后发现,每次绘制时,case 5会进入11次,case 6会进入31次。而且绘制时的顺序是先绘制11个5,然后再绘制31个6。经过对正确图像的查看,可以确定这两个就是点的坐标。因为答案中旗子使用了11个方块,右边的图案使用了31个方块。将其数据dump下来,发现绘制5时的坐标非常奇怪,从-290-100的数据都存在。而绘制6时的坐标则分布非常有规律,坐标点均在0-1之间。使用CE进行进一步分析,发现屏幕中心点为0,向两边延伸,坐标的范围在
-1~1之间。显然,绘制5时的坐标有误,使其无法被正确绘制。 -
在完成以上分析后,我想到了可以在这里进行hook,让5的数据被正确绘制。这里使用了注入dll的方式。在dll中对
shellcode+0x30e的位置挂上inlinehook。挂inlinehook的方法如下-
首先在
shellcode+30e的位置进行inlinehook,使用ff25跳转到纯汇编函数AsmHookHandler中PUCHAR t = (PUCHAR)((*saddr) + 0x30e); g_origin = (ULONG64)((*saddr) + 0x31c); // 需要跳回的地方 char bufcode[] = { 0xFF, 0x25, 0x00, 0x00, 0x00, 0x00, 0x00, 0x00, 0x00, 0x00, 0x00, 0x00, 0x00, 0x00, }; *(PULONG64)&bufcode[6] = (ULONG64)AsmHookHandler; DWORD old_protect = 0; VirtualProtect(t, 0x1000, PAGE_EXECUTE_READWRITE, &old_protect); A("改变内存属性成功"); A("AsmHookHandler = %llx\r\n", AsmHookHandler); memcpy(t, bufcode, sizeof bufcode); A("memcpy完成");
-
在
AsmHookHandler中进行对寄存器的保存,然后跳转到HookHandler函数中。在从HookHandler中返回后再从栈中恢复寄存器,并执行hook点中原来的指令,然后跳转回到原函数的下一条需要执行的指令。AsmHookHandler proc push r15; push r14; push r13; push r12; push r11; push r10; push r9; push r8; push rdi; push rsi; push rbp; push rsp; push rbx; push rdx; push rcx; push rax; mov rcx,rsp; sub rsp,0100h call HookHandler add rsp,0100h; pop rax; pop rcx; pop rdx; pop rbx; pop rsp; pop rbp; pop rsi; pop rdi; pop r8; pop r9; pop r10; pop r11; pop r12; pop r13; pop r14; pop r15; ;原来的操作 mov rcx, r14 mov rax, [r14] mov rdx, [rsp+304] jmp g_origin ;跳回到需要跳到的位置 AsmHookHandler endp
-
在HookHandler函数中,首先对最初的11个黄色方块进行绘制。由之前的dump可知在系统缩放为
125%的情况下右边图案最高点的y坐标为0.882840。经过实验,旗子最左边的x坐标应为-0.9305。一个方块的宽为0.064935,高为0.118343。左右相邻两个格子的间隔为0.012987,上下相邻的两个格子间隔为0.023669。经过对旗子的观察可知,旗杆高度为6个格子,在第四个格子高度向右再画三个格子,然后再斜着画上两个格子即可。 -
为了适配不同的系统缩放,在100%、125%、150%、175%缩放下分别对旗杆左上角位置进行定位。并根据系统缩放调整绘制的格子以及间隔的大小。代码如下,其中
getScreenZoom为封装的获取系统缩放的函数。float xgap = 0.064935, ygap = 0.118343; // 同一格子内部距离 float xbet = 0.012987, ybet = 0.023669; // 两个相邻格子之间的距离 float trans = getScreenZoom() / 1.25; xgap *= trans, ygap *= trans, xbet *= trans, ybet *= trans; // 进行缩放 float origin_a1_x = -0.9305; float origin_a1_y = 0.906692; #define eps 1e-2 if (fabs(getScreenZoom() - 1.00) < eps) origin_a1_y = 0.906692; // 缩放100% else if (fabs(getScreenZoom() - 1.25) < eps) origin_a1_y = 0.882840; // 缩放125% else if (fabs(getScreenZoom() - 1.50) < eps) origin_a1_y = 0.858773; // 缩放150% else if (fabs(getScreenZoom() - 1.75) < eps) origin_a1_y = 0.834448; // 缩放175% if (fabs(getScreenZoom() - 1.00) < eps) origin_a1_x = -0.9472; // 缩放100% else if (fabs(getScreenZoom() - 1.25) < eps) origin_a1_x = -0.9305; // 缩放125% else if (fabs(getScreenZoom() - 1.50) < eps) origin_a1_x = -0.9236; // 缩放150% else if (fabs(getScreenZoom() - 1.75) < eps) origin_a1_x = -0.9139; // 缩放175%
-
综上,
HookHandler中的代码如下。EXTERN_C VOID HookHandler(PGuestContext context) { static bool flag = false; if (!flag) { flag = true; A("inline hook成功!"); } float xgap = 0.064935, ygap = 0.118343; // 同一格子内部距离 float xbet = 0.012987, ybet = 0.023669; // 两个相邻格子之间的距离 float trans = getScreenZoom() / 1.25; xgap *= trans, ygap *= trans, xbet *= trans, ybet *= trans; // 进行缩放 float origin_a1_x = -0.9305; float origin_a1_y = 0.906692; #define eps 1e-2 if (fabs(getScreenZoom() - 1.00) < eps) origin_a1_y = 0.906692; // 缩放100% else if (fabs(getScreenZoom() - 1.25) < eps) origin_a1_y = 0.882840; // 缩放125% else if (fabs(getScreenZoom() - 1.50) < eps) origin_a1_y = 0.858773; // 缩放150% else if (fabs(getScreenZoom() - 1.75) < eps) origin_a1_y = 0.834448; // 缩放175% if (fabs(getScreenZoom() - 1.00) < eps) origin_a1_x = -0.9472; // 缩放100% else if (fabs(getScreenZoom() - 1.25) < eps) origin_a1_x = -0.9305; // 缩放125% else if (fabs(getScreenZoom() - 1.50) < eps) origin_a1_x = -0.9236; // 缩放150% else if (fabs(getScreenZoom() - 1.75) < eps) origin_a1_x = -0.9139; // 缩放175% PInfo info = (PInfo)(context->mRcx); static int ct = 0; ct++; if (ct <= 6) { float a1x = origin_a1_x; float a1y = origin_a1_y - (ct - 1) * (ygap + ybet); info->a1.x = a1x, info->a1.y = a1y; info->a2.x = a1x + xgap, info->a2.y = a1y; info->a3.x = a1x, info->a3.y = a1y - ygap; info->a4.x = a1x + xgap, info->a4.y = a1y - ygap; } else if (ct <= 9) { float a1x = origin_a1_x + (ct - 6) * (xgap + xbet); float a1y = origin_a1_y - (4 - 1) * (ygap + ybet); info->a1.x = a1x, info->a1.y = a1y; info->a2.x = a1x + xgap, info->a2.y = a1y; info->a3.x = a1x, info->a3.y = a1y - ygap; info->a4.x = a1x + xgap, info->a4.y = a1y - ygap; } else if (ct == 10) { float a1x = origin_a1_x + (7 - 6) * (xgap + xbet); float a1y = origin_a1_y - (2 - 1) * (ygap + ybet); info->a1.x = a1x, info->a1.y = a1y; info->a2.x = a1x + xgap, info->a2.y = a1y; info->a3.x = a1x, info->a3.y = a1y - ygap; info->a4.x = a1x + xgap, info->a4.y = a1y - ygap; } else if (ct == 11) { float a1x = origin_a1_x + (8 - 6) * (xgap + xbet); float a1y = origin_a1_y - (3 - 1) * (ygap + ybet); info->a1.x = a1x, info->a1.y = a1y; info->a2.x = a1x + xgap, info->a2.y = a1y; info->a3.x = a1x, info->a3.y = a1y - ygap; info->a4.x = a1x + xgap, info->a4.y = a1y - ygap; } if (ct == 42) ct = 0; }
-
-
最后通过cffexplorer对去掉ASLR、关闭
GetTickCount检测后的程序进行导入表的注入。让其加载时同时加载dll3.dll模块。最终效果如下。 -
代码已经开源到https://github.com/smallzhong/gslab-2022-competition仓库中,在release https://github.com/smallzhong/gslab-2022-competition/files/8508875/exe%2Bdll.zip中可以下载经过patch的exe和用来注入的dll。
