template: ../media/TB4Template.pptx
- Understand ROS messages
- Understand the concept of a publish / subscribe systems.
- Understand ROS middlewares.
- Identify ROS namespaces.
- Understand and use the ros CLI for
ros2 topic.
- A key feature of ROS is its message system.
- ROS Messages are like a standard sized mail envelope. They hold a value.
- A message is simply a collection of data, arranged as a set of fields with a
nameandtype.- The position of a robot, or an image are examples of a message.
- Messages can be composed from other messages, e.g. a robot's state message may be composed of a position message and an orientation message.
- These messages are similar to Python's
dicttype or C++'sstruct.
- Each ROS package can define a set of messages or use messages defined in another package.
- ROS has many prefined messages for common robot component.
- These shared messages are what make ROS so powerful!
- Let's look at an example from TB4.
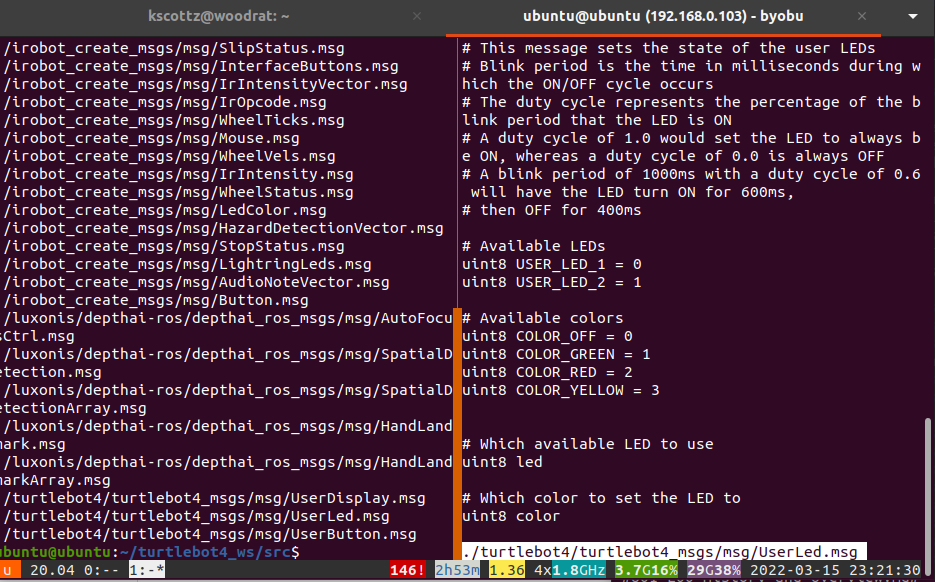
- Message files use the
*.msgsuffix. Let's look at a few. - Left pane: We used
findto list all of the*.msgfiles in the TB4 sources. - Right pane: We used
lessto view theUserLed.msgmessage files.- An LED is a light emitting diode, a small light bulb.
- We can see that messages are simply types (e.g.
uint8) and a name. There are also comments telling us what the messages represent. - The
UserLedmessage defines whichledyou want to color and thecoloryou want to make it.
- In the abstract, ROS moves messages using a concept called
publish / subscribe, often abbreviatedpub/sub. - It is easier to think of publishing as sending, and subscribing as recieving.
- In ROS messages are published and subscribed to
topics. Topicsare like a phone number, or a mail box, they allow the same message type to be used multiple times.- ROS topics are hierarchical, they can be grouped in a logical hierarchy.
- This hierarchy is denoted using the forward slash, "/", similarly to your computer's hard disk.
- Pub/sub systems aren't exactly like the mail in some respects. In some ways they're more like broadcast towers!
- In the mail, a letter goes from exactly one house to exactly one other house. We call this one-to-one transfer.
- In a pub/sub system messages are moved in a many-to-many fashion.
- In a pub/sub system multiple people can send and recieve messages to a topic.
- When a program subscribes to a topic it is asking to recieve messages from a topic.
- When a program publishes to a topic it is asking to send messages to everyone subscribed to a topic.
- In some ways a topic is like a public TV station, where anyone can make a program and anyone can watch that show (if they want).
- ROS doesn't actually move messages published to a topic!
- Instead, ROS has a generic interface for moving messages, and you choose how you want them to be moved.
- This generic layer is called a "ROS Middleware Layer" or
RMW. - An RMW is like an adapter that let's you plug ROS into lots of different software protocols and hardware transport layers.
- If you want to move ROS to publish topics over carrier pigeon or e-mail it is possible.
- Most ROS 2 robots use
DDSas their RMW. DDS stands for Data Distribution Service. - DDS is a generic protocol for moving data..
- DDS can supports a variety of transport protocols like WiFi, 4G, 5G, and even USB.
- There are a number of vendors of DDS software. Some of them are open-source and others are proprietary.
- Each ROS distro ships with a default RMW implementation.
- Just like any software, there are trade-offs with each RMW implementation. For each ROS distro the default is selected after a thorough vetting process.
- On the TurtleBot4, the TurtleBot4 simulation, and Create3, we're using CycloneDDS, but you can select other DDS vendors.
- The TB4 has two places where we can check and change our RMW.
- One the Create3
- Log into the iRobot console by entering it in your browser and then go to Application->Configuration. (see above).
- There is a drop down to select the RMW.
- On the Turtlebot / desktop you can check the
RMW_IMPLEMENTATIONby using theprintenvcommand. Detailed instructions are here. - If no value is set, assume you are using the default.
- Otherwise the RMW is the value listed in the environment.
- To see how ROS topics work in action we need to learn the ROS 2 command line interface (CLI).
- If you installed ROS yourself you're already familiar with a command line application. Commands like
ls,cd, andmvare all command line interfaces. - A command line interface is very simply a set of text-based programs for working with ROS.
- The ROS 2 CLI has a very particular grammar. Commands always start with
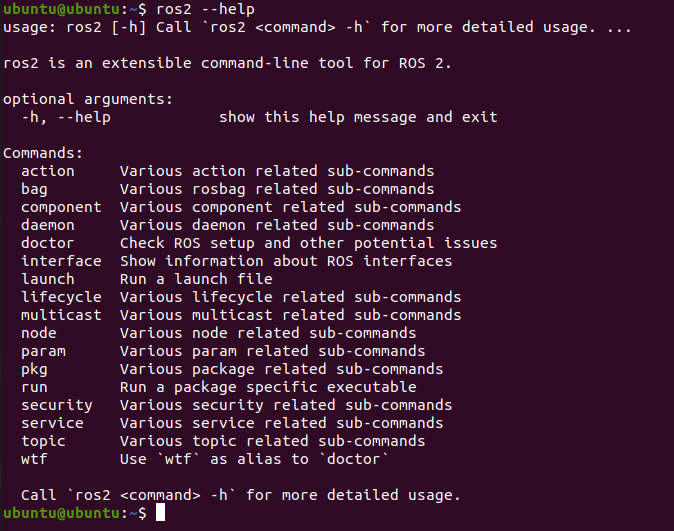
ros2followed by a noun liketopicornodeand then subsuquent commands or parameters. - The ROS 2 CLI is self documenting, meaning each command contains its own little help file. For any command you can add
--helpto the command and it will list its options.
- ROS has two concepts you need to be aware of at this point:
- Workspaces -- these are folders that are a collection of ROS code and executables. They usually live in a folder that ends with
_ws. - Overlays -- Overlaying is the process of combining ROS code. We say that one workspace overlays another workpace.
- We'll cover these in detail later on.
- Workspaces -- these are folders that are a collection of ROS code and executables. They usually live in a folder that ends with
- Roughly, on your desktop or laptop, you should currently have two workspace.
- The system level workspace (e.g. the whole computer with ROS installed).
- The TB4 Simulator workspace (
turtlebot4_ws). - We say that the
turtlebot4_wsoverlays your system level ROS installation.
- If you want to use ROS generally, you can tell your terminal about ROS by calling:
source /opt/ros/<ros distro>/setup.bash- Our ROS distro is
galactic.
- If you are working on specific ROS project in a folder you need to setup the workspace.
- e.g. in
~/turtlebot4_wscallsource ~/install/setup.bash
- e.g. in
- Before using the ROS 2 CLI you need to tell your terminal which workspace you want to use.
- Let's explore the ROS 2 CLI together. You can follow along.
- If you want to use your robot to follow along:
- ssh into your robot, and then start byobu
ssh [email protected]-- where XXX is your robot's IP address.- On the robot you simply need to source the system bash file.
source /opt/ros/galactic/setup.bash
- If you want to use the TB4 simulator:
- If you're using a VM or container, start it up.
- Now run
source /opt/ros/galactic/setup.bash - Move to the simulator workspace and run
source ./install/setup.bash - Next start the sim,
ros2 launch turtlebot4_ignition_bringup ignition.launch.py - Finally open a new terminal and source the system bash file again.
- From here the steps should be similar.
- One
- One A
- One B
- Two
- foo
- bar
- baz
** Here are some slide notes. Note you leave an empty line between the content - in this case a bulleted list - and the notes. **
- For help search Google.
This is highlighted code** This is emphasis code. **
      sudo apt update
      sudo apt install -y python3-rosdep
      sudo rosdep init
      rosdep update
- This is some text describing above
- Herp
- Derp
- Slerp
- Perp
** WILL THIS TEXT SHOW UP? **
      sudo apt update
      sudo apt install -y python3-rosdep
      sudo rosdep init
      rosdep update
- This text will appear!
- So will this
- So will this?
- This text will appear!
- So will this
- So will this?
Here is some subtext
Lorem ipsum dolor sit amet, consectetur adipiscing elit. Integer ultrices posuere lorem, eu dictum massa efficitur ac. Aenean at risus luctus, vulputate ex non, condimentum tellus. Aenean egestas, odio eu ornare eleifend, nulla enim efficitur nunc, non luctus velit purus a urna. Pellentesque magna odio, viverra eu enim non, hendrerit pulvinar nibh. Aenean blandit lacus et ex bibendum, at finibus orci rhoncus. Integer venenatis eros in scelerisque porta. Nam ligula sem, ullamcorper nec efficitur in, commodo sit amet justo. Praesent ut nibh ultrices, euismod eros in, consectetur risus. Fusce a imperdiet justo. Cras magna massa, venenatis non lectus ac, mattis luctus est.
Phasellus varius rutrum ullamcorper. Maecenas iaculis rhoncus ipsum, id congue augue suscipit eu. Nullam varius neque non est congue tincidunt. Vestibulum a nulla ac felis consequat posuere. Ut vulputate malesuada placerat. Integer accumsan rhoncus magna sit amet laoreet. Nullam aliquet libero pharetra, suscipit felis at, faucibus enim. Sed metus massa, tincidunt vitae nunc quis, bibendum laoreet ante. Donec id egestas dui. Quisque blandit tellus augue, in cursus mauris malesuada eget.
| a | b | c | d | e |
|---|---|---|---|---|
| 1 | 2 | 3 | 3 | 4 |
| a | f | g | d | s |
| s | s | s | s | s |
This is a underlined under a table
    def sortedNumericList(string):
        return sorted(list(map(int, set(string.split()))))

    def parseRGB(str):
        if RGBmatch := RGBRegex.match(str):
            # Matches
            return (True, RGBmatch.group(1))
        else:
            return (False, "")


