Pharo Project code snippets and useful hints. Some topics here:
- Generate new public/private key pair if needed: https://help.github.com/articles/generating-an-ssh-key/
- Open Configuration on Github: User -> Settings -> SSH and GPG keys


Open configuration of Iceberg tool (World menu > Tools > Iceberg > click Settings icon) and set:
- local path to ssh keys:

- set Default Code Subdirectory to: 'src'
- set File format type to: 'Tonel'
- set github token on credential list (that was previously
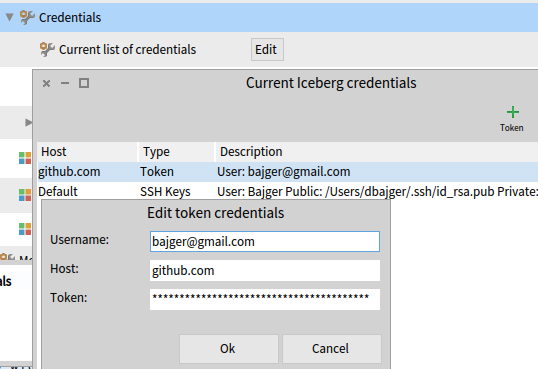
- see full description

Github CLI is useful when doing manual changes with repo (from command line).
There is auth option to use GH CLI, installation here: https://github.com/cli/cli#installation
- install e.g. using
brew install gh - set authentication method for git command line:
gh auth loginand select: HTTPS and then 'Authenticate using browser'
Git remote commands then run using GH CLI authentication - alternativelly, you can login via token e.g.:
gh auth login --with-token < some-token.txt
Open system configuration from World menu > Pharo > Settings > System tab > Local Directory > click directory icon and navigate to path, where directory with image is located


- Open Iceberg and click '+' add icon
- Choose "Clone from Github.com"
- Set your name from Github and type repository name you want to clone
- Choose "HTTPS" and click Ok


After cloning, you'll see project in Iceberg in state, where project metadata (how packages, classes are organized in repo) are missing. State "No project found" will be on line with cloned repo.

- Choose "Repair repository" in context menu (right-click on repo)
- Select "Create project meta-data" and click ok
- Choose Format "Tonel" instead of Filetree and then ok
-
Select your repo and right-click again, Choose "Packages"

-
Click '+' icon to add your packages (including extenstions) to your repo
-
Select desired packages and then ok

- Right click on your repo and choose "Commit"
- Type message to your commit, review changes
- Select "Push changes to origin/main"

- Type missing git properties (Github name, email)

That's it! Check your changes on Gihtub.


- Right click on repo in Pharo and select "Github -> Create new branch for an issue"

- Select a remote branch (depending if you want to pull title from issue on your own repo on GH or original repo from which you did fork)
- Put referencing issue nr. (title will be pulled from issue on GH)
- Then right click and select "commit" and then "Push"
- Put "Fixes #" on first line and add description on additional lines and click "commit"
- Right click on repo and choose "Gitbub -> Create Pull request"
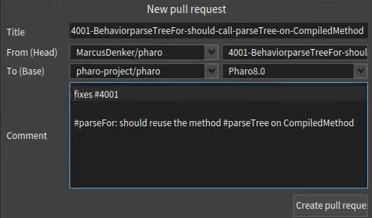
- Check head branch and remote (base) branch and press "Create pull request"
- Define in repo BaselineOfMyProject class like this (where MyProject is name of your project):
BaselineOf subclass: #BaselineOfMyProject
	slots: {  }
	classVariables: {  }
	package: 'BaselineOfMyProject'
Then in BaselineOfMyProject class define method that would define project dependencies (example below is simple and doesn't define any package dependencies):
baseline: spec
	<baseline>
	spec
		for: #common
		do: [
			"Define packages from your project to be loaded"
			spec
				package: 'MyProject';
				package: 'MyProject-Tests';
				package: 'MyProject-Gui';
				package: 'MyProject-Gui-Tests';
				package: 'MyProject-Examples' ]
Add package BaselineOfMyProject to your repository (as in step 7). You should see a new changes (new class and method). Commit these changes to git repository and push to your remote GitHub repo.
Next, your previous definition of Baseline can be used to load project using Metacello command. You can try it on fresh empty image to see, if everything works as expected. Project and its packages should be loaded to your image after evaluating:
Metacello new
	repository: {yourGHAccount/{YourRepository};
	baseline: {MyProject};
	load
Note: For more details, how baselines, dependencies and loading work, see this comprehensive guide: How to load GitHub project using Baseline
- On local repo just checkout branch where you want to remove/wipe-out commits
- Check stutus of last commits e.g. by:
git log --pretty=format:"%h - %an, %ar : %s" - Execute e.g.:
git reset --hard HEAD~3(this will remove last 3 commits from local branch) - then execute:
git push origin -fwhich will remove commits also on remote repo
Rebasing is useful when feature or issue branch is based on deprecated state of repo (forked long time ago). Therefore it is useful to sync with main branch and rebase commits from feature branch, so related PR can be merged and conflicts can be resolved.
- To switch to feature branch:
git checkout feature-branch - Rebase commits with main branch:
git rebase main
See more
Squashing is useful to put together multiple commits into just one commit
Step 1: run rebase command:
git rebase -i HEAD~[X] to squash last X commits
Step 2: edit file with commands:
To define what to do wih each commit, you need to edit file and pick first and squash all others:
pick SHA1 commit 1
s SHA2 commit 2
s SHA3 commit 3
...
Details here
This is used when you want to apply commit from different branch and individually copy them do current branch
Step 1: Check out to branch where you want to apply your commits
Step 2: To cherry-pick all the commits from commit A to commit B (where A is older than B), run:
git cherry-pick A^..B
If you want to ignore A itself, run: git cherry-pick A..B
Step 3: Some merge conflicts might occur:
Resolve them (by editing applying incoming or using current changes) and run git cherry-pick --continue
Details here
Using dark dawn UI theme:
Metacello new
	baseline: 'PharoDawnTheme';
	repository: 'github://sebastianconcept/PharoDawnTheme:latest';
	load.
Finding all references: self pointersTo: anObject
or use reference finder by: ReferenceFinder findPathTo: #nil
Inspector can be adopted to show some details that are presented in nicer way than raw. Method with annotation has to be defined, e.g.:
<inspectorPresentationOrder: 1 title: 'Demo'>
    | items |
    items := #( 1 2 3 4 5 6 7 8 ).

    ^ SpListPresenter new
        items: (items collect: [ :e |
            StInspectorTransmissionNode hostObject: e transmissionBlock: [ :theObject | theObject + 100 ] ]);
        display: [ :e | e hostObject ];
        yourself
Note: See all implementors of inspectorPresentationOrder:title: method to see examples.
To see how packages are dependent on each other, evaluate following:
|report|
report := DADependencyChecker new computeImageDependencies.
report knownDependantsOf: 'YourPackage'
"use proper line ending on target platform"
lineEnding := OSPlatform current lineEnding.

"using memory file reference - useful in tests"
memoryFileReference := FileSystem memory root / 'exercises'.
To load:
Metacello new
	repository: 'github://pharo-project/pharo-launcher:dev/src';
	baseline: 'PharoLauncher';
	load
This should work with P8 stable 64 bit
Load Bootstrap that will load Seaside as dependency:
Metacello new
      baseline:'Bootstrap4';
      repository: 'github://astares/Seaside-Bootstrap4:master/src';
      load
TODO
TODO
	Metacello new
    baseline:'Magritte';
    repository: 'github://magritte-metamodel/magritte:master';
	onConflictUseLoaded;
    load.
Deploying tips in AWS: http://forum.world.st/Getting-Pharo-running-on-AWS-td5117353.html
https://pharoweekly.wordpress.com/2020/05/20/deployment-tips-from-the-pros/
http://forum.world.st/running-Pharo8-in-Digitalocean-tt5115160.html
Options to easily setup a custom server: running a virtual machine in Azure, AWS, Google Cloud or elsewhere usually only takes a few minutes. So it's not different from other web deployments: run on a specific port and put a webserver like Apache, Nginx or other in front.
Some more Seaside specific resources:
- https://www.linode.com/docs/guides/deploy-smalltalk-applications-with-seaside/
- http://book.seaside.st/book/advanced/deployment/deployment-preparing
- https://ci.inria.fr/pharo-contribution/job/EnterprisePharoBook/lastSuccessfulBuild/artifact/book-result/DeploymentWeb/DeployForProduction.html
You can also use docker to deploy (see http://wiki.astares.com/pharo/612)