Deploying Scipion: Data Management
In this section, we describe basic principles users need to understand in order to be able to use Scipion with OneData, and also give general recommendations on data handling.
Data handling for Scipion is based on following principles:
- primary storage for the data is a OneData folder,
- when deploying a Scipion instance, the data is copied onto computation nodes,
- to protect the data, locking is in place--a primary storage folder can be deployed just once at the same time. To deploy it somewhere else, un-deploy where it is currently deployed,
- working data is periodically copied into OneData to keep the primary storage in sync with the working environment,
- when un-deploying a Scipion instance, the data is finally copied back into OneData and the computation nodes are cleaned and released.
When working with Scipion, it is customary that large input files need to be accessible from various folders. In order to prevent copying them unnecessarily, users use symbolic links to do so. Note that OneData does not support symbolic links at all (as in `Elvis didn't do no drugs'), making it an ideal storage place for such data. As symbolic links are an extremely useful mechanism with Scipion, symbolic links in the working folder are collected and stored in a special file in OneData so that they can be re-created when deploying the folder.
Note:
- do not use " and/or newline characters in file names
- folder called by default ".deployment_status_do_not_delete" contains lock files. Do not tamper with it unless you fully understand what you are doing. Your work may be overwritten when those files get damaged.
- file .deployment_status_do_not_delete/lock contains information where the deployment has been made, when and with what parameters. The lock file may need to be manually deleted in case when the deployment is destroyed in a non-standard way. Make doubly sure that the deployment no longer exists before removing the lock forcibly.
- the OneData folder is mounted on computation nodes using FUSE. After deployment, the data in the FUSE mount get regularly overwritten with the working copy, do not access it directly. The working copy must reside on a volume supporting symbolic links, and performance reasons play a significant role in this design decision, too.
In order to obtain access to West-Life project resources, you need to be a member of the West-Life Virtual Organisation. To become one, go and register at https://perun.cesnet.cz/westlife/registrar/?vo=WeNMR&locale=en.
You need access to the OneData storage system. You can choose any OneData provider to your liking, here we demonstrate how to get access to the CNAF instance. Go to https://onezone.cloud.cnaf.infn.it/#/home/login. Choose logging in using West-Life (the small orange button with strange symbols resembling letters W and L). Create a storage space using CNAF documentation FIXME WHERE? You may also ask CNAF to provide some storage space for you, the procedure is described in CNAF documentation.
In order to continue, we expect you to have access to a OneData world and you have a data provider there ("a green storage symbol on the map" in OneData).
In this example, we use https://scipion.westlife.dyn.cerit-sc.cz/ as a portal to control deployment of Scipion instances. You may have been advised by your administrator where your portal lives, in that case, use that name instead of the CERIT-SC instance. You can log into the portal provided you are a member of the West-Life Virtual Organisation.
To create a new deployment, click +CREATE NEW. Choose a size of the deployment, project name to your liking, and project duration. Note that the project will get un-deployed when the time runs out.
There are two more mandatory fields describing where the data repository in OneData resides, OneData URL and access token. Construction of those fields will be discussed in detail here.
In order to construct the OneData URL, log into OneData, choose your provider and click "Go to your data" there. In the upper right corner, you find your name. Click on it and select "About this provider". You shell find a screen like this:
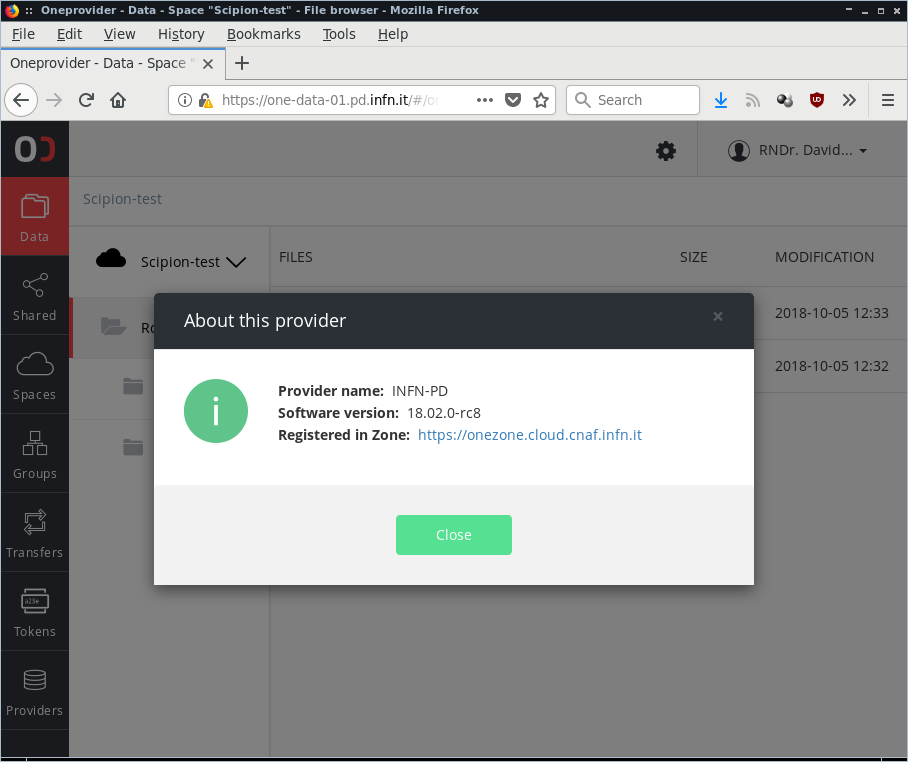
Note the "Registered in Zone" field. This is how your OneData URL starts. Copy it into the OneData URL field and close the "About this provider" window. The OneData URL is not completed yet. The address must be followed by the complete path to the folder you want to be deployed. This is how you construct it:
 Click through your way to the folder you want to use as the basis for deployment.
Note: you'd better create at least one file in the folder. OneData tends to drop empty folders unpredictably which would cause the deployment to fail.
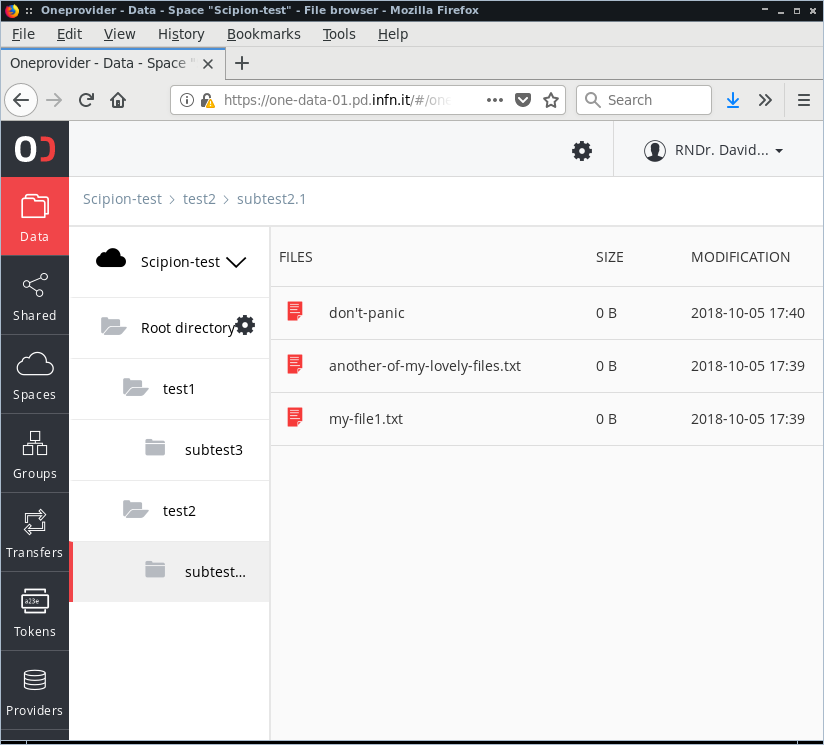
Now, suppose we want to deploy currently opened folder. Note the breadcrumbs in the upper left part of the screen, stating "Scipion-test > test2 > subtest2.1". This is the path in the repository.
So the full OneData URL will consist of the "Registered in Zone" followed with the path to the folder we have just identified, its component divided with slash symbols. Like this: "https://onezone.cloud.cnaf.infn.it/Scipion-test/test2/subtest2.1/".
Note: the path is case-sensitive.
The last field in the form is "OneData access token". In OneData, click on Tokens on the left side. Either use existing token, or (better) create a new one with "Create a new access token". Copy the token (you can use the small clipboard icon) and paste it to the deployment form.
Go for "Create" and wait a while until the system gets deployed.
Note: "client version" should be an extra field here as they are completely incompatible one with another.