-
Notifications
You must be signed in to change notification settings - Fork 2
Build From Scratch
This project is conformed by three parts:
I. The Videocall Application.
II. The Physical Interface. (Optional)
III. The Gun remote control. (Optional)
Pre-requisites:
- Have Node.js (v^4.4.3) installed on the machine that runs the application.
Material Needed:
- 2 Computers with speakers & microphone available.
- 2 Usb Cameras (high-resolution recommended).
- Internet connection on both computers.
How to Start?
Clone the repository of the project from Github:
https://github.com/Nearsoft/office-portal.git
Install the dependencies of the project using:
npm install
bower install
You can test the health of the project using:
npm test
Once the project is downloaded you can start the service using:
npm start
Note: Portal-NS runs the application on your localhost, it is needed to configure your public IP address or use an application as “Ngrok” to share the connection URL of Office-Portal with another machine.
Once you have the App running:
I. The videocall starts automatically when the app is running and 2 devices connect to the app URL on port 5000.
II. The Play/Pause Function:
- a) You can pause/resume the videocall with your computer keyboard using the "R" key.
or
- b) Press the trigger from the Gun remote control (optional).
Office-Portal is created with the purpose of making a video conference system but embedded as a realistic platform to enhance the talking experience in a more stimulant and realistic way.
The idea was to simulate a sci-fi portal just as in the game "Portal by Valve"

The idea was to cover the video screen to enhance a more realistic feeling when talking with someone.
so, how do we do it?
Material:
- 1 Tv screen or large pc monitor.
- Paper, Wood or the material of your choose to wrap the display leaving only an oval on it.
Instructions:
- Choose a place to mount the tv screen.
- Mount the display, you can mount it horizontally or vertically, we preffer it vertically.
- Wrap the display with the material of your choose (It's up to you so, be creative :)), leaving only an oval over the display.
- If you want to add decoration details to make it feel more realistic or customize it, feel free to it.
- Portal look & feel done.
Here are some pictures to describe how we do it:
First we open up a hole in a wall to embbed a tv screen inside of it.

Then we configure our computer to display vertically on the tv screen.

We mount the tv inside the hole.

After that we installed a wall with an oval over the hole.
(It starts to look good ;))

When the app is running but the streaming is paused, or there is only one client connected, it displays a waving animation that looks pretty cool!

In the bottom part of the hole, we have an apple mac mini computer running the app and an arduino connected to a raspberry to capture the gun remote control signal.
And That is how we do it.
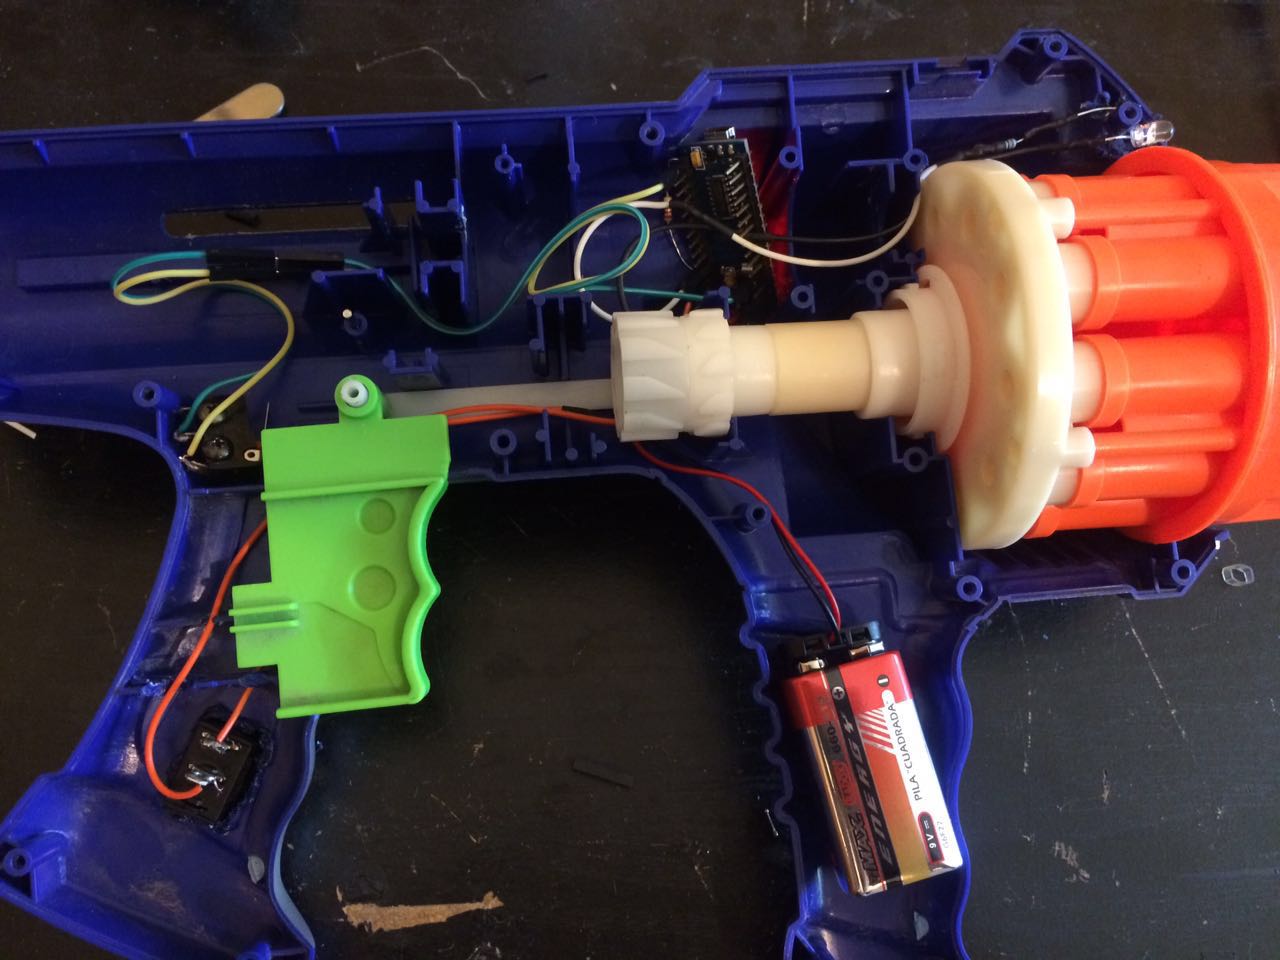
##III. The Gun remote control. (Optional) (Pending) A toy gun was used as a remote control to turn on and off the video and audio transmission to make the experience more like a game. An Arduino Nano and a FM transmitter and receiver were used in the gun to communicate the raspberry pi and the arduino.
Here's what you need:
- Arduino nano
- Arduino (uno/nano/mega/etc...)
- Raspberry pi (2 or higher)
- FM transmitter and receiver for arduino
- 9V battery
- A button
- A switch
- A toy gun
First we upload gun.ino into the arduino nano. Then we have to place the circuit inside the gun, basicly the circuit consist in a button and the FM transmitter.
This is how it looks on the inside:

On the receiver side we use an arduino mega/uno/nano and upload receptor.ino. Then we just wire the circuit (Add a 1k resistor between the raspberry and the base of each transistor):
The raspberry pi must run the node file gun.js.