Build and Install BESS
This page provides the step-by-step guide to install and get started with BESS! If you have any questions, feel free to file an issue to get help from the BESS development team. We recommend you read the BESS Overview first to get a lay of the land before getting started.
If you want to run BESS in a bare-metal machine, please skip this section. Alternatively, if you're just looking to play around with BESS and get started, many developers run BESS inside of a virtual machine. A known-good configuration is running in VirtualBox with a fresh Ubuntu 16.04 install. Make sure your VM has at least two vcpus and 5GB of memory. If you already have VirtualBox and Vagrant installed, the easiest way is to use the built-in Vagrant script:
git clone https://github.com/NetSys/bess.git
cd bess/env
vagrant up
Vagrant will automatically provision the VM and install all the dependencies for you. The cloned BESS codebase in the host machine is mapped to /opt/bess in the VM. You should be able to build BESS in the VM:
vagrant ssh
cd /opt/bess
./build.py
This should build BESS for you. You should be able to start up BESS and run a sample configuration.
BESS runs best under 64-bit Ubuntu 16.04 or 18.04 LTS. It's easiest to start with a fresh install of the operating system.
Once you have your host configured, go ahead and clone the BESS codebase and cd to the new directory:
git clone https://github.com/NetSys/bess.git
cd bess/
On Ubuntu 18.04 you can install all of the BESS build dependencies with the following commmand.
sudo apt install make apt-transport-https ca-certificates g++ make pkg-config libunwind8-dev liblzma-dev zlib1g-dev libpcap-dev libssl-dev libnuma-dev git python python-pip python-scapy libgflags-dev libgoogle-glog-dev libgraph-easy-perl libgtest-dev libgrpc++-dev libprotobuf-dev libc-ares-dev libbenchmark-dev libgtest-dev protobuf-compiler-grpc
# The following packages are needed to run bessctl
pip install --user protobuf grpcio scapy
For older releases, BESS conveniently comes with all of its dependencies bundled in an Ansible script -- all you have to do is run the script and it will set everything up. A warning: the script will aggressively replace any conflicting packages (this is why we recommend a fresh install). Here's what to run in your shell:
sudo apt-get install -y software-properties-common
sudo apt-add-repository -y ppa:ansible/ansible
sudo apt-get update
sudo apt-get install -y ansible
ansible-playbook -i localhost, -c local env/build-dep.yml
ansible-playbook -i localhost, -c local env/runtime.yml  # if you want to run BESS on the same machine.
sudo reboot
Return to the CM shell and reload vagrant in order to remount the /opt/bess directory:
vagrant up
vagrant reload
vagrant ssh
Every time you reboot the system, you have to set up hugepages. Note that this step is not just for installation! Every time you reboot and want to use bess, you need to run the following:
# For single-node systems
sudo sysctl vm.nr_hugepages=1024

# For multi-node (NUMA) systems
echo 1024 | sudo tee /sys/devices/system/node/node0/hugepages/hugepages-2048kB/nr_hugepages
echo 1024 | sudo tee /sys/devices/system/node/node1/hugepages/hugepages-2048kB/nr_hugepages
Return to your bess/ directory (the downloaded, cloned repository) and run ./build.py. This should build BESS for you.
Assuming building BESS was successful, you should now be ready to use bessctl to start up a bessd switch and configure it. Here's what to do from your bess/ directory:
$ cd bessctl/
$ ./bessctl
Type "help" for more information.
Connection to localhost:10514 failed
Perhaps bessd daemon is not running locally? Try "daemon start".
<disconnected> $
You will now enter a command line interface. Don't worry about the Connection to localhost:10514 failed warning; it just tells you that the BESS daemon (bessd) is not running. Here's how to start bessd:
> daemon start
You should now see a command prompt that says localhost:10514. This means that you have successfully started a bessd instance (which is currently forwarding no packets) and that your bessctl instance is communicating with bessd over a local socket. To make your bessd instance forward some packets, try running a sample script!
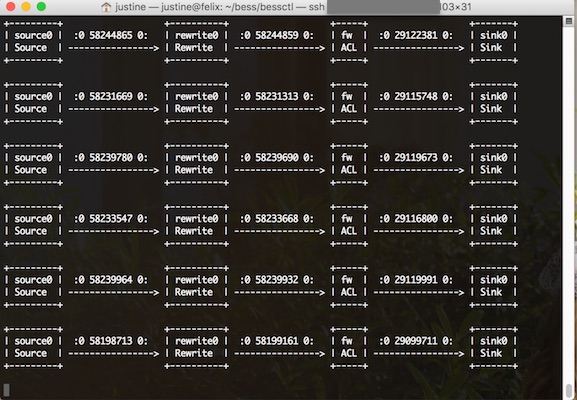
> run samples/acl
> monitor pipeline
run samples/acl (located at bessctl/conf/samples/acl.bess file) starts up a sample configuration of modules. bessd is not connected to any network interface cards or VMs so it creates its own packets to forward using a Source module; it then forwards them through an ACL module which filters out half of the packets (those that match a blacklisted term). monitor pipeline is a quick way to see how packets are flowing in your bessd configuration -- you can always type monitor pipeline to see all of the modules and ports in the system and how many packets per second are flowing through them.
To experiment more with bessctl, you might try running some other configurations (run samples/ and tab will show you a list of auto-complete options to play with) or type help to get a list of available commands.
From here, we recommend that you learn how to write your own BESS configuration scripts (so that you can choose from your own modules and connect them together how you want).