-
Notifications
You must be signed in to change notification settings - Fork 141
Development workflow
Contents:
- Getting started
- Coding conventions in QMCPACK
- Workflow process
- Code reviews
- Release process
- Issue handling
- Private repositories
- List of open questions
- FAQ/Troubleshooting
- References
Developers are expected to be broadly familiar with the Development Workflow, coding conventions, and code review process (etc.) described on this page. For simple instructions on developing and contributing a feature see Workflow summary.
Questions or suggestions can be made at List of open questions or by contacting the developers.
We expect to enforce a consistent coding convention in QMCPACK. See the [coding standards manual section] (https://github.com/QMCPACK/qmcpack/blob/develop/manual/coding_standards.tex) The Clang-Format rule to define and maintain the convention can be found at src/.clang_format. But there are conventions beyond formatting, here are some things to keep in mind for new C++ code in pull requests:
- Variable/function/class names should be self-documenting and follow the variable_name/functionName/ClassName conventions.
- There should be no commented out code
- Test code should be moved to unit tests so that it stays up-to-date with changes in the code that is being tested.
- Alternate implementations should have their own code paths, e.g. activated via ifdefs or conditional build options in CmakeLists.txt. They should not be scattered through files also used by other implementations. They should be tested with unit tests.
New code submitted in pull requests should be neat and have a uniform formatting conforming to QMCPACK's .clang_format file. To help with this, one can use the ClangFormat tool that comes with the LLVM Clang compiler. It can be used as a command-line file processor, or it can integrate with most editors.
$ clang-format -i <source.cpp>
This will format 'source.cpp' in-place (over-writing the original) automatically using the .clang-format configuration file included with the QMCPACK source code. Read the detailed QMCPACK coding standards here
New code in pull requests should be thoroughly documented using Doxygen. Here is a checklist to consider:
- Do comments exist and describe the intent of the code?
- Are all functions commented?
- Is any unusual behavior or edge-case handling described?
- Is the use and function of third-party libraries documented?
- Are data structures and units of measurement explained?
- Is there any incomplete code? If so, should it be removed or flagged with a suitable marker like ‘\TODO’?
This section will first describe how to set up a git environment to use GitHub for QMCPACK development, and then how to use that environment to develop new features and contribute them back to the QMCPACK project.
Once your git-QMCPACK development environment is set up, day-to-day development can commence. This is a cyclic process that starts with creating a new branch for a feature, and ends when that feature branch gets merged into the public QMCPACK repository via a pull request.
All pull requests must come from a feature branch that is branched from 'develop'.
Note that there are various (equally valid) ways to organize your own repositories, clones, remotes, etc. This page compares two common variants; see that page to decide which is preferable to you. This page currently assumes variant #1.
Note: Just reading this summary won't be enough the first time. Read the whole document!.
(Using variant #1 described in this page.)
- Setup your environment and fork the project on GitHub from QMCPACK/qmcpack to create your copy gituser/qmcpack
- Clone the code from github_user_id/qmcpack:
git clone <repo_url> - Create a new branch from 'develop' for your bugfix, feature, or enhancement:
git branch <feature_branch> - Switch your workspace to a newly created branch:
git checkout <feature_branch> - Commit your changes:
git commit(be sure your environment is correctly configured for committing) - Push the changes in your branch to your copy github_user_id/qmcpack :
git push origin <feature_branch>. If the default upstream for the branch is not defined, add the-uflag to thegit pushcommand. This flag sets default upstream for the branch. - Submit your change to the QMCPACK/qmcpack by opening a pull request. After submitting the PR, the code is reviewed by the reviewers/maintainers according to the Code review checklist. Once the reviewers and PR author reach an agreement, the author asks a maintainer to merge the changes.
- After the PR is merged, delete the branch:
git push origin :<feature_branch>and/orgit branch -d <feature_branch>
The steps in this section should be a one-time process. The first step in the recurrent day-to-day development of QMCPACK using git starts with the Create a separate branch step below.
Git attaches a name and email address to each commit in the logs, and this email address is also used to associate commits with the contributing GitHub account. Be sure that the email address you use here is one associated with your GitHub account (add email addresses under account settings), as this is used to link GitHub users to git commit authors. Use the following commands on any machine where you will be using git for QMCPACK development (replacing your name and email as appropriate):
$ git config --global user.name "Firstname Lastname"
$ git config --global user.email "[email protected]"
Using --global is optional and places the supplied information into ~/.gitconfig where more useful configuration can be added. Here is a simple ~/.gitconfig. Git has many useful optional settings, see $ git --help config for more details.
[user]
    name = Firstname Lastname
    email = [email protected]

[core]
    whitespace=fix,-indent-with-non-tab,trailing-space,cr-at-eol
    pager = less -RMFX
    excludesfile = /home/bob/.gitignore

[credential]
   helper = cache --timeout=3600

[alias]
    st = status
    ci = commit
    co = checkout
    br = branch
    logfiles = log --name-status
    logdiff = log -p --stat
    l = log --graph --decorate --oneline
    la = log --graph --decorate --oneline --all
    ls = ls-files

[push]
    default = simple
-
You can see information about the current branch and state of a repository directly in a Bash or Zsh prompt using "git prompt" (https://github.com/git/git/blob/master/contrib/completion/git-prompt.sh). It only adds the git-related information to the prompt when the current directory is part of a git repository. Instructions for BASH-family shells are included in the script. This is the excerpt from my .zshrc that configures the prompt:
  source ~/.git-prompt.sh
  setopt prompt_subst

  export GIT_PS1_SHOWDIRTYSTATE=true
  export GIT_PS1_SHOWUNTRACKEDFILES=true
  export GIT_PS1_SHOWUPSTREAM="auto"
  export GIT_PS1_SHOWCOLORHINTS=true

  PROMPT='$WHITE%m$CYAN:$CYAN%3~$YELLOW$(__git_ps1 "(%s)")$CYAN-| $NOCOLOR'
This configuration will cause the left side prompt to show the current branch name, if there are untracked files in the repository, if there are uncommitted changes in the repository, and whether the local branch is behind or ahead of the remote tracking branch.
In order to fork the QMCPACK repository, go to https://github.com/QMCPACK/qmcpack and press the "Fork" button in the upper right corner.
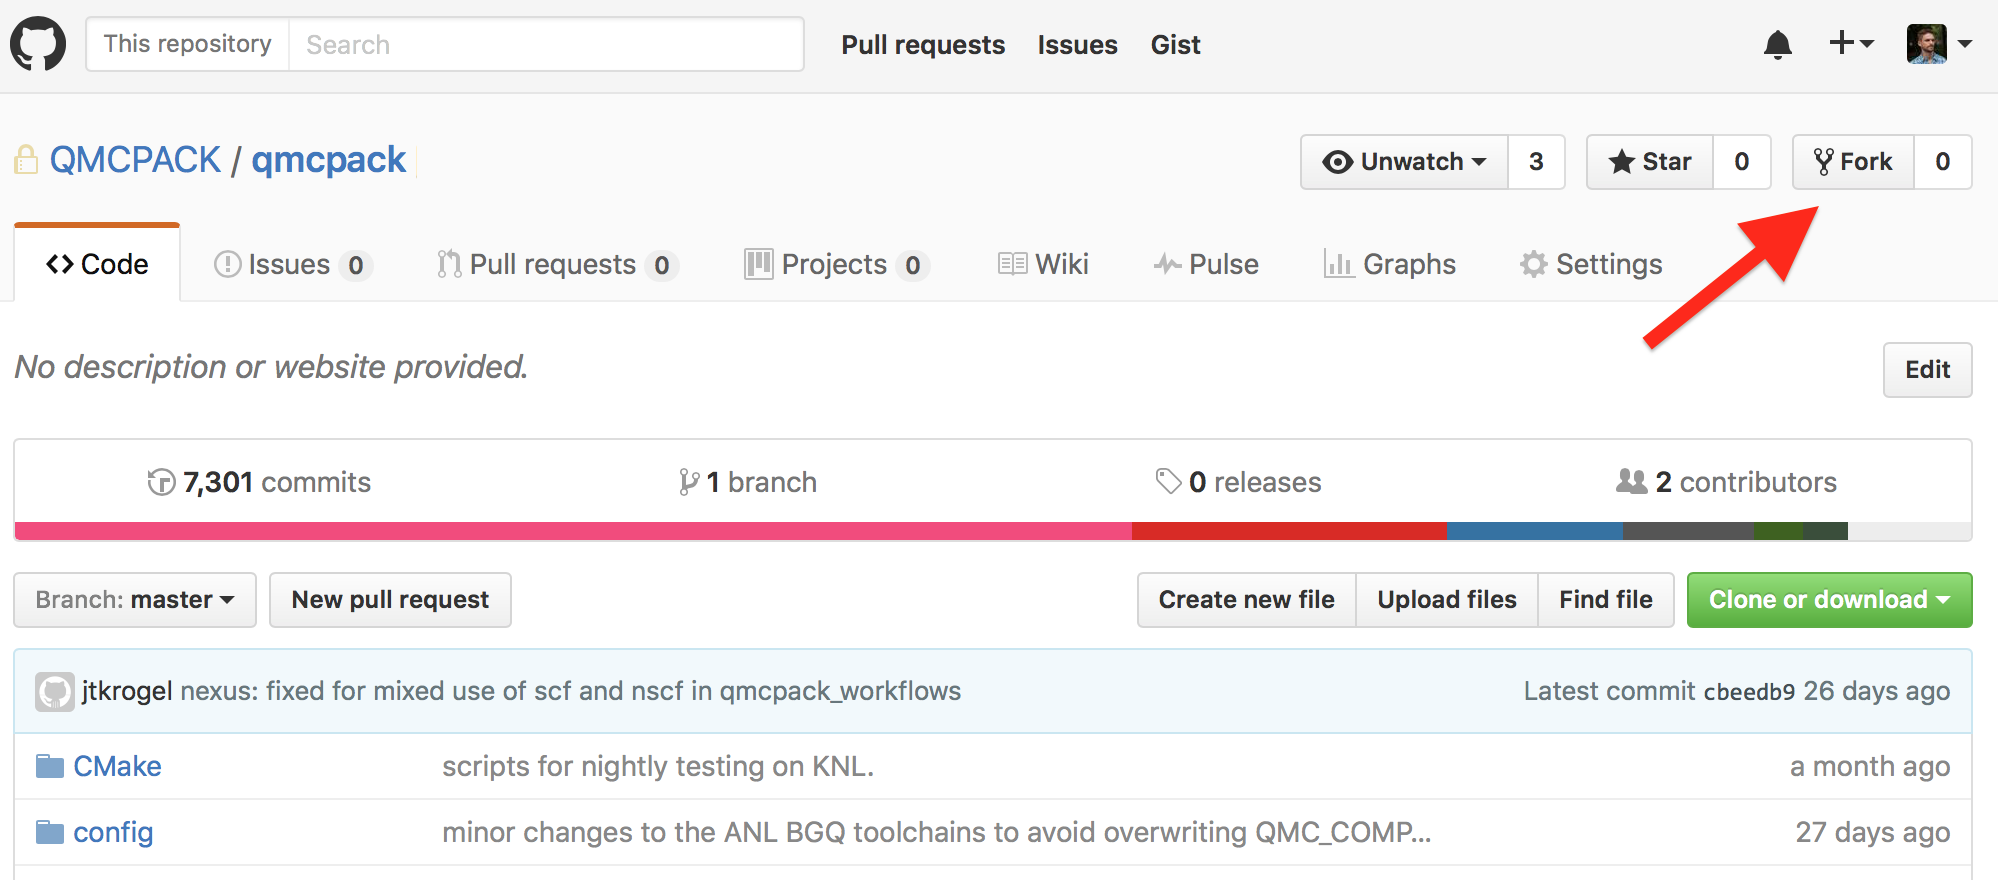
Forking a repository will create a copy of it under your own GitHub user account where you will be able to publish your changes before submitting a pull request back to the original QMCPACK public code base.
Cloning your QMCPACK fork will download the code to your local machine so that you can make edits. This downloads the entire repository (currently ~430MB).
$ git clone https://github.com/github_user_id/qmcpack.git
To avoid typing your username for remote git operations, you can modify the above command to add your GitHub user ID before the URL:
$ git clone https://[email protected]/github_user_id/qmcpack.git
At this point, your git-QMCPACK development environment should be set up and ready for day-to-day development activities.
All development in QMCPACK should take place in "topic branches" or "feature branches." These are created from the long-lived develop branch, and once completed, they will be merged back into develop via a pull request. Branch names should be a brief description of the branch's purpose, and could include an issue or bug number.
If it has been a while since you cloned the local repository, you may want to be sure your local develop branch is up to date with QMCPACK/qmcpack's develop:
-
(One time only) Be sure that you have your local repository configured to see the upstream branches.
$ git remote -v origin https://[email protected]/grahamlopez/qmcpack.git (fetch) origin https://[email protected]/grahamlopez/qmcpack.git (push) $ git remote add upstream https://[email protected]/QMCPACK/qmcpack.git $ git remote -v origin https://[email protected]/grahamlopez/qmcpack.git (fetch) origin https://[email protected]/grahamlopez/qmcpack.git (push) upstream https://[email protected]/QMCPACK/qmcpack (fetch) upstream https://[email protected]/QMCPACK/qmcpack (push) -
(One time only) Configure your local 'develop' branch to track upstream.
 $ git fetch upstream
 remote: Counting objects: 75, done.
 remote: Compressing objects: 100% (36/36), done.
 remote: Total 75 (delta 38), reused 24 (delta 24), pack-reused 15
 Unpacking objects: 100% (75/75), done.
 From https://github.com/QMCPACK/qmcpack
  * [new branch]      develop    -> upstream/develop
  * [new branch]      master     -> upstream/master
  * [new tag]         v3.0.0     -> v3.0.0

 $ git branch -vv
 * develop 81f7038 [origin/develop] Some current commit message from the logs

 $ git branch develop -u upstream/develop
 Branch develop set up to track remote branch develop from upstream.


 $ git branch -vv
 * develop 81f7038 [upstream/develop] Some current commit message from the logs
(If your git version doesn't support
git branch -u, see the FAQ/Troubleshooting at the bottom of the page.) -
Pull new changes from the upstream repository into your local repository.
$ git checkout develop $ git pull -
To create a new branch from
develop:$ git checkout develop $ git checkout -b <feature_branch>
To see all of the branches in your local repository with some useful information about them, use
$ git branch -vv
The running of the tests is controlled by the ctest command in the build directory.
Run the unit tests with ctest -L unit. See the QMCPACK manual for more information about running and writing unit tests. These take less than a minute, and should be run before code check-ins.
Run the short system tests with ctest -R short. The pass/fail criteria are statistical, so there may be occasional failures by chance.
There are also longer system tests that accumulate better statistics. Run them with ctest -R long. These take several hours to run.
Running 'ctest' with no arguments also runs the long tests, which is probably not what you want most of the time.
(TODO: add additional information about how/why/when to run the different types of QMCPACK tests)
During development, there are a few git tools/commands that can be used to help manage and organize code commits.
$ git status |
check which files have been changed |
$ git add new_file.cpp |
add new and changed files to the index to be committed |
$ git diff |
see changes in the working directory vs. the previous commit |
$ git diff --staged |
see changes in the index vs. the previous commit |
$ git commit |
locally commit the changes staged in the index |
$ git commit -a |
commit all changed/deleted files (automatic staging) |
$ git commit -i |
interactively commit parts of changed files |
A git commit message has two parts: a summary (the first line) and the description.
Formatting the commit message
- There should be a single line summary of 71 characters or less which allows the one-line form of the
git logutility to display the summary without wrapping. - A blank line separates the summary and the body.
- All lines of the body should be a maximum of 78 characters to display correctly in all terminal types and online tools.
There are several things that make a truly excellent commit message. Projects that consistently make an effort at good commit messages are much more pleasant to work with than those whose histories have "bug fix," "typo," and "new feature" throughout.
- The first line summary should give a brief description of what the commit does.
git log --onelineand many parts of GitHub only show the first line of the commit, so it is important that the summary be as useful as possible. - The summary can be given a larger context using a colon by convention. For example, "inverse update: added cublas capability to Fahy algorithm" This isn't mandatory since one can get the files changed by a commit, but it adds convenience when scanning through the logs and is a good practice.
- The description should be written in plain English and give details as to what the commit does, known issues, and an example if possible.
([MGL] squash typos/bugfixes out of intermediate commits)
After you are confident that your branch passes all tests and follows the Coding conventions in QMCPACK, you are ready to submit a pull request.
Pull requests for branches in the main QMCPACK/qmcpack repository will be rejected. Rather, branches should be pushed to a fork, and the pull request submitted from there. This is for a few reasons: 1) It keeps the main repository cleaner while developers to maintain responsibility for branches that they want (or not) to keep. 2) It is more consistent and easier for maintainers when all developers to use the same workflow process. 3) Minimizing direct interactions (e.g. push/pull) with the main repository adds some safety against mistakes.
If you followed the steps above, your GitHub qmcpack fork will be automatically set up as "origin" in your local git repository. ("origin" refers by default to the remote repository that the local repository was cloned from using git clone)
-
Push your branch that has the new feature to your forked qmcpack repository on GitHub.
$ git push -u origin <feature_branch> -
Create the pull request using the GitHub web interface. Once you have pushed your branch to GitHub, several buttons will show up that allow you to start a pull request. They all eventually accomplish the same thing.
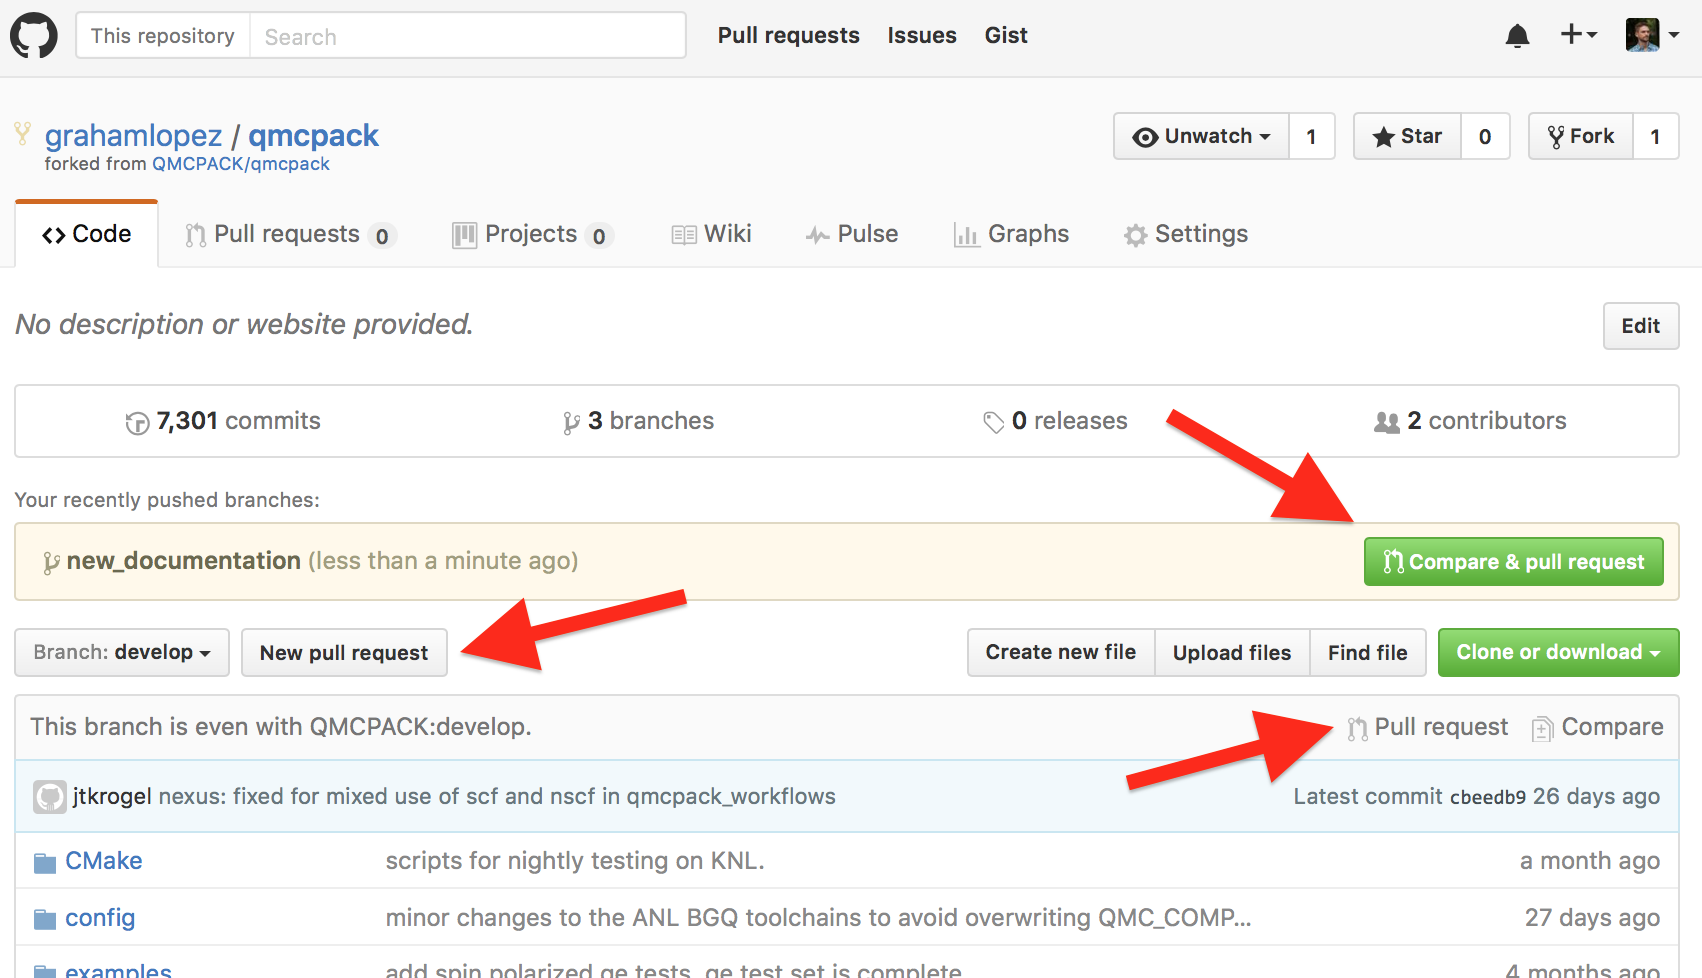
On the next screen, there may not be any changes shown. Be sure to specify the correct source and destination branches for the pull request using the drop down menus.
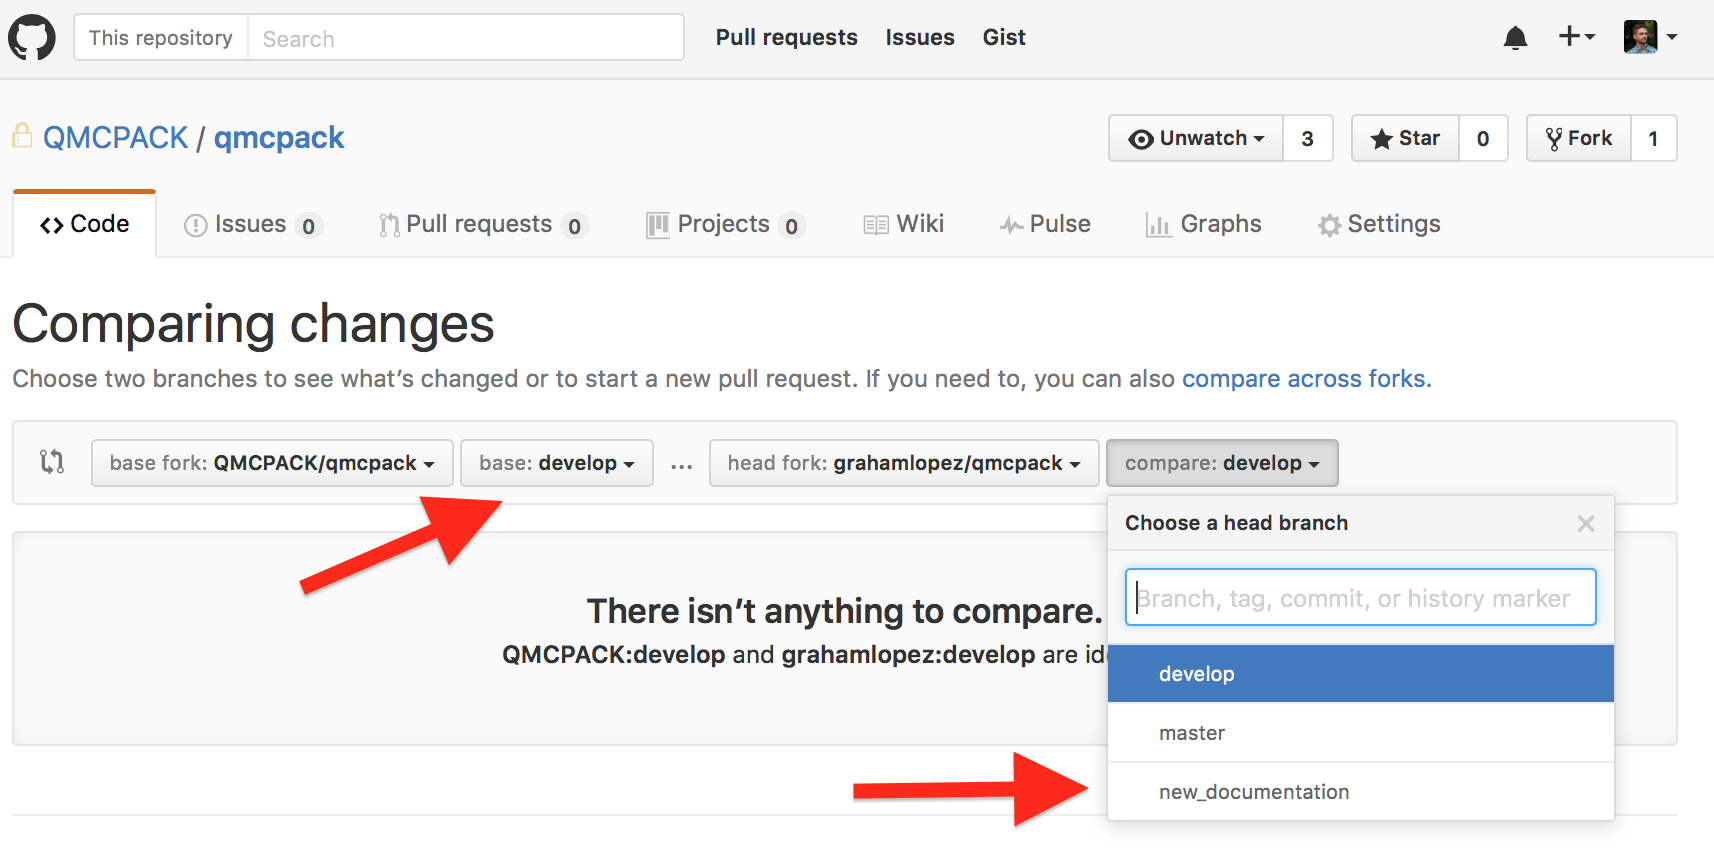
Just like commit messages, the pull request title and description should provide good documentation and historical reference.
See also GitHub's "How to write the perfect pull request" page.
- The title should be brief and descriptive.
- Do not reference issues or bug numbers in the title. These go in the description.
- Prefix the title with "[WIP]" if you don't want the PR merged yet, but do want some discussion or code review for your work. You can close the PR to keep working, or remove the "[WIP]" prefix when it is ready to be considered for merge.
- The description describes what you have done.
- Include references to issues and bugs with "#1234", and GitHub will automatically create the link for you. This syntax also works in the PR discussion.
- If you include auto-close syntax in the description, the corresponding GitHub issue in the same repository will be automatically closed when the PR is merged. This syntax doesn't work in the pull request discussion.
- In the PR description or later discussion, you can @mention users or teams that you want to be aware.
It is also recommended that you request the appropriate reviewer(s) that will have some prior expertise about the changes being added by the pull request. e.g. If you modify the optimizer code, currently Eric Neuscamman should be included in the discussion. The reviewers for day-to-day reviews are Mark Dewing, Graham Lopez, and Paul Kent. Larger, more complex and more delicate proposed changes will be reviewed by additional reviewers.

It is very common to need to make changes to the code after the pull request has been submitted, e.g. as a result of code-review and discussion. To update the pull request with new code, simply make the changes in the same branch, commit, and push the new commits to GitHub.
$ git commit
$ git push
Note that if you edit your commit history of the branch under PR in any way, you will need to force push.
$ git push -f
Once in a while, you will need to sync your branch with 'develop' from the original QMCPACK/qmcpack repository. This can happen when:
- Someone tells you that there are merge conflicts
- GitHub/Travis/Jenkins tells you that your branch could not be automatically merged
- You need some new change from 'develop' that was made/merged after you started your branch.
Note that you shouldn't make a habit of merging 'develop' into your feature branch every time there is an update - only if you think it is necessary. Hopefully your feature branches don't last very long anyway, so this issue is mitigated.
If you do need to update your feature branch for one of the reasons listed above, you simply need to merge 'develop' from upstream (QMCPACK/qmcpack).
-
Be sure that you have your local repository 'develop' branch configured to pull from the upstream branches.
 $ git remote -v
 origin  https://[email protected]/grahamlopez/qmcpack.git (fetch)
 origin  https://[email protected]/grahamlopez/qmcpack.git (push)
 upstream    https://[email protected]/QMCPACK/qmcpack (fetch)
 upstream    https://[email protected]/QMCPACK/qmcpack (push)
If you don't see the upstream configured, follow step 1 at Create a separate branch.
-
Pull new changes from the upstream 'develop' into your local feature branch.
 $ git checkout <feature_branch>
 $ git pull upstream develop
Once the branch has been merged into the 'develop' branch QMCPACK/qmcpack from the pull request, you may now delete the branch from your local and/or forked GitHub repositories. The branch in your GitHub fork will normally be deleted for you as part of the merge, but you will still need to delete it from your local repository clones.
To delete a branch in your local repository:
$ git branch -d <feature_branch>
To delete the branch from your remote GitHub fork, you push a null branch (usually not necessary):
$ git push origin :<feature_branch>
If you are asked to review a pull request, please try to have your comments or approval in by the same time (24hrs) of the next business day. This will help to keep discussion active. Once you are done reviewing, please mark the PR as approved. (TODO add screenshot of GitHub gui for how to mark PR as "approved")
Also checkout the thoughtbot guide to code-reviews.
Note that most of these things should be handled by the PR submitter before others review the code in order to make their job easier.
- Is the new code adequately covered by appropriate tests, and do all CI tests pass?
- Does the code follow the QMCPACK coding conventions?
- Is the PR composed of a reasonable hunk (less than 200 lines)? It should be a single logical feature that is as small as possible without breaking other parts of the application.
- Is the code easily understood? Are class/variable/function names descriptive of what they do?
- Is the code adequately documented? See Code documentation.
- Are invalid function inputs and return codes being checked and handled?
- Are any new dependencies being introduced, and can they be avoided?
- Is anything being reimplemented or duplicated that the submitter may not be aware of?
Here is an outline of the process:
- PR comes in for 'develop'
- CI and GitHub checks
- if clean merge or CI failures go unanswered, maintainer asks submitter to fix, and eventually rejects PR.
- maintainer does quick sanity checks
- patch is reasonably sized (smallest possible complete logical feature)
- code formatting
- well commented/documented
- Submitter addresses comments from maintainer(s)
- If required, maintainer tags project developer(s) to review and comment
- Submitter addresses comments from developer(s)
- Once developers and maintainers give '+1', thumbsup, okay, whatever, maintainer continues with Merging a pull request into
develop.
In addition to meeting the technical requirements discussed above, note the following guidelines:
- PR approvers should not approve work they have been involved with.
- Other than for trivial bug fixes or documentation improvements, PRs should only be approved by someone from a different site/organization for proper independent oversight.
- In the event of ambiguity or uncertainty, the PR approvers should all discuss an appropriate process in advance of any approval.
- Currently the status check requires the PR up-to-date with the develop branch. However, a merge of develop to the PR branch can difficulty for review. For this reason, unless there is particular concern, delay updating the PR from develop until the review process is completed.
These could be automated on the server side (more robust but more CI resources), or on the developer/IDE side.
- test coverage
- copyright information
- code formatting
- Create a release candidate branch from develop. Set this branch as protected.
- Update the version numbers in CMakeLists.txt
- Update the CHANGELOG.md with major changes since last release.
- Verify CHANGELOG.md is appropriate with contributors, interested parties. Update as needed.
- Issue a PR to master.
- PR approver verifies that the tests run on at least two distinct architectures, e.g. Intel Xeon, NVIDIA GPU. Rerun the nightlies if source or configuration changes are pushed to the release candidate branch.
- Approve the PR
- Tag the release with the version number, e.g. 3.0.1
- Create a release using the GitHub release tool
- Update http://qmcpack.org/downloads/releases/ , linking to GitHub release tarball, and add news item.
- Issue a PR from master to develop to update the development source with the new versions and any patches made on the release candidate.
- Delete the release candidate branch.
- Announce on google groups.
TODO
Any fork made from the project repo github.com/QMCPACK/qmcpack must be public, since the project repo itself is public. If private development is necessary, the following recipe will create a copy of the project repository that anyone in the QMCPACK GitHub organization will be able to read.
This process should only need to happen once per user, since all privately-developed features can use separate branches in this same repo.
-
Under the QMCPACK/ namespace on Github, click the new repository button.

-
Pick a name (e.g. "bobs_private_qmcpack"), and mark it as Private. Do not initialize with any README, .gitignore, license, or other files.
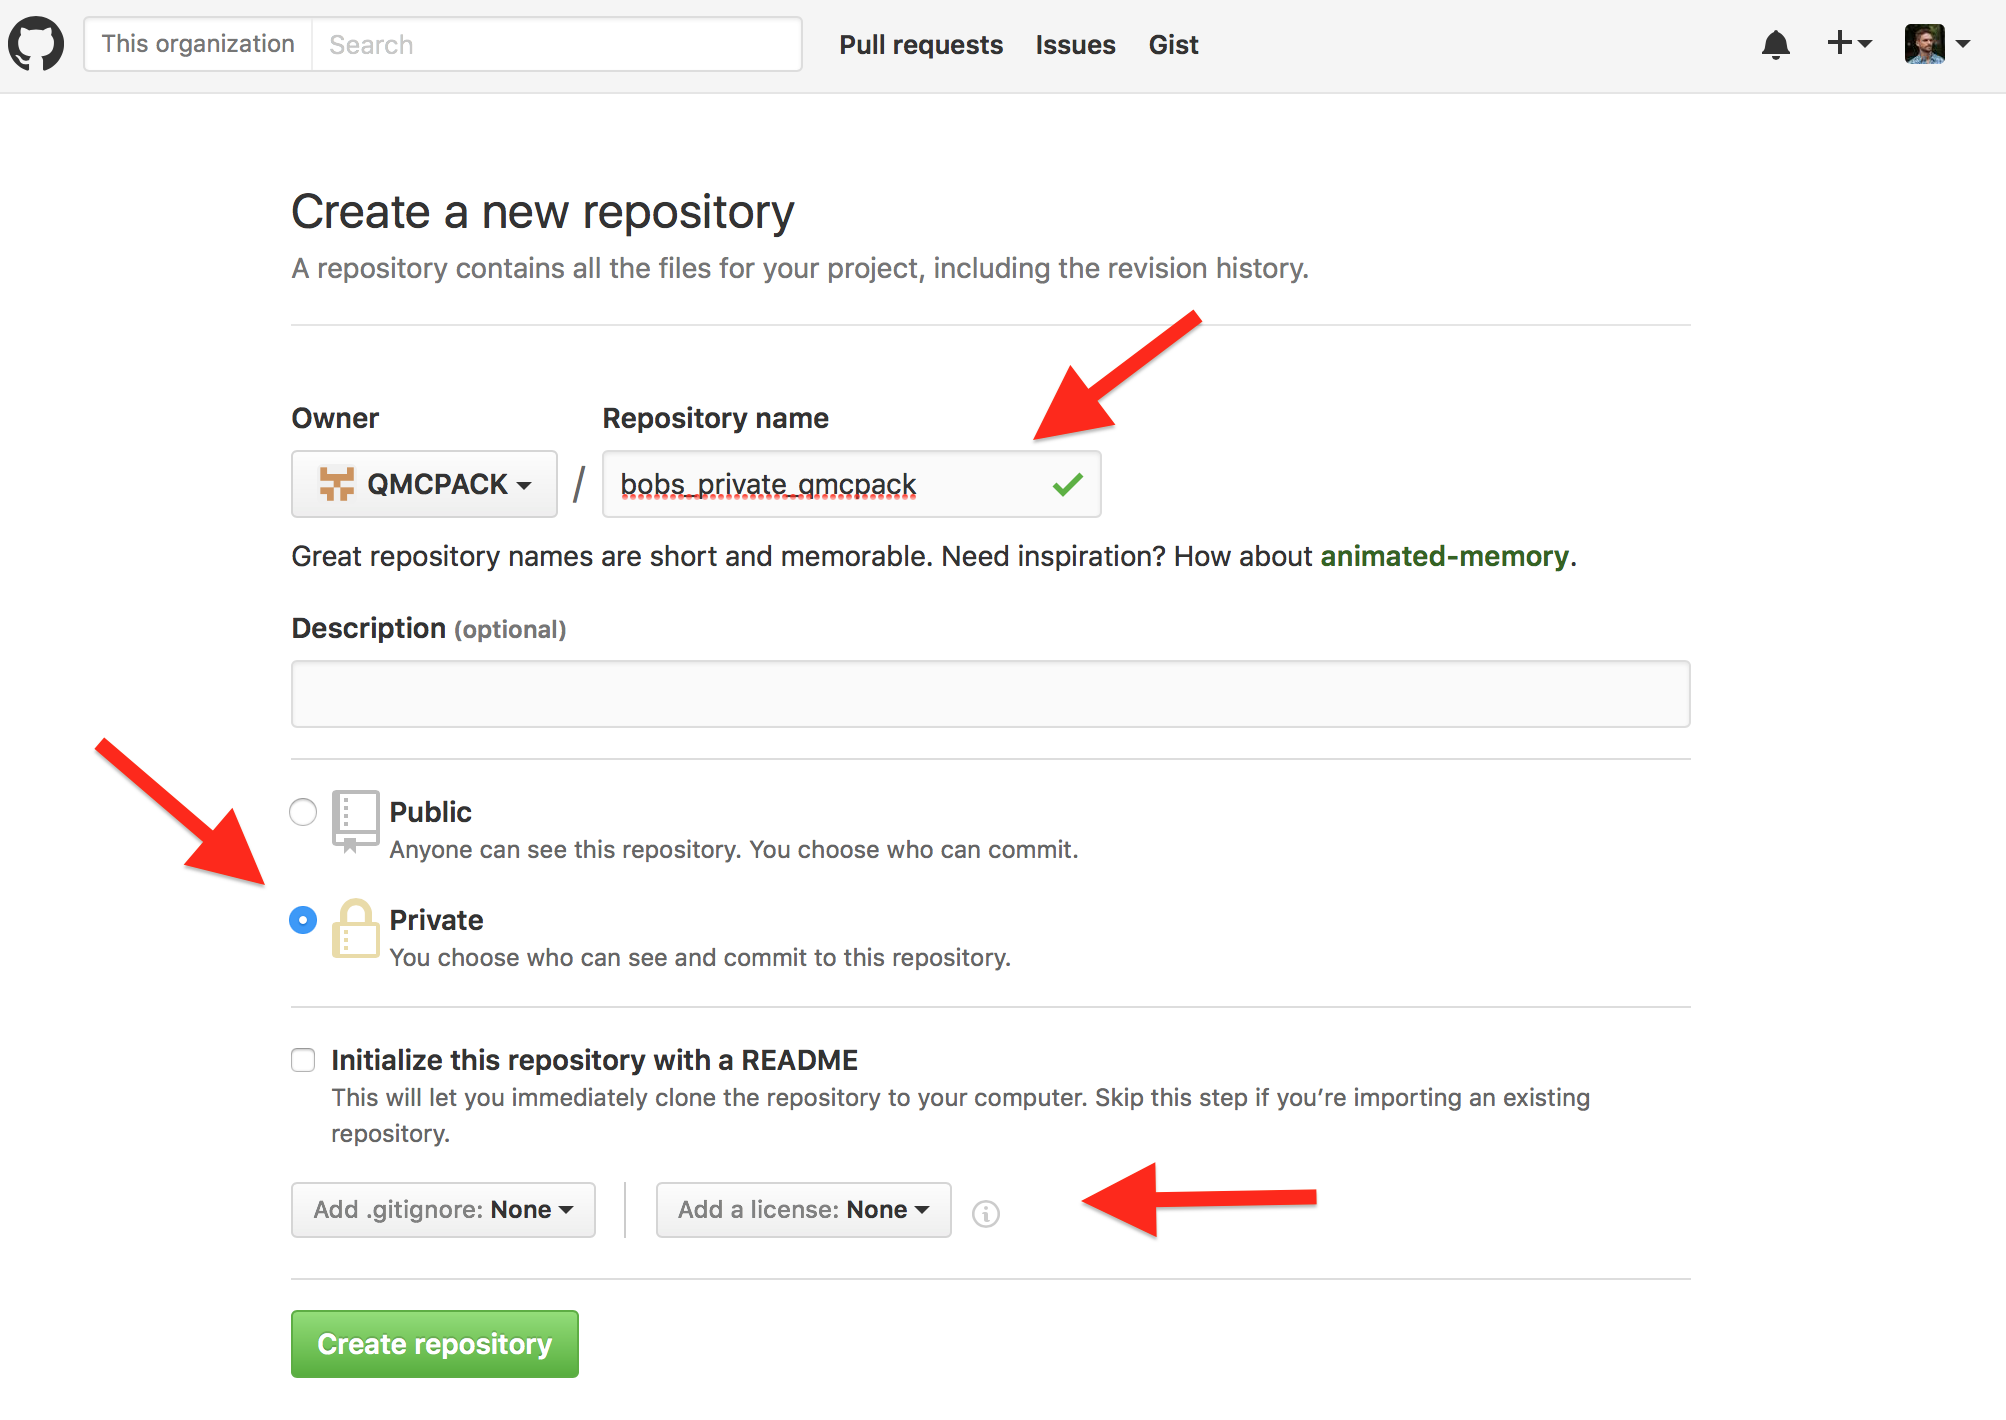
This creates an empty repository at github.com/QMCPACK/bobs_private_qmcpack. Notice that this repository is kept under the "QMCPACK" GitHub account, not the user's Github account.
-
Import the public repository using the "Import Code" button on the GitHub website

and add the source repository's clone url
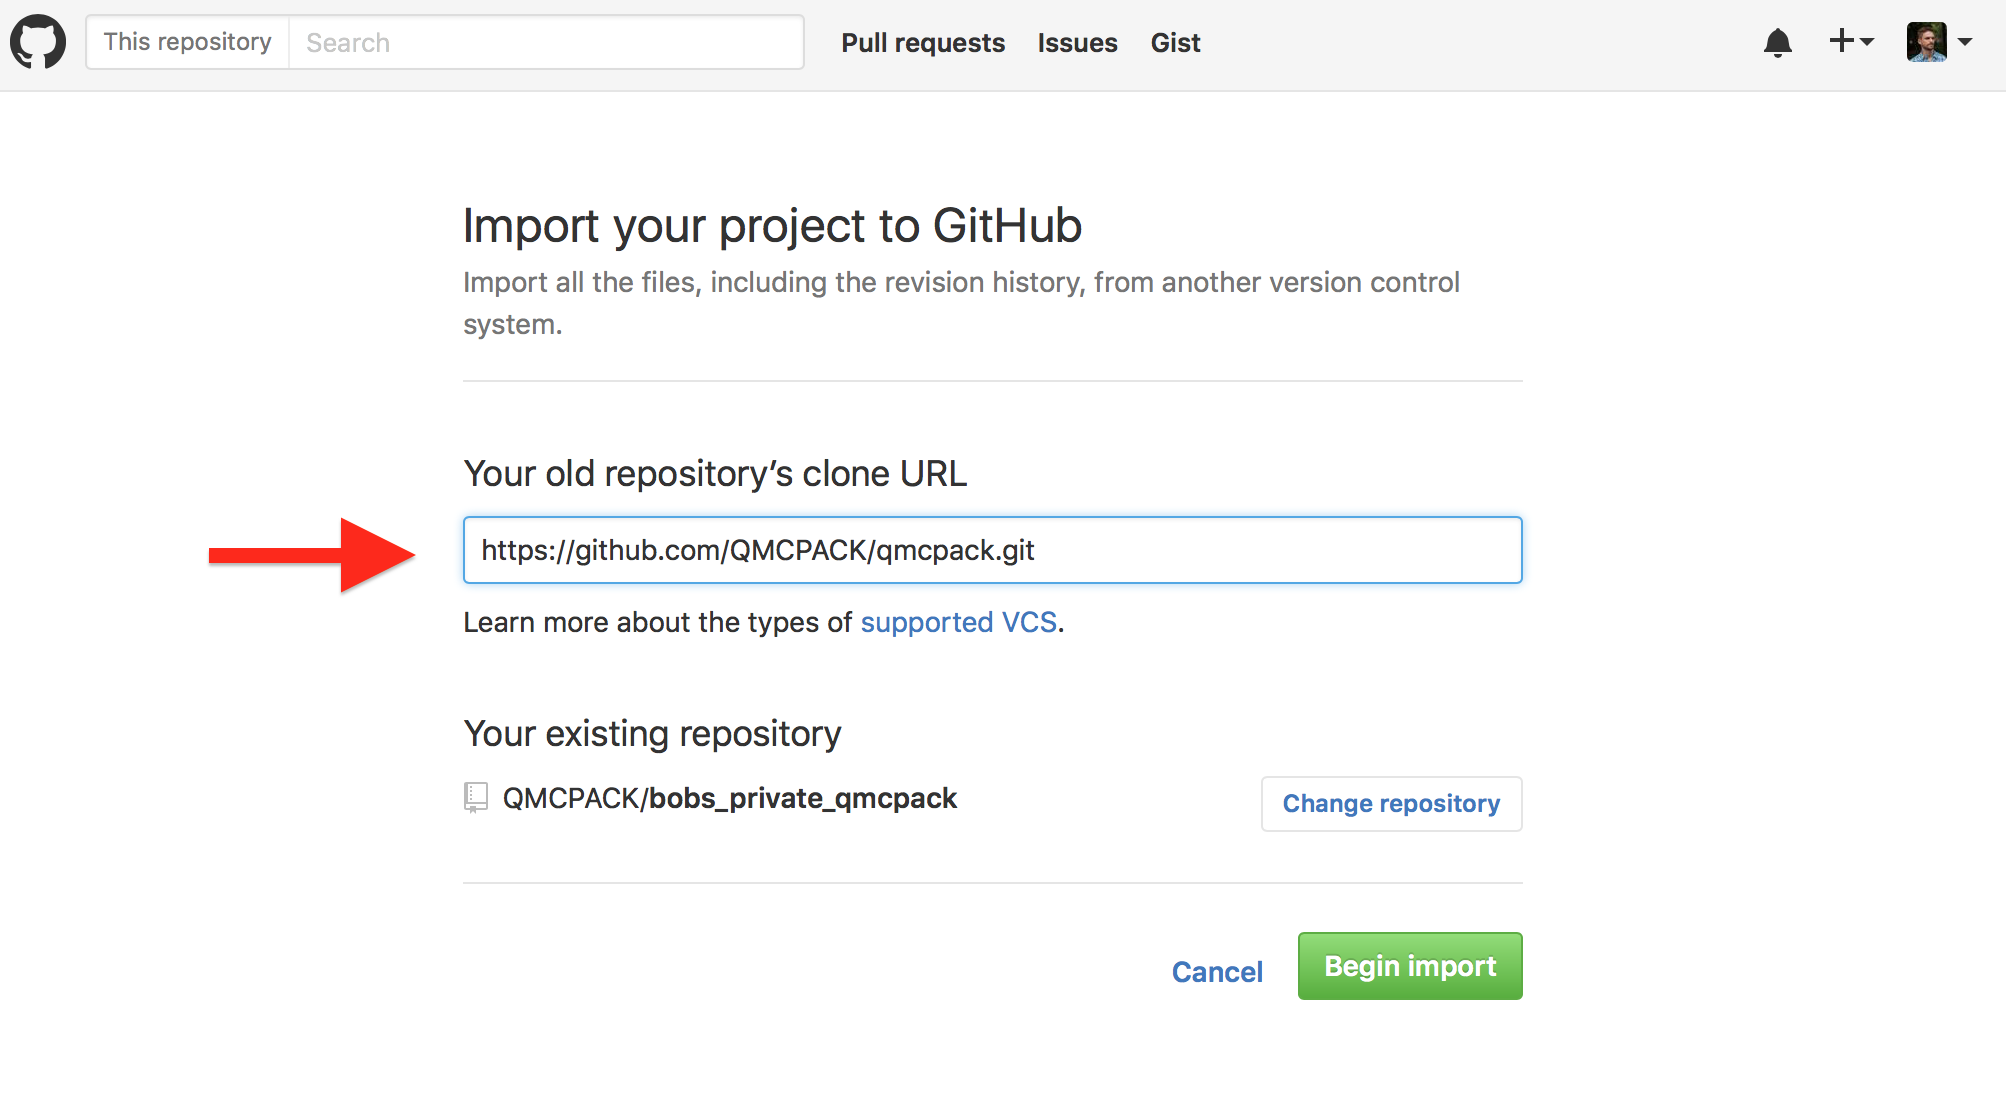
-
Clone a local working copy of the now private "bobs_private_qmcpack" repository.
$ git clone https://[email protected]/qmcpack/bobs_private_qmcpack.git
Development can now take place in this local repository similarly to the process described for public forks in Workflow process.
However, when a topic branch from this private repo is to be submitted back to the public project "qmcpack" repository, it must be pushed to a user's public fork, from which a pull request can be submitted as usual. At this point (after pushing the branch to a public repository), the privately-developed branch is now visible to the public. This step is required because github does not allow pull requests to be submitted to public repos from private repos.
-
(Assume private repo "bobs_private_qmcpack" has been created by the process described above)
-
Clone and do development work
-
Set up a public fork as a remote so that the topic branch can be made public
$ git remote add <remote_name> https://[email protected]/bob/qmcpack.git -
Push finished topic branch to a public fork github.com/bob/qmcpack
$ git push <remote_name> <feature_branch>
- Rules and guidelines for doxygen comments?
- How many code reviews required / upper limit on patch length for single reviews?
- What are the test coverage requirements for new patches?
- What are the documentation requirements for new patches?
-
How can I avoid typing my username and password all the time?
- for usernames, include it in the repository url when cloning, adding a remote, etc. E.g.
git clone https://[email protected]/username/qmcpack.gitandgit remote add upstream https://[email protected]/QMCPACK/qmcpack.git - for passwords, there are a couple of options:
- Use SSH keys
- Cache your password for a certain amount of time. Add the following to your
~/.gitconfig: [credential] helper = cache --timeout=3600
- for usernames, include it in the repository url when cloning, adding a remote, etc. E.g.
-
git diffandgit logdon't show colored output (e.g. on Titan)be sure to have the following in your
~/.gitconfigfile:[color] ui = autoand set your
$PAGERenvironment variable to "less -R" -
Titan has a very old version of git installed that doesn't support, e.g.,
git branch -uSome LCF machines have very old git versions as part of the OS that don't support the
git branch -uoption. Titan and Mira have newer git versions built and available as a module. It is recommended to always use a more recent version of git to avoid unexpected changed/deprecated behaviors.Alternatively, for git versions at or before 1.7.12, the
git branch --set-upstream branch_name your_new_remote/branch_nameis equivalent to the-uvariant given above. -
Is there additional material on the web that I can be used for learning git?
www.lynda.com has a 6-hour online training course that is self-paced on your own schedule. The name of the course is "Git Essential Training" -- it is very good and goes into a lot of detail. The one topic it does not cover is pull requests, otherwise it explains a lot of the basics including that "philosphy" of git which is very different from svn. Lynda.com can be accessed via a LinkedIn account. This service is normally available by a monthly paid subscription, but they have a no-cost 30-day free trial that can be used for accessing this course.
This page takes content from GitHub help pages, existing QMCPACK documentation, and is heavily inspired by the Sympy development guide.