-
Notifications
You must be signed in to change notification settings - Fork 12
Building: OS X and macOS
On OS X and macOS you can install AvanceDB with brew. If you don't already have brew installed then run the following command in a terminal window:
/usr/bin/ruby -e "$(curl -fsSL https://raw.githubusercontent.com/Homebrew/install/master/install)"Once you have brew installed you can install AvanceDB as follows:
brew install [email protected] && \
brew install autoconf && \
brew install ripcordsoftware/packages/avancedb
You can now install and start AvanceDB as a daemon:
sudo brew services start ripcordsoftware/packages/avancedbIf you want to build AvanceDB on OS X then you'll have to sully your pretty little machine with dev tools. Oh well, here goes:
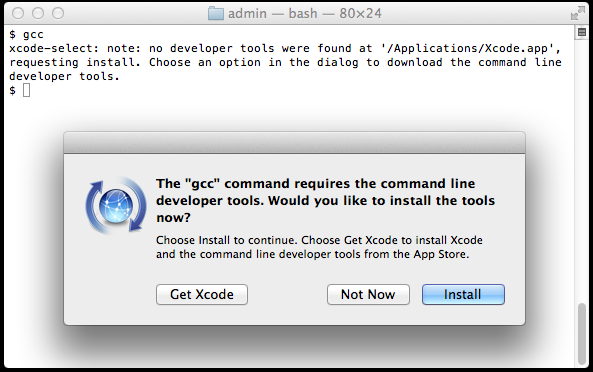
Firstly we need a C++ compiler, open a command window and type:
gccIf you are a developer you will probably see the GCC version number information printed in your console window. If you aren't a developer you probably don't have GCC installed and you have been prompted to install it.
You can now choose between Xcode and the basic command line tools (the Install button option). AvanceDB will build with either Xcode or the basic GCC.
Once you have a working GCC you can now install brew:
ruby -e "$(curl -fsSL https://raw.githubusercontent.com/Homebrew/install/master/install)"Now we need to ask brew to install some dev bits for us:
brew install boost
brew install pkg-config
brew install wget
brew install cppunit
brew install automake
It seems that brew's boost installs the _mt versions of the atomic and threading libraries, so we have to fix that:
sudo ln -s /usr/local/lib/libboost_thread-mt.a /usr/local/lib/libboost_thread.a
sudo ln -s /usr/local/lib/libboost_thread-mt.dylib /usr/local/lib/libboost_thread.dylib
sudo ln -s /usr/local/lib/libboost_atomic-mt.a /usr/local/lib/libboost_atomic.a
sudo ln -s /usr/local/lib/libboost_atomic-mt.dylib /usr/local/lib/libboost_atomic.dylib
Now we need to do some Python plumbing:
sudo easy_install pip
sudo pip install json_tools
And now we can pull the code, make a directory under your home directory, change to it and run the following:
git clone --recursive https://github.com/RipcordSoftware/AvanceDB.git
cd AvanceDB
make -j 4 CONF=Release
Assuming all went well you should have a built AvanceDB release binary under src/avancedb/dist/Release/GNU-Linux-x86, change to that directory and run it:
cd src/avancedb/dist/Release/GNU-Linux-x86
./avancedb
You can validate that AvanceDB is running by pointing your browser to port 5994 on your system, you should see something like:
{"couchdb":"Welcome","avancedb":"Welcome","uuid":"a2db86472466bcd02e84ac05a6c86185","version":"1.6.1","vendor":{"version":"0.0.1","name":"Ripcord Software"}}If you want to develop against AvanceDB you will need a debug build, first we need to install some more packages
brew install node
brew install couchdb
Configure your system to start CouchDB on start-up:
mkdir -p ~/Library/LaunchAgents
ln -sfv /usr/local/opt/couchdb/*.plist ~/Library/LaunchAgents
And now start CouchDB:
launchctl load ~/Library/LaunchAgents/homebrew.mxcl.couchdb.plistBuild in debug mode:
make -j 2If you have more than two CPU cores on your system then you can increase the value of the -j parameter to decrease build times.
Now you can run the tests:
make test