-
Notifications
You must be signed in to change notification settings - Fork 7
Introduction to PyCharm, Git and GitHub
PyCharm is a Python integrated development environment (IDE).
Integrates a text editor, terminal, Python interpreter and version control (Git) interface all within one application.
Other IDEs with Python support are available such as VSCode, Atom and Spyder and most of what we describe will be translatable.

Depending on your configuration and version some elements may appear different / in different locations.
Main components that we will use
- Project explorer - opening and managing files
- File editor area - editing and viewing files and file changes
- Terminal - running system commands
- Python Console - running Python commands
- Commit tab - adding and committing changes *
- Pull Requests tab - creating and viewing pull requests *
- Git tab - navigating commit history and branches *
(*) We will return to these in the second Git part of these notes.

Main point of entry for opening and creating files.
Can also be used to perform some Git operations via the context menu.
Colours of filenames indicate Git status - for example ignored files in yellow, untracked files in red.

Allows viewing and editing text based files, most commonly .py Python source files.
Inbuilt syntax highlighting and code analysis help writing code and spotting bugs.
Documentation pane can be used to show document for currently selected object.
We can set breakpoints for debugging by clicking in gutter to right of line numbers.
Using context menu when selecting a name in file allows navigating to definition of object and/or usages.
Problems tab and highlighting in editor help flag up potential issues in code.
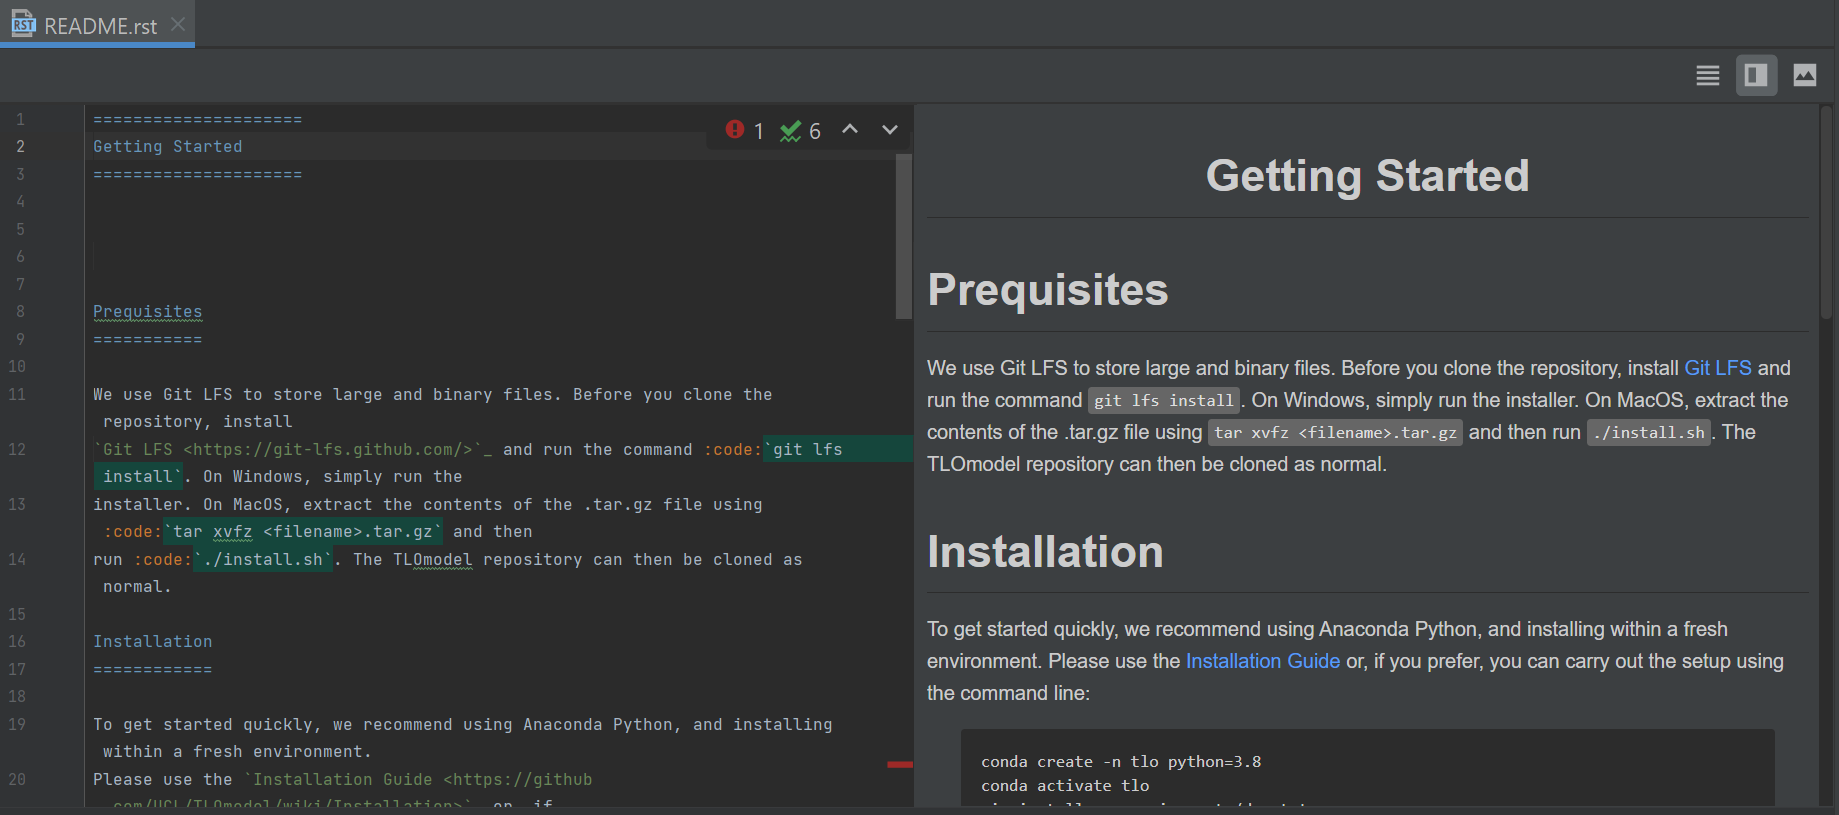
PyCharm also includes support for other text file formats including Markdown and reStructuredText documents.
In-built rich-text preview simplifies writing documentation pages.

Allows running commands in system shell (terminal).
On Windows defaults to PowerShell and on MacOS / Linux a bash shell.
Can be useful for using git command-line interface or submitting Azure runs.

Python interpreter running in virtual environment created as part of environment set up.
Can be used interactively, for example to test snippets of code, inspect objects.
Variable inspector allows inspecting objects in current namespace.

Shortcut toolbar under top menu bar allows quick access to running scripts and tests.
Options for running tests with a debugger or profiler active.
We can specify run configurations for commonly used scripts and tests.
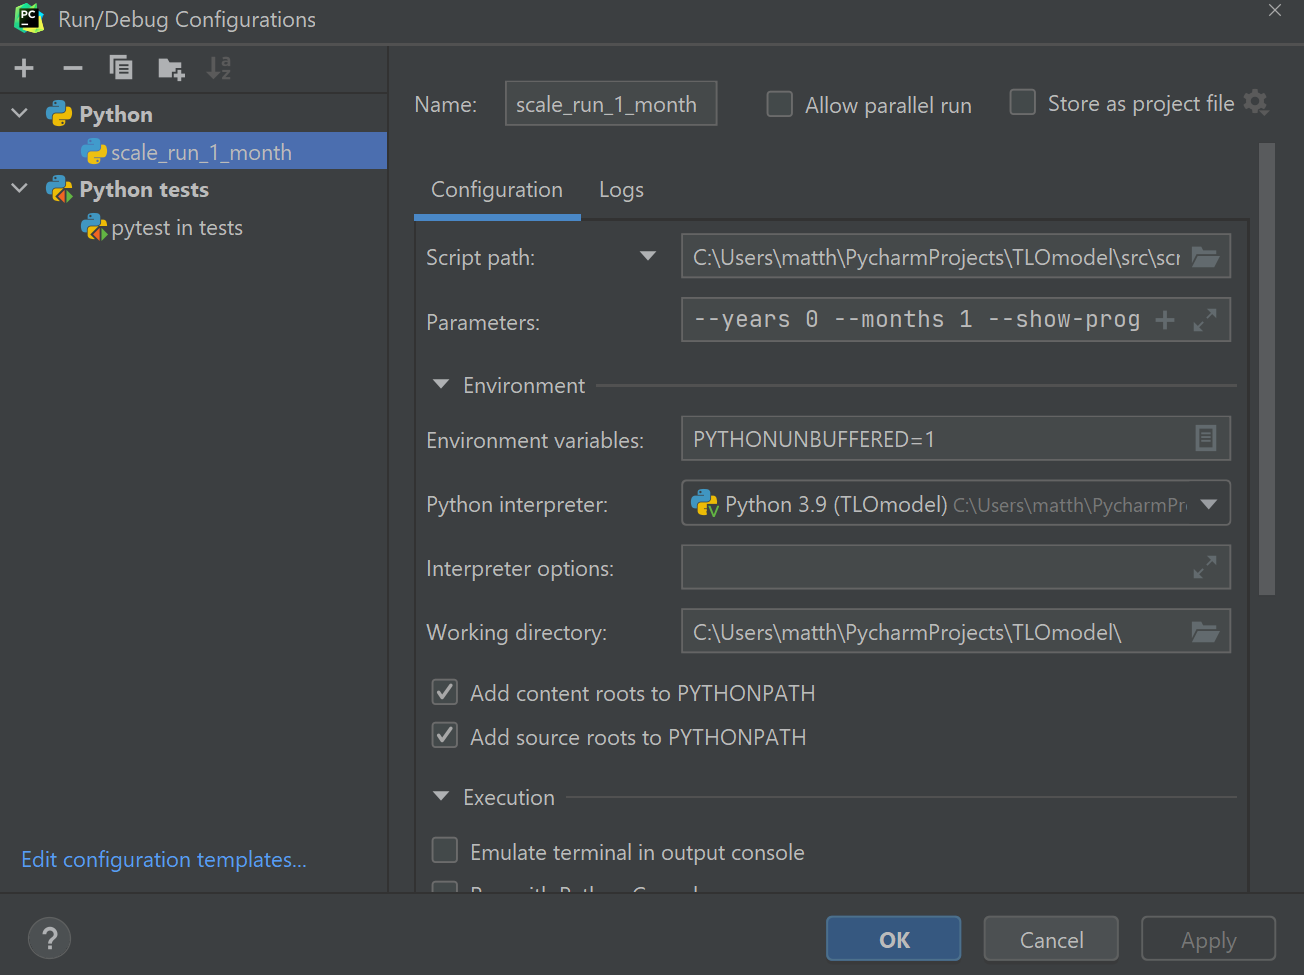
Dialog can be used to add pre-defined configurations for running commonly used scripts or test suites.
For scripts generally can just specify script path and leave other settings as defaults unless script accepts arguments.
Can be useful to set up configurations for analysis scripts and tests for modules you are developing.

When running a script any output, for example logger output or the simulation progress bar will be shown in a Python interpreter in the Run tab.
We can halt a running script at any time using the :black_square_for_stop: stop button.

When tests are running the Run tab will show details of currently running test and test passes / fails.
Can rerun only failed tests - useful when trying to fix problems in implementation causing failures.
Git is an example of a version control system (VCS) - a tool for managing and tracking changes to a set of files.
Git is free and open-source and currently the most widely used VCS.
Git has a distributed design which makes it simple for multiple people to be working on a project concurrently - ideal for TLO!
GitHub is a web service which allows hosting Git repositories online and provides a web interface with additional features for collaboration.
Repository : Collection of all files and their history associated with a particular project
Commits : Snapshots of the state of the files in a repository
Branches : A linear sequence of commits originating from a particular point in the commit tree, often implementing a particular feature or fix with an associated label
Cloning : Copying a a repository hosted remotely (for example GitHub) to your local machine
Pulling : Synchronising changes from a remote repository to your local repository
Pushing : Synchronising changes from your local repository to a remote repository
Forking : Creating a new copy of a repository on a hosting service such as GitHub that you can synchronise changes to
Git's distributed design means there can be multiple copies of a repository on different machines (or even the same machine).
Typically each person collaborating on a project will have their own local repository and there will also be a remote repository hosted on a service such as GitHub where the changes made in each individual's repository are synchronised to.
In TLO's case this central repository is hosted at https://github.com/UCL/TLOmodel
This model allows each person to simultaneously work on their own updates without affecting other peoples files. While there can be conflicts when changes are merged, Git has powerful tools for helping to resolve these.
A commit corresponds to a snapshot of the files in a repository plus some associated metadata.
An example of GitHub's representation of a commit on the TLOModel repository is https://github.com/UCL/TLOmodel/commit/4578425b4a6136bb1026d330876001463e1c430f
Commits are tagged with the author, the date and time of creation, a message (short description) and a reference to the parent commit (the previous commit changes were made from).
A commit is uniquely identified by a long hexadecimal string (using characters 0-9 and a-f) or commit hash, for example 4578425b4a6136bb1026d330876001463e1c430f
We can use a subsection of this hash to refer to a commit, for example 4578425, providing it is unique amongst all commits in the repository.
Typically however we work with branches which are pointers to commits with a more human readable name.
Typically there be multiple simultaneous lines of development of a Git repository as people work on adding different features or fixes.
A branch is an automatically updating pointer to the latest in a chain of commits representing a line of development, and associated with a human readable name.
A branch present in many repositories is the master or main branch, which by convention is often used to represent the main line of development which the changes in other branches are merged in to when considered 'complete'.
Each copy of a repository will have its own set of branches, however we can pull changes from a branch on a remote repository to a branch on our local repository and conversely we can push changes from a branch on our local repository to a branch on a remote repository
The GitHub TLOModel branches are listed at
https://github.com/UCL/TLOmodel/branches
We will now go through a worked example of the basics of interacting with Git and GitHub in PyCharm.
We will use an example 'Travel guide' repository rather than the actual TLOModel repository to allow us to make edits without polluting the TLO codebase!
https://github.com/matt-graham/git-example
This example is taken from an exercise designed by David Perez-Suarez for the UCL Research Software Engineering with Python course.
To create a new project from a Git repository in PyCharm we need to clone the repository by going to Git > Clone... on the menu bar

A Get from Version Control dialog will then appear

In the URL field enter https://github.com/matt-graham/git-example
By default the repository will be cloned to a directory named git-example in your PyCharm projects directory - you may change this to something else if you wish.
Once you have entered the URL and if desired changed the directory, click the Clone button at the bottom right of the dialog

This will then show a progress bar while the repository is cloned to your machine - as this is a very small Git repository this should be quick!
Once the repository has finished loading you should be able to browse the files from the Project tab on the left of the PyCharm interface. You should see a list of directories for each continent and a README.md file like the following
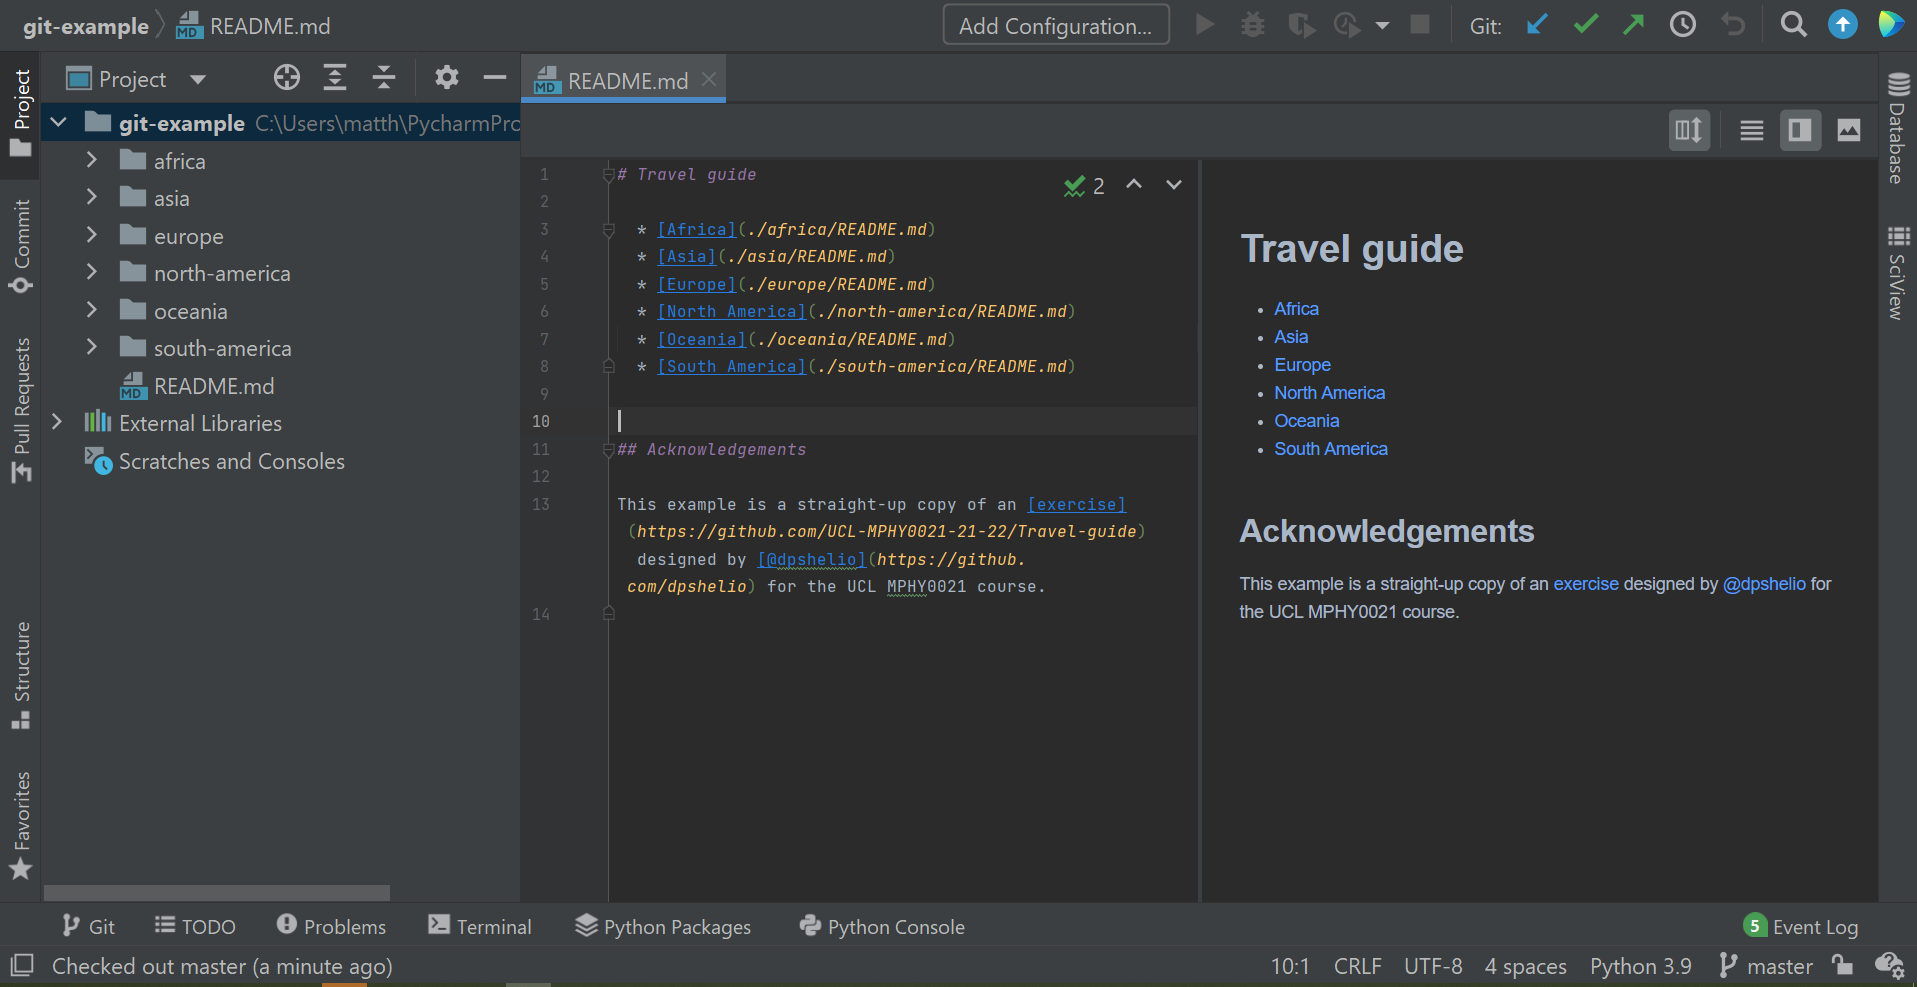
By default when you clone the git-example repository the master branch is checked out and the files you see correspond to the latest commit on this branch.
If we open the Git tab from the toolbar at the bottom of the interface you will see something like the following

The tabular area in the centre shows the commit history of the current master branch. We can see there are three commits, each with an associated commit message, author, commit time and (short) hexadecimal hash.
The 🏷️ origin & master label indicates the commit currently referenced both by the local master branch and the master branch on the remote (GitHub) origin repository.
The tree navigator interface in the left column of the Git tab shows the branches in the local and remote repositories.
As well as the current master branch we see that there is folder icon 📁 mmg (my initials!) which if we expand we see there is a branch named wuerzburg-entry within.
The branch is shown in this directory tree like manner as it was given the name mmg/wuerzburg-entry with the forward slash being interpreted as a directory separator. While naming branches like this is not necessary it can be a useful way of organizing the branches you are personally working on to allow easier access in a large repository like TLO.

We can switch to the mmg/wuerzburg-branch by right-clicking on the entry in the navigator and selecting Checkout from the context menu.
If we select Branch: HEAD from the dropdown in the central history viewer column, we will see the commit history for the branch we just checked out with HEAD being the Git term for the currently checked out branch (or other commit).

We see that the mmg/wuerzburg-entry branch currently has one commit on top of the current master branch with message Adding initial entry for Würzburg, Germany. There are now two 🏷️ tags showing the commits pointed to by the mmg/wuerzburg-entry and master branches.

Although we will not do so at the moment, we can also create new branches from the currently checked out branch from the Git tab by clicking the ➕ icon in the left sidebar.
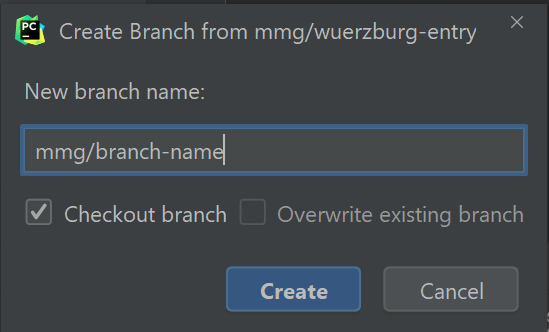
A Create branch from ... dialogue will then show where the new branch name can be specified and a checkbox used to select whether to also checkout (switch to) this new branch at the same time as creating it.
A typical workflow is for a branch to be used to manage the changes associated with a particular unit of work for example adding a new feature.
While we are working on this feature, we commit changes we make as we proceed to the branch. This allows us to keep track of what changes we have made and also allows for the possibility of going back to an earlier point in the commit history or reverting certain changes.
Ideally we should make small regular commits and give the informative descriptions to make it easier for us to get to navigate to a particular point in the history later.
As an example, here we will consider adding a commit to the mmg/wuerzburg-entry branch which performs some file reorganisation.
If we browse the files from the Project explorer tab we see that this branch has two new files README.md and wuerzburg.md under europe.
We might later decide we would prefer to have the files associated with each place further grouped in to per country directories.
To make this changes we would create a new directory germany in the europe directory

We then move the wuerzburg.md file in to this new subdirectory by dragging it in the Project explorer.
PyCharm will then display a Move dialog. As well as actually moving the files, PyCharm has the useful feature that it can automatically update any references to the files in other files to reflect the updated location. Here the wuerzburg.md file is linked to from the README.md file in the europe directory so if we select Search for references and click Refactor, PyCharm will automatically update this link for us.

We have now updated the files in our local working copy of the branch but we have not yet commited these changes to the local repository. To do this we use the Commit tab on left sidebar of the PyCharm interface.

The Commit tab shows a tree navigator interface listing two top-level options Changes and Unversioned Files. We will ignore the latter for now. If we expand the Changes entry we will the europe/README.md and europe/wuerzburg.md files are both listed as having changes.
If we click on the README.md entry we are shown a summary of the changes made to this file as a side-by-side diff (difference).

We see that the URL for the Würzburg link has been updated to reflect the new location.
To stage these changes ready for committing we add them to the commit by toggling the checkboxes next to the individual files (or we can select all changes by toggling the top-level Changes checkbox).
Once we have added the changes to be committed, our final task is to write a short descriptive message for the changes made in the commit in the text field at the bottom of the Commit tab.

Once we have entered a commit message we click the Commit button in the bottom left to perform the commit.
If we now look at the commit history in the Git tab we see the new commit has been added

Importantly there are now separate 🏷️ tags for the local mmg/wuerzburg-entry branch and the mmg/wuerzburg branch on the remote origin repository, with the later still pointing to the previous commit. This is because while we have added this commit to our local branch we have not yet pushed this update to the remote repository.
In Git parlance, the operation of synchronising changes from a remote repository to the local repository is called pulling and the operation in the opposite direction of synchronising changes from a local repository to a remote repository is called pushing.
In PyCharm while the latter operation is till referred to as Push the former operation is instead termed Update.
While we want to ultimately push our changes to the remote repository here, a good habit to get in to is to always update (or pull) from the remote repository before pushing. This will make sure if there have been any changes to the branch on the remote repository since you last updated these will be merged in to your local branch first.
In PyCharm we can update our local branch by right clicking on it within the the branch tree navigator column in the Git tab and selecting Update from the context menu.

This will pull in any commits from the branch on the remote repository and merge them in to the local branch. If there are commits to be pulled in, in some cases Git can automatically 'rewind' your local commits and reapply them on top of the incoming commits. In other cases there may be conflicts between the commits that need to be resolved.
Here there have been no commits made so no updates occur.
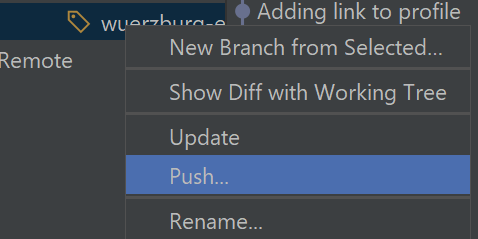
We are now finally ready to push our local changes to the remote repository. To do this we again right-click the branch name in the branch tree explorer in the Git tab and select Push... from the context menu.
A Push Commits to git-example dialogue will then appear. This summarises the commits that will be pushed and allows reviewing the changes made to the files. It is a good idea to double-check you have not unintentionally added any changes you did not want to commit at this point as undoing changes that are only present in your local repository is much simpler than doing so once they have been pushed to a remote repository.

Once you are happy that you do want to push the commits, clock the Push button at the bottom right of the dialogue.

As pulling and pushing changes to the current branch is a very common operation, PyCharm provides shortcut icons to update (pull to) and push from the currently checked out branch on the toolbar at the top right of the interface, with the
While pushing synchronises local changes to your branch to the remote repository, eventually you will want to merge these changes in to the main master branch on the remote repository.
To ensure changes are only merged in once they have been reviewed by another member of the team, TLO, as with many other open-source projects, uses GitHub's pull request feature to manage the process of merging in changes from a feature branch.
Pull requests allow you to describe the changes you have pushed to a branch in a GitHub repository, and discuss these changes with other team members. You can also request for your change to be reviewed and follow up with further commits to address comments from reviewers.
For the TLOModel repository we also have continuous integration set up using GitHub Actions that automatically runs all of our tests with the proposed updates to the code in a pull request every time new commits are pushed to it. This allows us to ensure that any changes that are being considered for merging in do not cause failure in existing tests. Generally if adding a new feature it will also be necessary to add new tests to check the validity of the new functionality.
Once reviewers have approved the changes made in a pull-request and all tests are passing, the final feature branch can then be merged into the main master branch.
Once a branch has been pushed to the remote repository on GitHub, we can go to the GitHub web page for the repository to create a pull request using GitHub's web interface. It is also possible however to open pull-requests directly from PyCharm.
This is performed using the Pull Requests tab accessible from the left sidebar.

On first opening the Pull Requests tab a list of any open pull requests will be shown along with a search bar that can be used to search within / filter the pull requests. To create a new pull request we click the ➕ icon on the top toolbar.

A New Pull Request at ... dialogue then appears. In the main Info tab we can enter a title for the pull request as well as a longer description of the changes made. Ideally the description should both summarise the changes made and the rationale for them, and provide pointers for reviewers of things you think need checking. The pull request opening description can use GitHub Flavor Markdown to add rich formatting, and can also uses autolinking features to automatically link to related GitHub issues or other pull requests, and to tag people with their GitHub username.
We can also request reviews from specific team members when opening a pull request by clicking the 📝 icon next to text currently showing No reviewers. This then shows a pop-up field into which the GitHub username of another collaborator on the repository can be entered to request a review; multiple reviews can also be requested.
The Files and Commits tabs on the New Pull Request at... dialogue can be used to check which files changes have been made to and what the commit history is of the branch the pull request is being made for.
Once you are happy with the information entered for the pull request, the Create Pull Request button at the bottom of the dialogue can be clicked to open the pull request on the GitHub repository 🎉
- Create a new branch named
<initials>/<place>-entrywhere<initials>are your initials and<place>is the name of place you would like to visit or have visited. - Create a new Markdown file
placename.mdin the relevant subdirectory of the repository, creating any necessary intermediate subdirectories. - Add a title
# Place nameand short description of the place to the file and save. - Commit the new file to your branch.
- Push the branch to the remote repository on GitHub.
- Create a new pull request with the branch, adding a brief description of the changes made.
- Software Carpentries Version Control with Git lesson notes
- Git and Github crash course - FreeCodeCamp.org 1h video
TLO Model Wiki