- Clone it to your machine
- Install all modules
$ yarn install - Start contributing
Generally, you don't need to build locally, but in some cases, you want to check that everything works as expected. Running this command will build all packages: $ yarn build
Using the following commands, you can manually run unit tests, linting, and prettier. Remember, though, that we have a set of automation that will run those commands for you. i.e., every time you push a commit.
To run tests locally in all packages, run $ yarn test
To run tests locally in all packages, run $ yarn lint
To run prettier locally in all packages, run $ yarn prettier
If you have common dev dependencies, it's better to specify them in the workspace root package.json. For instance, this can be dependencies like Jest, Husky, Storybook, Eslint, Prettier, etc.
yarn add husky --D -W
Adding the -W flag makes it explicit that we're adding the dependency to the workspace root.
To install, for example, react as a dependency into all packages, you can use the following command:
$ lerna add react
If you want to install react as a dependency only to a particular package, execute the following command:
$ lerna add react --scope my-package
$ npx lerna add @ethereumjs/util --scope=@metamask-institutional/custody-keyring
If you have installed, react for every package but would like to upgrade/downgrade to a particular version only for a specific package, then you can do it like this:
$ lerna add [email protected] --scope my-package
Alternatively, another way to install dependencies is by going to the root of a specific package and, as we always do, running the following:
cd packages/types
$ yarn add react
Create a directory for your package in the packages folder, and run npm init, as usual, to create the package.json for your new package. Alternatively, please copy and paste one package folder and rename it to the desired new package name.
For versioning and publishing, we're using Github Actions.
Lerna comes with a version command that allows us to increment our package's version number, commit the changes and tag them accordingly. Lerna versioning is powerful but only gives us some of what we want. That's why we are using Release Please Action
to automate releases with Conventional Commit Messages.
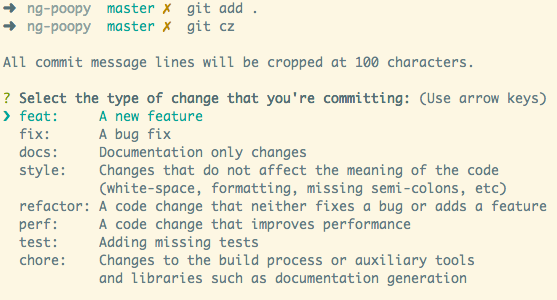
To commit, please run this command: $ git commit as we're using Commitizen. When you do it, you'll be prompted to fill out any required commit fields at commit time.
The type is mandatory and determines the intent of the change. Here are possible values:
- build: changes affecting build systems or external dependencies
- ci: updating configuration files for continuous integration and deployment services
- chore: updating grunt tasks etc.; no production code change
- docs: documentation-only changes
- feat: a new feature
- fix: a bug fix
- perf: a code change that improves performance
- refactor: a code change that neither fixes a bug nor adds a feature
- style: changes that do not affect the meaning of the code (white-space, formatting, missing semicolons, etc.)
- test: adding missing tests or correcting existing tests
A scope is a mandatory value that provides additional contextual information about the change. For example, when the module's name, npm package, or particular routine was affected. The scope must be contained within parentheses.
The subject is the headline of the commit. It should summarize in one sentence the nature of change.
packages
├── api
├── app
└── web

❯ echo "build(api): change something in api's build" | commitlint
⧗   input: build(api): change something in api's build
✔   found 0 problems, 0 warnings

❯ echo "test(foo): this won't pass" | commitlint
⧗   input: test(foo): this won't pass
✖   scope must be one of [api, app, web] [scope-enum]
✖   found 1 problems, 0 warnings

❯ echo "ci: do some general maintenance" | commitlint
⧗   input: ci: do some general maintenance
✔ found 0 problems, 0 warningsThe Release PR, made possible by release-please, is automatically created from the latest main branch, and it will create a "Release Pull Request" from the Conventional Commit Messages. In order for it to be triggered, one of the following prefixes has to be used in the previously merged PR:
- chore: updating grunt tasks etc.; no production code change
- feat: a new feature
- fix: a bug fix
This PR will contain the changelog update, based on the commit messages used, example PR.
Also, while the Release PR is open, if the developer merges other PRs to main with more updates, the current existing Release PR will auto-update.
We are using an automation for this. The steps that are needed to publish a new version are:
- Use conventional commits. If you don't use them, the automation won't trigger.
- Create a PR of the work that you have been developing. i.e., #117
- After all tests are passed, and you have at least one approval, merge this PR to the
mainbranch. - Generate changelog automation will now be triggered, and, if successful, it will create a new PR automatically. i.e., #120
- Review the PR, approve it, and merge it to the
mainbranch. - Publish to npmjs automation will now be triggered, and it will publish the package or packages to npmjs.


