Cozystack is an open-source PaaS platform for cloud providers.
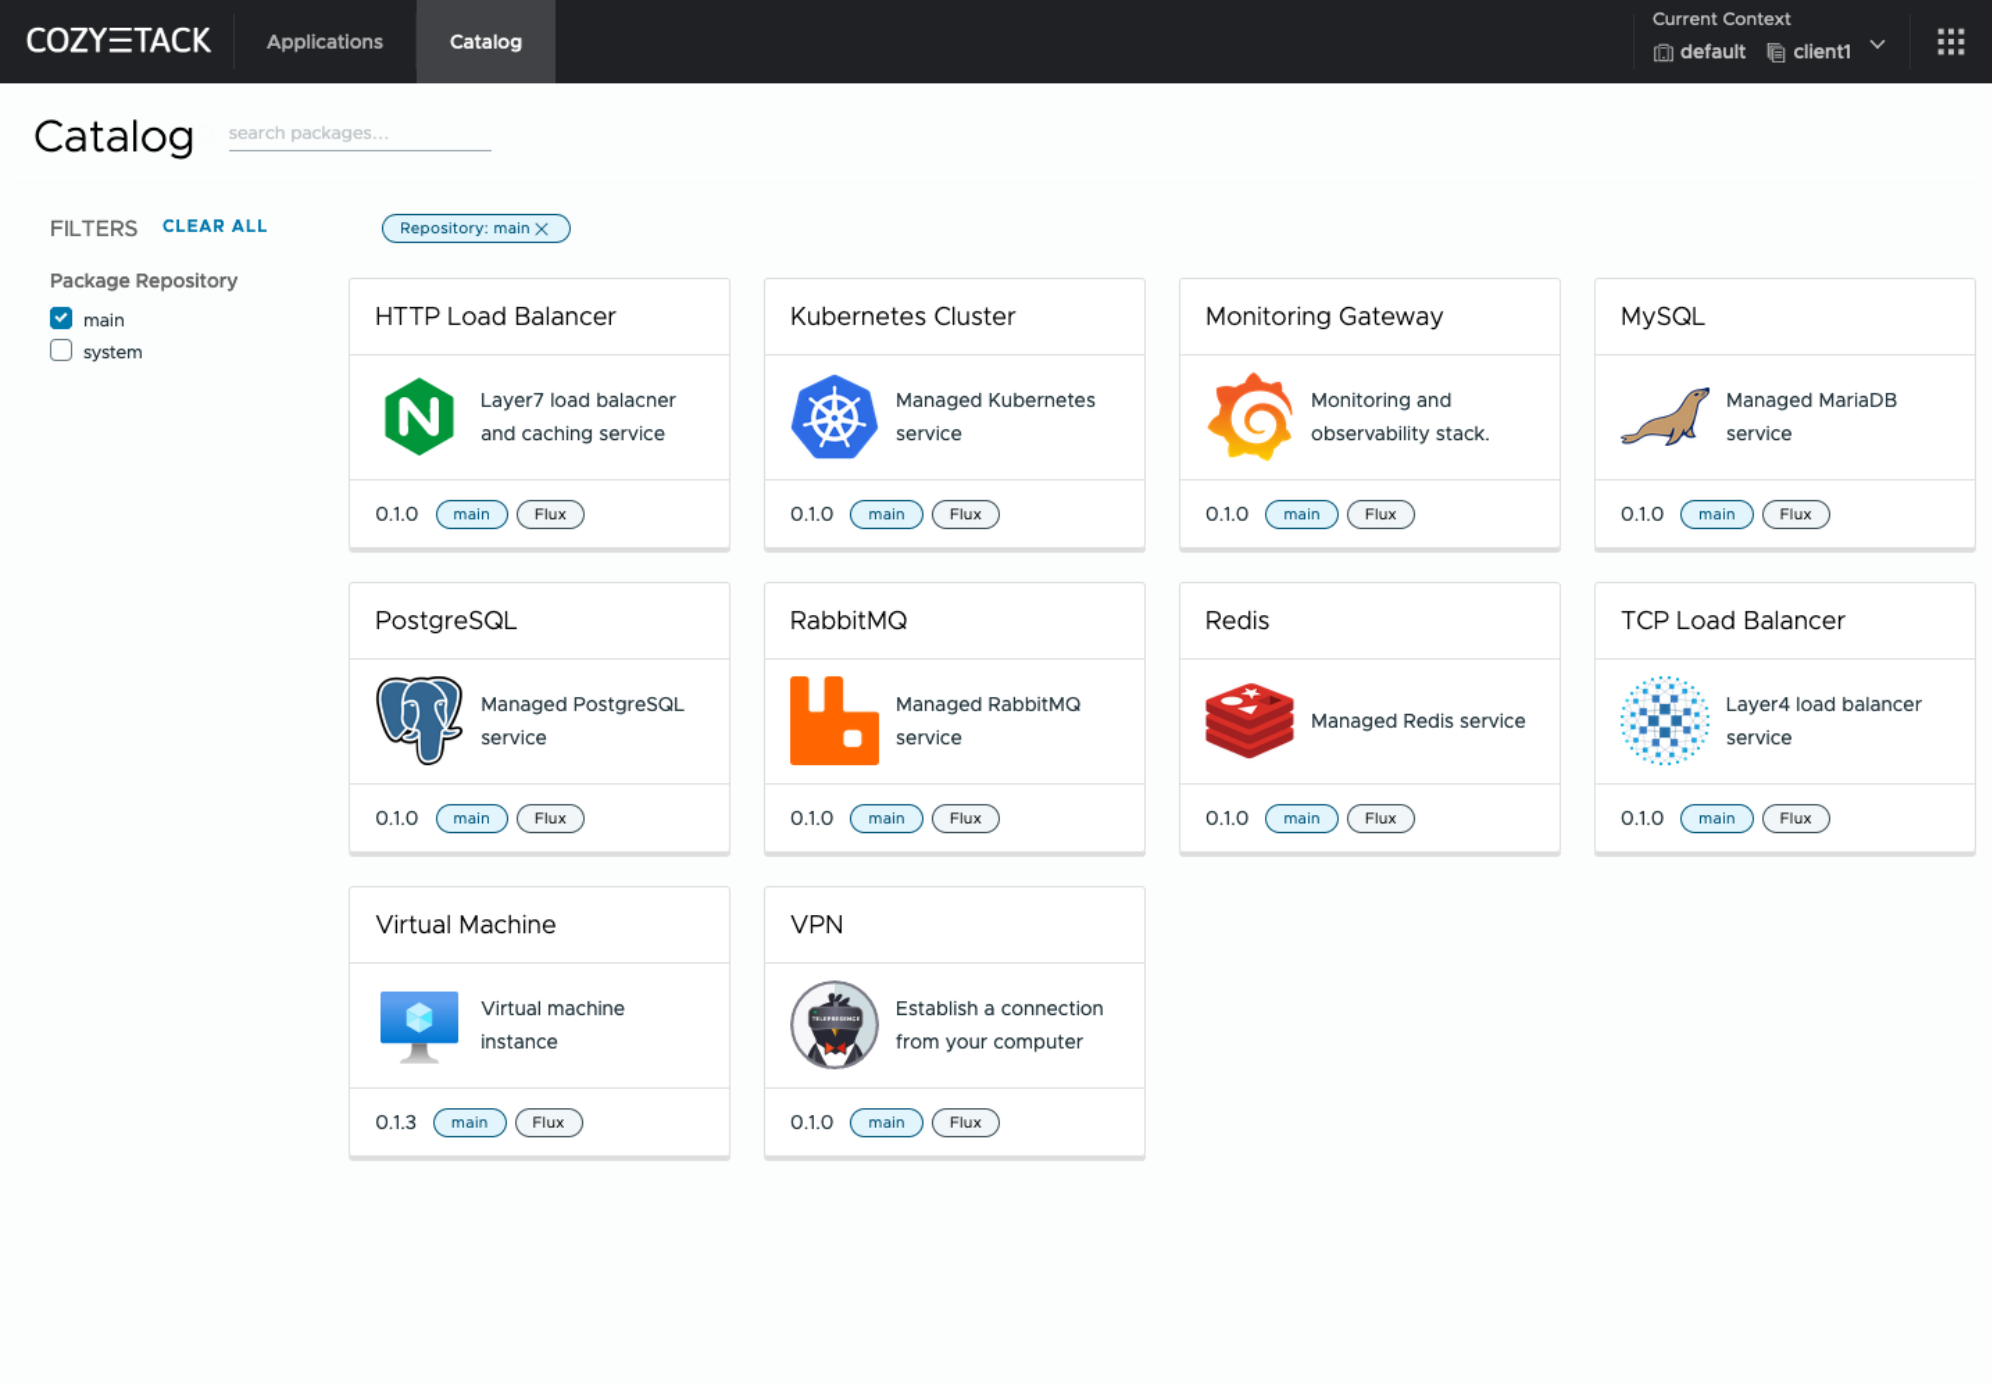
With Cozystack, you can transform your bunch of servers into an intelligent system with a simple REST API for spawning Kubernetes clusters, Database-as-a-Service, virtual machines, load balancers, HTTP caching services, and other services with ease.
You can use Cozystack to build your own cloud or to provide a cost-effective development environments.
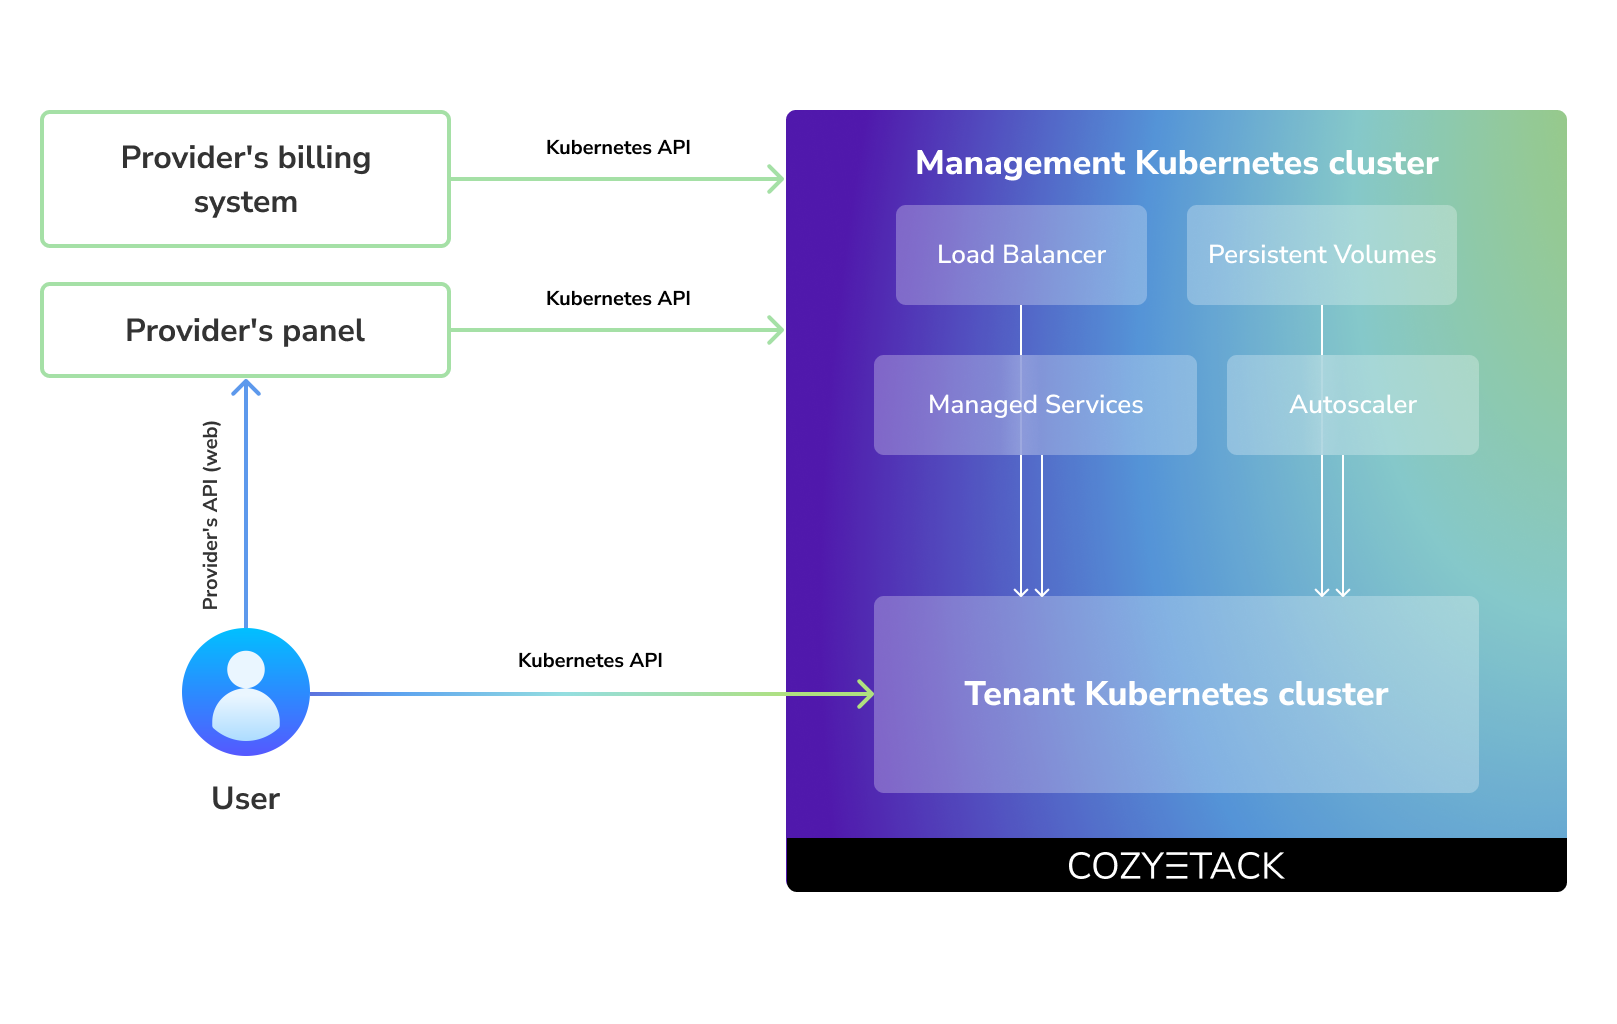
Cozystack positions itself as a kind of framework for building public clouds. The key word here is framework. In this case, it's important to understand that Cozystack is made for cloud providers, not for end users.
Despite having a graphical interface, the current security model does not imply public user access to your management cluster.
Instead, end users get access to their own Kubernetes clusters, can order LoadBalancers and additional services from it, but they have no access and know nothing about your management cluster powered by Cozystack.
Thus, to integrate with your billing system, it's enough to teach your system to go to the management Kubernetes and place a YAML file signifying the service you're interested in. Cozystack will do the rest of the work for you.
One of the use cases is a self-portal for users within your company, where they can order the service they're interested in or a managed database.
You can implement best GitOps practices, where users will launch their own Kubernetes clusters and databases for their needs with a simple commit of configuration into your infrastructure Git repository.
Thanks to the standardization of the approach to deploying applications, you can expand the platform's capabilities using the functionality of standard Helm charts.
We created Cozystack primarily for our own needs, having vast experience in building reliable systems on bare metal infrastructure. This experience led to the formation of a separate boxed product, which is aimed at standardizing and providing a ready-to-use tool for managing your infrastructure.
Currently, Cozystack already solves a huge scope of infrastructure tasks: starting from provisioning bare metal servers, having a ready monitoring system, fast and reliable storage, a network fabric with the possibility of interconnect with your infrastructure, the ability to run virtual machines, databases, and much more right out of the box.
All this makes Cozystack a convenient platform for delivering and launching your application on Bare Metal.
All components of the platform are based on open source tools and technologies which are widely known in the industry.
If a feature being developed for the platform could be useful to a upstream project, it should be contributed to upstream project, rather than being implemented within the platform.
Cozystack is based on Kubernetes and involves close interaction with its API. We don't aim to completely hide the all elements behind a pretty UI or any sort of customizations; instead, we provide a standard interface and teach users how to work with basic primitives. The web interface is used solely for deploying applications and quickly diving into basic concepts of platform.
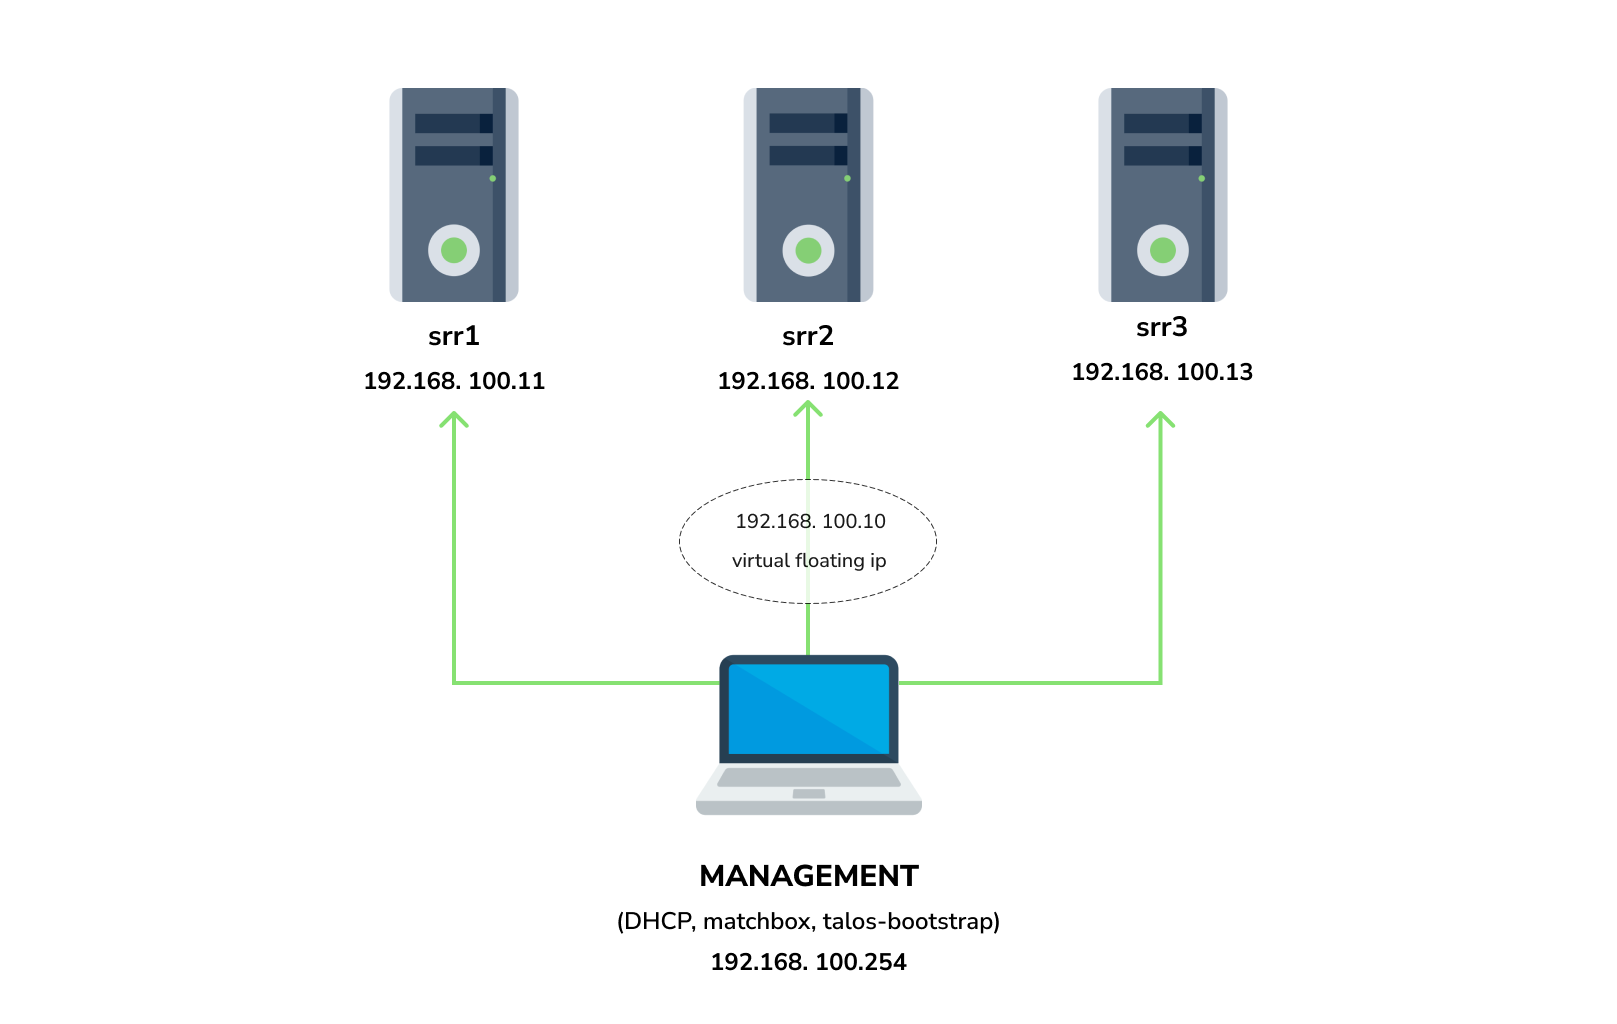
You need 3 physical servers or VMs with nested virtualisation:
CPU: 4 cores
CPU model: host
RAM: 8-16 GB
HDD1: 32 GB
HDD2: 100GB (raw)
And one management VM or physical server connected to the same network. Any Linux system installed on it (eg. Ubuntu should be enough)
Note: The VM should support x86-64-v2 architecture, the most probably you can achieve this by setting cpu model to host
dockertalosctldialognmapmakeyqkubectlhelm
Start matchbox with prebuilt Talos image for Cozystack:
sudo docker run --name=matchbox -d --net=host ghcr.io/aenix-io/cozystack/matchbox:v0.0.1 \
  -address=:8080 \
  -log-level=debug
Start DHCP-Server:
sudo docker run --name=dnsmasq -d --cap-add=NET_ADMIN --net=host quay.io/poseidon/dnsmasq \
  -d -q -p0 \
  --dhcp-range=192.168.100.3,192.168.100.254 \
  --dhcp-option=option:router,192.168.100.1 \
  --enable-tftp \
  --tftp-root=/var/lib/tftpboot \
  --dhcp-match=set:bios,option:client-arch,0 \
  --dhcp-boot=tag:bios,undionly.kpxe \
  --dhcp-match=set:efi32,option:client-arch,6 \
  --dhcp-boot=tag:efi32,ipxe.efi \
  --dhcp-match=set:efibc,option:client-arch,7 \
  --dhcp-boot=tag:efibc,ipxe.efi \
  --dhcp-match=set:efi64,option:client-arch,9 \
  --dhcp-boot=tag:efi64,ipxe.efi \
  --dhcp-userclass=set:ipxe,iPXE \
  --dhcp-boot=tag:ipxe,http://192.168.100.254:8080/boot.ipxe \
  --log-queries \
  --log-dhcp
Where:
192.168.100.3,192.168.100.254range to allocate IPs from192.168.100.1your gateway192.168.100.254is address of your management server
Check status of containers:
docker ps
example output:
CONTAINER ID   IMAGE                                        COMMAND                  CREATED          STATUS          PORTS     NAMES
22044f26f74d   quay.io/poseidon/dnsmasq                     "/usr/sbin/dnsmasq -…"   6 seconds ago    Up 5 seconds              dnsmasq
231ad81ff9e0 ghcr.io/aenix-io/cozystack/matchbox:v0.0.1 "/matchbox -address=…" 58 seconds ago Up 57 seconds matchboxWrite configuration for Cozystack:
cat > patch.yaml <<\EOT
machine:
  kubelet:
    nodeIP:
      validSubnets:
      - 192.168.100.0/24
  kernel:
    modules:
    - name: openvswitch
    - name: drbd
      parameters:
        - usermode_helper=disabled
    - name: zfs
  install:
    image: ghcr.io/aenix-io/cozystack/talos:v1.6.4
  files:
  - content: |
      [plugins]
        [plugins."io.containerd.grpc.v1.cri"]
          device_ownership_from_security_context = true
    path: /etc/cri/conf.d/20-customization.part
    op: create

cluster:
  network:
    cni:
      name: none
    podSubnets:
    - 10.244.0.0/16
    serviceSubnets:
    - 10.96.0.0/16
EOT

cat > patch-controlplane.yaml <<\EOT
cluster:
  allowSchedulingOnControlPlanes: true
  controllerManager:
    extraArgs:
      bind-address: 0.0.0.0
  scheduler:
    extraArgs:
      bind-address: 0.0.0.0
  apiServer:
    certSANs:
    - 127.0.0.1
  proxy:
    disabled: true
  discovery:
    enabled: false
  etcd:
    advertisedSubnets:
    - 192.168.100.0/24
EOT
Run talos-bootstrap to deploy cluster:
talos-bootstrap installSave admin kubeconfig to access your Kubernetes cluster:
cp -i kubeconfig ~/.kube/configCheck connection:
kubectl get nsexample output:
NAME              STATUS   AGE
default           Active   7m56s
kube-node-lease   Active   7m56s
kube-public       Active   7m56s
kube-system Active 7m56sNote:: All nodes should currently show as "Not Ready", don't worry about that, this is because you disabled the default CNI plugin in the previous step. Cozystack will install it's own CNI-plugin on the next step.
write config for cozystack:
Note: please make sure that you written the same setting specified in patch.yaml and patch-controlplane.yaml files.
cat > cozystack-config.yaml <<\EOT
apiVersion: v1
kind: ConfigMap
metadata:
  name: cozystack
  namespace: cozy-system
data:
  cluster-name: "cozystack"
  ipv4-pod-cidr: "10.244.0.0/16"
  ipv4-pod-gateway: "10.244.0.1"
  ipv4-svc-cidr: "10.96.0.0/16"
  ipv4-join-cidr: "100.64.0.0/16"
EOT
Create namesapce and install Cozystack system components:
kubectl create ns cozy-system
kubectl apply -f cozystack-config.yaml
kubectl apply -f manifests/cozystack-installer.yaml
(optional) You can track the logs of installer:
kubectl logs -n cozy-system deploy/cozystack -fWait for a while, then check the status of installation:
kubectl get hr -AWait until all releases become to Ready state:
NAMESPACE                        NAME                        AGE    READY   STATUS
cozy-cert-manager                cert-manager                4m1s   True    Release reconciliation succeeded
cozy-cert-manager                cert-manager-issuers        4m1s   True    Release reconciliation succeeded
cozy-cilium                      cilium                      4m1s   True    Release reconciliation succeeded
cozy-cluster-api                 capi-operator               4m1s   True    Release reconciliation succeeded
cozy-cluster-api                 capi-providers              4m1s   True    Release reconciliation succeeded
cozy-dashboard                   dashboard                   4m1s   True    Release reconciliation succeeded
cozy-fluxcd                      cozy-fluxcd                 4m1s   True    Release reconciliation succeeded
cozy-grafana-operator            grafana-operator            4m1s   True    Release reconciliation succeeded
cozy-kamaji                      kamaji                      4m1s   True    Release reconciliation succeeded
cozy-kubeovn                     kubeovn                     4m1s   True    Release reconciliation succeeded
cozy-kubevirt-cdi                kubevirt-cdi                4m1s   True    Release reconciliation succeeded
cozy-kubevirt-cdi                kubevirt-cdi-operator       4m1s   True    Release reconciliation succeeded
cozy-kubevirt                    kubevirt                    4m1s   True    Release reconciliation succeeded
cozy-kubevirt                    kubevirt-operator           4m1s   True    Release reconciliation succeeded
cozy-linstor                     linstor                     4m1s   True    Release reconciliation succeeded
cozy-linstor                     piraeus-operator            4m1s   True    Release reconciliation succeeded
cozy-mariadb-operator            mariadb-operator            4m1s   True    Release reconciliation succeeded
cozy-metallb                     metallb                     4m1s   True    Release reconciliation succeeded
cozy-monitoring                  monitoring                  4m1s   True    Release reconciliation succeeded
cozy-postgres-operator           postgres-operator           4m1s   True    Release reconciliation succeeded
cozy-rabbitmq-operator           rabbitmq-operator           4m1s   True    Release reconciliation succeeded
cozy-redis-operator              redis-operator              4m1s   True    Release reconciliation succeeded
cozy-telepresence                telepresence                4m1s   True    Release reconciliation succeeded
cozy-victoria-metrics-operator   victoria-metrics-operator   4m1s   True    Release reconciliation succeeded
tenant-root tenant-root 4m1s True Release reconciliation succeededSetup alias to access LINSTOR:
alias linstor='kubectl exec -n cozy-linstor deploy/linstor-controller -- linstor'list your nodes
linstor node listexample output:
+-------------------------------------------------------+
| Node | NodeType  | Addresses                 | State  |
|=======================================================|
| srv1 | SATELLITE | 192.168.100.11:3367 (SSL) | Online |
| srv2 | SATELLITE | 192.168.100.12:3367 (SSL) | Online |
| srv3 | SATELLITE | 192.168.100.13:3367 (SSL) | Online |
+-------------------------------------------------------+
list empty devices:
linstor physical-storage listexample output:
+--------------------------------------------+
| Size         | Rotational | Nodes          |
|============================================|
| 107374182400 | True       | srv3[/dev/sdb] |
|              |            | srv1[/dev/sdb] |
|              |            | srv2[/dev/sdb] |
+--------------------------------------------+
create storage pools:
linstor ps cdp lvm srv1 /dev/sdb --pool-name data --storage-pool data
linstor ps cdp lvm srv2 /dev/sdb --pool-name data --storage-pool data
linstor ps cdp lvm srv3 /dev/sdb --pool-name data --storage-pool data
list storage pools:
linstor sp lexample output:
+-------------------------------------------------------------------------------------------------------------------------------------+
| StoragePool          | Node | Driver   | PoolName | FreeCapacity | TotalCapacity | CanSnapshots | State | SharedName                |
|=====================================================================================================================================|
| DfltDisklessStorPool | srv1 | DISKLESS |          |              |               | False        | Ok    | srv1;DfltDisklessStorPool |
| DfltDisklessStorPool | srv2 | DISKLESS |          |              |               | False        | Ok    | srv2;DfltDisklessStorPool |
| DfltDisklessStorPool | srv3 | DISKLESS |          |              |               | False        | Ok    | srv3;DfltDisklessStorPool |
| data                 | srv1 | LVM      | data     |   100.00 GiB |    100.00 GiB | False        | Ok    | srv1;data                 |
| data                 | srv2 | LVM      | data     |   100.00 GiB |    100.00 GiB | False        | Ok    | srv2;data                 |
| data                 | srv3 | LVM      | data     |   100.00 GiB |    100.00 GiB | False        | Ok    | srv3;data                 |
+-------------------------------------------------------------------------------------------------------------------------------------+
Create default storage classes:
kubectl create -f- <<EOT
---
apiVersion: storage.k8s.io/v1
kind: StorageClass
metadata:
  name: local
  annotations:
    storageclass.kubernetes.io/is-default-class: "true"
provisioner: linstor.csi.linbit.com
parameters:
  linstor.csi.linbit.com/storagePool: "data"
  linstor.csi.linbit.com/layerList: "storage"
  linstor.csi.linbit.com/allowRemoteVolumeAccess: "false"
volumeBindingMode: WaitForFirstConsumer
allowVolumeExpansion: true
---
apiVersion: storage.k8s.io/v1
kind: StorageClass
metadata:
  name: replicated
provisioner: linstor.csi.linbit.com
parameters:
  linstor.csi.linbit.com/storagePool: "data"
  linstor.csi.linbit.com/autoPlace: "3"
  linstor.csi.linbit.com/layerList: "drbd storage"
  linstor.csi.linbit.com/allowRemoteVolumeAccess: "true"
  property.linstor.csi.linbit.com/DrbdOptions/auto-quorum: suspend-io
  property.linstor.csi.linbit.com/DrbdOptions/Resource/on-no-data-accessible: suspend-io
  property.linstor.csi.linbit.com/DrbdOptions/Resource/on-suspended-primary-outdated: force-secondary
  property.linstor.csi.linbit.com/DrbdOptions/Net/rr-conflict: retry-connect
volumeBindingMode: WaitForFirstConsumer
allowVolumeExpansion: true
EOT
list storageclasses:
kubectl get storageclassesexample output:
NAME              PROVISIONER              RECLAIMPOLICY   VOLUMEBINDINGMODE      ALLOWVOLUMEEXPANSION   AGE
local (default)   linstor.csi.linbit.com   Delete          WaitForFirstConsumer   true                   11m
replicated linstor.csi.linbit.com Delete WaitForFirstConsumer true 11mTo access your services select the range of unused IPs, eg. 192.168.100.200-192.168.100.250
Note: These IPs should be from the same network as nodes or they should have all necessary routes for them.
Configure MetalLB to use and announce this range:
kubectl create -f- <<EOT
---
apiVersion: metallb.io/v1beta1
kind: L2Advertisement
metadata:
  name: cozystack
  namespace: cozy-metallb
spec:
  ipAddressPools:
  - cozystack
---
apiVersion: metallb.io/v1beta1
kind: IPAddressPool
metadata:
  name: cozystack
  namespace: cozy-metallb
spec:
  addresses:
  - 192.168.100.200-192.168.100.250
  autoAssign: true
  avoidBuggyIPs: false
EOTGet token from tenant-root:
kubectl get secret -n tenant-root tenant-root -o go-template='{{ printf "%s\n" (index .data "token" | base64decode) }}'Enable port forward to cozy-dashboard:
kubectl port-forward -n cozy-dashboard svc/dashboard 8080:80Open: http://localhost:8080/
- Select
tenant-root - Click
Upgradebutton - Write a domain into
hostwhich you wish to use as parent domain for all deployed applications Note:- if you have no domain yet, you can use
192.168.100.200.nip.iowhere192.168.100.200is a first IP address in your network addresses range. - alternatively you can leave the default value, however you'll be need to modify your
/etc/hostsevery time you want to access specific application.
- if you have no domain yet, you can use
- Set
etcd,monitoringandingressto enabled position - Click Deploy
Check persistent volumes provisioned:
kubectl get pvc -n tenant-rootexample output:
NAME                                     STATUS   VOLUME                                     CAPACITY   ACCESS MODES   STORAGECLASS   VOLUMEATTRIBUTESCLASS   AGE
data-etcd-0                              Bound    pvc-4cbd29cc-a29f-453d-b412-451647cd04bf   10Gi       RWO            local          <unset>                 2m10s
data-etcd-1                              Bound    pvc-1579f95a-a69d-4a26-bcc2-b15ccdbede0d   10Gi       RWO            local          <unset>                 115s
data-etcd-2                              Bound    pvc-907009e5-88bf-4d18-91e7-b56b0dbfb97e   10Gi       RWO            local          <unset>                 91s
grafana-db-1                             Bound    pvc-7b3f4e23-228a-46fd-b820-d033ef4679af   10Gi       RWO            local          <unset>                 2m41s
grafana-db-2                             Bound    pvc-ac9b72a4-f40e-47e8-ad24-f50d843b55e4   10Gi       RWO            local          <unset>                 113s
vmselect-cachedir-vmselect-longterm-0    Bound    pvc-622fa398-2104-459f-8744-565eee0a13f1   2Gi        RWO            local          <unset>                 2m21s
vmselect-cachedir-vmselect-longterm-1    Bound    pvc-fc9349f5-02b2-4e25-8bef-6cbc5cc6d690   2Gi        RWO            local          <unset>                 2m21s
vmselect-cachedir-vmselect-shortterm-0   Bound    pvc-7acc7ff6-6b9b-4676-bd1f-6867ea7165e2   2Gi        RWO            local          <unset>                 2m41s
vmselect-cachedir-vmselect-shortterm-1   Bound    pvc-e514f12b-f1f6-40ff-9838-a6bda3580eb7   2Gi        RWO            local          <unset>                 2m40s
vmstorage-db-vmstorage-longterm-0        Bound    pvc-e8ac7fc3-df0d-4692-aebf-9f66f72f9fef   10Gi       RWO            local          <unset>                 2m21s
vmstorage-db-vmstorage-longterm-1        Bound    pvc-68b5ceaf-3ed1-4e5a-9568-6b95911c7c3a   10Gi       RWO            local          <unset>                 2m21s
vmstorage-db-vmstorage-shortterm-0       Bound    pvc-cee3a2a4-5680-4880-bc2a-85c14dba9380   10Gi       RWO            local          <unset>                 2m41s
vmstorage-db-vmstorage-shortterm-1       Bound    pvc-d55c235d-cada-4c4a-8299-e5fc3f161789   10Gi       RWO            local          <unset>                 2m41s
Check all pods are running:
kubectl get pod -n tenant-rootexample output:
NAME                                           READY   STATUS    RESTARTS       AGE
etcd-0                                         1/1     Running   0              2m1s
etcd-1                                         1/1     Running   0              106s
etcd-2                                         1/1     Running   0              82s
grafana-db-1                                   1/1     Running   0              119s
grafana-db-2                                   1/1     Running   0              13s
grafana-deployment-74b5656d6-5dcvn             1/1     Running   0              90s
grafana-deployment-74b5656d6-q5589             1/1     Running   1 (105s ago)   111s
root-ingress-controller-6ccf55bc6d-pg79l       2/2     Running   0              2m27s
root-ingress-controller-6ccf55bc6d-xbs6x       2/2     Running   0              2m29s
root-ingress-defaultbackend-686bcbbd6c-5zbvp   1/1     Running   0              2m29s
vmalert-vmalert-644986d5c-7hvwk                2/2     Running   0              2m30s
vmalertmanager-alertmanager-0                  2/2     Running   0              2m32s
vmalertmanager-alertmanager-1                  2/2     Running   0              2m31s
vminsert-longterm-75789465f-hc6cz              1/1     Running   0              2m10s
vminsert-longterm-75789465f-m2v4t              1/1     Running   0              2m12s
vminsert-shortterm-78456f8fd9-wlwww            1/1     Running   0              2m29s
vminsert-shortterm-78456f8fd9-xg7cw            1/1     Running   0              2m28s
vmselect-longterm-0                            1/1     Running   0              2m12s
vmselect-longterm-1                            1/1     Running   0              2m12s
vmselect-shortterm-0                           1/1     Running   0              2m31s
vmselect-shortterm-1                           1/1     Running   0              2m30s
vmstorage-longterm-0                           1/1     Running   0              2m12s
vmstorage-longterm-1                           1/1     Running   0              2m12s
vmstorage-shortterm-0                          1/1     Running   0              2m32s
vmstorage-shortterm-1                          1/1     Running   0              2m31s
Now you can get public IP of ingress controller:
kubectl get svc -n tenant-root root-ingress-controller
example output:
NAME                      TYPE           CLUSTER-IP     EXTERNAL-IP       PORT(S)                      AGE
root-ingress-controller   LoadBalancer   10.96.16.141   192.168.100.200   80:31632/TCP,443:30113/TCP   3m33s
Use grafana.example.org (under 192.168.100.200) to access system monitoring, where example.org is your domain specified for tenant-root
- login:
admin - password:
kubectl get secret -n tenant-root grafana-admin-password -o go-template='{{ printf "%s\n" (index .data "password" | base64decode) }}'


