-
Notifications
You must be signed in to change notification settings - Fork 2.7k
Keyboard Navigation
General Keyboard accessibility rule
All functionality should be accessible via the keyboard
- Sections, panels, controls
- Workflow
- Navigation Controller
- Navigation Actions
- Navigation Events
- Navigation Control
- Navigation Index
- Dev Tools
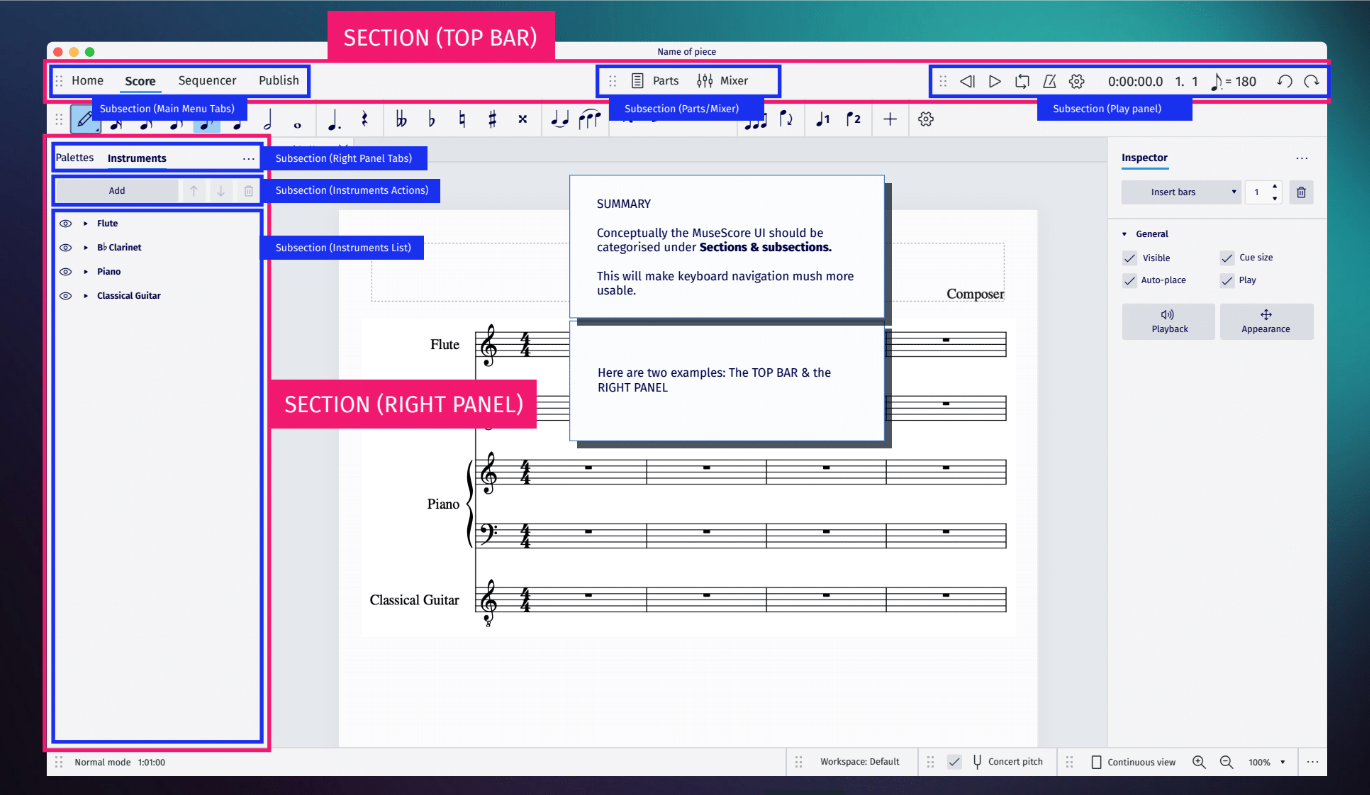
Sections and panels (subsections) are logical areas into which we have separated the application. Controls are controls such as buttons, menus, checkbox and etc.

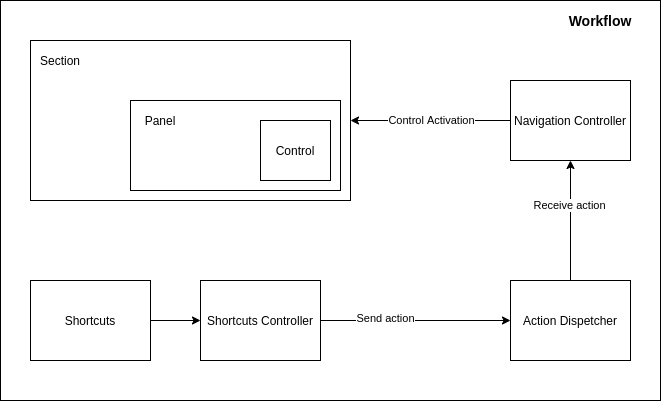
Navigation is performed using the keyboard, specific keys, or key sequences. The navigation system does not work directly with keyboard events, it works with actions. And we can assign shortcuts to the appropriate actions to send them. This allows us not to bind to specific keys, allows us to reassign shortcuts, for example, for up, left, down, right to use the WASD keys.

The navigation controller contains the main logic of the navigation, it determines which section, panel, control needs to be made active when receiving actions. To do this, it subscribes to receive the corresponding actions
void NavigationController::init()
{
    dispatcher()->reg(this, "nav-next-section", this, &NavigationController::goToNextSection);
    dispatcher()->reg(this, "nav-prev-section", [this]() { goToPrevSection(false); });
    dispatcher()->reg(this, "nav-next-panel", this, &NavigationController::goToNextPanel);
    dispatcher()->reg(this, "nav-prev-panel", this, &NavigationController::goToPrevPanel);
    dispatcher()->reg(this, "nav-right", this, &NavigationController::onRight);
    dispatcher()->reg(this, "nav-left", this, &NavigationController::onLeft);
    dispatcher()->reg(this, "nav-up", this, &NavigationController::onUp);
    dispatcher()->reg(this, "nav-down", this, &NavigationController::onDown);
    dispatcher()->reg(this, "nav-escape", this, &NavigationController::onEscape);
    ...
}To be able to send a navigation action, we need to make a UI Action for it (as well as for any other actions that the user can initiate using shortcuts or UI controls) We don't have to give them a title or icon, because we will only send them using shortcuts, no menu items or buttons (and we could)
navigationuiactions.cpp
const UiActionList NavigationUiActions::m_actions = {
    UiAction("nav-next-section",
             mu::context::UiCtxAny
             ),
    UiAction("nav-prev-section",
             mu::context::UiCtxAny
             ),
    UiAction("nav-next-panel",
             mu::context::UiCtxAny
             ),
    UiAction("nav-prev-panel",
             mu::context::UiCtxAny
             ),
    UiAction("nav-next-tab",
             mu::context::UiCtxAny
             ),
    UiAction("nav-prev-tab",
             mu::context::UiCtxAny
             ),
    UiAction("nav-right",
             mu::context::UiCtxAny
             ),
    UiAction("nav-left",
             mu::context::UiCtxAny
             ),
...Before making a section, panel and controller active, the navigation controller sends them events that they can process. This allows us to make custom logic and interrupt the default logic if set an accepted flag for the event. The controller also sends events for control actions, for example, when pressing Esc.
SomePopup.qml
    NavigationPanel {
        id: navPanel

        ...

        onNavigationEvent: {
            if (event.type === NavigationEvent.Escape) {
                root.close()
            }
        }
    }
Navigation control is just a control object, it does not contain any visual component, it has properties and signals for control. Typical use case
SampleButton.qml
import QtQuick 2.15
import MuseScore.Ui 1.0

FocusScope {
    id: root

    property alias text: label.text

    property alias navigation: navCtrl

    signal clicked()

    function ensureActiveFocus() {
        if (!root.activeFocus) {
            root.forceActiveFocus()
        }

        if (!navCtrl.active) {
            navCtrl.forceActive()
        }
    }

    NavigationControl {
        id: navCtrl
        name: root.objectName != "" ? root.objectName : "SampleButton"
        enabled: root.enabled && root.visible
        onActiveChanged: {
            if (!root.activeFocus) {
                root.forceActiveFocus()
            }
        }
        onTriggered: root.clicked()
    }

    Rectangle {
        id: backgroud
        anchors.fill: parent

        color: ui.theme.buttonColor

        border.width: navCtrl.active ? 2 : 0
        border.color: ui.theme.focusColor
    }

    Text {
        id: label
        ...
    }

    MouseArea {

        anchors.fill: parent

        onClicked: {
            root.ensureActiveFocus()
            root.clicked()
        }
    }
}
To set the desired traversal order for the elements, we must set the order for the section and panels and the index for the controls.
Panels can have a traversal direction:
- Horizontal - moving between controls using the right - left keys. The controllers must have an
index.column. - Vertical - moving between controls using the up and down keys. Controllers must have an
index.row - Both - move in all directions, like a table. Controls must have
index.rowandindex.column
It can be difficult to arrange the correct orders and indexes. There is a tool that can help you with this. see Dev Tools
Example:
NavigationSection {
    id: navTopSection

    name: "TopSection"
    order: 1
}

NavigationPanel {
    id: navTopPanel1

    name: "TopPanel1"
    section: navTopSection
    order: 1
    direction: NavigationPanel.Vertical
}

NavigationControl {
    id: navTopPanel1_Control1

    name: "TopPanel1_Control1"
    panel: navTopPanel1
    index.row: 1
}

NavigationControl {
    id: navTopPanel1_Control2

    name: "TopPanel1_Control2"
    panel: navTopPanel1
    index.row: 2
}

NavigationPanel {
    id: navTopPanel2

    name: "TopPanel2"
    section: navTopSection
    order: 2
}
...


NavigationSection {
    id: navLeftSection

    name: "LeftSection"
    order: 2
}

...
You can press Ctrl+F1 and a dialog will open with all sections, panels, and controls that are currently registered. In this dialog, you can see what state the elements are in and what their order (index) is.
Testing
- Manual testing
- Automatic testing
Translation
Compilation
- Set up developer environment
- Install Qt and Qt Creator
- Get MuseScore's source code
- Install dependencies
- Compile on the command line
- Compile in Qt Creator
Beyond compiling
Misc. development
Architecture general
- Architecture overview
- AppShell
- Modularity
- Interact workflow
- Channels and Notifications
- Settings and Configuration
- Error handling
- Launcher and Interactive
- Keyboard Navigation
Audio
Engraving
- Style settings
- Working with style files
- Style parameter changes for 4.0
- Style parameter changes for 4.1
- Style parameter changes for 4.2
- Style parameter changes for 4.3
- Style parameter changes for 4.4
Extensions
- Extensions overview
- Manifest
- Forms
- Macros
- Api
- Legacy plugin API
Google Summer of Code
References