Home
Node generator is a command line tool to generate Node-RED nodes based on various sources such as an OpenAPI document, a Function node or Web of Things Thing Description. It helps developers dramatically reduce the time to implement Node-RED nodes.
Node-RED is useful for rapid development using existing nodes in the flow library. On the other hand, once Node-RED users develop their original nodes to realize custom processing, JavaScript and HTML coding will be a time-consuming task. To solve the problem, the Node generator generates original nodes without coding and packages it. There are four types of use cases for Node generator.
The http request node can easily connect to cloud services via REST API. From a marketing perspective, having a dedicated node for a cloud service is more attractive to users because having preset node properties, and targeted information and documents can help improve the usability of the node. In general, cloud service providers publish OpenAPI document with REST API for users to test on Swagger UI. Node generator can use the OpenAPI document to create nodes for connection to a cloud service. Therefore, cloud service providers can release their original nodes without node development cost.
Node-RED users use the function node to write basic functionality with JavaScript code. Through trial and error of enhancing a flow, often times too many lines of Javascript code gets added into a function node. If the function node has useful functionality, sharing such a node for other Node-RED users will be useful because other users can just use the shared node without worrying about creating the same functionality and are able to concentrate on the development of their flow. In this case, Node generator supports the development of an original node from an existing function node.
In terms of reusability, the unit of subflow is suitable for sharing with other Node-RED users. In the future, Node generator will support functionality for creating an original node from a subflow. Node-RED users can encapsulate their flow as an original node. For example, both template node which has an authentication header and http request node which has URL is a typical pair which a lot of Node-RED users use to connect to cloud services. Node generator can generate an original node from a subflow that contains the flow. And Node-RED users can easily share their original node with other Node-RED users via flow library.
IoT application developers wants to concentrate their effort to create value from connected devices, and not to go into detail of implementation. To abstract out these detail, W3C Web of Things (WoT) provides mechanism to formally describe interfaces of IoT devices. In WoT, a device interface is described by Thing Description, and Node generator will support the Thing Description to create original nodes. Using Node generator, application developers can handle a node in Node-RED as an avatar of a device.
To install Node generator to your local PC, you need to input the following "npm install" command on command prompt (Windows) or terminal (macOS/Linux). Because the command execution needs root permission, "sudo" is required before "npm install" command on macOS or Linux environment.
npm install -g node-red-nodegen
The current version of Node generator supports function node, OpenAPI document and WoT Thing Description as source files. node-red-nodegen creates a node from the file which is specified in the argument of the command as follows.
node-red-nodegen <source file> -> The command tool outputs the node from the source file
The following documentation explains methods of creating nodes from two types of source files.
- How to create a node from OpenAPI document
- How to create a node from function node
- How to create a node from WoT Thing Description
The following is a typical directory structure of the node package generated by Node generator. After generating the node, you can install it on your local PC or publish it on the flow library.
- node.js         <- JavaScript file for node processing
- node.html       <- HTML file for node property UI
- icons
   |-icon.png     <- Icon file for node
- package.json    <- node package information
- README.md       <- Explanation file for node package
- LICENSE         <- License information of node
- test
   |-node_spec.js <- Test case for node
- locales
   |-en-US
      |-node.json <- Message catalog for English language
   |-ja
      |-node.json <- Message catalog for Japanese language
   |-zh-CN
      |-node.json <- Message catalog for Chinese language
   |-de-DE
      |-node.json <- Message catalog for German language
You can specify the URL or file path of an OpenAPI document as the first argument of the node-red-nodegen command.
(1) Generate node using node-red-nodegen command
node-red-nodegen http://petstore.swagger.io/v2/swagger.json
Node-RED users typically import the generated node to the palette of Node-RED flow editor using the following procedures.
(2) Change directory to the generated node's directory
cd node-red-contrib-swagger-petstore
(3) Prepare the symbolic link
sudo npm link
(4) Change current directory to Node-RED home directory (Typically, Node-RED home directory is ".node-red" under the home directory)
cd ~/.node-red
(5) Create a symbolic link
npm link node-red-contrib-swagger-petstore
(6) Start Node-RED
node-red
(7) Access the Node-RED flow editor (http://localhost:1880)
-> You can see the generated node on the palette of the Node-RED flow editor.
(8) Drag and drop the generated node to the workspace
(9) Select a method on the node property setting
(When the OpenAPI document does not contain a hostname or has authentication settings, the node property will have a property to set hostname and authentication settings.)
(10) Create flow on the Node-RED flow editor
-> The flow which consists of inject node, the generated node and debug node are suitable as a first step. (If the generated node uses POST method, you need to set JSON data to msg.payload of the inject node)
(11) Run the flow
-> In this example, After clicking the button on the inject node, you can check the received data from the debug tab.
If you want to customize the generated node, the following procedures and command line options will be helpful.
Node generator uses "node-red-contrib-" as the default prefix of the module name. Therefore, when the node name is "swagger-petstore", the module name becomes "node-red-contrib-swagger-petstore". If you want to change the default module name, you can specify the module name using --module or --prefix option.
node-red-nodegen http://petstore.swagger.io/v2/swagger.json --module node-red-node-swagger-petstore
node-red-nodegen http://petstore.swagger.io/v2/swagger.json --prefix node-red-node
In the case of the node generated from OpenAPI document, "info.title" value in OpenAPI document is used as the generated node's name. Node generator will replace uppercase characters and spaces with hyphens to convert appropriate name for npm module and Node-RED node.
{
  "swagger": "2.0",
  "info": {
    "description": "This is a sample server Petstore server.",
    "version": "1.0.0",
    "title": "Swagger Petstore",  <- Node generator converts this value to "swagger-petstore" and uses it as node name.
    "license": {
      "name": "Apache 2.0",
      "url": "http://www.apache.org/licenses/LICENSE-2.0.html"
    }
  },
  "host": "petstore.swagger.io",
  "basePath": "/v2",
  "schemes": [
    "https"
  ],
  ...
}
If you want to change the default name, you can set the node name using --name option. If "info.title" value contains a double-byte character instead of alphabet and number, you need to specify the node name using --name option in order for Node generator to generate the name correctly.
node-red-nodegen http://petstore.swagger.io/v2/swagger.json --name new-node-name
By default, Node generator uses "info.version" value as the module version number.
{
  "swagger": "2.0",
  "info": {
    "description": "This is a sample server Petstore server.",
    "version": "1.0.0",  <- Node generator uses this version number as the module version number.
    "title": "Swagger Petstore",
    "license": {
      "name": "Apache 2.0",
      "url": "http://www.apache.org/licenses/LICENSE-2.0.html"
    }
  },
  "host": "petstore.swagger.io",
  "basePath": "/v2",
  "schemes": [
    "https"
  ],
  ...
}
When you update the version number of the module without incrementing the version number in OpenAPI document, you need to specify --version option. A conflict error will occur when you publish a module that has the same version number as the previously published module when using "npm publish" command. In this case, the --version option needs to be specified to update the version number of the module.
node-red-nodegen http://petstore.swagger.io/v2/swagger.json --version 0.0.2
--keywords is a useful option for keywords of the module in the flow library. On the flow library website, visitors can search the module using keywords. For example, if you want to use "petstore" as a keyword, you can specify the word using --keywords option. By default, Node generator uses "node-red-nodegen" as a keyword.
node-red-nodegen http://petstore.swagger.io/v2/swagger.json --keywords petstore
To add more than two keywords, you can also use comma-separated keywords.
node-red-nodegen http://petstore.swagger.io/v2/swagger.json --keywords petstore,petshop
When "--keywords node-red" is specified before publishing the generated node, your node will be registered on the flow library and you can install the node via Node-RED flow editor.
node-red-nodegen http://petstore.swagger.io/v2/swagger.json --keywords petstore,petshop,node-red
On the palette of Node-RED flow editor, the generated node is in the function category by default. To change the category or use the product name, you can use --category option. For example, the node generated from the following command can be viewed in the "analysis" category on the Node-RED flow editor.
node-red-nodegen http://petstore.swagger.io/v2/swagger.json --category analysis
Node generator command supports --icon option to specify icon file for the generated node. You can use PNG file path or file name of stock icons for the option. The icon should have white on a transparent background.
node-red-nodegen http://petstore.swagger.io/v2/swagger.json --icon <PNG file or stock icon>
By default, Node generator uses default node color defined in the node templates. If you need to change it, you can use the --color option of the command line. The option value should be the sequence of the hexadecimal numbers ("RRGGBB" formats) which represents node color.
node-red-nodegen http://petstore.swagger.io/v2/swagger.json --color FFFFFF
Node generator automatically generates the node information in the info tab using the following values in OpenAPI document.
- info.description : Node description
- paths.[path].[http method].summary : Method description
- paths.[path].[http method].operationId : Method name
{
  "swagger": "2.0",
  "info": {
    "description": "This is a sample server Petstore server.",  <- Node generator uses this value as the node description.
    "version": "1.0.0",
    "title": "Swagger Petstore",
    "license": {
      "name": "Apache 2.0",
      "url": "http://www.apache.org/licenses/LICENSE-2.0.html"
    }
  },
  "host": "petstore.swagger.io",
  "basePath": "/v2",
  "schemes": [
    "https"
  ],
  ...
  "paths": {
    "/pet": {
      "post": {
        "tags": [
          "pet"
        ],
        "summary": "Add a new pet to the store",  <- Node generator uses this value as the method description.
        "description": "",
        "operationId": "addPet",  <- Node generator uses this value as the method name.
  ...
}
If you want to modify node information in info tab, you can manually edit the node's HTML file at the end of the section.
vi node-red-contrib-swagger-petstore/node.html
<script type="text/x-red" data-help-name="swagger-petstore">

    <p>This is a sample server Petstore server.</p>   <- Modify the node description
    <h2>Methods</h2>
        <h3>addPet</h3>                               <- Modify the method name
        <h4>Add a new pet to the store</h4>           <- Modify the method description
        ...
        <h3>deleteUser</h3>
        <h4>This can only be done by the logged in user.</h4> </script>
To explain the details of the node, you can write documentation in a README.md file. The documentation will be used in the flow library website if you publish your node on the flow library. The Node generator outputs the template file of README.md so you can just modify it.
vi node-red-contrib-swagger-petstore/README.md
node-red-contrib-swagger-petstore
=====================

Node-RED node for swagger-petstore

This is a sample server Petstore server.

Install
-------

Run the following command in your Node-RED home directory, typically `~/.node-red`

        npm install node-red-contrib-swagger-petstore
The set of test cases is important in order to maintain the quality of the generated node in production use. Node generator outputs the template file ("test/node_spec.js") of test cases into the generated directory. You need to modify the following three lines, (1),(2) and (3) in the test case file. If OpenAPI document does not contain hostname in "info" section, you need to write hostname as (4) in each test case manually.
vi node-red-contrib-swagger-petstore/test/node_spec.js
    it('should handle addPet()', function (done) {
        var flow = [
            { id: 'n1', type: 'swagger-petstore', name: 'swagger-petstore',
                method: 'addPet',
                addPet_body: '<node property>', // (1) define node properties
                wires: [['n3']]
            },
            { id: 'n3', type: 'helper' }
        ];
        helper.load(node, flow, function () {
            var n3 = helper.getNode('n3');
            var n1 = helper.getNode('n1');
            n3.on('input', function (msg) {
                try {
                    msg.should.have.property('payload', { "id": 4513 }); // (3) define output message
                    done();
                } catch (e) {
                    done(e);
                }
            });
            n1.receive({ payload: { "id": 4513 } }); // (2) define input message
        });
    });
In this example, the generated node sends data, "{ "id": 4513 }" to pet store REST API. And then, REST API returns the same data, "{ "id": 4513 }". You can run the test cases using the "npm test" command under the generated directory.
cd node-red-contrib-swagger-petstore
npm install
npm test
By default, Node generator outputs template files in English, Japanese, Chinese and German languages. If you want to support internationalization of node properties, you need to add language messages of parameters into the files.
vi node-red-contrib-swagger-petstore/locales/ja/node.json
{
    "SwaggerPetstore": {
        "label": {
            "service": "サービス",
            "method": "メソッド",
            "host": "ホスト",
            "header": "ヘッダ",
            "value": "値",
            "isQuery": "クエリ"
        },
        "status": {
            "requesting": "要求中"
        },
        "parameters": {
            "addPet": "addPet",
            "body": "body",
            "updatePet": "updatePet",
            "findPetsByStatus": "findPetsByStatus",
            ...
            "optionalParameters": "任意項目"
        }
    }
}
If your node does not support some languages, you can delete the language directory. (For example, delete "zh-CN" directory, if you do not want to support the Chinese language in the node)
While creating flow, you can use configuration nodes to change the endpoint of REST API which the generated node access.
To make the configuration node enable, you need to delete host, basePath and schemes properties from the OpenAPI document before generating node.
{
  "swagger": "2.0",
  "info": {
    "description": "This is a sample server Petstore server.",
    "version": "1.0.0",
    "title": "Swagger Petstore",
    "license": {
      "name": "Apache 2.0",
      "url": "http://www.apache.org/licenses/LICENSE-2.0.html"
    }
  },
  "host": "petstore.swagger.io",  <- Delete this line
  "basePath": "/v2",              <- Delete this line
  "schemes": [                    <- Delete this line
    "https"                       <- Delete this line
  ],                              <- Delete this line
  ...
}
This configuration node is suitable for REST API which have different URLs depending on the data center region on the cloud services. It will also be useful for edge computing use cases to switch from a cloud service endpoint to a local endpoint which has the same functionality as the cloud service.
If you want to use OpenAPI Specification 3.0 to generate a node, you need to convert data format from 3.0 to 2.0 using api-spec-converter command.
(1) Install api-spec-converter command
npm install -g api-spec-converter
(2) Convert data format
api-spec-converter -f openapi_3 -t swagger_2 https://raw.githubusercontent.com/OAI/OpenAPI-Specification/master/examples/v3.0/uspto.yaml > swagger.json
(3) Generate node
node-red-nodegen swagger.json
After writing JavaScript code in a function node, you can export the JavaScript code as js file using "Save to Library..." menu in function node. Because Node generator uses function node name as the generated node name, it is better to input node name before exporting the function node. Node-RED saves the js file to the directory, "/.node-red/lib/functions/". Therefore, you need to specify the directory and file path as the argument of the command line.
(1) Export function node as a js file
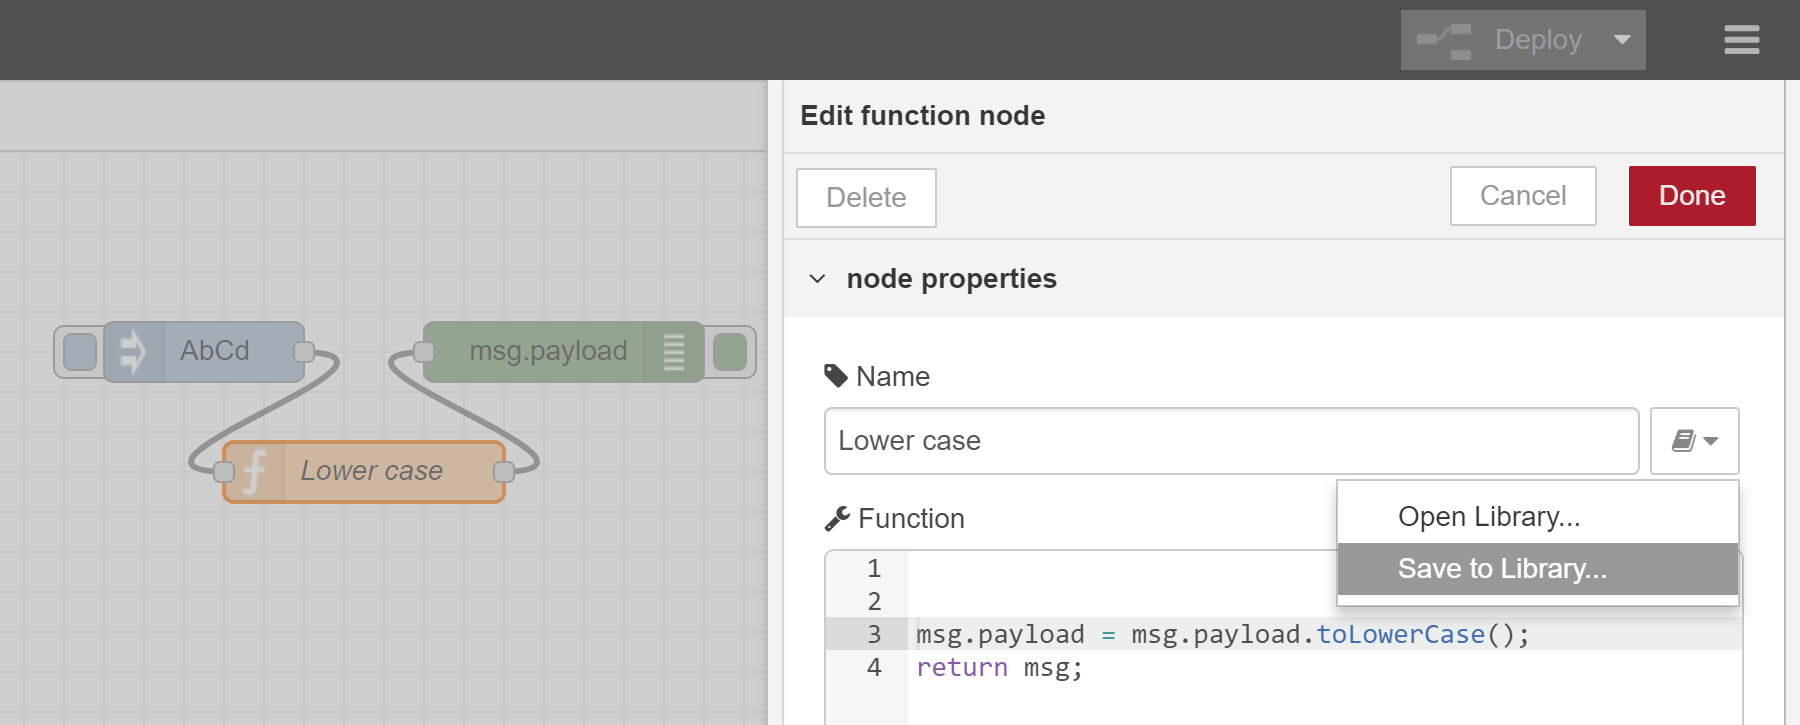
(2) Generate node using node-red-nodegen command
node-red-nodegen ~/.node-red/lib/functions/lower-case.js
Node-RED users typically import generated node to the palette of Node-RED flow editor using the following procedures.
(3) Change the current directory to generated node's directory
cd node-red-contrib-lower-case
(4) Prepare a symbolic link
sudo npm link
(5) Change directory to Node-RED home directory (Typically, Node-RED home directory is ".node-red" under the home directory)
cd ~/.node-red
(6) Create a symbolic link
npm link node-red-contrib-lower-case
(7) Start Node-RED
node-red
(8) Access the Node-RED flow editor (http://localhost:1880)
-> You can see the generated node on the palette of the Node-RED flow editor.
(9) Drag and drop the generated node to the workspace
(10) Create flow on the Node-RED flow editor
-> The flow which consists of inject node, the generated node and debug node are suitable as a first step.
(11) Run the flow
-> In this example, After clicking the button on the inject node, you can check the received data from the debug tab.
If you want to customize the generated node, the following procedures and command line options will be helpful.
Node generator uses "node-red-contrib-" as default prefix of the module name. Therefore, module name is "node-red-contrib-lower-case" when node name is "lower-case". If you want to change the default module name, you can specify module name using --module or --prefix option.
node-red-nodegen ~/.node-red/lib/functions/lower-case.js --module node-red-node-lower-case
node-red-nodegen ~/.node-red/lib/functions/lower-case.js --prefix node-red-node
In the case of function node, node name in function node is used as the generated node's name. If you want to change the default name, you can set node name using --name option.
node-red-nodegen ~/.node-red/lib/functions/lower-case.js --name new-node-name
By default, the version number of the module is always "0.0.1". When you update the version number of the module, you need to specify --version option. A conflict error will occur when you publish a module that has the same version number as the previously published module when using "npm publish" command. In this case, the --version option needs to be specified to update the version number of the module.
node-red-nodegen ~/.node-red/lib/functions/lower-case.js --version 0.0.2
--keywords is a useful option for keywords of the module on flow library. On the flow library website, visitors will search the module using the keywords. For example, if you want to use "lower-case" as a keyword, you can specify the word using --keywords option. As the default, Node generator uses "node-red-nodegen" as a keyword.
node-red-nodegen ~/.node-red/lib/functions/lower-case.js --keywords lower-case
To add more than two keywords, you can also use comma-separated keywords.
node-red-nodegen ~/.node-red/lib/functions/lower-case.js --keywords lower-case,function
When "--keywords node-red" is specified before publishing the generated node, your node will be registered on the flow library and you can install the node via Node-RED flow editor.
node-red-nodegen ~/.node-red/lib/functions/lower-case.js --keywords lower-case,function,node-red
On the palette of Node-RED flow editor, the generated node is in the function category as the default. To change the category or use product name, you can use --category option. For example, the node generated from the following command can be viewed in the "analysis" category on the Node-RED flow editor.
node-red-nodegen ~/.node-red/lib/functions/lower-case.js --category analysis
Node generator command supports --icon option to specify icon file for the generated node. You can use PNG file path or file name of stock icons for the option. The icon should have white on a transparent background.
node-red-nodegen ~/.node-red/lib/functions/lower-case.js --icon <PNG file or stock icon>
By default, Node generator uses default node color defined in the node templates. If you need to change it, you can use the --color option of the command line. The option value should be hexadecimal numbers ("RRGGBB" formats) which represent node color.
node-red-nodegen ~/.node-red/lib/functions/lower-case.js --color FFFFFF
Node generator outputs the template of node information into the node.html file. You need to modify the template along with your node. (Node developer will be able to use node description property to use node information in the future version of Node-RED and Node generator)
vi node-red-contrib-lower-case/node.html
<script type="text/x-red" data-help-name="lower-case">
    <p>Summary of the node.</p>
    <h3>Inputs</h3>
    <dl class="message-properties">
       <dt>payload<span class="property-type">object</span></dt>
       <dd>Explanation of payload.</dd>
       <dt class="optional">topic <span class="property-type">string</span></dt>
       <dd>Explanation of topic.</dd>
    </dl>
    <h3>Outputs</h3>
    <dl class="message-properties">
        <dt>payload<span class="property-type">object</span></dt>
        <dd>Explanation of payload.</dd>
        <dt class="optional">topic<span class="property-type">string</span></dt>
        <dd>Explanation of topic.</dd>
    </dl>
    <h3>Details</h3>
    <p>Explanation of the details.</p>
    <p><b>Note</b>: Note of the node.</p>
</script>
In the template, there is a summary of the node and three sections. Inputs section has properties information of inputted messages. Outputs section has properties explanation of outputted messages. Details section will contain additional information about the generated node.
To explain the details of the node, you can write documentation in a README.md file. The documentation will be used in the flow library website if you publish your node on npmjs. The Node generator outputs the template file of README.md so you can just modify it.
vi node-red-contrib-lower-case/README.md
node-red-contrib-lower-case
=====================

Node-RED node for lower case

Install
-------

Run the following command in your Node-RED home directory, typically `~/.node-red`

        npm install node-red-contrib-lower-case
The set of test cases is important in order to maintain the quality of the generated node in production use. Node generator outputs the template file of test cases into the file, "test/node_spec.js" under the generated directory. You need to modify the following two lines, (1) and (2) in the test case file.
vi node-red-contrib-lower-case/test/node_spec.js
    it('should have payload', function (done) {
        var flow = [
            { id: "n1", type: "lower-case", name: "lower-case", wires: [["n2"]] },
            { id: "n2", type: "helper" }
        ];
        helper.load(node, flow, function () {
            var n2 = helper.getNode("n2");
            var n1 = helper.getNode("n1");
            n2.on("input", function (msg) {
                msg.should.have.property('payload', 'abcd'); // (2) define output message
                done();
            });
            n1.receive({ payload: "AbCd" }); // (1) define input message
        });
    });
In this example, the generated node converts upper case characters to lower case characters. Therefore, the input message is "AbCd" and the output message is "abcd". You can run the test cases using "npm test" command under the generated directory.
cd node-red-contrib-lower-case
npm install
npm test
When loading external module to a function node, Node-RED users generally add the module into functionGlobalContext section in settings.js file.
Current Node generator does not support exporting this setting to the generated node.
Therefore, you need to modify node.js file and package.json file before you share the generated node with other Node-RED environments.
The following example is the procedure to generate a node from the function node that requires the moment module.
(1) Add external module into settings.js file (around line number 214)
vi ~/.node-red/settings.js
    functionGlobalContext: {
        // os:require('os'),
        // jfive:require("johnny-five"),
        // j5board:require("johnny-five").Board({repl:false})
        moment: require('moment')    <- Add definition of the external module
    },
(2) Install the external module
cd ~/.node-red/
npm install moment
cd
(3) Start Node-RED
node-red
(4) Write JavaScript code which uses the external module to the function node
| Item | Value in function node property |
|---|---|
| Name | Format date |
| Function | var moment = global.get('moment'); msg.payload = moment().format('MMMM Do YYYY, h:mm:ss a'); return msg; |
(5) Save the function node as a js file from "Save to Library..." menu on function node property UI
(6) Generate node
node-red-nodegen ~/.node-red/lib/functions/Format-date.js
(7) Add definition into js file (around line number 206)
vi node-red-contrib-format-date/node.js
        }
        sandbox.global.set("moment", require('moment'));  <- Add definition before vm.createContext()
        var context = vm.createContext(sandbox);
        try {
            this.script = vm.createScript(functionText, {
(8) Add dependency into the package.json file (around line number 17)
vi node-red-contrib-format-date/package.json
  "keywords": [
    "node-red-nodegen"
  ],
  "dependencies": {     <- Add dependency
    "moment": "2.23.0"  <- Add dependency
  },                    <- Add dependency
  "devDependencies": {
    "node-red": "0.18.7",
(9) Prepare symbolic link
sudo npm link
(10) Create symbolic link
cd ~/.node-red/
npm link node-red-contrib-format-date
(11) Restart Node-RED
node-red
-> You can use format-date node on your Node-RED flow editor.
You can specify the URL or file path of a Thing Description (TD) as the first argument of the node-red-nodegen command. If you use the URL for retrieve a TD, or the file whose extension isn't ".jsonld", you should specify the --wottd option. And, if you get a TD using URL, you can also specify --lang option to get a TD of the specific language, if exist.
(1) Generate node using node-red-nodegen command
node-red-nodegen td.jsonld
Node-RED users typically import the generated node to the palette of Node-RED flow editor using the following procedures.
(2) Change current directory to Node-RED home directory (Typically, Node-RED home directory is ".node-red" under the home directory)
cd ~/.node-red
(3) Locally install the module
npm install <location of node module>
(4) Start Node-RED
node-red
(5) Access the Node-RED flow editor (http://localhost:1880)
-> You can see the generated node on the palette (in an "Web of Things" category, if not specified by command-line option) of the Node-RED flow editor.
(6) Drag and drop the generated node to the workspace
(7) Configure the node
- Interaction: which interaction do you want to use?
- Name: what is the name of the interaction?
- Access: when you use a property, what kind of interaction do you want? (Read/Write/Observe)
- Form: which pair of authentication method and end point do you want to use?
- Token or Username/Password: if the end point needs credential for access, specify it.
- Node name: you can specify the display name of the node
(8) Create a flow on the Node-RED flow editor
- Property:
- To read a property, send any message to the node, and the result will emitted as msg.payload.
- To write to property, send the value to be written as msg.payload.
- When you observe a property, the node periodically emits the property value as msg.payload.
- Action:
- To invoke an action, send message to a node with arguments in msg.payload.
- Event:
- The node emits messages when event occurred. Event is stored in msg.payload.
(9) Run the flow
If you want to customize the generated node, the following procedures and command line options will be helpful.
Node generator uses "node-red-contrib-" as the default prefix for the module, and default node name is created from "name" property in TD.
If you want to change the default module name, you can specify the module name using --module or --prefix option.
node-red-nodegen td.jsonld --module wotmodule
node-red-nodegen td.jsonld --prefix node-red-wot
In the case of the node generated from Thing Description, "name" property in TD is used as the generated node's name. Node generator will replace uppercase characters and spaces with hyphens to convert appropriate name for npm module and Node-RED node.
If you want to change the default name, you can set the node name using --name option.
If "name" property contains a double-byte character instead of alphabet and number, you need to specify the node name using --name option in order for Node generator to generate the name correctly.
node-red-nodegen td.jsonld --name new-node-name
By default, Node generator uses "version" property as the module version number.
When you update the version number of the module without incrementing the version number in Thing Description, you need to specify --version option.
A conflict error will occur when you publish a module that has the same version number as the previously published module when using "npm publish" command.
In this case, the --version option needs to be specified to update the version number of the module.
node-red-nodegen td.jsonld --version 0.0.2
--keywords is a useful options for keywords of the module in the flow library.
On the flow library website, visitors can search the module using keywords.
For example, if you want to use "lamp" as a keyword, you can specify the word using --keyword option.
By default, Node generator uses "node-red-nodegen" as a keywords.
node-red-nodegen td.jsonld --keywords lamp
To add more than two keywords, you can also use comma-separated keywords.
node-red-nodegen td.jsonld --keywords lamp,led
If "--keywords node-red" is specified when you publish the generated node, your node will be registered on the flow library and you can install the node via Node-RED flow editor.
node-red-nodegen td.jsonld --keyword lamp,led,node-red
On the palette of Node-RED flow editor, the generated node is in "Web of Things" category by default.
To change the category, you can use --category option.
For example, the node generated from the following command can be viewed in the "analysis" category on the Node-RED flow editor.
node-red-nodegen td.jsonld --category analysis
Node generator command supports --icon option to specify icon file for the generated node.
You can use PNG file path or file name of stock icons for the option. The icon should have white on a transparent background.
node-red-nodegen td.jsonld --icon <PNG file or stock icon>
By default, Node generator uses default node color defined in the node templates. If you need to change it, you can use the --color option of the command line. The option value should be the sequence of the hexadecimal numbers ("RRGGBB" formats) which represents node color.
node-red-nodegen td.jsonld --color FFFFFF
Node generator automatically generates the node information in the info tab using the following properties in Thing Description
- description: Node description:
- title/description/forms in properties/actions/events: Interaction description
- support: Support Information
- links: References
If you want to modify node information in info tab, you can manually edit the generated HTML file.
To explain the details of the node, you can write documentation in a README.md file. The documentation will be used in the flow library website if you publish your node on the flow library. The Node generator outputs the template file of README.md so you can just modify it.
- In the Node generator command, you cannot use --tgz option and --icon option simultaneously because it has an asynchronous problem.
- The value of
info.titlein the OpenAPI document has to start with an alphabet (not a number) because it will be used in the variable name in the generated code.