Amateur astronomers want mounts that track automatically for several reasons, among them:
- To greatly improve the comfort of observing objects at high magnifications/powers, specially the planets and the moon
- To make it much easier to share views with family and friends or outreach events, since the observed object stays in the view even a high power
- To be able to mount a DSLR camera on top of their telescope and capture widefield images the sky
- To be able to do near-rea-time imaging (via short exposure imaging, or EAA) using an electronic eyepiece (a.k.a. CCD/CMOS astronomy camera), to be able to see the eye cannot see but the camera can
This is a simple motor drive to enable an inexpensive equatorial astronomy mount to track automatically on Right Ascension. I built it for my Explore Scientific Exos Nano, and after testing it and using it successfully for several nights, I want to share it.
RA Drives are already available commercially, from Celestron, Orion and others. The most basic models are not expensive (~$35), so most amateur astronomers will probably want to just buy one of those for their equatorial mount. You are not likely to save money by building this yourself instead of purchasing a ready-made-RA drive, but:
- If you own an odd mount for which there are no "known to work" commercial RA drives (or are building your own)
- If your mount has the wrong number of "gear teeth", so the the available commercial drives will not work with it
- If You are a tinkerer at heart
Then you might find this project interesting or educational.
You can see the hand controller features a small, black rotating knob. It enables you to adjust the motor speed (to match sidereal tracking rate) with resolution of 0.1% of the motor's full speed. Above the knob is a 4 digit LED to display the current motor speed (as a percentage of max speed), and it can be toggled off/on by pushing the rotary knob (to help preserve dark adaptation).
On the side there are 4 blue buttons to overrride the motor speed: 2x forward, full speed forward, 2x reverse, and full speed reverse. These help frame the observed object in the telescope view, which is useful since you lose access to the mount's slow motion knob when you install the DC motor.
I built this for my Explore Scientific Exos Nano, and it has worked very well with a 90mm Mak at up to 208x magnification for visually observing the moon and planets, and with my 80mm F4.4 refractor for short exposure (8 second) EAA imaging.
If you measure how many turns of the RA motion control does it take to make your mount rotate 90º, you'll be able to calculate how slow or fast a DC motor you need. If for your mount that measurement is somewhere between 25 and 90 turns (to produce 90º rotation of the RA axis), then the 0.6 RPM motor used in this project will likely work for your mount.
Any lower than 25 turns and you'll likely need a slower DC motor (there are inexpensive 0.5 RPM DC motors, but not slower), and much larger than 90 turns and you'll need a faster motor (1RPM DC motors are easy to find)
The ugly math:
- I measured how many turns of my mount's RA slow motion control does it take to make it rotate 90º.
- The Exos Nano takes ~30 full rotations of the RA slow motion control for the RA axis to rotate ~90º.
- This means the ratio between the slow motion control and the RA axis is (30*360/90)=120, or ~120:1
- So for example to move the RA axis 1 degree, we have to rotate the slow motion control ~120 degrees
- Sidereal speed is approximately 360º in 24 hours, or approximately 0,0041666 degrees per second.
- So, to get the RA axis to move at sideral speed, we need to rotate the slow motion control at 120 * 0,0041666 = 0.5 degrees per second
- A speed of 0.5 degrees per second is the same as 30 degrees per minute, or 0.083 RPM (revolutions per minute)
- A speed of 0.083 RPM is achievable using a DC 0.6 RPM motor and PWM with a duty cycle of: 0.083 / 0.6 = 13.8%
That's what the math says. In reality, you can expect the duty cycle to go somewhat lower for very light loads (perfectly balanced on the mount) or go higher for heavier/unbalanced loads.
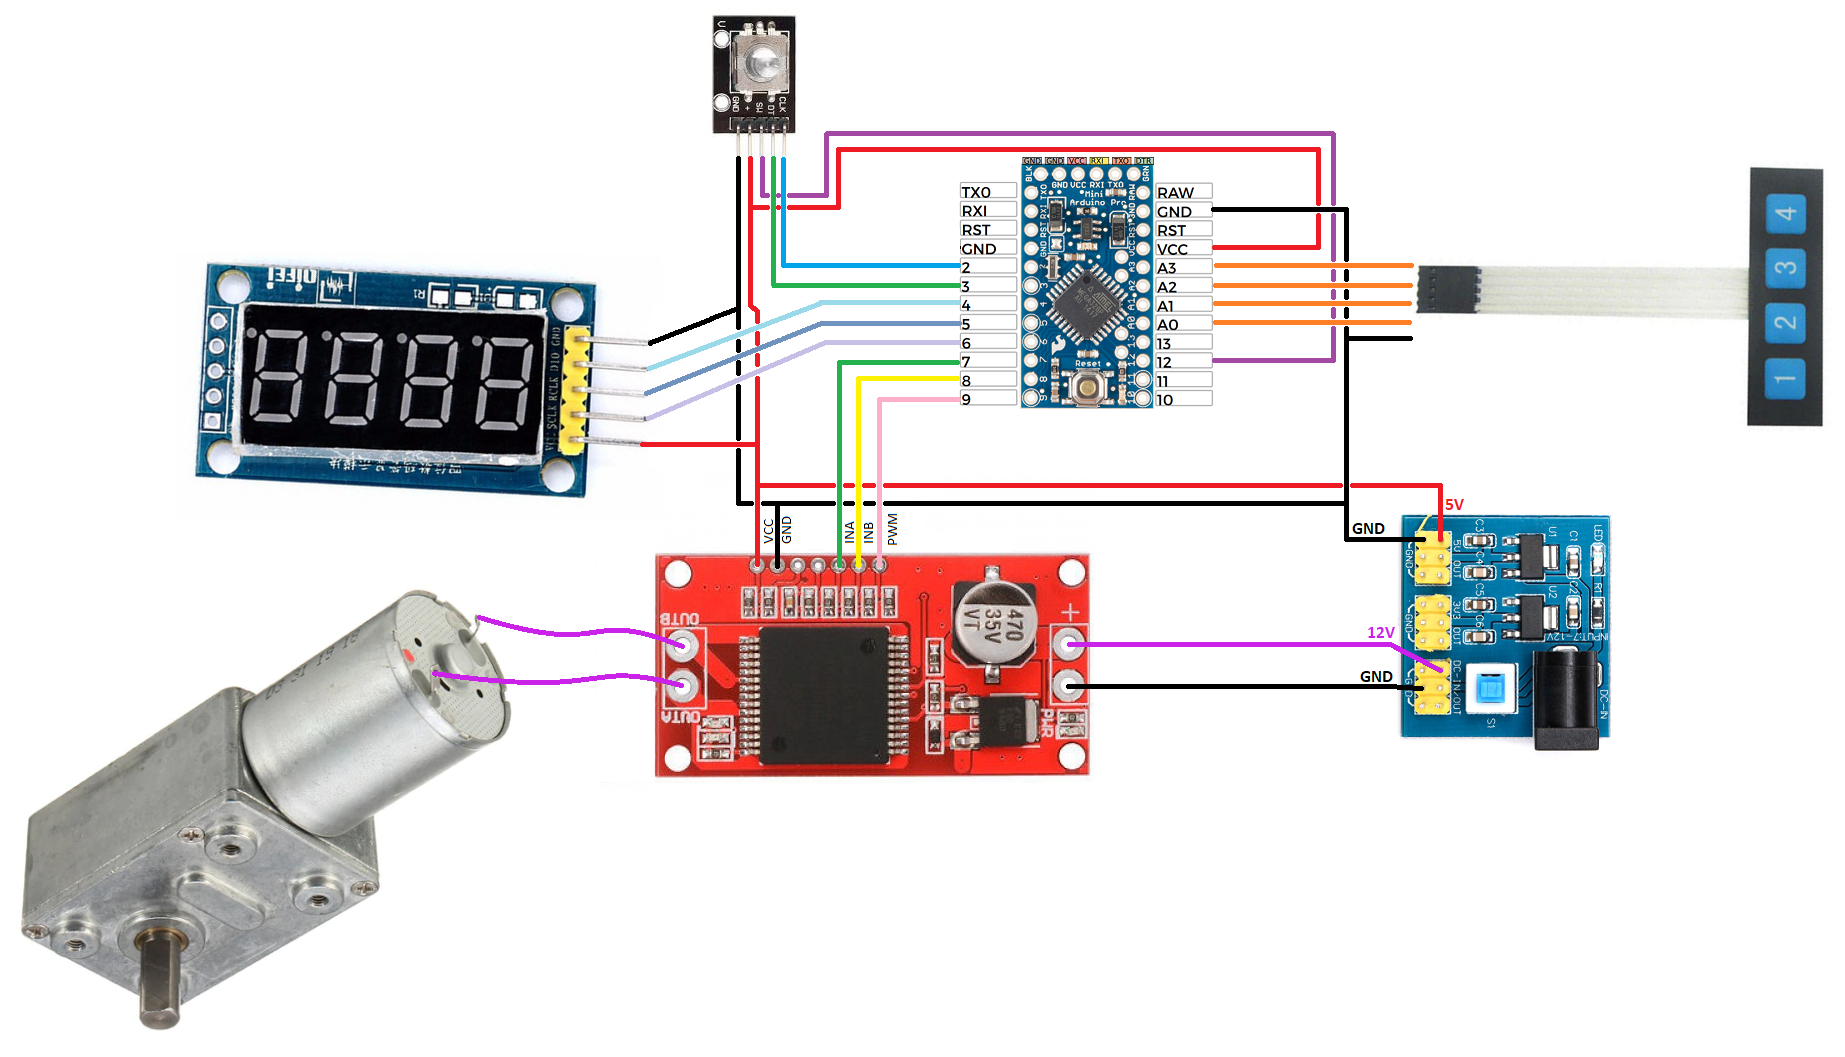
- Arduino based on the ATmega328P (could be an Uno, Pro Mini or similar based on the ATmega328P)
- 12V 0.6RPM DC motor (~$13). These are 12V "low speed high torque" (20Kg.cm) geared motors. I got mine for $11 from here: https://www.aliexpress.com/item/-/32719817076.html but that particular store is now gone. Still, these can be found elsewhere, like here: https://www.aliexpress.com/item/-/32816451726.html)
- VNH2SP30 (~$3) Motor Driver (a.k.a. "Monster") I used this one: https://www.aliexpress.com/item/-/32247122784.html
- KY-040 Rotary Encoder (~$1), I used this one: https://www.aliexpress.com/item/-/32251159127.html
- TM74HC595 based, 7 segment, 4 digit common anode LED display (~$1), like this one: https://www.aliexpress.com/item/-/1688259613.html
- 4 Key Matrix Membrane Switch Keypad (~$1), like this one: https://www.aliexpress.com/item/-/1719136832.html
- A shaft coupler of the approrpiate size, matching your mount on one side, and the motor on the other side. Probably one of these: https://www.aliexpress.com/item/-/1784910763.html
- Recommended power source: Talentcell 12V battery + this buck adapter: https://www.aliexpress.com/item/-/32806774850.html
You'll find the code on the EqRADrive.ino file. It needs Paul Stoffregen's TimerOne library to compile, so make sure to install that first on your Arduino IDE.
You'll notice that the 2x forward and 2x reverse buttons (or 2 of the unused GPIO input pins of the Arduino) could be easily fed from an ST4/RJ11 signal, if you were to adventure into auto-guiding for longer exposure astrophotography.
If you have questions or feedback, you are welcome to comment here: https://www.cloudynights.com/topic/628394-diy-ra-drive/


