-
Notifications
You must be signed in to change notification settings - Fork 1
Guide Overview of DASHER
Home | Installation Guide | User Guide | Admin Guide | User Tests
DASHER consists of two separate XNAT servers, one containing the non-anonymised data and the other containing the pseudonymised data. Full instructions for XNAT can be found in the XNAT User Guide, however, DASHER uses heavily customised versions of XNAT, with many features deliberately removed to simplify or restrict use, so some parts of the user guide may not be applicable to DASHER.
Once you have logged on to DASHER you will be presented with the home page. Note: The controls available will vary with the permissions granted to the user account you use for logging in.
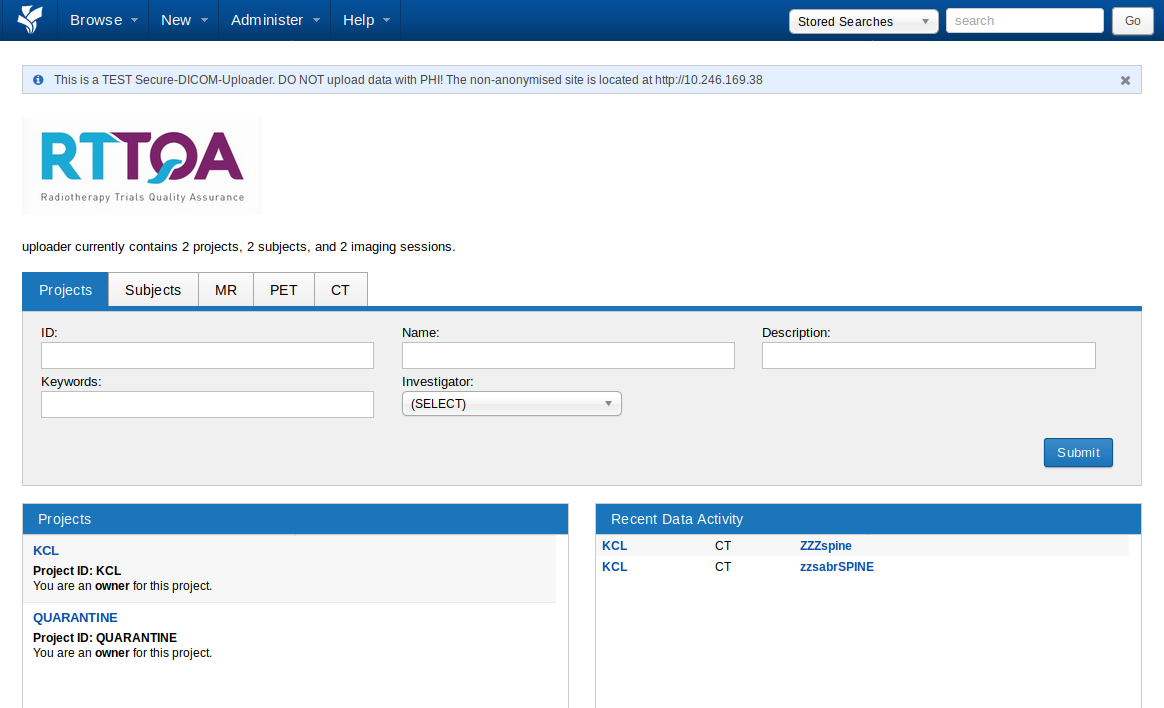
On the non-anonymised server you should see two projects listed on the left-hand side, one named with the hospital code for your site (KCL in the example below) and the other called QUARANTINE. See The QUARANTINE Project for more details:

On the pseudonymised server you should see a project set during the installation. This is linked to a remote server which data from the project is sent to. In the example below, the project RTTQA is linked to a remote server. You will also see any additional projects that have been created for local research (see Adding a Project for Local Research) or for sending data to other remote servers (see Adding a Project for a Remote Server).

Data in XNAT is stored in the Archive. Importing data usually comes in via a Prearchive to identify and prevent any conflicts before data is added to the Archive (see how to Import Data into DASHER for more information).
Data is organised into a hierarchical structure within XNAT.
Project -> Subject (patient) -> Experiments -> Session such as Imaging session, or other Subject Assessments
A project contains one or more subjects which usually represent individual patients. Subjects cannot exist outside a project. Each subject can have one or more experiments. The term experiment is used in the XNAT world for any event that acquires or produces data. One particular type of experiment is an imaging session which for instance can contains CT, MR, or PET scans. Other types of experiments describe assessments, non-imaging sessions, and other custom experiments. For more information have a look at the XNAT documentation.
Within this documentation we use a simplified hierarchy:
Project -> Subject -> Session
Once you are logged into XNAT you can navigate to the home-page by clicking on the XNAT-icon in the top left-hand corner.

The homepage has four main components:
- Top: The bar for general navigation, administration (if given appropriate rights), and help.
- Middle: The search area with the tabs called Subjects, MR, PET, and CT allows you to search for data within these categories.
- Bottom left: A list of projects.
- Bottom right: A list of recent data activity.
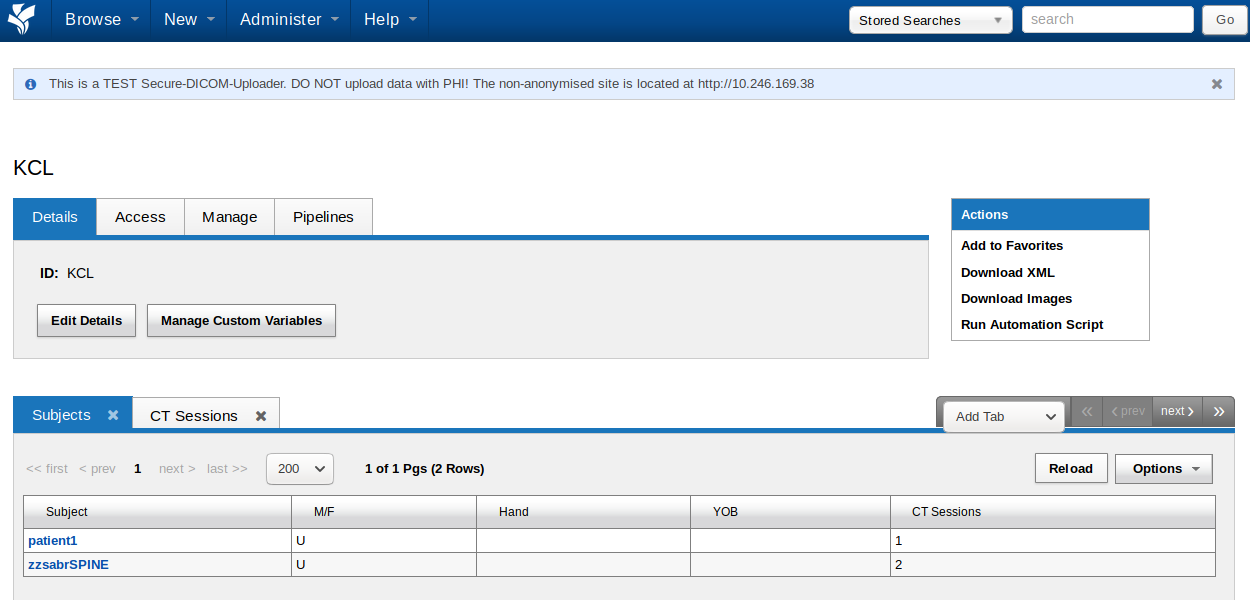
Clicking on the Hospital project (KCL in the example) will get you to the project page.
The project page provides tabs which provide access to project related settings such as access control, plugin related management, and pipeline settings. Below this you will find a list of subjects included in this project. You can add extra tabs to the table (for example with MR sessions) by clicking on ‘Add Tab’. A drop-down menu with additional tables will appear. You can view the details of each subject or session by clicking on the link in the Subject column.

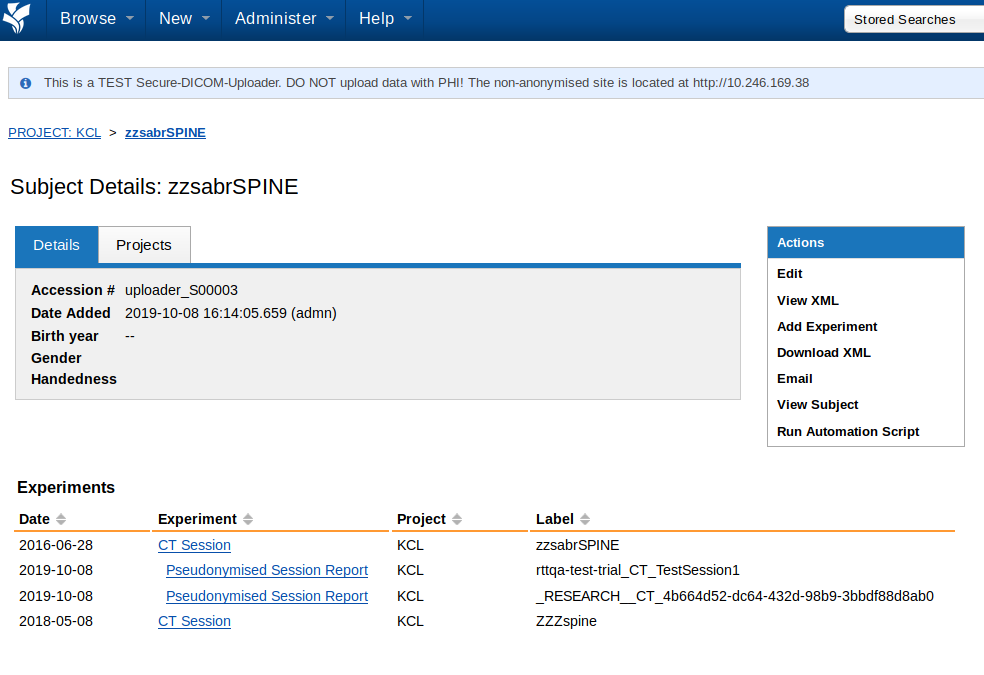
The Subject page (you will get here by clicking on a subject) lists the sessions (experiments) and demographic information related to that subject.

In this example, the patient zsabrSPINE has two imaging sessions - zzsabrSPINE and ZZZspine. The session zzsabrSPINE has been pseudonymised twice - first for a clinical trial (label 'rttqa-test-trial_CT_TestSession1') and second for other research by automatic hashing (label '_RESEARCH__CT_4b664d52-dc64-432d-98b9-3bbdf88d8ab'). An imaging session can be pseudonymised multiple times.
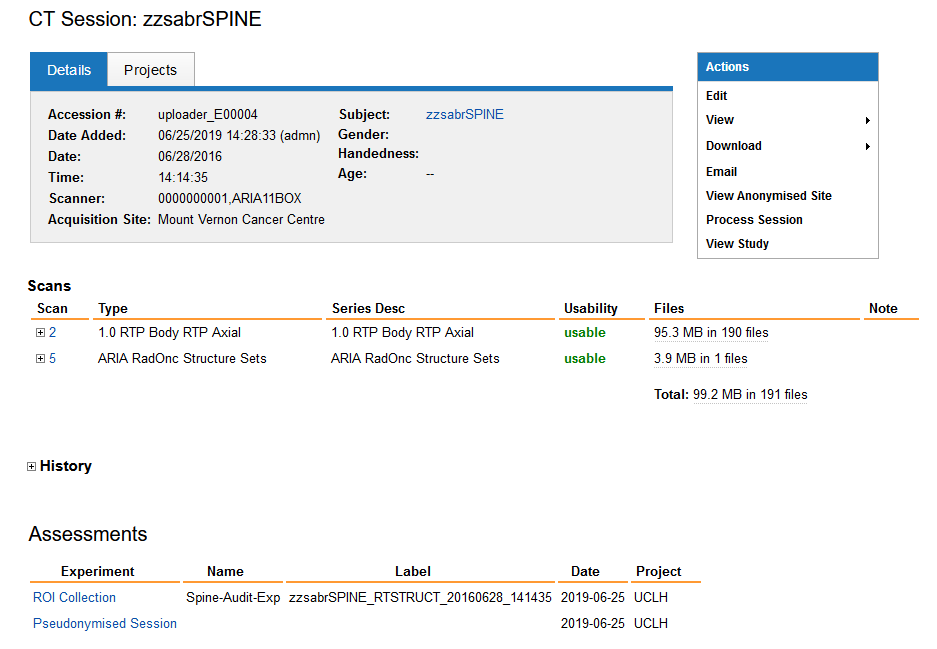
The session page gives detailed information about this session which may contain multiple items. CT images and corresponding RT-structures are listed under scans. Assessments of this session appear at the bottom. In this example you see that the RT Struct files was processed into a ROI Collection.

Next
Navigate: Home | Installation Guide | User Guide | Admin Guide | User Tests
New Pages:
- Test Release Version 4 Notes
- First time install on Windows
- First time install on Linux
- Updating DASHER on Windows
- Updating DASHER on Linux
- Editing xnat.cfg
- Building DASHER on Windows
- Building DASHER on Linux
- Installing the Processing Pipelines
- Setting up XSync
- Troubleshooting
- Logging in to the Servers
- Overview of DASHER
- Importing Data into DASHER
- Pseudonymising Data
- Uploading Data to a Remote Server
- Exporting Data from DASHER
- The QUARANTINE Project
- Create and Edit Users
- Adding Clinical Trials
- Managing the QUARANTINE Project
- Setting Quarantine Protocol
- Adding a Project for Local Research
- Adding a Project for a Remote Server
- Changing the Pseudonymisation
- Installing SSL Certificates
- Maintenance
- Download Test Data
- Installing DASHER
- Installing Plugins
- Adding Clinical Trial
- Creating a New User
- Importing Data into DASHER
- Pseudonymising Data 1
- Export Pseudonymised Data Locally
- Upload Data (XSync)
- Import - DICOM push
- Import - Duplicate
- Import - Single RTSTRUCT
- Import - Quarantine
- Pseudonymise - Edits
- Pseudonymise - Missing structure
- Pseudonymise - Local research
- Restarting Docker