Getting Started with Google Cloud Platform
The speech recognition from Google is quite impressive. Using this feature with Facepager requires a number of steps. I think it's worth it: you will learn a lot about Google's infrastructure and how APIs work. Get in touch with the magic of artificial intelligence. First time is intense, second time is simple. When everything is prepared, steps 4 & 5 are sufficient.
You will need Facepager v3.10 or newer.
If you never worked with Facepager before consider going through one of the shorter Getting Started tutorials and read about the basic concept. Or just keep going.
-
Register at Google Cloud Console https://console.cloud.google.com
-
Create a project. See https://cloud.google.com/resource-manager/docs/creating-managing-projects for help.
-
Enable the Cloud Speech API by entering the name of the API into the search field or by using the sandwich menu. You should find a button to enable the API. Click it. For a list of all APIs see https://cloud.google.com/apis/docs/overview (the section about machine learning possibly is of special interest to you).
-
Enable Google Cloud Storage JSON API using the search field or the sandwich menu. There should be a button to enable the API. click it.
-
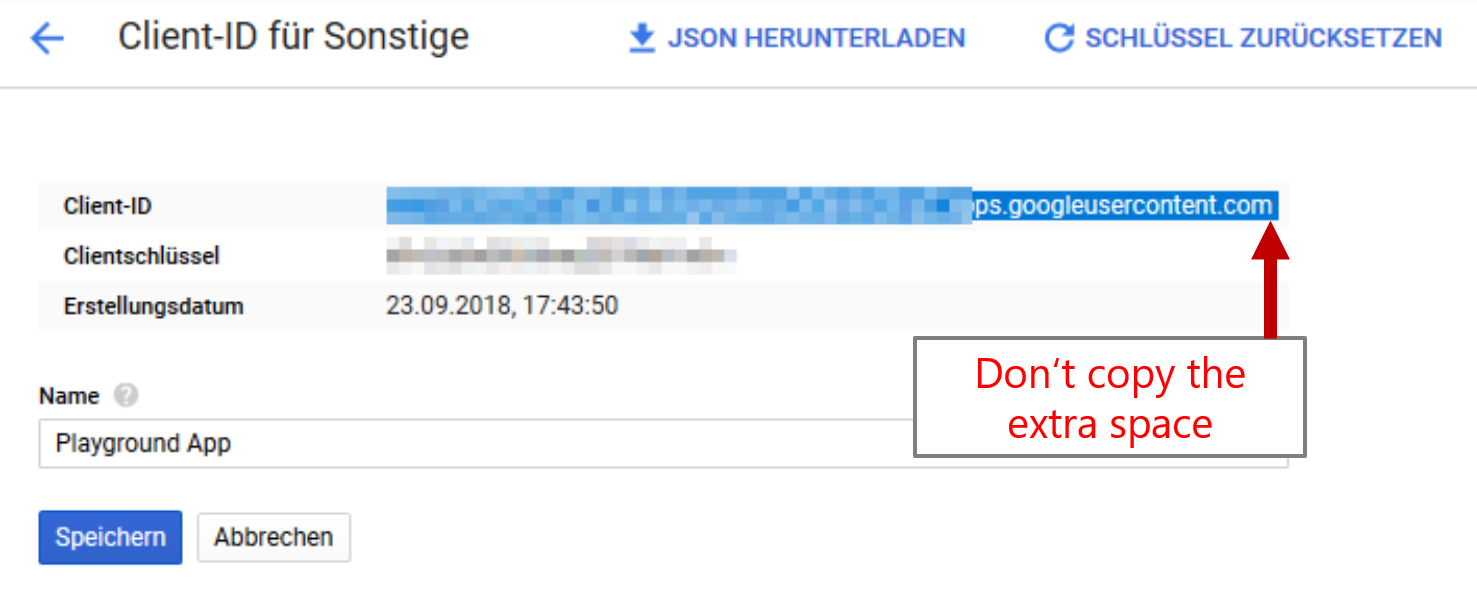
To access the APIs with Facepager, authentication is performed by OAuth2. Go to the API section of your project and create OAuth 2.0 permissions to get Client ID and Client Secret: https://console.cloud.google.com/apis/credentials. You have to fill out the name field for the OAuth dialog with what you like. Leave everything else as is. When asked set the type of application to "other".
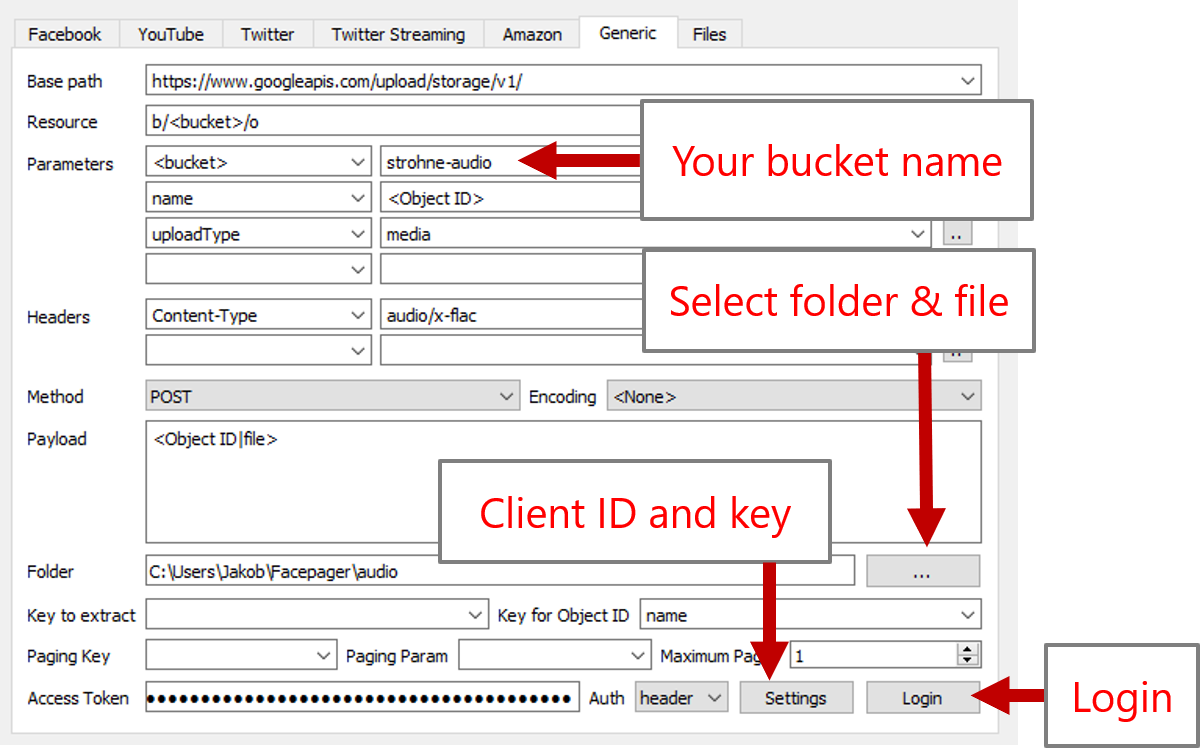
In the Generic Tab of Facepager click the Settings-button (next to Login-Button) and enter Client ID and Client Secret (Google calls this Client Key). The other settings will be filled out later on by the presets coming with Facepager. When you copy the credential data from the Google website be careful not to copy additional whitespaces at the end. The invisible space can lead to an error later in the login dialog. When working on a public computer make sure to blank out these fields when closing Facepager. You can set a tick at "Clear settings when closing" to automatically wipe out all the secrets.
- Open the storage browser at https://console.cloud.google.com/storage/browser. Create a blank bucket. I recommend to name the bucket by the following scheme:
myfancyusername-myfancybucketname
Be aware of rate limits and prices: https://cloud.google.com/speech-to-text/quotas
Audio files need to be FLAC-encoded, preferred is 16bit, 16000Hz. The file must be mono, not stereo. You can convert your files to mono and FLAC with Audacity or similar applications.
You can use our example file. It is about weather in Germany. Credits go to @spiderjens. Make sure to change the language to German in step number 5 below.
Have a look at https://archive.org/details/audio for tons auf audio files. Try to find a speech of your favorite politician, some come in FLAC format. Not every file works, it has to be mono!
For information about other file formats see https://cloud.google.com/speech-to-text/docs/reference/rest/v1/RecognitionConfig#AudioEncoding and adjust the settings in the following steps. MP3 or MP4 is not supported.
- Create a database: click
New Databasein the Menu Bar. - Load preset "Upload files to Google Cloud Storage bucket"
- Login. Make sure you have entered your Client ID and Client Secret before, see above. The permissions which are requested are defined in the scopes field. This field is filled by the preset with all scopes you will need for the following steps.
- Click the button (
...) next to the folder input and select the folder on you computer which contains the audio files. In the dialog make sure to check the option "Add files as nodes". Alternatively, you can manually add filenames afterwards, e.g. "nobel-peace-speech.flac". - Set the <bucket>-parameter to the name of you bucket, e.g. "myfancyusername-myfancybucketname".
- Select the new node containing the filename, click Fetch data-button and wait until the file is uploaded.
Check the web interface of Google Storage Browser: https://console.cloud.google.com/storage/browser. The file should appear in your bucket.
If something went wrong check for error messages in the data view.
Maybe you want to work with files uploaded earlier or with files not uploaded with Facepager. In this case get the contents of your bucket instead of uploading files:
- Load preset "Get contents of bucket from Google Cloud Storage"
- Add bucket name as node.
- Select the new node and fetch data
- New nodes for every object in the bucket should appear (don't forget to expand nodes)
- Preset "Asynchronous speech recognition using cloud storage"
- Select the node with the bucket item that refers to your audio file. You fetched these items in the last step (either by uploading files or by getting bucket content). You can instead add the name of the bucket object as node and adjust the payload setting, see the hints below.
- See the payload for setting file type or language. Leave everything as is for English language and FLAC encoded files. Information about other options can be found in the reference: https://cloud.google.com/speech-to-text/docs/reference/rest/v1/speech/longrunningrecognize (click "RecognitionConfig" or "RecognitionAudio"). For example, replace "en-US" with "de-DE" for German language files.
- Fetch data
This results in a node containing an operation number. The file is processed by Google under this number. Depending on how big your audio file is it takes some time. So repeat the next step until the result is ready. Five minutes of audio should not take longer than 30 seconds. 40 minutes may need up to 20 minutes.
- Preset "Result of asyncronous speech recognition"
- Select the node with the operation number
- Fetch data
You will only get back some number until you transcript is ready. Don't give up too early. Just poll the data every some minutes. As soon as the transcription is ready you get a new node for every chunk of speech. Notice the different alternatives in the detail view. You are now ready to export the result to a csv file.
- Instead of uploading the file with Facepager you can use the web interface of Google: https://console.cloud.google.com/storage/browser
- You can skip getting the contents of a bucket if you grasp the name from the browser. Add the name as a node, e.g. "myfancyusername-myfancybucket/awesomespeech.flac". After loading the preset for asychronous speech recognition look at the payload field and change
gs://<bucket>/<name>togs://<Object ID>. - Short audio files (< 1 minute) can be processed directly without uploading to cloud storage. See the preset "Synchronous speech recognition" and https://cloud.google.com/speech-to-text/docs/sync-recognize
- Make sure to use supported file formats and check for typos in the bucket name and file name.
- If you get authentication errors check the scopes, fill out client key and client secret fields and login again. Also check whether all necessary APIs are activated for your project in Google Cloud Console.
- The presets combine multiple scopes to reduce the need to login multiple times. Multiple scopes are separeted by space in the scopes field. See https://developers.google.com/identity/protocols/googlescopes for a list of scopes.
- For uploading files with Facepager a special kind of placeholders is used. In the payload field you will find the placeholder
<Object ID|file>. By using the pipe operator in conjunction with the file modifier the value of the placeholder is interpreted as a file name. The placeholder is then replaced by the contents of the file. The filename is relative to the folder specified in the input field below the payload field. - If you need to upload files with base64-encoding feed the contents to the base64-modifier using another pipe:
<Object ID|file|base64>. This type of placeholder is used in the setting for synchronous speech recognition.
What about feeding the result to named entity recognition, syntax parsing and sentiment analysis using the Natural Language API? See https://cloud.google.com/natural-language/docs/reference/rest/