Advanced Topics Under The Hood
When sending a build to the server we can provide additional parameters to the build, which are incorporated into the build process on the server to "hint" on multiple different build time options.
These hints are often referred to as "build hints" or "build arguments", they are effectively very much like souped up compiler flags that you can use to tune the build server’s behavior. This is useful for fast iteration on new functionality without building plugin UI for every change. This is also useful for exposing very low level behavior such as customizing the Android manifest XML or the iOS plist.
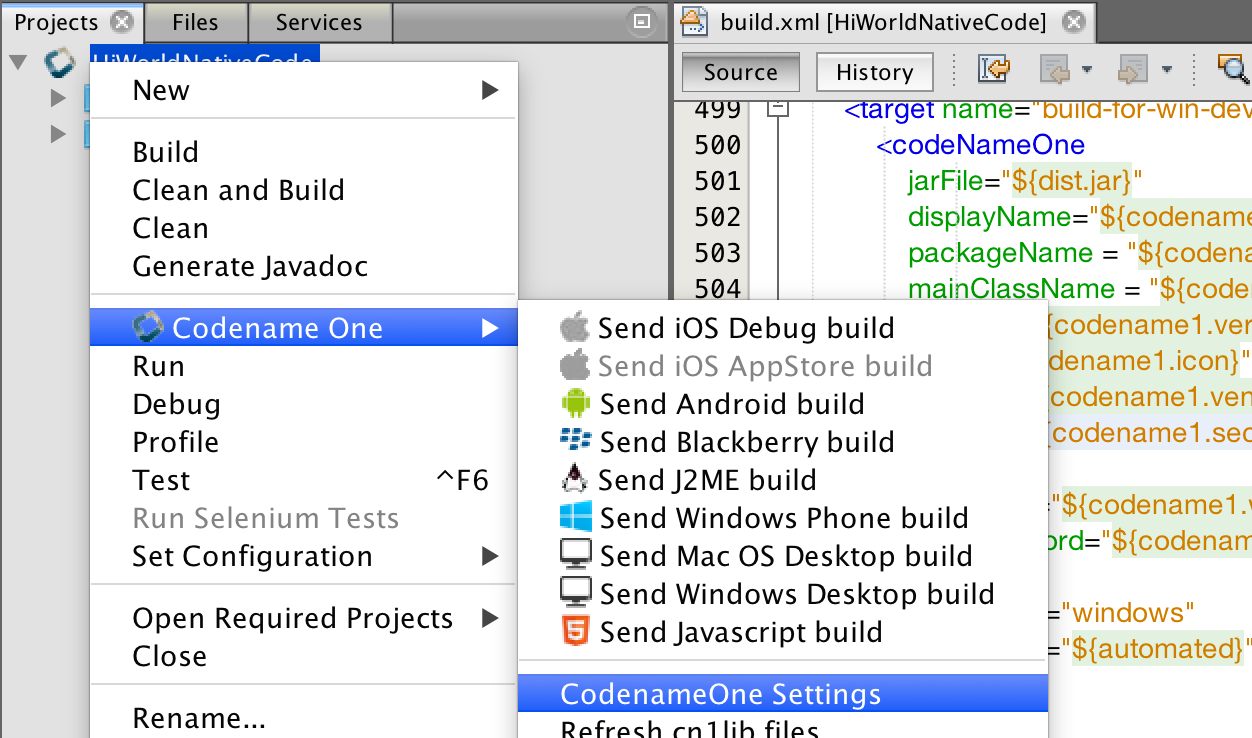
You can set these hints by right clicking the project in the IDE and selecting Codename One → Codename One Settings → Build Hints. The hints use the key=value style of data.
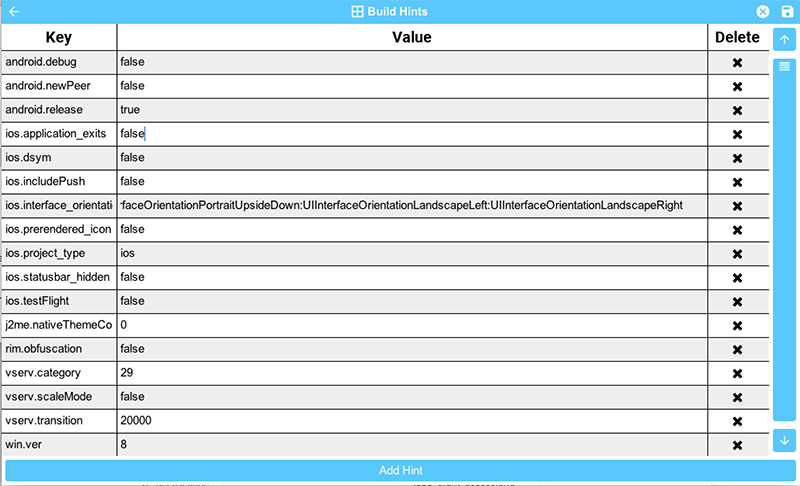
You can set the build hints in the codenameone_settings.properties file directly notice that when you do that all settings need to start with the codename1.arg. prefix. When editing the properties file directly we would need to define something like android.debug=true as codename1.arg.android.debug=true.
Here is the current list of supported arguments, notice that build hints are added all the time so consult the discussion forum if you don’t find what you need here:
| Name | Description |
|---|---|
android.debug |
true/false defaults to true - indicates whether to include the debug version in the build |
android.release |
true/false defaults to true - indicates whether to include the release version in the build |
android.installLocation |
Maps to android:installLocation manifest entry defaults to auto. Can also be set to internalOnly or preferExternal. |
android.gradle |
Deprecated, this mode is no longer supported. true/false defaults to false prior to 3.3 and true after. Uses Gradle instead of Ant to build the Android app |
android.xapplication |
defaults to an empty string. Allows developers of native Android code to add text within the application block to define things such as widgets, services etc. |
android.permission.PERMISSION_NAME |
true/false Whether to include a particular permission. Use of these build hints is preferred to |
android.permission.PERMISSION_NAME.maxSdkVersion |
Will be translated to the |
android.permission.PERMISSION_NAME.required |
true/false Will be translated to the |
android.xpermissions |
additional permissions for the Android manifest |
android.xintent_filter |
Allows adding an intent filter to the main android activity |
android.activity.launchMode |
Allows explicitly setting the |
android.licenseKey |
The license key for the Android app, this is required if you use in-app-purchase on Android |
android.stack_size |
Size in bytes for the Android stack thread |
android.statusbar_hidden |
true/false defaults to false. When set to true hides the status bar on Android devices. |
android.facebook_permissions |
Permissions for Facebook used in the Android build target, applicable only if Facebook native integration is used. |
android.googleAdUnitId |
Allows integrating admob/google play ads, this is effectively identical to google.adUnitId but only applies to Android |
android.googleAdUnitTestDevice |
Device key used to mark a specific Android device as a test device for Google Play ads defaults to C6783E2486F0931D9D09FABC65094FDF |
android.includeGPlayServices |
Deprecated, please android.playService.*! Indicates whether Goolge Play Services should be included into the build, defaults to false but that might change based on the functionality of the application and other build hints. Adding Google Play Services support allows us to use a more refined location implementation and invoke some Google specific functionality from native code. |
android.playService.plus, android.playService.auth, android.playService.base, android.playService.identity, android.playService.indexing, android.playService.appInvite, android.playService.analytics, android.playService.cast, android.playService.gcm, android.playService.drive, android.playService.fitness, android.playService.location, android.playService.maps, android.playService.ads, android.playService.vision, android.playService.nearby, android.playService.panorama, android.playService.games, android.playService.safetynet, android.playService.wallet, android.playService.wearable |
Allows including only a specific play services library portion. Notice that this setting conflicts with the deprecated If none of the services are defined to true then plus, auth, base, analytics, gcm, location, maps & ads will be set to true. If one or more of the |
android.playServicesVersion |
The version number of play services to build against. Experimental. Use with caution as building against versions other than the server default may introduce incompatibilities with some Codename One APIs. |
xxx.minPlayServicesVersion |
This is a special case build hint. You can use any prefix to the build hint and the convention is to use your cn1lib name. It’s identical to |
android.multidex |
Boolean true/false defaults to false. Multidex allows Android binaries to reference more than 65536 methods. This slows builds a bit so we have it off by default but if you get a build error mentioning this limit you should turn this on. |
android.headphoneCallback |
Boolean true/false defaults to false. When set to true it assumes the main class has two methods: |
android.gpsPermission |
Indicates whether the GPS permission should be requested, it is auto-detected by default if you use the location API. However, some code might want to explicitly define it |
android.asyncPaint |
Boolean true/false defaults to true. Toggles the Android pipeline between the legacy pipeline (false) and new pipeline (true) |
android.stringsXml |
Allows injecting additional entries into the strings.xml file using a value that includes something like this`<string name="key1">value1</string><string name="key2">value2</string>` |
android.supportV4 |
Boolean true/false defaults to false but that can change based on usage (e.g. push implicitly activates this). Indicates whether the android support v4 library should be included in the build |
android.style |
Allows injecting additional data into the |
android.cusom_layout1 |
Applies to any number of layouts as long as they are in sequence (e.g. android.cusom_layout2, android.cusom_layout3 etc.). Will write the content of the argument as a layout xml file and give it the name |
android.keyboardOpen |
Boolean true/false defaults to true. Toggles the new async keyboard mode that leaves the keyboard open while we move between text components |
android.versionCode |
Allows overriding the auto generated version number with a custom internal version number specifically used for the xml attribute |
android.captureRecord |
Indicates whether the |
android.nonconsumable |
Comma delimited string of items that are non-consumable in the in-app-purchase API |
android.removeBasePermissions |
Boolean true/false defaults to false. Disables the builtin permissions specifically |
android.blockExternalStoragePermission |
Boolean true/false defaults to false. Disables the external storage (SD card) permission |
android.min_sdk_version |
The minimum SDK required to run this app, the default value changes based on functionality but can be as low as 7. This corresponds to the XML attribute |
android.manifest.queries |
Embeds XML content into the <queries> section of the Android manifest file. This is required in Android 11 for package visibility. See queries element Android documentation. |
android.mockLocation |
Boolean true/false defaults to true. Toggles the mock location permission which is on by default, this allows easier debugging of Android device location based services |
android.smallScreens |
Boolean true/false defaults to true. Corresponds to the |
android.xapplication_attr |
Allows injecting additional attributes into the |
android.xactivity |
Allows injecting additional attributes into the |
android.streamMode |
The mode in which the volume key should behave, defaults to OS default. Allows setting it to |
android.pushVibratePattern |
Comma delimited long values to describe the push pattern of vibrate used for the |
android.enableProguard |
Boolean true/false defaults to true. Allows disabling the proguard obfuscation even on release builds, notice that this isn’t recommended |
android.proguardKeep |
Arguments for the keep option in proguard allowing us to keep a pattern of files e.g. |
android.shrinkResources |
Boolean true/false defaults to false. Used only in conjunction with android.enableProguard. Strips out unused resources to reduce apk size. Since 7.0 |
android.sharedUserId |
Allows adding a manifest attribute for the sharedUserId option |
android.sharedUserLabel |
Allows adding a manifest attribute for the sharedUserLabel option |
android.targetSDKVersion |
Indicates the Android SDK used to compile the Android build currently defaults to 21. Notice that not all targets will work since the source might have some limitations and not all SDK targets are installed on the build servers. |
android.useAndroidX |
Use Android X instead of support libraries. This will also run a find/replace on all source files to replace support libraries and artifacts with AndroidX equivalents. |
android.rootCheck |
Boolean true/false defaults to false. Indicates whether the app should check for root access on the device. If root access is detected, the app will exit. |
android.fridaDetection |
Boolean true/false defaults to false. Indicates whether the app should check for the presence of the Frida dynamic instrumentation toolkit on the device. If Frida is detected, the app will exit. |
android.theme |
Light or Dark defaults to Light. On Android 4+ the default Holo theme is used to render the native widgets in some cases and this indicates whether holo light or holo dark is used. Currently this doesn’t affect the Codename One theme but that might change in the future. |
android.web_loading_hidden |
true/false defaults to false - set to true to hide the progress indicator that appears when loading a web page on Android. |
block_server_registration |
true/false flag defaults to false. By default Codename One applications register with our server, setting this to true blocks them from sending information to our cloud. We keep this data for statistical purposes and intend to provide additional installation stats in the future. |
facebook.appId |
The application ID for an app that requires native Facebook login integration, this defaults to null which means native Facebook support shouldn’t be in the app |
facebook.clientToken |
The client token for an app that requires native Facebook login integration, this is required if the facebook.appId is set. |
gcm.sender_id |
The Android/chrome push identifier, see the push section for more details |
android.background_push_handling |
Deliver push messages on Android when the app is minimized by setting this to "true". Default behaviour is to deliver the message only if the app is in the foreground when received, or after the user taps on the notification to open the app, if the app was in the background when the message was received. |
desktop.mac.plist.PLISTKEY |
Set the key |
desktop.mac.plistInject |
Injects raw XML into the Info.plist file for desktop builds. E.g. |
ios.associatedDomains |
Comma-delimited list of domains associated with this app. Since 6.0. Note that each domain should be prefixed by a supported prefix. E.g. "applinks:" or "webcredentials:". See Apple’s documentation on Associated domains for more information. |
ios.bitcode |
true/false defaults to false. Enables bitcode support for the build. |
ios.debug.archs |
Can be set to "armv7" to force iOS debug builds to be 32 bit. By default, debug builds are 64 bit only. |
ios.release.archs |
Can be set to "arm64" to only build iOS release builds for 64 bit. By default, release builds are both 32 and 64 bit. |
ios.distributionMethod |
Specifies distribution type for debug iOS builds. This is generally used for enterprise or ad-hoc builds (using values "enterprise" and "ad-hoc" respectively). |
ios.debug.distributionMethod |
Specifies distribution type for debug iOS builds only. This is generally used for enterprise or ad-hoc builds (using values "enterprise" and "ad-hoc" respectively). |
ios.release.distributionMethod |
Specifies distribution type for release iOS builds only. This is generally used for enterprise or ad-hoc builds (using values "enterprise" and "ad-hoc" respectively). |
ios.keyboardOpen |
Flips between iOS keyboard open mode and auto-fold keyboard mode. Defaults to true which means the keyboard will remain open and not fold automatically when editing moves to another field. |
ios.urlScheme |
Allows intercepting a URL call using the syntax |
ios.useAVKit |
Use AVKit for video components on iOS rather than |
ios.teamId |
Specifies the team ID associated with the iOS provisioning profile and certificate. Use |
ios.debug.teamId |
Specifies the team ID associated with the iOS debug provisioning profile and certificate. |
ios.release.teamId |
Specifies the team ID associated with the iOS release provisioning profile and certificate. |
ios.project_type |
one of ios, ipad, iphone (defaults to ios). Indicates whether the resulting binary is targeted to the iphone only or ipad only. Notice that the IDE plugin has a "Project Type" combo box you should use under the iOS section. |
ios.rpmalloc |
|
ios.statusbar_hidden |
true/false defaults to false. Hides the iOS status bar if set to true. |
ios.newStorageLocation |
true/false defaults to false but defined on new projects as true by default. This changes the storage directory on iOS from using caches to using the documents directory which is more correct but might break compatibility. This is described in this issue |
ios.prerendered_icon |
true/false defaults to false. The iOS build process adapts the submitted icon for iOS conventions (adding an overlay) that might not be appropriate on some icons. Setting this to true leaves the icon unchanged (only scaled). |
ios.app_groups |
Space-delimited list of app groups that this app belongs to as described in Apple’s documentation. These are added to the entitlements file with key |
ios.keychainAccessGroup |
Space-delimited list of keychain access groups that this app has access to as described in Apple’s documentation. These are added to the entitlements file with the key |
ios.application_exits |
true/false (defaults to false). Indicates whether the application should exit immediately on home button press. The default is to exit, leaving the application running is only partially tested at the moment. |
ios.blockScreenshotsOnEnterBackground |
true/false (defaults to false). Indicates that app should prevent iOS from taking screenshots when app enters background. Described here. |
ios.detectJailbreak |
true/false (defaults to false). When true, the iOS app will exit on launch if it detects that it is running on a jailbroken device. |
ios.applicationQueriesSchemes |
Comma separated list of url schemes that |
ios.themeMode |
default/legacy/modern/auto (defaults to default). Default means you don’t define a theme mode. Currently this is equivalent to legacy. In the future we will switch this to be equivalent to auto. legacy - this will behave like iOS 6 regardless of the device you are running on. modern - this will behave like iOS 7 regardless of the device you are running on. auto - this will behave like iOS 6 on older devices and iOS 7 on newer devices. |
ios.interface_orientation |
UIInterfaceOrientationPortrait by default. Indicates the orientation, one or more of (separated by colon :): UIInterfaceOrientationPortrait, UIInterfaceOrientationPortraitUpsideDown, UIInterfaceOrientationLandscapeLeft, UIInterfaceOrientationLandscapeRight. Notice that the IDE plugin has an "Interface Orientation" combo box you should use under the iOS section. |
ios.xcode_version |
The version of xcode used on the server. Defaults to 4.5; currently accepts 5.0 as an option and nothing else. |
ios.multitasking |
Set to true to enable iOS multitasking and split-screen support. This only works if |
java.version |
Valid values include 5 or 8. Indicates the JVM version that should be used for server compilation, this is defined by default for newly created apps based on the Java 8 mode selection |
javascript.inject_proxy |
true/false (defaults to |
javascript.inject.beforeHead |
Content to be injected into the index.html file at the beginning of the |
javascript.inject.afterHead |
Content to be injected into the index.html file at the end of the |
javascript.minifying |
true/false (defaults to |
javascript.proxy.url |
The URL to the proxy servlet that should be used for making network requests. If this is omitted, the .war version of the app will be set to use the bundled proxy servlet, and the .zip version of the app will be set to use no proxy. If |
javascript.sourceFilesCopied |
true/false (defaults to |
javascript.stopOnErrors |
true/false (defaults to |
javascript.teavm.version |
(Optional) The version of TeaVM to use for the build. Use caution, only use this property if you know what you are doing! |
rim.askPermissions |
true/false defaults to true. Indicates whether the user is prompted for permissions on Blackberry devices. |
google.adUnitId |
Allows integrating Admob/Google Play ads into the application see this |
rim.ignor_legacy |
true/false defaults to false. When set to true the Blackberry build targets only 5.0 devices and newer and doesn’t build the 4.x version. rim.nativeBrowser true/false defaults to false. Enables the native blackberry browser on OS 5 or higher. It is disabled by default since it might casue crashes on some cases. |
rim.obfuscation |
true/false defaults to false. Obfuscate the JAR before invoking the rimc compiler. |
ios.entitlementsInject |
Content to inject into the iOS entitlements file. This should be in the Plist XML format. See Apple Entitlements Documentation. |
ios.plistInject |
entries to inject into the iOS plist file during build. |
ios.includePush |
true/false (defaults to false). Whether to include the push capabilities in the iOS build. Notice that the IDE plugin has an "Include Push" check box you should use under the iOS section. |
ios.newPipeline |
Boolean true/false defaults to true. Allows toggling the OpenGL ES 2.0 drawing pipeline off to the older OGL ES 1.0 pipeline. |
ios.headphoneCallback |
Boolean true/false defaults to false. When set to true it assumes the main class has two methods: |
ios.facebook_permissions |
Permissions for Facebook used in the Android build target, applicable only if Facebook native integration is used. |
ios.applicationDidEnterBackground |
Objective-C code that can be injected into the iOS callback method (message) |
ios.enableAutoplayVideo |
Boolean true/false defaults to false. Makes videos "auto-play" when loaded on iOS |
ios.googleAdUnitId |
Allows integrating admob/google play ads, this is effectively identical to google.adUnitId but only applies to iOS |
ios.viewDidLoad |
Objective-C code that can be injected into the iOS callback method (message) |
ios.googleAdUnitIdPadding |
Indicates the amount of padding to pass to the Google ads placed at the bottom of the screen with |
ios.enableBadgeClear |
Boolean true/false defaults to true. Clears the badge value with every load of the app, this is useful if the app doesn’t manually keep track of number values for the badge |
ios.glAppDelegateHeader |
Objective-C code that can be injected into the iOS app delegate at the top of the file. E.g. if you need to include headers or make special imports for other injected code |
ios.glAppDelegateBody |
Objective-C code that can be injected into the iOS app delegate within the body of the file before the end. This only makes sence for methods that aren’t already declared in the class |
ios.beforeFinishLaunching |
Objective-C code that can be injected into the iOS app delegate at the top of the body of the didFinishLaunchingWithOptions callback method |
ios.afterFinishLaunching |
Objective-C code that can be injected into the iOS app delegate at the bottom of the body of the didFinishLaunchingWithOptions callback method |
ios.locationUsageDescription |
This flag is required for iOS 8 and newer if you are using the location API. It needs to include a description of the reason for which you need access to the users location |
ios.NSXXXUsageDescription |
iOS privacy flags for using certain APIs. Starting with Xcode 8, you are required to add usage description strings for certain APIs. Find a full list of the available keys in Apple’s docs. Some relevant ones include |
ios.add_libs |
A semicolon separated list of libraries that should be linked to the app in order to build it |
ios.pods |
A comma separated list of Cocoa Pods that should be linked to the app in order to build it. E.g. |
ios.pods.platform |
Sets the Cocoapods 'platform' for the Cocoapods. Some Cocoapods require a minimum platform level. E.g. |
ios.deployment_target |
Sets the deployment target for iOS builds. This is the minimum version of iOS required by a device to install the app. E.g. |
ios.bundleVersion |
Indicates the version number of the bundle, this is useful if you want to create a minor version number change for the beta testing support |
ios.objC |
Added the |
ios.testFlight |
Boolean true/false defaults to false and works only for pro accounts. Enables the testflight support in the release binaries for easy beta testing. Notice that the IDE plugin has a "Test Flight" check box you should use under the iOS section. |
ios.generateSplashScreens |
Boolean true/false defaults to false as of 5.0. Enable legacy generation of splash screen images for use when launching the app. These have been replaced now by the new launch storyboards. |
desktop.width |
Width in pixels for the form in desktop builds, will be doubled for retina grade displays. Defaults to 800. |
desktop.height |
Height in pixels for the form in desktop builds, will be doubled for retina grade displays. Defaults to 600. |
desktop.adaptToRetina |
Boolean true/false defaults to true. When set to true some values will ve implicitly doubled to deal with retina displays and icons etc. will use higher DPI’s |
desktop.resizable |
Boolean true/false defaults to true. Indicates whether the UI in the desktop build is resizable |
desktop.fontSizes |
Indicates the sizes in pixels for the system fonts as a comma delimited string containing 3 numbers for small,medium,large fonts. |
desktop.theme |
Name of the theme res file (without the ".res" extension) to use as the "native" theme. By default this is native indicating iOS theme on Mac and Windows Metro on Windows. If its something else then the app will try to load the file /themeName.res (placed in native/javase directory). |
desktop.themeMac |
Same as |
desktop.themeWin |
Same as |
desktop.windowsOutput |
Can be exe or msi depending on desired results |
desktop.win.cef |
Whether to use CEF for media and BrowserComponent instead of JavaFX in windows desktop builds. true/false. Currently default value is |
desktop.mac.cef |
Whetherto use CEF for media or BrowserComponent instead of JavaFX in Mac desktop builds. true/false. Currently default value is |
mac.desktop-vm |
The JVM the should be bundled with Mac desktop build. Mac desktop builds only. Supported values: zuluFx8, zulu11, zuluFx11 |
win.desktop-vm |
The JVM that should be bundled in the Windows desktop build. Windows desktop builds only. Supported values: zulu8, zuluFx8, zulu8-32bit, zuluFx8-32bit, zulu11, zuluFx11, zulu11-32bit, zuluFx11-32bit |
windows.extensions |
Content to be embedded into the |
win.vm32bit |
true/false (defaults to false). Forces windows desktop builds to use the Win32 JVM instead of the 64 bit VM making them compatible with older Windows Machines. This is off by default at the moment because of a bug in JDK 8 update 112 that might cause this to fail for some cases |
noExtraResources |
true/false (defaults to false). Blocks codename one from injecting its own resources when set to true, the only effect this has is in slightly reducing archive size. This might have adverse effects on some features of Codename One so it isn’t recommended. |
j2me.iconSize |
Defaults to 48x48. The size of the icon in the format of width x height (without the spacing). |
|
Important
|
Offline build is an enterprise feature |
At this time Codename One supports iOS & Android targets for offline builds. We require an Enterprise grade subscription as explained in the sidebar.
|
Note
|
If you signup for Enterprise and cancel you can still do the offline build. You won’t be able to update the builder though |
There are several reasons, the technical one is that offline builds are no panacea. Things fail. The support effort for offline builds is huge, as evidence despite the fact that all of our code is open source very few people bothered trying to compile it because of the complexities.
We don’t think building offline is convenient and we always recommended avoiding it. When we build our own apps we use the cloud just like everyone else because it’s surprisingly faster and more convenient…
However, some government and regulated industries have issues with SaaS delivered solutions and thus must use offline build. These organizations also require enterprise grade support for most cases and so it makes sense to bundle as an enterprise only solution.
You need the following installed tools/versions for Codename One’s offline build process:
-
Mac ideally with El Capitan, newer should work
-
Xcode 7+ (but not 8+ at this time)
-
Oracle’s JDK 8
-
Cocoapods - in the terminal type
sudo gem install cocoapods --pre. -
xcodeproj - in the terminal type
sudo gem install xcodeproj
Android builds need the following:
-
Android Studio
-
Oracle’s JDK 8
-
Gradle version 2.11
To build offline you need to install the offline builder code which is a stripped down version of the build servers. When you install a version of the offline builder it maps to the time in which you downloaded it…
That means that features like versioned builds won’t work. You can download/keep multiple offline builders and toggle between them which is similar in scope.
E.g. if you installed an offline builder then installed a newer version and the newer version has a bug you can revert to the old version. Notice that the older version might not have features that exist in a newer version.
|
Tip
|
Since installation requires an enterprise account, you might need to re-login in the Codename One Settings UI |
To install an offline builder open the Codename One Settings UI by right clicking the project and selecting Codename One → Codname One Settings.
|
Tip
|
Even though the settings are a part of a project, the offline build settings are global and apply to all the projects… |
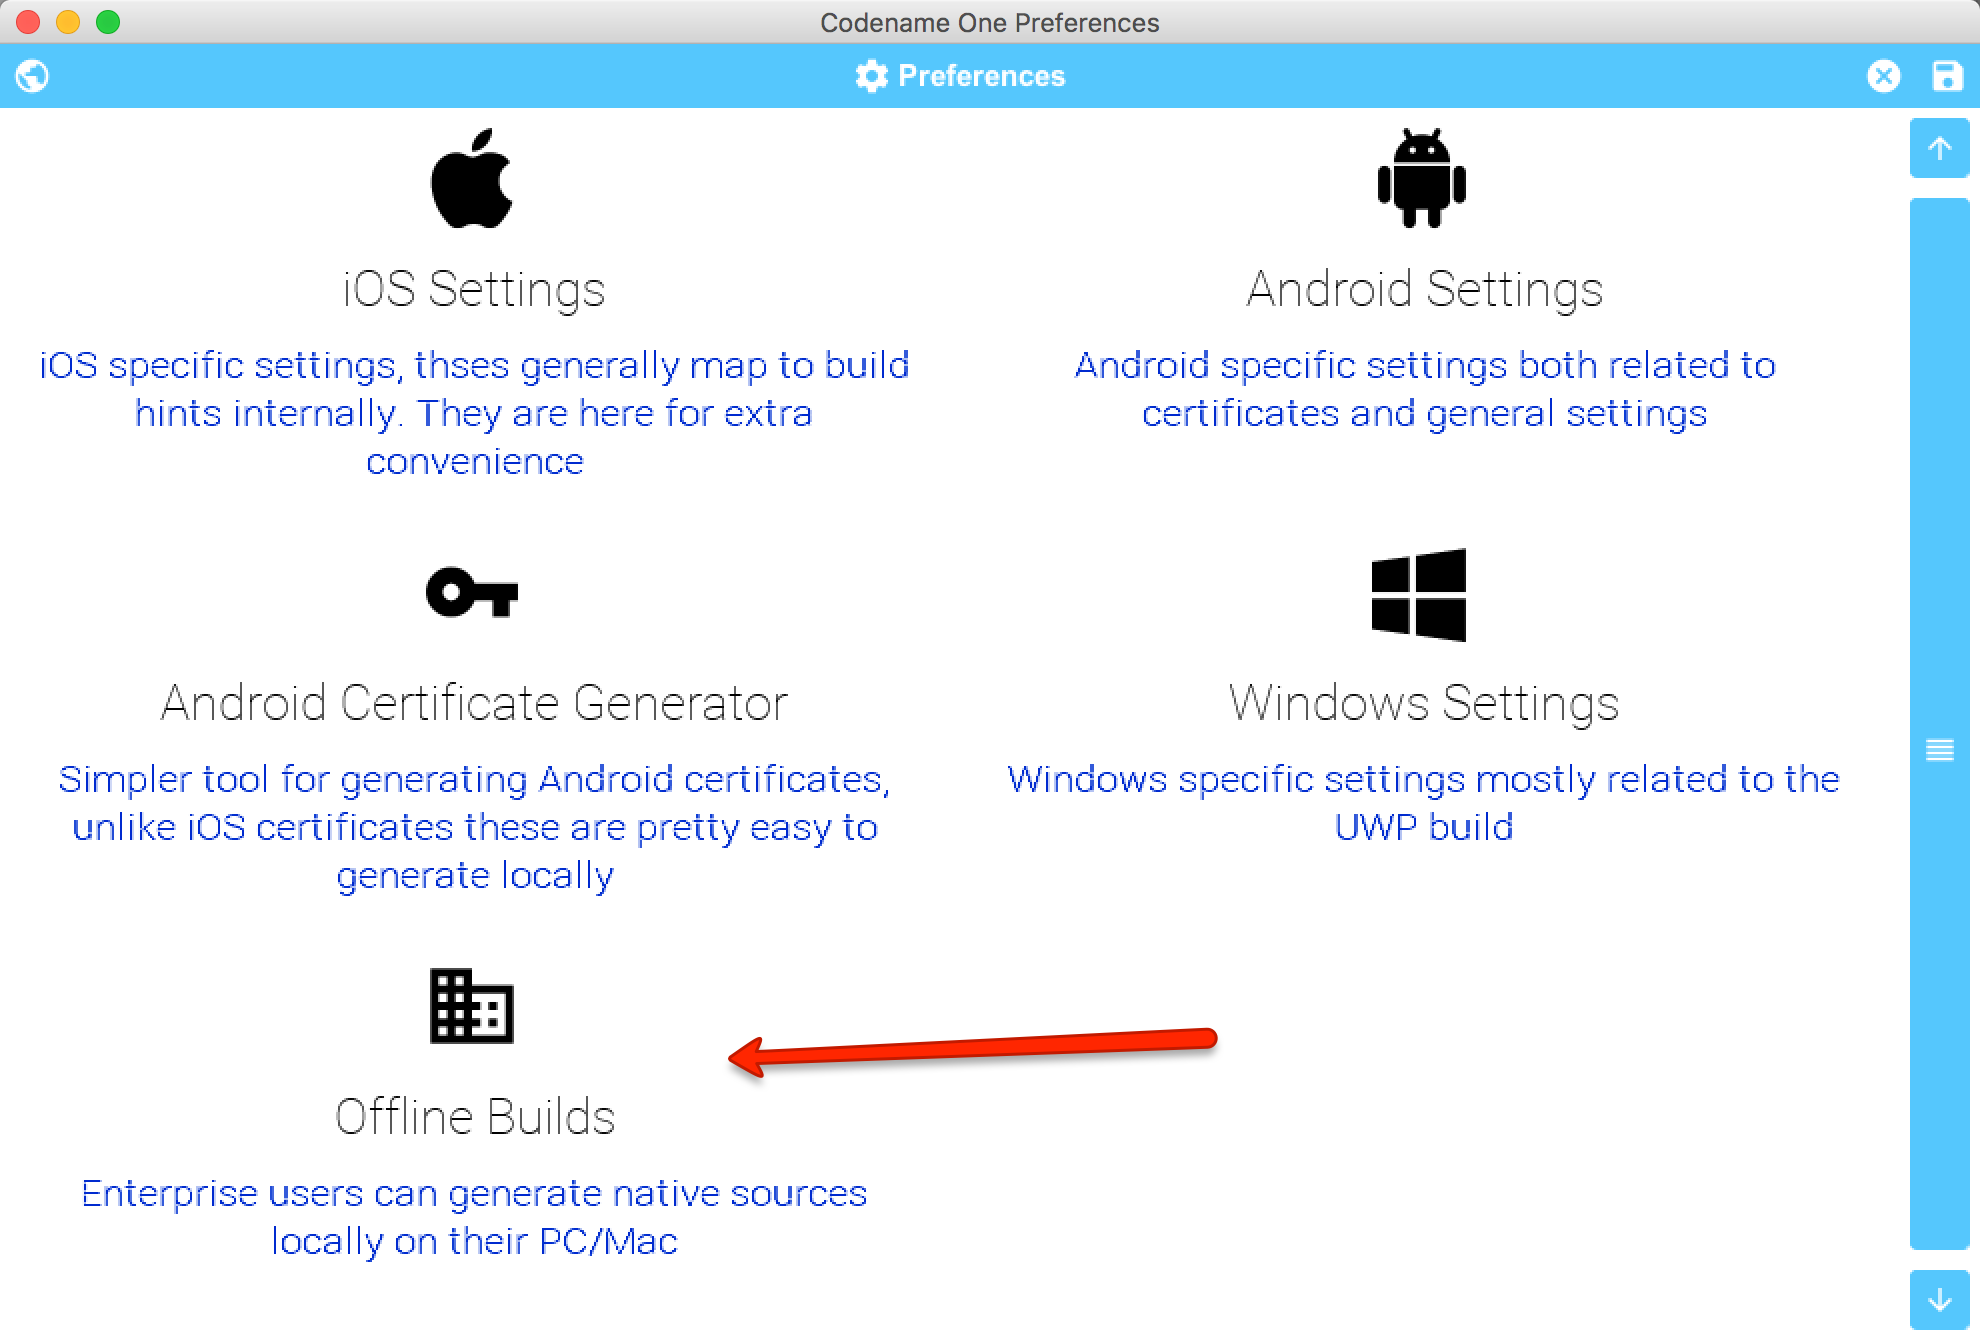
Once the Codename One settings UI launches select the Offline Builds entry:
This should launch the settings UI which would be blank the first time around:
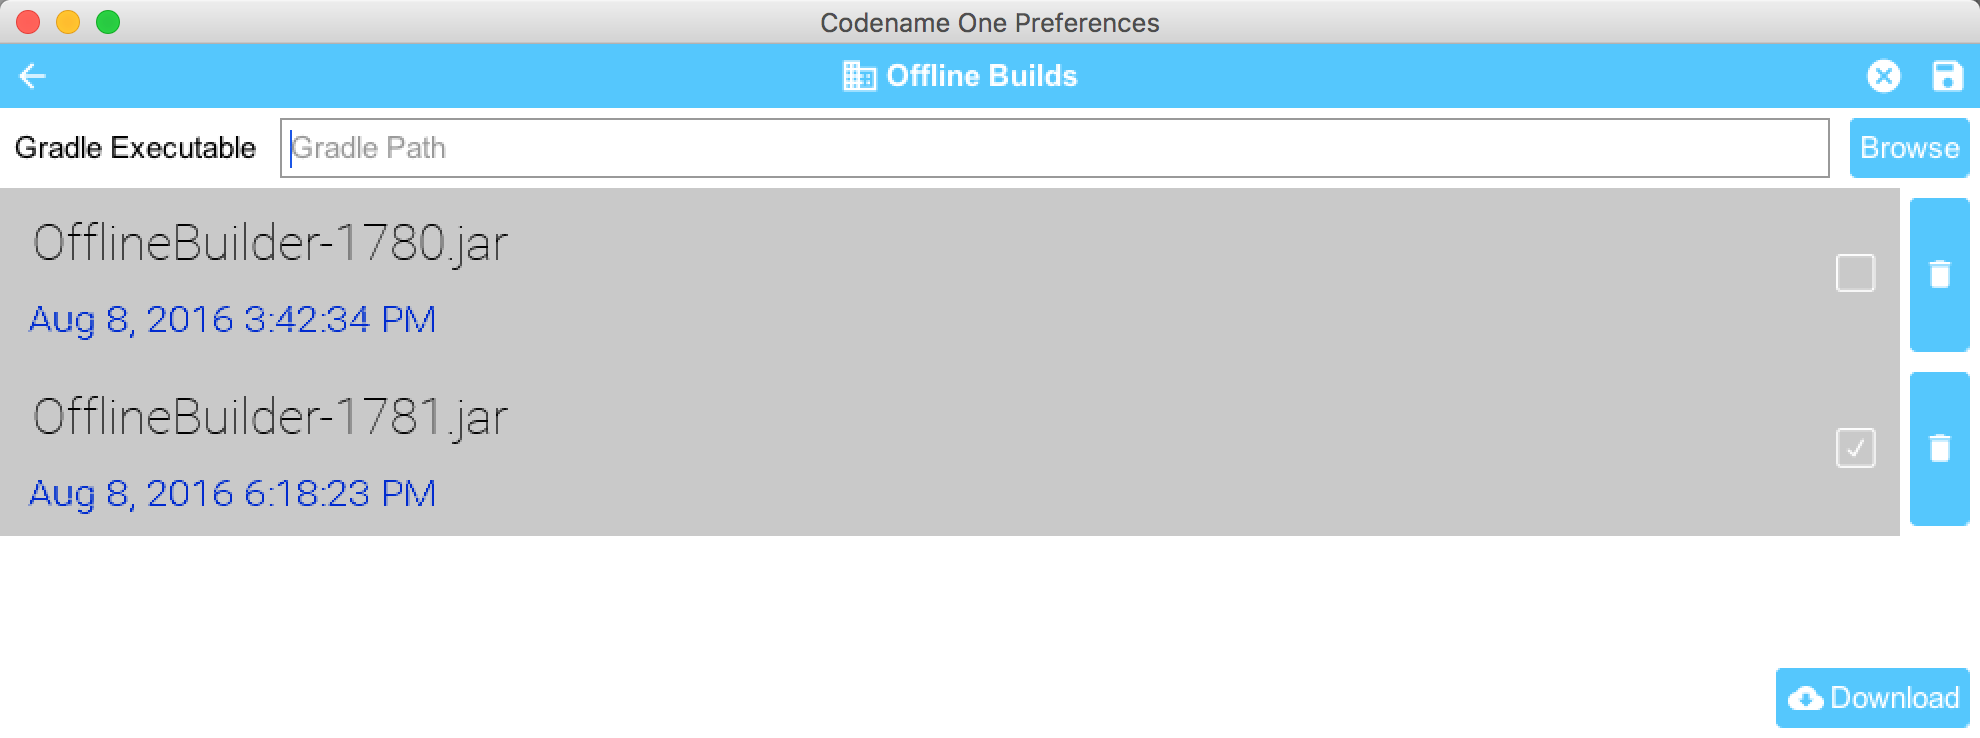
When you are in this form you can press the download button to download the current version from the build server. If there is no update nothing will happen. If there is the latest version will download and tag with a version number/date.
You can see/change the selected version in this UI. This allows building against an older version. You can also delete older builds to save space.
Offline building is almost like building with the cloud. In the right click menu you can select one of the offline build targets as such:
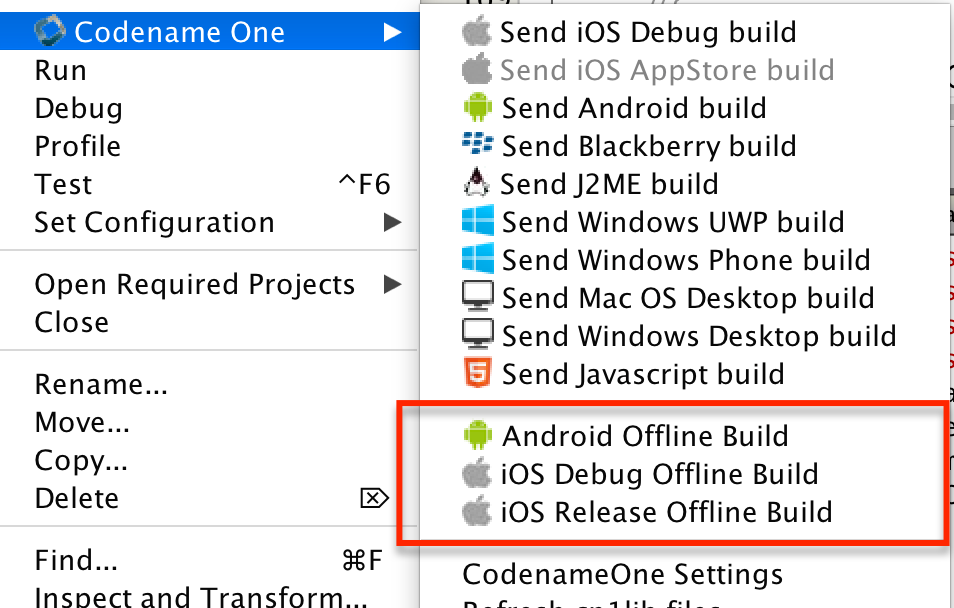
Once selected build generates a project under the build/and or build/iphone respectively.
Open these directories in Android Studio or xcode to run/build in the native IDE to the device or native emulator/simulator.
|
Warning
|
Build deletes previous offline builds, if you want to keep the sources of a build you need to move it to a different directory! |
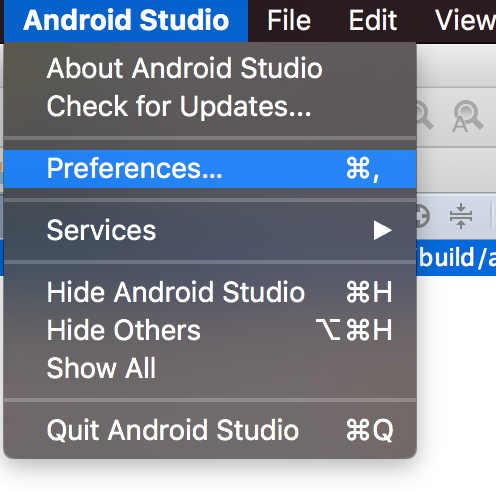
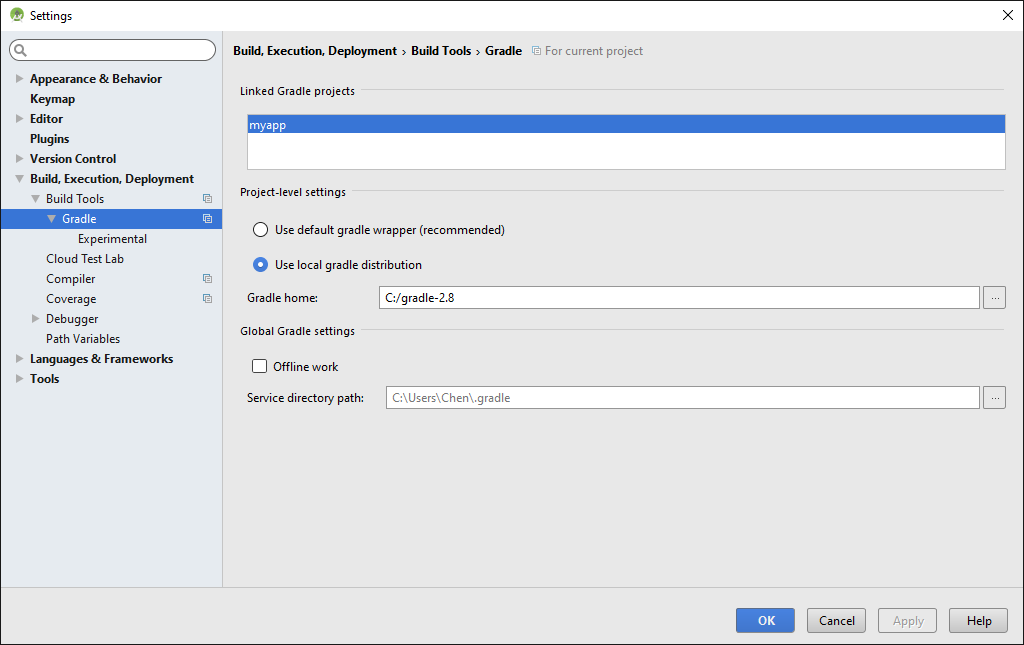
To get this to work with Android Studio you will need one more step. You will need to configure Android studio to use your local version of gradle 2.11 by following these steps:
-
Open the Android Studio preferences
-
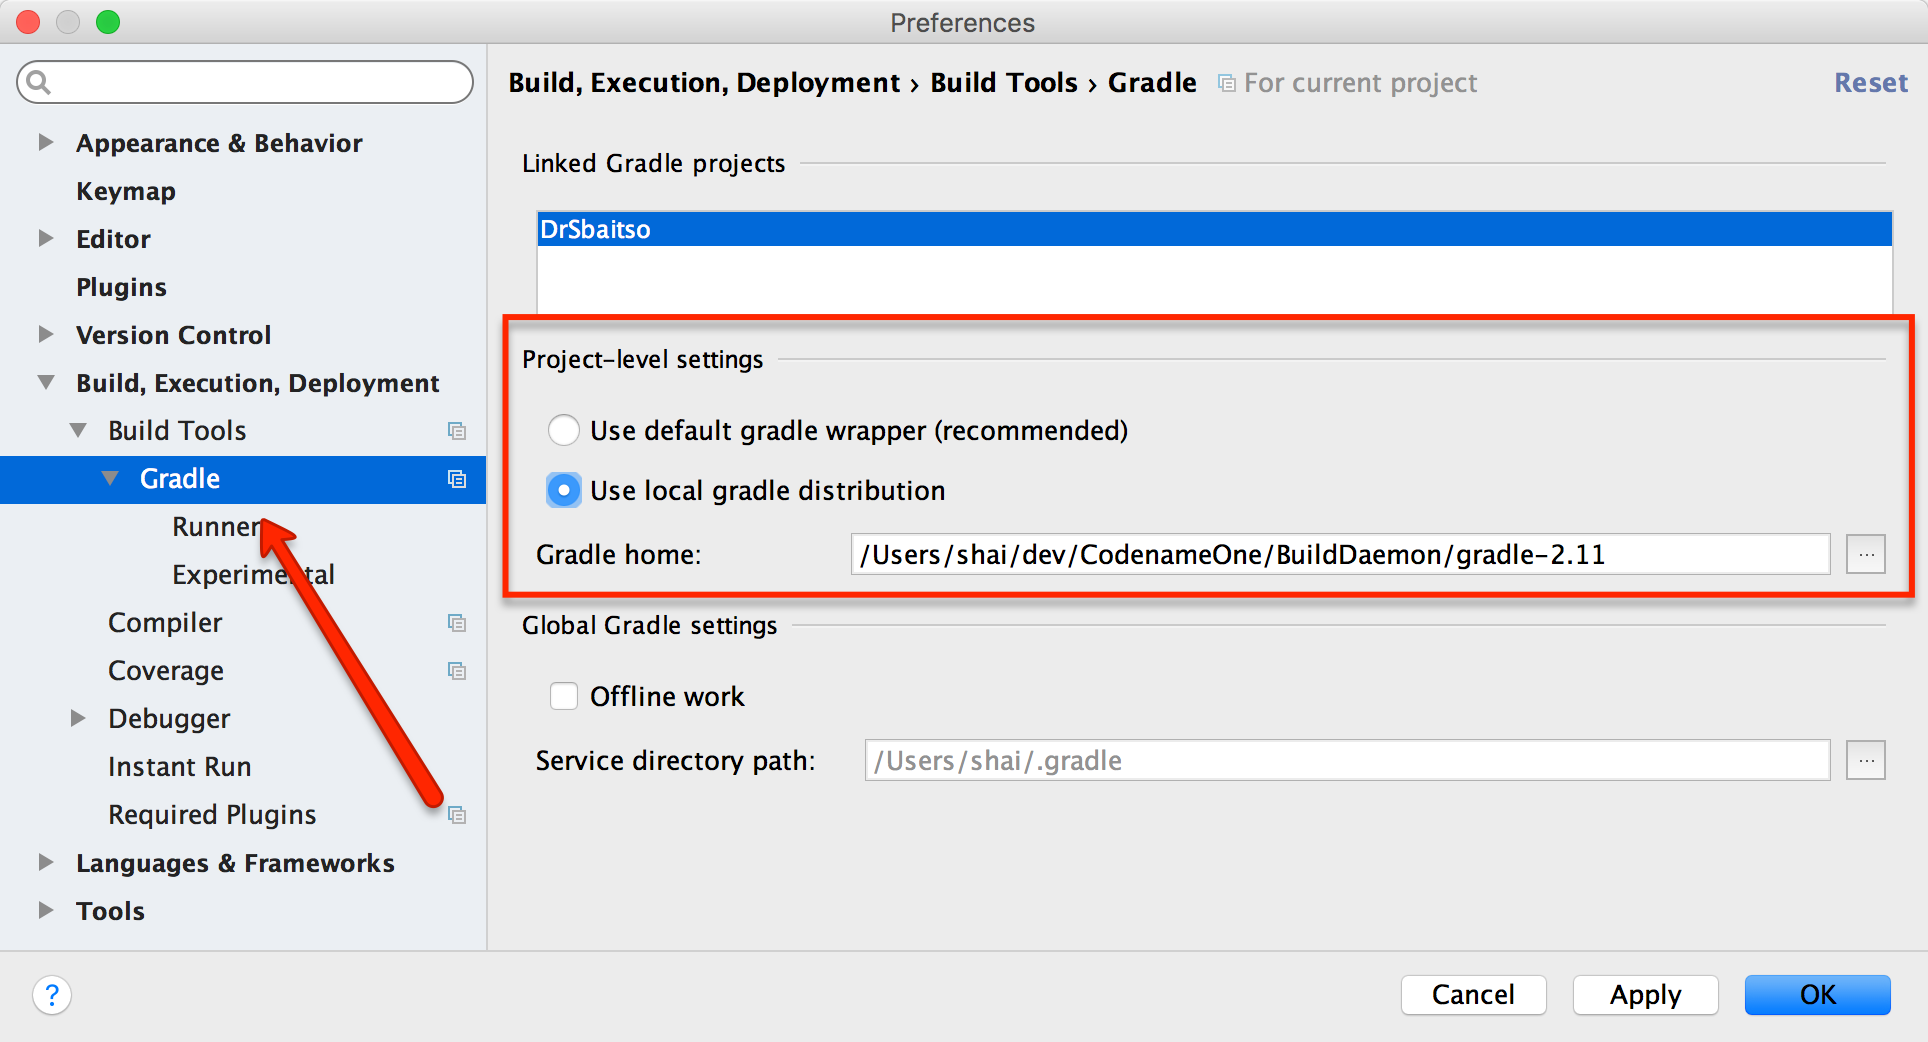
Select Build, Execution, Deployment → Build Tools → Gradle
-
Select the Use Local gradle distribution
-
Press the … and pick your local gradle 2.11 install
Probably not.
Cloud build is far more convenient, simple. Doesn’t require any installs (other than the plugin) and is much faster.
We built this tool for developers who work in situations that prohibit cloud build. E.g. government, banking etc. where regulation is restrictive.
No.
We protect all the builders to avoid abuse. If you backup and restore on a new system the builders might stop working even if you are a paying enterprise customer.
Our licensing terms require a parallel developer seat for the Codename One developers in your company. If you have 5 Codename One developers they must all have an enterprise developer account to comply.
E.g. You can’t have one enterprise account and 4 basic accounts.
The reason behind this is simple, in the past we saw a lot of funneling from developers who built such a licensing structure.
If you cancel your enterprise subscription all your existing installed offline builders should work as before but you won’t be able to update them or get support for this.
We will try to keep this in the same release pace as library updates i.e. once a week typically on a Friday.
They grow but we sometimes skip versions. Versions map to our cloud deployment versioning scheme and we might skip versions in some cases.
This is a complex tool to support & maintain. SaaS has a well defined business model where we can reduce prices and maintenance costs.
Offline builds are more like a shrinkwrap business model in which case our pricing needs to align itself to shrinkwrap pricing models for long term sustainability.
The main use case this product tries to address is government and highly regulated industries who are in effect enterprise users.
One of the annoying tasks when programming native Android applications is tuning all the required permissions to match your codes requirements, Codename One aims to simplify this. The build server automatically introspects the classes sent to it as part of the build and injects the right set of permissions required by the app.
However, sometimes developers might find the permissions that come up a bit confusing and might not understand why a specific permission came up. This maps Android permissions to the methods/classes in Codename One that would trigger them. Notice that this list isn’t exhaustive as the API is rather large:
android.permission.WRITE_EXTERNAL_STORAGE - this permission appears by default for Codename One
applications, since the FileSystemStorage API (which is used extensively) might have some dependencies on it. You can explicitly disable it using the build hint android.blockExternalStoragePermission=true, notice that this is something we don’t test and it might fail on devices.
android.permission.INTERNET - this is a hardcoded permission in Codename One, the ability to connect to the network is coded into all Codename One applications.
android.hardware.camera & android.permission.RECORD_AUDIO - are triggered by com.codename1.Capture
android.permission.RECORD_AUDIO - is triggered by usage of MediaManager.createMediaRecorder() & Display.createMediaRecorder()
android.permission.READ_PHONE_STATE - is triggered by com.codename1.ads package, com.codename1.components.Ads,
com.codename1.components.ShareButton, com.codename1.media, com.codename1.push, Display.getUdid() &
Display.getMsisdn(). This permission is required for media in order to suspend audio playback when you get a phone call.
android.hardware.location, android.hardware.location.gps, android.permission.ACCESS_FINE_LOCATION,
android.permission.ACCESS_MOCK_LOCATION & android.permission.ACCESS_COARSE_LOCATION -
map to com.codename1.maps & com.codename1.location.
package.permission.C2D_MESSAGE, com.google.android.c2dm.permission.RECEIVE, android.permission.RECEIVE_BOOT_COMPLETED -
are requested by the com.codename1.push package
android.permission.READ_CONTACTS - triggers by the package com.codename1.contacts & Display.getAllContacts().
android.permission.VIBRATE - is triggered by Display.vibrate() and Display.notifyStatusBar()
android.permission.SEND_SMS - is triggered by Display.sendSMS()
android.permission.WAKE_LOCK - is triggered by Display.lockScreen() & Display.setScreenSaverEnabled()
android.permission.WRITE_CONTACTS - is triggered by Display.createContact(), Display.deleteContact(),
ContactsManager.createContact() & ContactsManager.deleteContact()
Starting with Marshmallow (Android 6+ API level 23) Android shifted to a permissions system that prompts users for permission the first time an API is used e.g. when accessing contacts the user will receive a prompt whether to allow contacts access.
|
Note
|
Permission can be denied and a user can later on revoke/grant a permission via external settings UI |
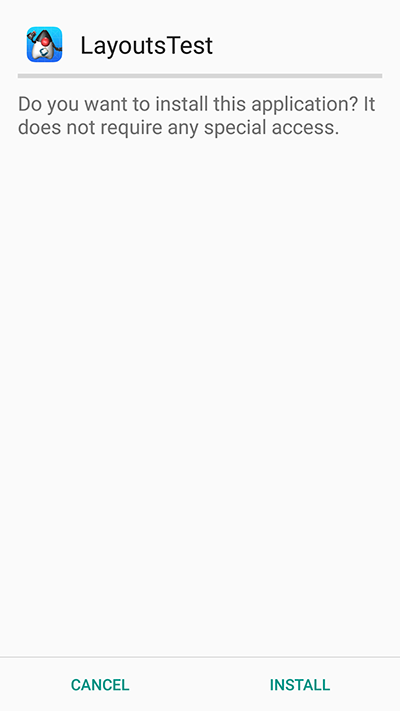
This is really great as it allows apps to be installed with a single click and no permission prompt during install which can increase conversion rates!
Codenmae One compiles Android targets with SDK level 23 but not with target level 23!
This means that by default the new permission mode is still off and you won’t see any of the effects mentioned below.
|
Warning
|
This will probably change to the default in the future but at the moment the target SDK defaults to 21 |
To activate this functionality you will need to set the target SDK to level 23 by using the android.targetSDKVersion=23 build hint.
To test this API see the following simple contacts app:
Form f = new Form("Contacts", BoxLayout.y());
f.add(new InfiniteProgress());
Display.getInstance().invokeAndBlock(() -> {
    Contact[] ct = Display.getInstance().getAllContacts(true, true, false, true, true, false);
    Display.getInstance().callSerially(() -> {
        f.removeAll();
        for(Contact c : ct) {
            MultiButton mb = new MultiButton(c.getDisplayName());
            mb.setTextLine2(c.getPrimaryPhoneNumber());
            f.add(mb);
        }
        f.revalidate();
    });
});

f.show();
When we try to install this app without changing anything on an Android 6 device we see this UI:
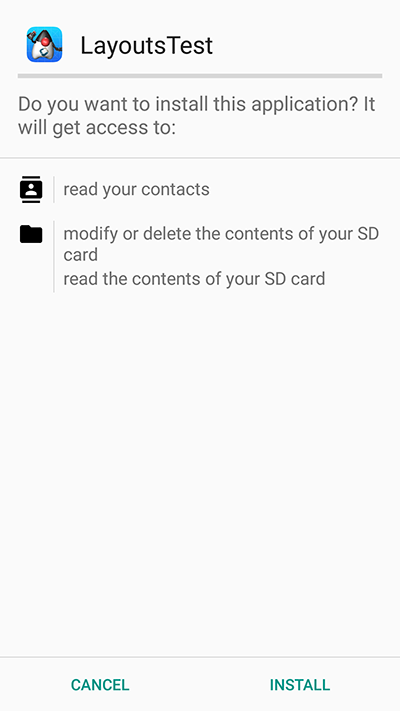
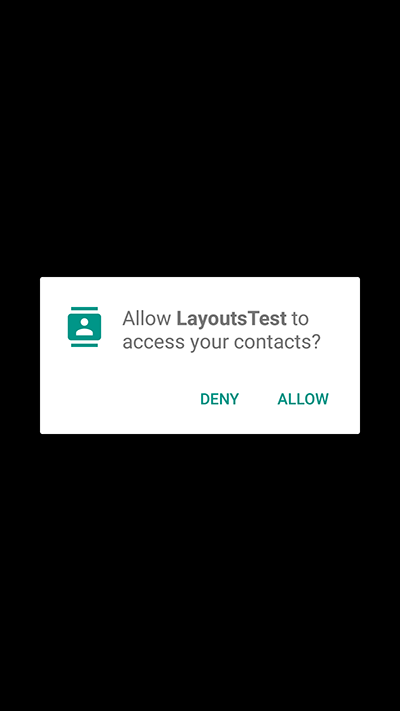
When we set android.targetSDKVersion=23 in the build hints and try to install again the UI looks like this:
When we launch the UI under the old permissions system we see the contacts instantly. In the new system we are presented with this UI:
If we accept and allow all is good and the app loads as usual but if we deny then Codename One gives the user another chance to request the permission. Notice that in this case you can customize the prompt string as explained below.
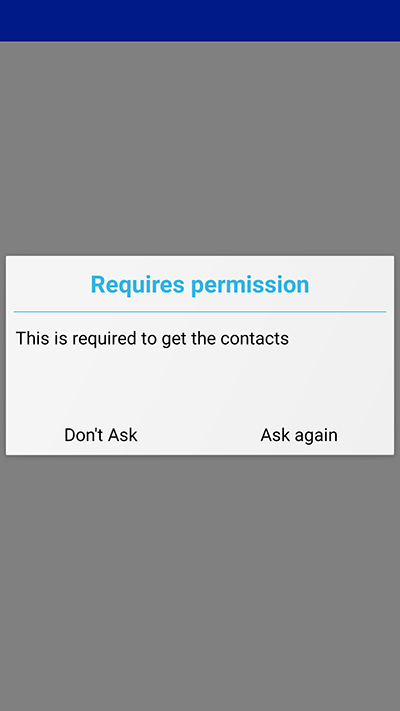
If we select don’t ask then you will get a blank screen since the contacts will return as a 0 length array. This makes sense as the user is aware he denied permission and the app will still function as expected on a device where no contacts are available. However, if the user realizes his mistake he can double back and ask to re-prompt for permission in which case he will see this native prompt:
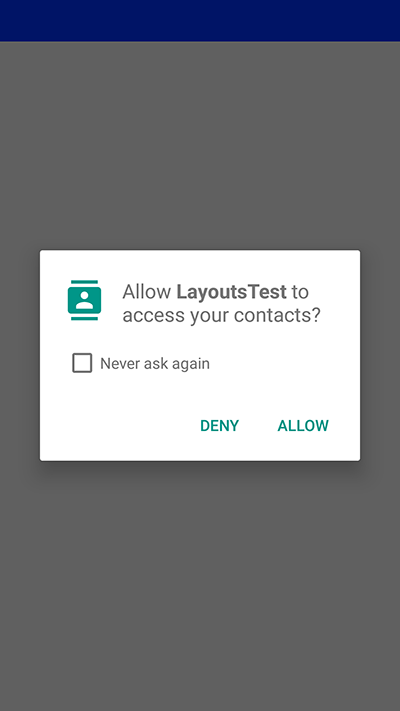
Notice that denying this second request will not trigger another Codename One prompt.
There are no explicit code changes needed for this functionality to "just work". The respective API’s will work just like they always worked and will prompt the user seamlessly for permissions.
|
Tip
|
Some behaviors that never occurred on Android but were perfectly legal in the past might start occurring with the switch to the new API. E.g. the location manager might be null and your app must always be ready to deal with such a situation |
When permission is requested a user will be seamlessly prompted/warned, Codename One has builtin text to control such prompts but you might want to customize the text. You can customize permission text via the Display properties e.g. to customize the text of the contacts permission we can do something such as:
Display.getInstance().setProperty("android.permission.READ_CONTACTS", "MyCoolChatApp needs access to your contacts so we can show you which of your friends already have MyCoolChatApp installed");This is optional as there is a default value defined. You can define this once in the init(Object) method but for some extreme cases permission might be needed for different things e.g. you might ask for this permission with one reason at one point in the app and with a different reason at another point in the app.
The following permission keys are supported: "android.permission.READ_PHONE_STATE"
android.permission.WRITE_EXTERNAL_STORAGE,
android.permission.ACCESS_FINE_LOCATION,
android.permission.SEND_SMS,
android.permission.READ_CONTACTS,
android.permission.WRITE_CONTACTS,
android.permission.RECORD_AUDIO.
You can simulate permission prompts by checking that option in the simulator menu.
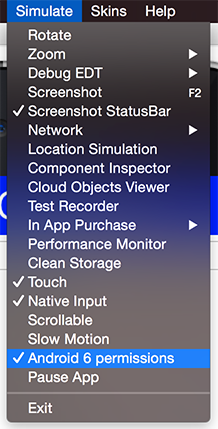
This will produce a dialog to the user whenever this happens in Android and will try to act in a similar way to the device. Notice that you can test it in the iOS simulator too.
If you write Android native code using native interfaces you are probably familiar with the AndroidNativeUtil class from the com.codename1.impl.android package.
This class provides access to many low level capabilities you would need as a developer writing native code. Since native code might need to request a permission we introduced the same underlying logic we used namely:
checkForPermission.
To get a permission you can use this code as such:
if(!AndroidNativeUtil.checkForPermission(
    Manifest.permission.READ_PHONE_STATE, "
    This should be the description shown to the user...")){
    // you didn't get the permission, you might want to return here
}
// you have the permission, do what you need
This will prompt the user with the native UI and later on with the fallback option as described above. Notice that the checkForPermission method is a blocking method and it will return when there is a final conclusion on the subject. It uses invokeAndBlock and can be safely invoked on the event dispatch thread without concern.
Codename One supports debugging applications on devices by using the natively generated project. All paid subscription levels include the ability to check an Include Source flag in the settings that returns a native OS project. You can debug that project in the respective native IDE.
In iOS this is usually strait forward, just open the project with xcode and run it optionally disabling bitcode. Unzip the .bz2 file and open the .xcworkspace file if it’s available otherwise open the .xcodeproj file inside the dist directory.
|
Important
|
Only the .xcworkspace if it is there, it is activated by the CocoaPods build pipeline so it won’t always be there
|
With Android Studio this is sometimes as very easy task as it is possible to actually open the gradle project in Android Studio and just run it. However, due to the fragile nature of the gradle project this stopped working for some builds and has been "flaky".
By default you should be able to open the gradle project in Android Studio and just run it. To get this to work open the Android Studio Setting and select gradle 2.11.
If this works for you then you can ignore the section below.
In some cases the gradle project might not work or this might fail with a change from Google.
Here are steps that should work for everyone:
-
Check the include source flag in the IDE and send a build
-
Download the
sources.zipresult from the build server -
Launch Android Studio and create a new project
-
Make sure to use the same package and app name as you did in the Codename One project, select to not create an activity
-
Unzip the
sources.zipfile and copy themaindirectory from itssrcdirectory to the Android Studio projectssrcdirectory make sure to overwrite files/directories. -
Copy its
libsdirectory on top of the existing libs -
Copy the source gradle dependencies content to the destination gradle file
-
Connect your device and press the Debug button for the IDE
|
Note
|
You might need to copy additional gradle file meta-data such as multi-dexing etc. |
You might not need to repeat the whole thing with every build. E.g. it might be practical to only copy the userSources.jar from the libs directory to get the latest version of your code. You can copy the src/main directory to get the latest up to date Android port.
Sometimes you may wish to use an API that is unsupported by Codename One or integrate with a 3rd party library/framework that isn’t supported. These are achievable tasks when writing native code and Codename One lets you encapsulate such native code using native interfaces.
Notice that when we say "native" we do not mean C/C++ always but rather the platforms "native" environment. So in the case of Android the Java code will be invoked with full access to the Android API, in case of iOS an Objective-C message would be sent and so forth.
|
Tip
|
You can still access C code under Android either by using JNI from the Android native code or by using a library |
Native interfaces are designed to only allow primitive types, Strings, arrays of primitive types (single dimension only) & PeerComponent values. Any other type of parameter/return type is prohibited. However, once in the native layer the native code can act freely and query the Java layer for additional information.
|
Note
|
The reason for the limits is the disparity between the platforms. Mapping a Java Object to an Objective-C NSObject is possible but leads to odd edge cases and complexity e.g. GC vs. ARC in a disparate object graph
|
Furthermore, native methods should avoid features such as overloading, varargs (or any Java 5+ feature for that matter) to allow portability for languages that do not support such features.
|
Important
|
Do not rely on pass by reference/value behavior since they vary between platforms |
Implementing a native layer effectively means:
-
Creating an interface that extends NativeInterface and only defines methods with the arguments/return values declared in the previous paragraph.
-
Creating the proper native implementation hierarchy based on the call conventions for every platform within the native directory
E.g. to create a simple hello world interface do something like:
package com.mycompany.myapp;
import com.codename1.system.NativeInterface;
public interface MyNative extends NativeInterface {
String helloWorld(String hi);
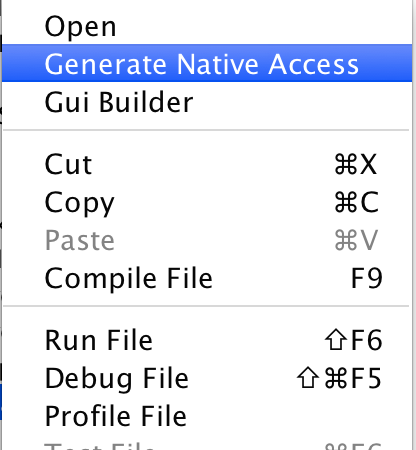
}We now need to right click the class in the IDE and select the Generate Native Access menu item:
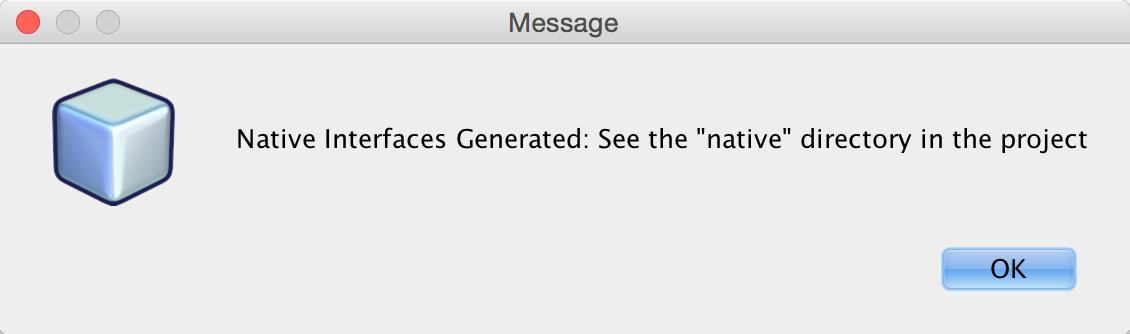
We can now look int the native directory in the project root (in NetBeans you can see that in the Files tab) and you can see something that looks like this:
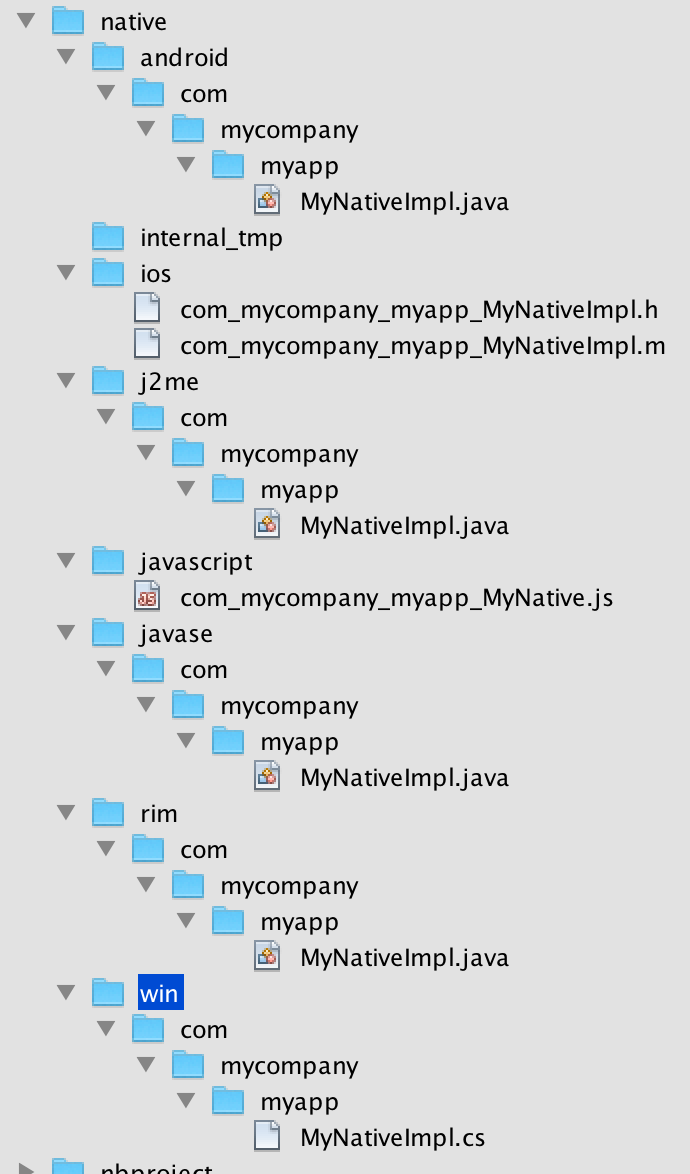
These are effectively stubs you can edit to implement the methods in native code.
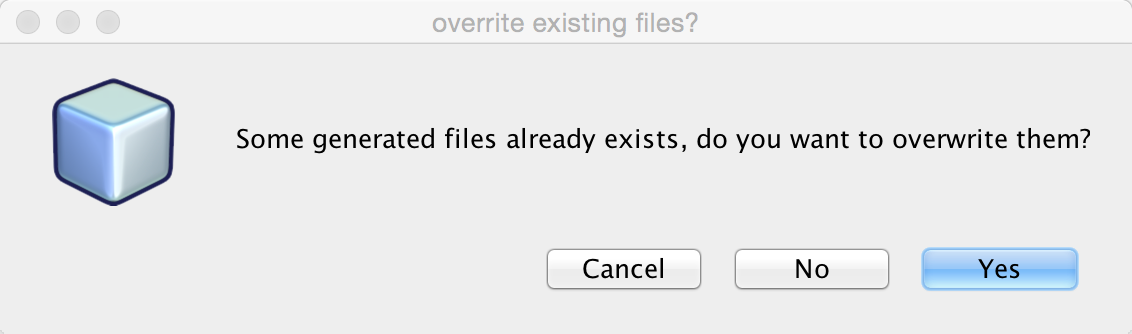
|
Tip
|
If you re-run the Generate Native Access tool you will get this dialog, if you answer yes all the files will be overwritten, if you answer no only files you deleted/renamed will be recreated |
For now lets leave the stubs and come back to them soon. From the Codename One Java code we can call the implementation of this native interface using:
MyNative my = NativeLookup.create(MyNative.class);
if(my != null && my.isSupported()) {
    Log.p(my.helloWorld("Hi"));
}
Notice that for this to work you must implement the native code on all supported platforms.
We’ll start with Android which should be familiar and intuitive to many developers, this is how the generated file under the native/android directory looks:
package com.mycompany.myapp;

public class MyNativeImpl {
    public String helloWorld(String param) {
        return null;
    }

    public boolean isSupported() {
        return false;
    }

}
The stub implementation always returns false, null or 0 by default. The isSupported also defaults to false thus allowing us to implement a NativeInterface on some platforms and leave the rest out without really knowing anything about these platforms.
We can implement the Android version using code similar to this:
package com.mycompany.myapp;

import android.util.Log; // (1)

public class MyNativeImpl { // (2)
    // (3)
    public String helloWorld(String param) {
        Log.d("MyApp", param);
        return "Tada";
    }

    public boolean isSupported() { // (4)
        return true;
    }
}-
Notice that we are using the Android native
android.util.Logclass which isn’t accessible from standard Codename One code -
The impl class doesn’t physically implement the
MyNativeinterface!
This is intentional and due to thePeerComponentfunctionality mentioned below. You don’t need to add an implements clause. -
Notice that there is no constructor and the class is public. It is crucial that the system will be able to allocate the class without obstruction. You can use a constructor but it can’t have any arguments and you shouldn’t rely on semantics of construction.
-
We implemented the native method and that we set
isSupportedto true.
|
Important
|
The IDE won’t provide completion suggestions and will claim that there are errors in the code! Codename One doesn’t include the native platforms in its bundle e.g. the full Android SDK or the full xcode Objective-C runtime. However, since the native code is compiled on the servers (where these runteims are present) this shouldn’t be a problem |
|
Tip
|
When implementing a non-trivial native interface, send a server build with the "Include Source" option checked. Implement the native interface in the native IDE then copy and paste the native code back into Codename One |
The implementation of this interface is nearly identical for Android, J2ME & Java SE.
iOS, Android & pretty much any modern OS has an EDT like thread that handles events etc. The problem is that they differ in their nuanced behavior. E.g. Android will usually respect calls off of the EDT and iOS will often crash. Some OS’s enforce EDT access rigidly and will throw an exception when you violate that…
Normally you don’t need to know about these things, hidden functionality within our implementation bridges between our EDT and the native EDT to provide consistent cross platform behavior. But when you write native code you need awareness.
Calling into the native EDT includes overhead and it might not be necessary for some features (e.g. IO, polling etc.). Furthermore, some calls might work well with asynchronous calls while others might need synchronous results and we can’t know in advance which ones you would need.
Within your native code in Android do something like:
com.codename1.impl.android.AndroidNativeUtil.getActivity().runOnUiThread(new Runnable() {
    public void run() {
       // your native code here...
    }
});
This will execute the block within run() asynchronously on the native Android UI thread. If you need synchronous execution we have a special method for Codename One:
com.codename1.impl.android.AndroidImplementation.runOnUiThreadAndBlock(new Runnable() {
    public void run() {
       // your native code here...
    }
});
This blocks in a way that’s OK with the Codename One EDT which is unique to our Android port.
Integrating a native OS library isn’t hard but it sometimes requires some juggling. Most instructions target developers working with xcode or Android Studio & you need to twist your head around them. In Android the steps for integration in most modern libraries include a gradle dependency.
E.g. we published a library that added support for Intercom. The native Android integration instructions for the library looked like this:
Add the following dependency to your app’s build.gradle file:
dependencies {
    compile 'io.intercom.android:intercom-sdk:3.+'
}
Which instantly raises the question: "How in the world do I do that in Codename One"?
Well, it’s actually pretty simple. You can add the build hint:
android.gradleDep=compile 'io.intercom.android:intercom-sdk:3.+'
This would "work" but there is a catch…
You might need to define the specific version of the Android SDK used and specific version of Google play services version used. Intercom is pretty sensitive about those and demanded that we also add:
android.playServices=9.8.0
android.sdkVersion=25
Once those were defined the native code for the Android implementation became trivial to write and the library was easy as there were no jars to include.
When generating the Objective-C code the "Generate Native Sources" tool produces two files: com_mycompany_myapp_MyNativeImpl.h & com_mycompany_myapp_MyNativeImpl.m.
The .m files are the Objective-C equivalent of .c files and .h files contain the header/include information. In this case the com_mycompany_myapp_MyNativeImpl.h contains:
#import <Foundation/Foundation.h>

@interface com_mycompany_myapp_MyNativeImpl : NSObject {
}

-(NSString*)helloWorld:(NSString*)param;
-(BOOL)isSupported;
@end
And com_mycompany_myapp_MyNativeImpl.m contains:
#import "com_mycompany_myapp_MyNativeImpl.h"

@implementation com_mycompany_myapp_MyNativeImpl

-(NSString*)helloWorld:(NSString*)param{
    return nil;
}

-(BOOL)isSupported{
    return NO;
}

@end|
Important
|
Objective-C relies on argument names as part of the message (method) signature. So -(NSString*)helloWorld:(NSString*)param isn’t the same as -(NSString*)helloWorld:(NSString*)iChangedThisName!Don’t change argument names in the Objective-C native interface! |
Here is a simple implementation similar to above:
#import "com_mycompany_myapp_MyNativeImpl.h"

@implementation com_mycompany_myapp_MyNativeImpl

-(NSString*)helloWorld:(NSString*)param{
    NSLog(@"MyApp: %@", param);
    return @"Tada";
}

-(BOOL)isSupported{
    return YES;
}

@endiOS has a native thread you should use for all calls just like Android. Check out the Native EDT on Android section above for reference.
On iOS this is pretty similar to Android (if you consider objective-c to be similar). This is used for asynchronous invocation:
dispatch_async(dispatch_get_main_queue(), ^{
    // your native code here...
});
You can use this for synchronous invocation, notice the lack of the a in the dispatch call:
dispatch_sync(dispatch_get_main_queue(), ^{
    // your native code here...
});
The problem with the synchronous call is that it will block the caller thread, if the caller thread is the EDT this can cause performance issues and even a deadlock. It’s important to be very cautious with this call!
Cocoapods are the iOS equivalent of gradle dependencies.
CocoaPods allow us to add a native library dependency to iOS far more easily than Gradle. By default we target iOS 7.0 or newer which is supported by Intercom only for older versions of the library. Annoyingly CocoaPods might seem to work but some specific API’s won’t work since it fell back to an older version… To solve this you have to explicitly define the build hint ios.pods.platform=8.0 to force iOS 8 or newer. You might need to force it to even newer versions as some libraries force an iOS 9 minimum etc.
Including intercom itself required a single build hint: ios.pods=Intercom which you can obviously extend by using commas to include multiple libraries. You can search the cocoapods website for supported 3rd party libraries which includes everything you would expect. One important advantage when working with CocoaPods is the faster build time as the upload to the Codename One website is smaller and the bandwidth we have to CocoaPods is faster. Another advantage is the ability to keep up with the latest developments from the library providers.
Native interfaces in Javascript look a little different than the other platforms since Javascript doesn’t natively support threads or classes. The native implementation should be placed in a file with name matching the name of the package and the class name combined where the "." elements are replaced by underscores.
The default generated stubs for the JavaScript build look like this com_mycompany_myapp_MyNative:
(function(exports){

var o = {};

    o.helloWorld__java_lang_String = function(param1, callback) {
        callback.error(new Error("Not implemented yet"));
    };

    o.isSupported_ = function(callback) {
        callback.complete(false);
    };

exports.com_mycompany_myapp_MyNative= o;

})(cn1_get_native_interfaces());
A simple implementation looks like this.
(function(exports){

var o = {};

    o.helloWorld__java_lang_String = function(param1, callback) {
        callback.complete("Hello World!!!");
    }

    o.isSupported_ = function(callback) {
        callback.complete(true);
    };

exports.com_my_code_MyNative = o;

})(cn1_get_native_interfaces());
Notice that we use the complete() method of the provided callback to pass the return value rather than using the return statement. This is to work around the fact that Javascript doesn’t natively support threads. The Java thread that is calling your native interface will block until your method calls callback.complete(). This allows you to use asynchronous APIs inside your native method while still allowing Codename One to work use your native interface via a synchronous API.
|
Warning
|
Make sure you call either callback.complete() or callback.error() in your method at some point, or you will cause a deadlock in your app (code calling your native method will just sit and "wait" forever for your method to return a value).
|
The naming conventions for the methods themselves are modeled after the naming conventions shown in the previous examples:
<method-name>__<param-1-type>_<param-2-type>_…<param-n-type>
Where <method-name> is the name of the method in Java, and the `<param-X-type>`s are a string representing the parameter type. The general rule for these strings are:
-
Primitive types are mapped to their type name. (E.g.
intto "int",doubleto "double", etc…). -
Reference types are mapped to their fully-qualified class name with '.' replaced with underscores. E.g.
java.lang.Stringwould be "java_lang_String". -
Array parameters are marked by their scalar type name followed by an underscore and "1ARRAY". E.g.
int[]would be "int_1ARRAY" andString[]would be "java_lang_String_1ARRAY".
Java API:
public void print(String str);becomes
o.print__java_lang_String = function(param1, callback) {
    console.log(param1);
    callback.complete();
}
Java API:
public int add(int a, int b);becomes
o.add__int_int = function(param1, param2, callback) {
    callback.complete(param1 + param2);
}
public int add(int[] a);becomes
o.add__int_1ARRAY = function(param1, callback) {
    var c = 0, len = param1.length;
    for (var i =0; i<len; i++) {
        c += param1[i];
    }
    callback.complete(c);
}PeerComponent return values are automatically translated to the platform native peer as an expected return value. E.g. for a NativeInterface method such as this:
public PeerComponent` createPeer();Android native implementation would use:
public View createPeer() {
    return null;
}
The iphone would need to return a pointer to a view e.g.:
- (UIView*)createPeer;|
Tip
|
Not all platforms support native peers. Specifically JavaSE doesn’t support them due to the way the JavaSE native interfaces are mapped to their implementation. Note that this won’t limit the code from running on an unsupported platform. Only that specific method won’t work. |
Javascript would expect a DOM Element (e.g. a <div> tag to be returned.). E.g.
o.createHelloComponent_ = function(callback) {
    var c = jQuery('<div>Hello World</div>')
            .css({'background-color' : 'yellow', 'border' : '1px solid blue'});
    callback.complete(c.get(0));
};
Notice that if you want to use a native library (jar, .a file etc.) just places it within the appropriate native directory and it will be packaged into the final executable. You would only be able to reference it from the native code and not from the Codename One code, which means you will need to build native interfaces to access it.
This is discussed further below.
Several rules govern the creation of NativeInterfaces and we only briefly covered some of them.
-
The implementation class must have a default public constructor or no constructor at all
-
Native methods can’t throw exceptions, checked or otherwise
-
A native method can’t have the name
initas this is a reserved method in Objective-C -
Only the supported types listed below can be used
-
Native implementations can’t rely on pass by reference/value semantics as those might change between platforms
-
hashCode,equals&toStringare reserved and won’t be mapped to native code
| Java | Android | JavaSE | Obj-C | C# | byte |
|---|---|---|---|---|---|
byte |
byte |
char |
sbyte |
boolean |
boolean |
boolean |
BOOL |
bool |
char |
char |
char |
int |
char |
short |
short |
short |
short |
short |
int |
int |
int |
int |
int |
long |
long |
long |
long long |
long |
float |
float |
float |
float |
float |
double |
double |
double |
double |
double |
String |
String |
String |
NSString* |
String |
byte[] |
byte[] |
byte[] |
NSSData* |
sbyte[] |
boolean[] |
boolean[] |
boolean[] |
NSData* |
bool[] |
char[] |
char[] |
char[] |
NSData |
char[] |
short[] |
short[] |
short[] |
NSData* |
short[] |
int[] |
int[] |
int[] |
NSData* |
int[] |
long[] |
long[] |
long[] |
NSData* |
long[] |
float[] |
float[] |
float[] |
NSData* |
float[] |
double[] |
double[] |
double[] |
NSData* |
double[] |
|
Tip
|
JavaScript is excluded from the table above as it isn’t a type safe language and thus has no such type mapping |
|
Note
|
PeerComponent on iOS is void* but UIView is expected as a result
|
The examples below demonstrate the signatures for this method on all platforms:
public void test(byte b, boolean boo, char c, short s,
    int i, long l, float f, double d, String ss,
    byte[] ba, boolean[] booa, char[] ca, short[] sa, int[] ia,
    long[] la, float[] fa, double[] da,
PeerComponent cmp);public void test(byte param, boolean param1, char param2,
short param3, int param4, long param5, float param6,
double param7, String param8, byte[] param9,
boolean[] param10, char[] param11, short[] param12,
int[] param13, long[] param14, float[] param15,
double[] param16, android.view.View param17) {
}-(void)test:(char)param param1:(BOOL)param1
param2:(int)param2 param3:(short)param3 param4:(int)param4
param5:(long long)param5 param6:(float)param6
param7:(double)param7 param8:(NSString*)param8
param9:(NSData*)param9 param10:(NSData*)param10
param11:(NSData*)param11 param12:(NSData*)param12
param13:(NSData*)param13 param14:(NSData*)param14
param15:(NSData*)param15 param16:(NSData*)param16
param17:(void*)param17;
}|
Note
|
We had to break lines for the print version, the JavaScript version is a really long method name that literally broke the book! |
o.test__byte_boolean_char_short_int_long_float_double
_java_lang_String_byte_1ARRAY_boolean_1ARRAY_char_1ARRAY
_short_1ARRAY_int_1ARRAY_long_1ARRAY_float_1ARRAY_double
_1ARRAY_com_codename1_ui_PeerComponent = function(param1, param2, param3, param4, param5, param6, param7, param8, param9, param10, param11, param12, param13, param14, param15, param16, param17, param18, callback) {
    callback.error(new Error("Not implemented yet"));
};public void test(byte param, boolean param1, char param2, short param3, int param4, long param5, float param6, double param7, String param8, byte[] param9, boolean[] param10, char[] param11, short[] param12, int[] param13, long[] param14, float[] param15, double[] param16, com.codename1.ui.PeerComponent param17) {
}public void test(byte param, bool param1, char param2, short param3, int param4, long param5, float param6, double param7, String param8, byte[] param9, boolean[] param10, char[] param11, short[] param12, int[] param13, long[] param14, float[] param15, double[] param16, FrameworkElement param17) {
}Normally permissions in Codename One are seamless. Codename One traverses the bytecode and automatically assigns permissions to Android applications based on the API’s used by the developer.
However, when accessing native functionality this just won’t work since native code might require specialized permissions and we don’t/can’t run any serious analysis on it (it can be just about anything).
So if you require additional permissions in your Android native code you need to define them in the build arguments using
android.permission.<PERMISSION_NAME>=true for each permission you want to include. A full list of permissions are listed in Android’s Manifest.permission documentation.
E.g.
android.permission.ADD_VOICEMAIL=true
android.permission.BATTERY_STATS=true
...
You can specify the maximum SDK version in which the permission is needed using the android.permission.<PERMISSION_NAME>.maxSdkVersion build hint. You can also specify whether the permission is required for the app to run using the android.permission.<PERMISSION_NAME>.required build hint.
E.g.
android.permission.ADD_VOICEMAIL=true
android.permission.BATTERY_STATS=true
android.permission.ADD_VOICEMAIL.required=false
android.permission.ADD_VOICEMAIL.maxSdkVersion=18
...
You can alternatively use the android.xpermissions build hint to inject <uses-permission> tags into the manifest file. E.g.:
android.xpermissions=<uses-permission android:name="android.permission.READ_CALENDAR" />
|
Note
|
You need to include the full XML snippet. You can unify multiple lines into a single line in the GUI as XML allows that. |
If you do any native interfaces programming in Android you should be familiar with the AndroidNativeUtil class which allows you to access native device functionality more easily from the native code. E.g. many Android API’s need access to the Activity which you can get by calling AndroidNativeUtil.getActivity().
The native util class includes quite a few other features such as:
-
runOnUiThreadAndBlock(Runnable)- this is such a common pattern that it was generalized into a public static method. Its identical toActivity.runOnUiThreadbut blocks until the runnable finishes execution. -
addLifecycleListener/removeLifecycleListener- These essentially provide you with a callback to lifecycle events:onCreateetc. which can be pretty useful for some cases. -
registerViewRenderer- PeerComponent's are usually shown on top of the UI since they are rendered within their own thread outside of the EDT cycle. So when we need to show a Dialog on top of the peer we grab a screenshot of the peer, hide it and then show the dialog with the image as the background (the same applies for transitions). Unfortunately some components (specifically the MapView) might not render properly and require custom code to implement the transferal to a native Bitmap, this API allows you to do just that.
You can work with AndroidNativeUtil using native code such as this:
import com.codename1.impl.android.AndroidNativeUtil;

class NativeCallsImpl {
     public void nativeMethod() {
        AndroidNativeUtil.getActivity().runOnUiThread(new Runnable() {
            public void run() {
               ...
            }
        });
     }
    ....
}A common way to implement features in Android is the BroadcastReceiver API. This allows intercepting operating system events for common use cases.
A good example is intercepting incoming SMS which is specific to Android so we’d need a broardcast receiver to implement that. This is often confusing to developers who sometimes derive the impl class from broadcast receiver. That’s a mistake…
The solution is to place any native Android class into the native/android directory. It will get compiled with the rest of the native code and "just works". So you can place this class under native/android/com/codename1/sms/intercept:
package com.codename1.sms.intercept;

import android.content.*;
import android.os.Bundle;
import android.telephony.*;
import com.codename1.io.Log;

public class SMSListener extends BroadcastReceiver {

    @Override
    public void onReceive(Context cntxt, Intent intent) {
        // based on code from https://stackoverflow.com/questions/39526138/broadcast-receiver-for-receive-sms-is-not-working-when-declared-in-manifeststat
        if(intent.getAction().equals("android.provider.Telephony.SMS_RECEIVED")) {
            Bundle bundle = intent.getExtras();
            SmsMessage[] msgs = null;
            if (bundle != null){
                try{
                    Object[] pdus = (Object[]) bundle.get("pdus");
                    msgs = new SmsMessage[pdus.length];
                    for(int i=0; i<msgs.length; i++){
                        msgs[i] = SmsMessage.createFromPdu((byte[])pdus[i]);
                        String msgBody = msgs[i].getMessageBody();
                        SMSCallback.smsReceived(msgBody);
                    }
                } catch(Exception e) {
                    Log.e(e);
                    SMSCallback.smsReceiveError(e);
                }
            }
        }
    }
}
The code above is pretty standard native Android code, it’s just a callback in which most of the logic is similar to the native Android code mentioned in this stackoverflow question.
But there is still more you need to do. In order to implement this natively we need to register the permission and the receiver in the manifest.xml file as explained in that question. This is how their native manifest looked:
<?xml version="1.0" encoding="utf-8"?>
<manifest xmlns:android="http://schemas.android.com/apk/res/android"
    package="com.bulsy.smstalk1">
    <uses-permission android:name="android.permission.RECEIVE_SMS" />
    <uses-permission android:name="android.permission.READ_SMS" />
    <uses-permission android:name="android.permission.SEND_SMS"/>
    <uses-permission android:name="android.permission.READ_CONTACTS" />

    <application
        android:allowBackup="true"
        android:icon="@mipmap/ic_launcher"
        android:label="@string/app_name"
        android:supportsRtl="true"
        android:theme="@style/AppTheme">
        <activity android:name=".MainActivity">
            <intent-filter>
                <action android:name="android.intent.action.MAIN" />
                <category android:name="android.intent.category.LAUNCHER" />
            </intent-filter>
        </activity>
        <receiver android:name="com.bulsy.smstalk1.SmsListener"
               android:enabled="true"
               android:permission="android.permission.BROADCAST_SMS"
               android:exported="true">
            <intent-filter android:priority="2147483647">//this doesnt work
                <category android:name="android.intent.category.DEFAULT" />
                <action android:name="android.provider.Telephony.SMS_RECEIVED" />
            </intent-filter>
        </receiver>
    </application>
</manifest>
We only need the broadcast permission XML and the permission XML. Both are doable via the build hints. The former is pretty easy:
android.xpermissions=<uses-permission android:name="android.permission.RECEIVE_SMS" />The latter isn’t much harder, notice I took multiple lines and made them into a single line for convenience:
android.xapplication=<receiver android:name="com.codename1.sms.intercept.SMSListener" android:enabled="true" android:permission="android.permission.BROADCAST_SMS" android:exported="true"> <intent-filter android:priority="2147483647"><category android:name="android.intent.category.DEFAULT" /> <action android:name="android.provider.Telephony.SMS_RECEIVED" /> </intent-filter> </receiver>Here it is formatted nicely:
<receiver android:name="com.codename1.sms.intercept.SMSListener"
              android:enabled="true"
              android:permission="android.permission.BROADCAST_SMS"
              android:exported="true">
                   <intent-filter android:priority="2147483647">
                          <category android:name="android.intent.category.DEFAULT" />
                          <action android:name="android.provider.Telephony.SMS_RECEIVED" />
                   </intent-filter>
</receiver>You will notice that these don’t include the actual binding or permission prompts you would expect for something like this. To do this we need a native interface.
The native sample in stack overflow bound the listener in the activity but here we want the app code to decide when we should bind the listening:
public interface NativeSMSInterceptor extends NativeInterface {
    public void bindSMSListener();
    public void unbindSMSListener();
}
That’s easy!
Notice that isSupported() returns false for all other OS’s so we won’t need to ask whether this is "Android" we can just use isSupported().
The implementation is pretty easy too:
package com.codename1.sms.intercept;

import android.Manifest;
import android.content.IntentFilter;
import com.codename1.impl.android.AndroidNativeUtil;

public class NativeSMSInterceptorImpl {
    private SMSListener smsListener;
    public void bindSMSListener() {
        if(AndroidNativeUtil.checkForPermission(Manifest.permission.RECEIVE_SMS, "We can automatically enter the SMS code for you")) { // (1)
            smsListener = new SMSListener();
            IntentFilter filter = new IntentFilter();
            filter.addAction("android.provider.Telephony.SMS_RECEIVED");
            AndroidNativeUtil.getActivity().registerReceiver(smsListener, filter); // (2)
        }
    }

    public void unbindSMSListener() {
        AndroidNativeUtil.getActivity().unregisterReceiver(smsListener);
    }

    public boolean isSupported() {
        return true;
    }
}-
This will trigger the permission prompt on Android 6 and newer. Even though the permission is declared in XML this isn’t enough for 6+. Notice that even when you run on Android 6 you still need to declare permissions in XML!
-
Here we actually bind the listener, this allows us to grab one SMS and not listen in on every SMS coming thru
Native interfaces standardize the invocation of native code from Codename One, but it doesn’t standardize the reverse of callbacks into Codename One Java code. The reverse is naturally more complicated since its platform specific and more error prone.
A common "trick" for calling back is to just define a static method and then trigger it from native code. This works nicely for Android, Java SE, Blackberry & Java ME since those platforms use Java for their "native code". Mapping this to iOS requires some basic understanding of how the iOS VM works.
For the purpose of this explanation lets pretend we have a class called NativeCallback in the src hierarchy under
the package com.mycompany that has the method: public static void callback().
package com.mycompany;
public class NativeCallback {
    public static void callback() {
        // do stuff
    }
}
So if I want to call it from Android or all of the Java based platforms I can just write this in the "native" code:
com.mycompany.NativeCallback.callback();I can also pass a argument as we do later on:
com.mycompany.NativeCallback.callback("My Arg");If we want to invoke that method from Objective-C we need to do the following.
Add an include statement as such:
#include "com_mycompany_NativeCallback.h"
#include "CodenameOne_GLViewController.h"
Notice that the CodenameOne_GLViewController.h include defines various macros such as CN1_THREAD_STATE_PASS_SINGLE_ARG.
Then when we want to trigger the method just do:
com_mycompany_NativeCallback_callback__(CN1_THREAD_STATE_PASS_SINGLE_ARG);|
Tip
|
For most callbacks you should use the macro CN1_THREAD_GET_STATE_PASS_SINGLE_ARG instead of CN1_THREAD_STATE_PASS_SINGLE_ARG also make sure to add `#include "cn1_globals.h" in the file
|
The VM passes the thread context along method calls to save on API calls (thread context is heavily used in Java for synchronization, gc and more).
We can easily pass arguments like:
public static void callback(int arg)Which maps to native as (notice the extra _ before the int):
com_mycompany_NativeCallback_callback___int(CN1_THREAD_GET_STATE_PASS_ARG intValue);Notice that there is no comma between the CN1_THREAD_GET_STATE_PASS_ARG and the value!
The comma is included as part of the macro which makes for code that isn’t as readable.
The reason for this dates to the migration from XMLVM [1] to the current ParparVM implementation. CN1_THREAD_GET_STATE_PASS_ARG is defined as nothing in XMLVM since it didn’t use that concept. Yet under ParparVM it will include the necessary comma.
A common use case is passing string values to the Java side, or really NSString* which is iOS equivalent. Assuming a method like this:
public static void callback(String arg)You would need to convert the NSString* value you already have to a java.lang.String which the callback expects.
The fromNSString function also needs this special argument so you will need to modify the method as such:
com_mycompany_NativeCallback_callback___java_lang_String(CN1_THREAD_GET_STATE_PASS_ARG fromNSString(CN1_THREAD_GET_STATE_PASS_ARG nsStringValue));And finally you might want to return a value from callback as such:
public static int callback(int arg)This is tricky since the method name changes to support covariant return types and so the signature would be:
com_mycompany_NativeCallback_callback___int_R_int(intValue);The upper case R allows us to differentiate between void callback(int,int) and int callback(int).
|
Tip
|
Covariant return types are a little known Java 5 feature. E.g. the method Object getX() can be overriden by MyObject getX(). However, in the VM level they can both exist side by side.
|
The mechanism for invoking static callback methods from Javascript (for the Javascript port only) is similar to Objective-C’s. The this object in your native interface method contains a property named $GLOBAL$ that provides access to static java methods. This object will contain Javascript mirror objects for each Java class (though the property name is mangled by replacing "." with underscores). Each mirror object contains a wrapper method for its underlying class’s static methods where the method name follows the same naming convention as is used for the Javascript native methods themselves (and very similar to the naming conventions used in Objective-C).
For example, the Google Maps project includes the static callback method:
static void fireMapChangeEvent(int mapId, final int zoom, final double lat, final double lon) { ... }defined in the com.codename1.googlemaps.MapContainer class.
This method is called from Javascript inside a native interface using the following code:
var fireMapChangeEvent = this.$GLOBAL$.com_codename1_googlemaps_MapContainer.fireMapChangeEvent__int_int_double_double;
google.maps.event.addListener(this.map, 'bounds_changed', function() {
    fireMapChangeEvent(self.mapId, self.map.getZoom(), self.map.getCenter().lat(), self.map.getCenter().lng());
});
In this example we first obtain a reference to the fireMapChangeEvent method, and then call it later. However, we could have called it directly also.
|
Warning
|
Your code MUST contain the full string path this.$GLOBAL$.your_class_name.your_method_name or the build server will not be able to recognize that your code requires this method. The $GLOBAL$ object is populated by the build server only with those classes and methods that are used inside your native methods. If the build server doesn’t recognize that the methods are being used (via this pattern) it won’t generate the necessary wrappers for your Javascript code to access the Java methods.
|
The SMS Broadcast Receiver code from before also used callbacks such as this:
package com.codename1.sms.intercept; // (1)

import com.codename1.util.FailureCallback;
import com.codename1.util.SuccessCallback;
import static com.codename1.ui.CN.*;

/**
 * This is an internal class, it's package protect to hide that
 */
class SMSCallback {
    static SuccessCallback<String> onSuccess;
    static FailureCallback onFail;

    public static void smsReceived(String sms) {
        if(onSuccess != null) {
            SuccessCallback<String> s = onSuccess;
            onSuccess = null;
            onFail = null;
            SMSInterceptor.unbindListener();
            callSerially(() -> s.onSucess(sms)); // (2)
        }
    }

    public static void smsReceiveError(Exception err) {
        if(onFail != null) {
            FailureCallback f = onFail;
            onFail = null;
            SMSInterceptor.unbindListener();
            onSuccess = null;
            callSerially(() -> f.onError(null, err, 1, err.toString()));
        } else {
            if(onSuccess != null) {
                SMSInterceptor.unbindListener();
                onSuccess = null;
            }
        }
    }
}-
Notice that the package is the same as the native code and the other classes. This allows the callback class to be package protected so it isn’t exposed via the API (the class doesn’t have the public modifier)
-
We wrap the callback in call serially to match the Codename One convention of using the EDT by default. The call will probably arrive on the Android native thread so it makes sense to normalize it and not expose the Android native thread to the user code
One of the problematic aspects of calling back into Java from Javascript is that Javascript has no notion of multi-threading. Therefore, if the method you are calling uses Java’s threads at all (e.g. It includes a wait(), notify(), sleep(), callSerially(), etc…) you need to call it asynchronously from Javascript. You can call a method asynchronously by appending $async to the method name. E.g. With the Google Maps example above, you would change :
this.$GLOBAL$.com_codename1_googlemaps_MapContainer.fireMapChangeEvent__int_int_double_double;to
this.$GLOBAL$.com_codename1_googlemaps_MapContainer.fireMapChangeEvent__int_int_double_double$async;This will cause the call to be wrapped in the appropriate bootstrap code to work properly with threads - and it is absolutely necessary in cases where the method may use threads of any kind. The side-effect of calling a method with the $async suffix is that you can’t use return values from the method.
|
Tip
|
In most cases you should use the async version of a method when calling it from your native method. Only use the synchronous (default) version if you are absolutely sure that the method doesn’t use any threading primitives. |
Support for JAR files in Codename One has been a source of confusion so its probably a good idea to revisit this subject again and clarify all the details.
The first source of confusion is changing the classpath. You should NEVER change the classpath or add an external JAR via the IDE classpath UI. The reasoning here is very simple, these IDE’s don’t package the JAR’s into the final executable and even if they did these JAR’s would probably use features unavailable or inappropriate for the device (e.g. java.io.File etc.).
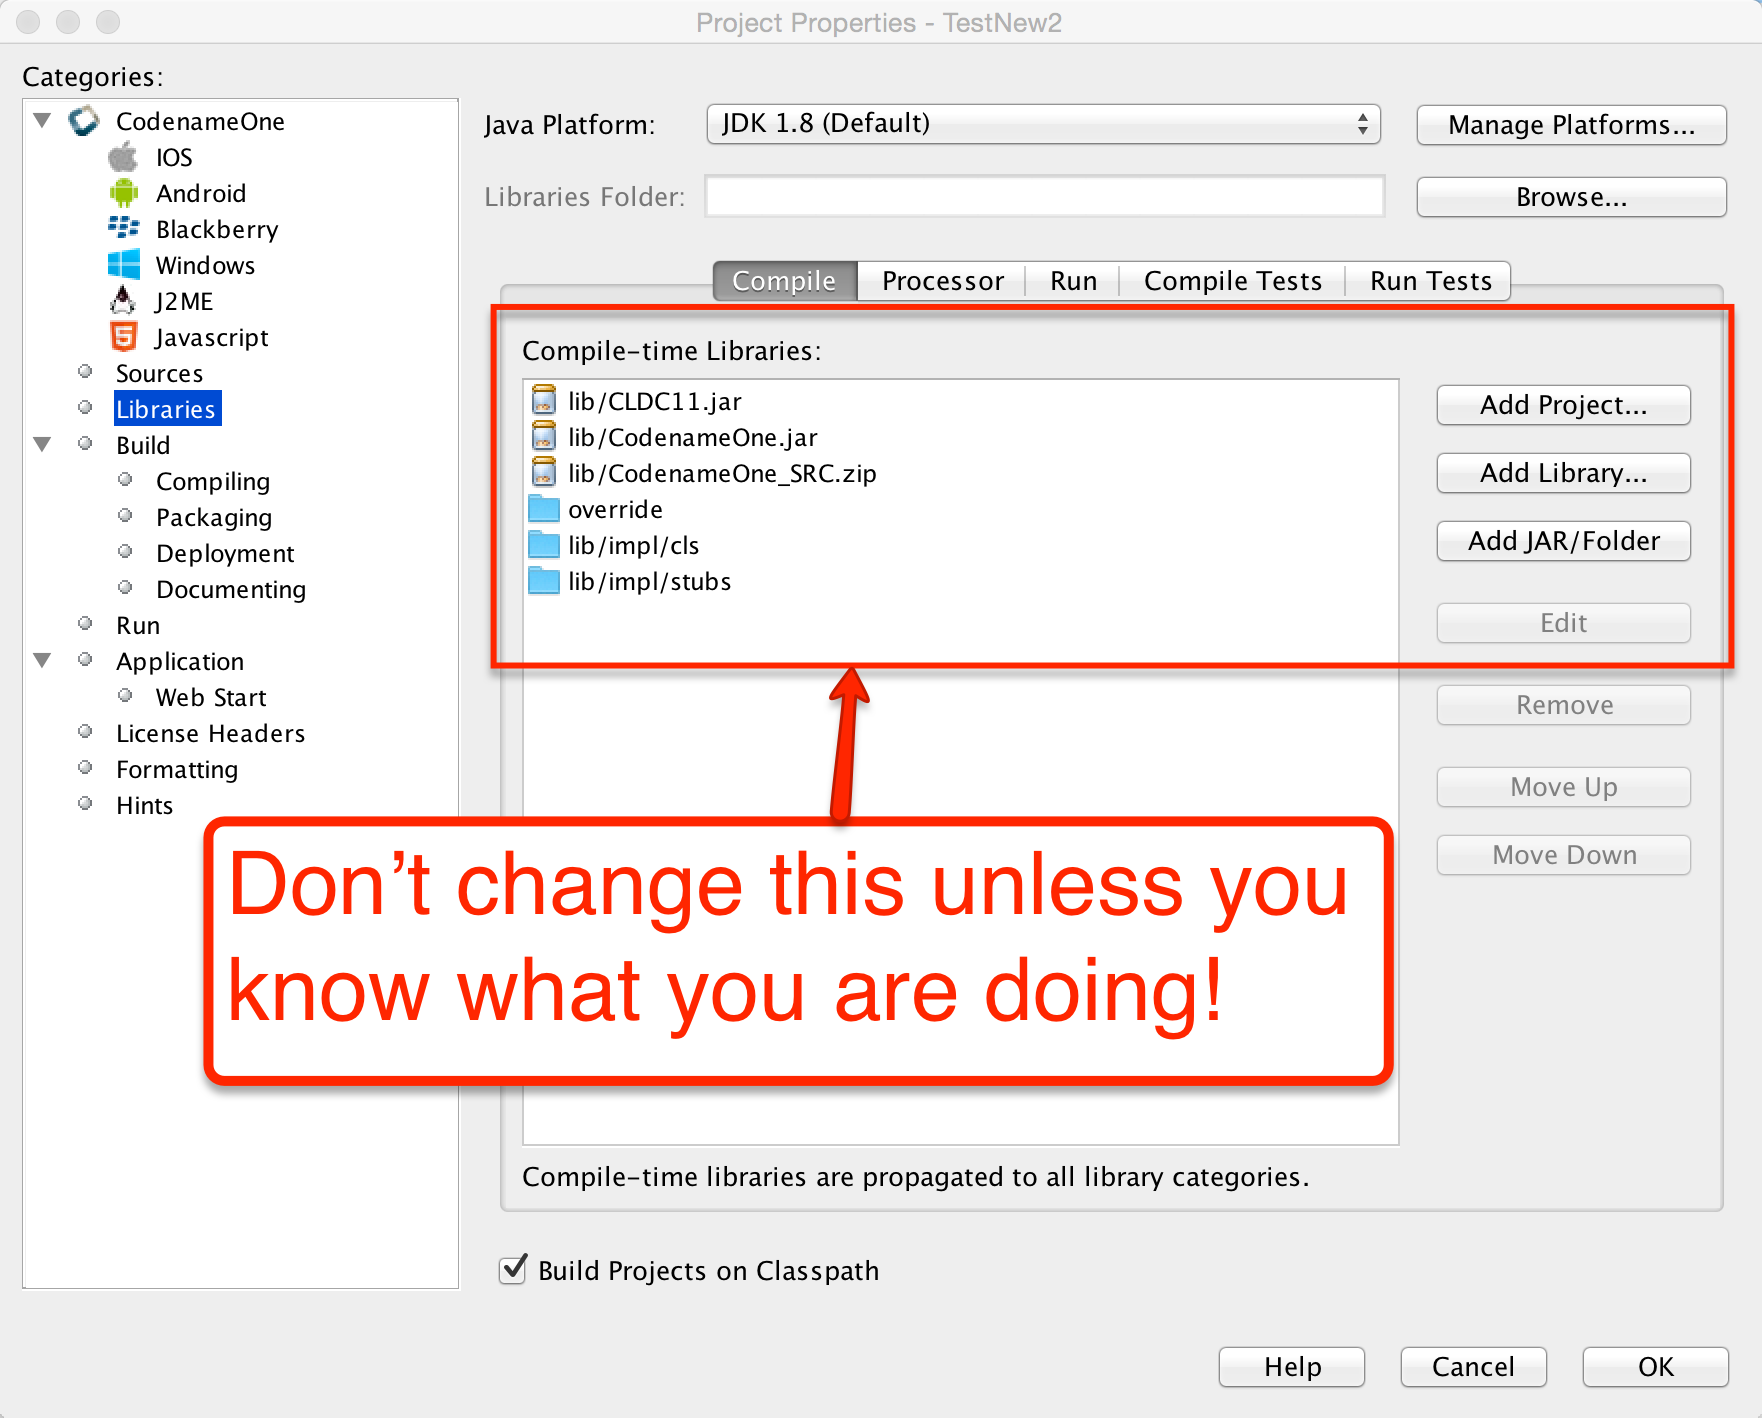
Cn1libs are Codename One’s file format for 3rd party extensions. It’s physicially a zip file containing other zip files and some meta-data.
A jar can be compiled with usage of any Java API that might not be supported, it can be compiled with a Java target version that isn’t tested.
Jars don’t include support for writing native code, you could use JNI in jars (awkwardly) but that doesn’t match Codename One’s needs for native support (see section above).
Jars don’t support "proper" code completion, a common developer trick is to stick source code into the jar but that prevents usage with proprietary code. Cn1libs provide full IDE code completion (with JavaDoc hints) without exposing the sources.
There are two use cases for wanting JAR’s and they both have very different solutions:
-
Modularity
-
Working with an existing JARs
Cn1lib’s address the modularity aspect allowing you to break that down. Existing jars can sometimes be used native code settings but for the most part you would want to adapt the code to abide by Codename One restrictions.
Codename One has a large repository of 3rd party cn1libs, you can install a cn1lib by placing it in the lib directory of your project then right clicking the project and selecting Codename One → Refresh cn1lib files.
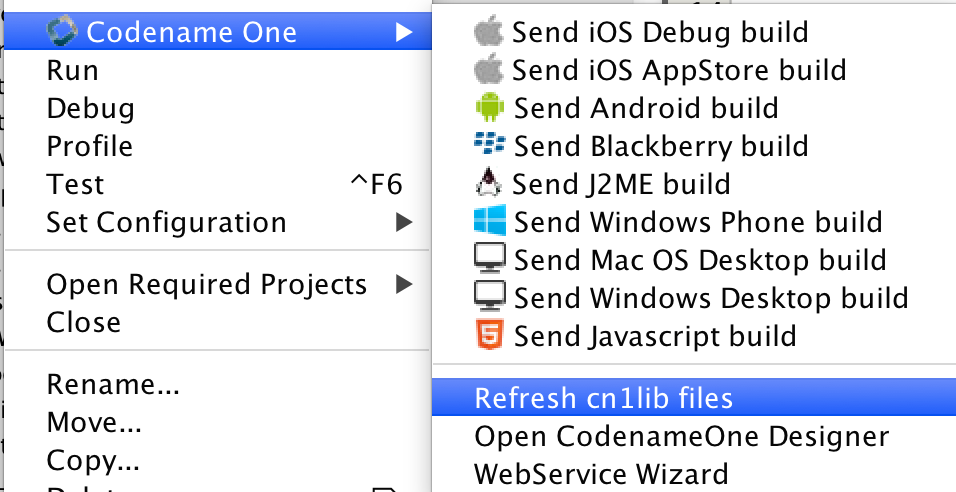
Once refreshed the content of the cn1lib will be available to code completion and you could just use it.
|
Tip
|
Notice that some cn1libs require additional configurations such as build hints etc. so make sure to read the developers instructions when integrating a 3rd party library. |
Refresh cn1lib files invokes the ant task refresh-libs. You could automatically trigger a refresh as part of your build process by invoking that ant task manually.
Technically that task invokes a custom task that unzips the content of the cn1lib into a set of directories accessible to the build process. Classes and stub sources are installed in lib/impl/cls & lib/impl/stubs respectively.
The native files are extracted to lib/impl/native. The classpath for the main project and the ant build process know about these directories and include them within their path.
Creating a cn1lib is trivial, we will get into more elaborate uses soon enough but for a hello world cn1lib we can just use this 2 step process:
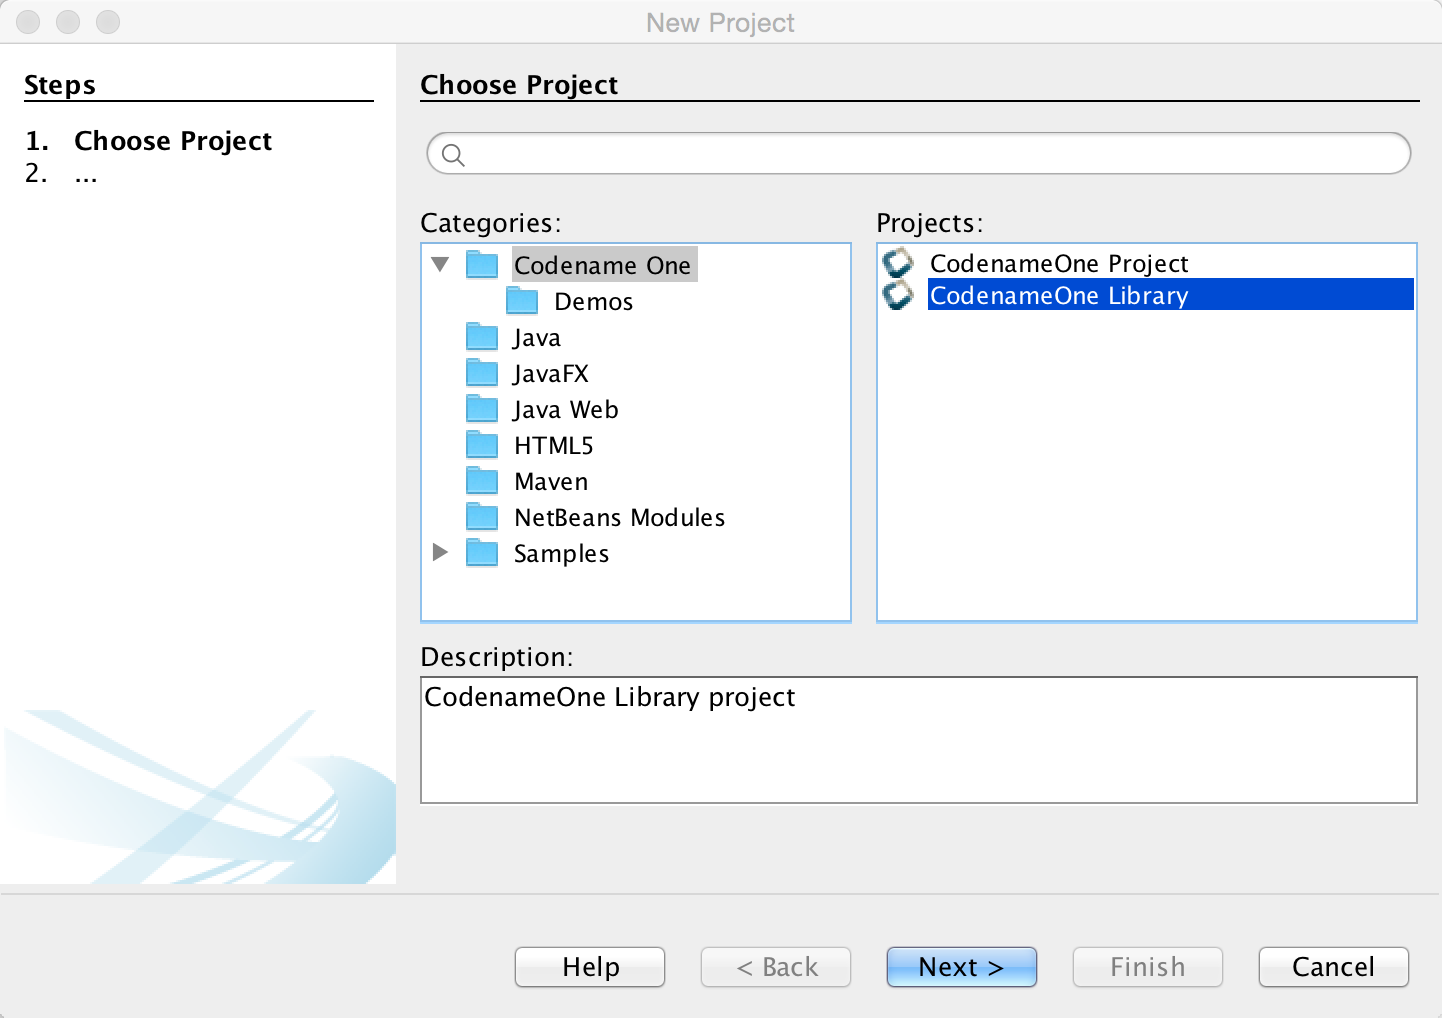
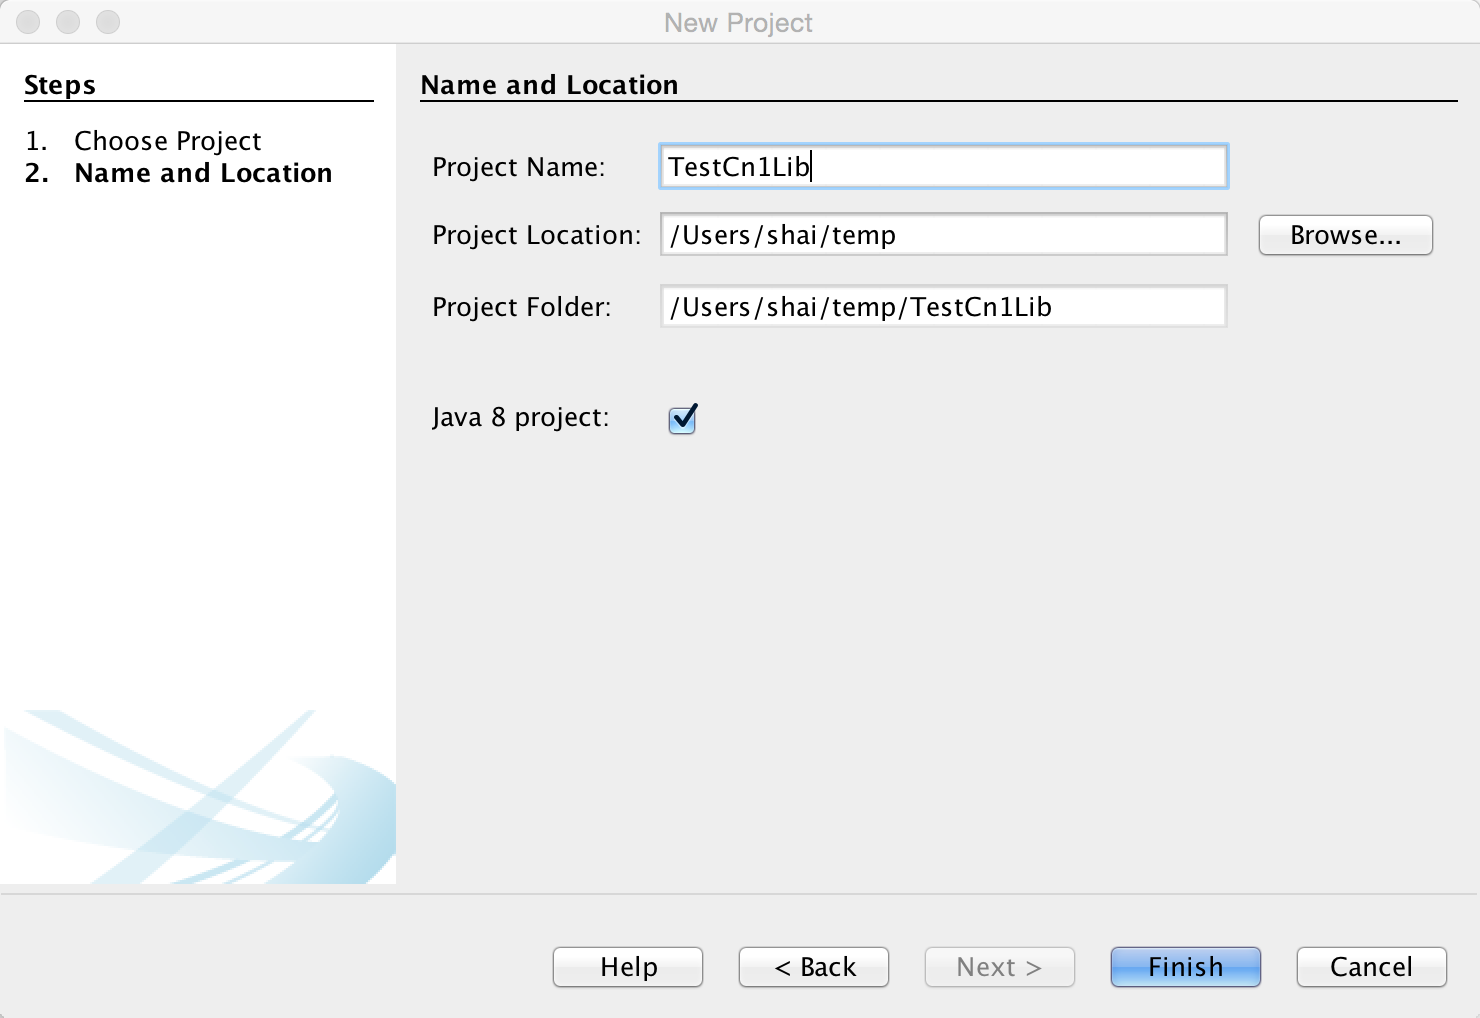
Once we go thru these steps we can define any source file within the library and it will be accessible to the users of the library.
Some cn1libs are pretty simple to install, just place them under the lib directory and refresh. However, many of the more elaborate cn1libs need some pretty complex configurations. This is the case when native code is involved where we need to add permissions or plist entries for the various native platforms to get everything to work. This makes the cn1lib’s helpful but less than seamless which is where we want to go.
Codename One cn1libs include two files that can be placed into the root: codenameone_library_required.properties & codenameone_library_appended.properties.
In these files you can just write a build hint as codename1.arg.ios.plistInject=… for the various hints.
|
Tip
|
Notice the usage of the properties syntax for the build hint with the codename1.arg prefix you would also need to escape reserved characters for properties files.The best way to discover the right syntax for such build hints is to set them via the build hints GUI in a regular project and copy/paste them from codenameone_settings.properties into the cn1lib file.
|
The obvious question is why do we need two files?
There are two types of build hints: required and appended.
Required build hints can be something like ios.objC=true
which we want to always work. E.g. if a cn1lib defines ios.objC=true and another cn1lib defines ios.objC=false
things won’t work since one cn1lib won’t get what it needs…
In this case we’d want the build to fail so we can remove the faulty cn1lib.
|
Note
|
If two cn1libs define ios.objC=true there will be no collision as the value would be identical
|
An appended property would be something like ios.plistInject=<key>UIBackgroundModes</key><array><string>audio</string> </array>
Notice that this can still collide e.g. if a different cn1lib defines its own background mode. However, there are many valid cases where ios.plistInject can be used for other things. In this case we’ll append the content of the ios.plistInject into the build hint if it’s not already there.
There are a couple of things you need to keep in mind:
-
Properties are merged with every "refresh libs" call not dynamically on the server. This means it should be pretty simple for the developer to investigate issues in this process.
-
Changing flags is problematic - there is no "uninstall" process. Since the data is copied into the
codenameone_settings.propertiesfile. If you need to change a flag later on you might need to alert users to make changes to their properties essentially negating the value of this feature…
So be very careful when adding properties here.
It’s your responsibility as a library developer to decide which build hint goes into which file!
Codename One can’t automate this process as the whole process of build hints is by definition an ad hoc process.
The rule of thumb is that a build hint with a numeric or boolean value is always a required property. If an entry has a string that you can append with another string then its probably an appended entry.
These build hints are probably of the "required" type:
android.debug
android.release
android.installLocation
android.licenseKey
android.stack_size
android.statusbar_hidden
android.googleAdUnitId
android.includeGPlayServices
android.headphoneCallback
android.gpsPermission
android.asyncPaint
android.supportV4
android.theme
android.cusom_layout1
android.versionCode
android.captureRecord
android.removeBasePermissions
android.blockExternalStoragePermission
android.min_sdk_version
android.smallScreens
android.streamMode
android.enableProguard
android.targetSDKVersion
android.web_loading_hidden
facebook.appId
facebook.clientToken
ios.keyboardOpen
ios.project_type
ios.newStorageLocation
ios.prerendered_icon
ios.application_exits
ios.themeMode
ios.xcode_version
javascript.inject_proxy
javascript.minifying
javascript.proxy.url
javascript.sourceFilesCopied
javascript.teavm.version
rim.askPermissions
google.adUnitId
ios.includePush
ios.headphoneCallback
ios.enableAutoplayVideo
ios.googleAdUnitId
ios.googleAdUnitIdPadding
ios.enableBadgeClear
ios.locationUsageDescription
ios.bundleVersion
ios.objC
ios.testFlight
desktop.width
desktop.height
desktop.adaptToRetina
desktop.resizable
desktop.fontSizes
desktop.theme
desktop.themeMac
desktop.themeWin
desktop.windowsOutput
noExtraResources
j2me.iconSize
android.permission.<PERMISSION_NAME>
These build hints should probably be appended:
android.xapplication
android.xpermissions
android.xintent_filter
android.facebook_permissions
android.stringsXml
android.style
android.nonconsumable
android.xapplication_attr
android.xactivity
android.pushVibratePattern
android.proguardKeep
android.sharedUserId
android.sharedUserLabel
ios.urlScheme
ios.interface_orientation
ios.plistInject
ios.facebook_permissions
ios.applicationDidEnterBackground
ios.viewDidLoad
ios.glAppDelegateHeader
ios.glAppDelegateBody
ios.beforeFinishLaunching
ios.afterFinishLaunching
ios.add_libsThe cb1lib file format is quite simple, it’s a zip file containing zip files within it with fixed names to support the various features.
The table below covers the files that can/should be a part of a cn1lib file:
| File Name | Required | Purpose |
|---|---|---|
main.zip |
✓ |
Contains the bytecode and the library binary data. This is effectively the portable portion of the jar |
stubs.zip |
✓ |
Stub source files (auto-generated) containing javadocs to provide code completion |
manifest.properties |
× |
General properties of the library, this isn’t used for much at the moment |
codenameone_ library_ appended.properties |
× |
Discussed above |
codenameone_ library_ required.properties |
× |
Discussed above |
nativeios.zip |
× |
Native iOS sources if applicable |
nativeand.zip |
× |
Native Android sources if applicable |
nativejavascript.zip |
× |
Native JavaScript sources if applicable |
nativerim.zip |
× |
Native RIM sources if applicable |
nativese.zip |
× |
Native JavaSE sources if applicable |
nativewin.zip |
× |
Native Windows sources if applicable |
nativeme.zip |
× |
Native Java ME sources if applicable |
While its pretty easy to use native interfaces to write Android native code some things aren’t necessarily as obvious. E.g. if you want to integrate a 3rd party library, specifically one that includes native C JNI code this process isn’t as straightforward.
If you need to integrate such a library into your native calls you have the following options:
-
The first option (and the easiest one) is to just place a Jar file in the native/android directory. This will link your binary with the jar file. Just place the jar under the native/android and the build server will pick it up and will add it to the classpath.
Notice that Android release apps are obfuscated by default which might cause issues with such libraries if they reference API’s that are unavailable on Android. You can workaround this by adding a build hint to the proguard obfuscation code that blocs the obfuscation of the problematic classes using the build hint:
android.proguardKeep=-keep class com.mypackage.ProblemClass { *; }` -
Another option is the
aarfile is a binary format Google introduced to represent an Android Library project (similarly to the cn1lib format). One of the problem with the Android Library projects was the fact that it required the project sources which made it difficult for 3rd party vendors to publish libraries.
As a result so android introduced theaarfile which is a binary format that represents a Library project. To learn more about arr you can read this.You can link an
aarfile by placing it under the native/android and the build server will link it to the project. -
There is another obsolete approach that we are mentioning for legacy purposes (e.g. if you need to port code written with this legacy option). This predated the
aaroption from Google… Not all 3rd party tools can be packaged as a simple jar, some 3rd party tools need to declare activities add permissions, resources, assets, and/or even add native code (.sofiles).
To link a Library project to your Codename One project open the Library project in Eclipse or Android Studio and make sure the project builds, after the project was built successfully remove the bin directory from the project and zip the whole project.Rename the extension from
.zipto.andliband place the andlib file under thenative/androiddirectory. The build server will pick it up and will link it to the project.
Unlike other platforms that tried to create overly generic catch all API’s Codename One tried to make things as simple as possible.
In Codename One only components can be dragged and drop targets are always components. The logic of actually performing the operation indicated by the drop is the responsibility of the person implementing the drop.
|
Note
|
Some platforms e.g. AWT allow dragging abstract concepts such as mime type elements. This allows dragging things like a text file into the app, but that use case isn’t realistic in mobile |
The code below allows you to rearrange the items based on a sensible order. Notice it relies on the default Container drop behavior.
Form hi = new Form("Rearrangeable Items", new BorderLayout());
String[] buttons = {"A Game of Thrones", "A Clash Of Kings",  "A Storm Of Swords",
    "A Feast For Crows", "A Dance With Dragons", "The Winds of Winter", "A Dream of Spring" };

Container box = new Container(BoxLayout.y());
box.setScrollableY(true);
box.setDropTarget(true);
java.util.List<String> got = Arrays.asList(buttons);
Collections.shuffle(got);
for(String current : got) {
    MultiButton mb = new MultiButton(current);
    box.add(mb);
    mb.setDraggable(true);
}

hi.add(BorderLayout.NORTH, "Arrange The Titles").add(BorderLayout.CENTER, box);
hi.show();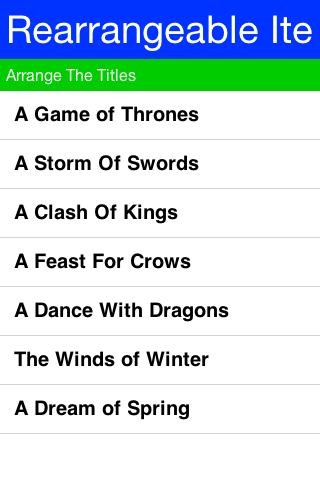
To enable dragging a component it must be flagged as draggable using setDraggable(true), to allow dropping the component onto another component you must first enable the drop target with setDropTarget(true) and override some methods (more on that later).
When dragging on top of a child component of a drop target the code recursively searches for a drop target parent. Dropping a component on the child will automatically find the right drop target, hence there is no need to make "everything" into a drop target.
You can override these methods in the draggable components:
-
getDragImage- this generates an image preview of the component that will be dragged. This automatically generates a sensible default so you don’t need to override it. -
drawDraggedImage- this method will be invoked to draw the dragged image at a given location, it might be useful to override it if you want to display some drag related information such an additional icon based on location etc. (e.g. a move/copy icon).
In the drop target you can override the following methods:
-
draggingOver- returns true if a drop operation at this point is permitted. Otherwise releasing the component will have no effect. -
dragEnter/Exit- useful to track and cleanup state related to dragging over a specific component. -
drop- the logic for dropping/moving the component must be implemented here!
Codename One was essentially built for continuous integration since the build servers are effectively a building block for such an architecture. However, there are several problems with that: the first of which is limited server capacity.
If all users would start sending builds with every commit the servers would instantly become unusable due to the heavy load. To circumvent this CI support is limited only on the Enterprise level which allows Codename One to stock more servers and cope with the rise in demand related to the feature.
To integrate with any CI solution just use the standard Ant targets such as build-for-android-device, build-for-iphone-device etc.
Normally, this would be a problem since the build is sent but since it isn’t blocking you wouldn’t get the build result and wouldn’t be able to determine if the build passed or failed. To enable this just edit the build XML and add the attribute automated="true" to the codeNameOne tag in the appropriate
targets.
This will deliver a result.zip file under the dist folder containing the binaries of a successful build. It will
also block until the build is completed. This should be pretty easy to integrate with any CI system together with
our automated testing solutions .
E.g. we can do a synchronous build like this:
<target name="build-for-javascript-sync" depends="clean,copy-javascript-override,copy-libs,jar,clean-override">
    <codeNameOne
        jarFile="${dist.jar}"
        displayName="${codename1.displayName}"
        packageName = "${codename1.packageName}"
        mainClassName = "${codename1.mainName}"
        version="${codename1.version}"
        icon="${codename1.icon}"
        vendor="${codename1.vendor}"
        subtitle="${codename1.secondaryTitle}"
        automated="true"
        targetType="javascript"
        />
</target>
This allows us to build a JavaScript version of the app automatically as part of a release build script.
When running on Android Lollipop (5.0 or newer) the native action bar will use the Lollipop design. This isn’t applicable if you use the Toolbar or SideMenuBar this will be used only in the task switcher.
To customize the colors of the native ActionBar on Lollipop define a colors.xml file in the native/android directory
of your project. It should look like this:
<resources>
   <color name="colorPrimary">#ff00ff00</color>
   <color name="colorPrimaryDark">#80ff0000</color>
   <color name="colorAccent">#800000ff</color>
</resources>A common trick in mobile application development, is communication between two unrelated applications.
In Android we can use intents which are pretty elaborate and can be used via Display.execute, however what if you would like to expose the functionality of your application to a different application running on the device. This would allow that application to launch your application.
This isn’t something we builtin to Codename One, however it does expose enough of the platform capabilities to enable that functionality rather easily on Android.
On Android we need to define an intent filter which we can do using the android.xintent_filter build hint, this accepts the XML to filter whether a request is relevant to our application:
android.xintent_filter=<intent-filter> <action android:name="android.intent.action.VIEW" /> <category android:name="android.intent.category.DEFAULT" /> <category android:name="android.intent.category.BROWSABLE" /> <data android:scheme="myapp" /> </intent-filter>You can read more about it in this stack overflow question.
To bind the myapp:// URL to your application. As a result typing myapp://x into the Android browser will launch the application.
You can access the value of the URL that launched the app using:
String arg = Display.getInstance().getProperty("AppArg");This value would be null if the app was launched via the icon.
iOS is practically identical to Android with some small caveats, iOS’s equivalent of the manifest is the plist.
You can inject more data into the plist by using the ios.plistInject build hint.
So the equivalent in the iOS side would be
ios.plistInject=<key>CFBundleURLTypes</key> <array> <dict> <key>CFBundleURLName</key> <string>com.yourcompany.myapp</string> </dict> <dict> <key>CFBundleURLSchemes</key> <array> <string>myapp</string> </array> </dict> </array>However, that can conflict with the Facebook integration if you use FacebookConnect which needs access to the schemes. To workaround it you can use the build hint ios.urlScheme e.g.:
ios.urlScheme=<string>myapp</string>Many Codename One developers don’t truly grasp the reason for the separation between peer (native) components and Codename One components. This is a crucial thing you need to understand especially if you plan on working with native widgets e.g. Web Browser, native maps, text input, media and native interfaces (which can return a PeerComponent).
Codename One draws all of its widgets on its own, this is a concept which was modeled in part after Swing. This allows functionality that can’t be achieved in native widget platforms:
-
The Codename One GUI builder & simulator are almost identical to the device - notice that this also enables the build cloud, otherwise device specific bugs would overwhelm development and make the build cloud redundant.
-
Ability to override everything - paint, pointer, key events are all overridable and replaceable. Developers can also paint over everything e.g. glasspane and layered pane.
-
Consistency - provides identical functionality on all platforms for the most part.
This all contributes to our ease of working with Codename One and maintaining Codename One. More than 95% of Codename One’s code is in Java hence its really portable and pretty easy to maintain!
We need the native device to do input, html rendering etc. these are just too big and too complex tasks for Codename One to do from scratch.
They are sometimes impossible to perform without the native platform. E.g. the virtual keyboard input on the devices is tied directly to the native text input. It’s impractical to implement everything from scratch for all languages, dictionaries etc. The result would be sub-par.
A web browser can’t be implemented in this day and age without a JavaScript JIT and including a JIT within an iOS app is prohibited by Apple.
Codename One does pretty much everything on the EDT (Event Dispatch Thread), this provides a lot of cool features e.g. modal dialogs, invokeAndBlock etc.
However native widgets have to be drawn on the devices native UI thread.
This means that drawing looks something like this:
-
Loop over all Codename One components and paint them.
-
Loop over all native peer components and paint them.
This effectively means that all peer components are drawn on top of the Codename One components.
|
Note
|
This was also the case in AWT/Swing to one degree or another… |
Codename One grabs a screenshot of the peer, hide it and then we can just show the screenshot. Since the screenshot is static it can be rendered via the standard UI. Naturally we can’t do that always since grabbing a screenshot is an expensive process on all platforms and must be performed on the native device thread.
Since the form title/footer etc. are drawn by Codename One the peer component might paint itself on top of them. Clipping a peer component is often pretty difficult. Furthermore, if the user drags his finger within the peer component he might trigger the native scroll within the might collide with our scrolling?
There is also another problem that might be counter intuitive. iOS has screenshot images representing the first form. If your first page is an HTML or a native map (or other peer widget) the screenshot process on the build server will show fallback code instead of the real thing thus providing sub-par behavior.
Its impractical to support something like HTML for the screenshot process since it would also look completely different from the web component running on the device.
|
Tip
|
You can read more about the screenshot process here. |
The following is a description of the procedure that was used to create the Codename One FreshDesk library. This process can be easily adapted to wrap any native SDK on Android and iOS.
Before we begin, we’ll need to review the Android and iOS SDKs.
-
FreshDesk Android SDK: Integration Guide | API Docs
-
FreshDesk iOS SDK: Integration Guide | API Docs
In reviewing the SDKs, we are looking for answers to two questions:
-
What should my Codename One FreshDesk API look like?
-
What will be involved in integrating the native SDK in my app or lib?
When designing the Codename One API, we should begin by looking at the Javadocs for the native Android SDK. If the class hierarchy doesn’t look too elaborate, we may decide to model our Codename One public API fairly closely on the Android API. On the other hand, if we only need a small part of the SDK’s functionality, we may choose to create my abstractions around just the functionality that we need.
In the case of the FreshDesk SDK, it looks like most of the functionality is handled by one central class Mobihelp,
with a few other POJO classes for passing data to and from the service. This is a good candidate for a comprehensive
Codename One API.
Before proceeding, we also need to look at the iOS API to see if there are any features that aren’t included. While naming conventions in the iOS API are a little different than those in the Android API, it looks like they are functionally the same.
Therefore, I choose to create a class hierarchy and API that closely mirrors the Android SDK.
A Codename One library that wraps a native SDK, will generally consist of the following:
-
Public Java API, consisting of pure Java classes that are intended to be used by the outside world.
-
Native Interface(s). The Native Interface(s) act as a conduit for the public Java API to communicate to the native SDK. Parameters in native interface methods are limited to primitive types, arrays of primitive types, and Strings, as are return values.
-
Native code. Each platform must include an implementation of the Native Interface(s). These implementations are written in the native language of the platform (e.g. Java for Android, and Objective-C for iOS).
-
Native dependencies. Any 3rd party libraries required for the native code to work, need to be included for each platform. On android, this may mean bundling .jar files, .aar files, or .andlib files. On iOS, this may mean bundling .h files, .a files, .framework, and .bundle files.
-
Build hints. Some libraries will require you to add some extra build hints to your project. E.g. On Android you may need to add permissions to the manifest, or define services in the
<Application>section of the manifest. On iOS, this may mean specifying additional core frameworks for inclusion, or adding build flags for compilation.
The following diagram shows the dependencies in a native library:
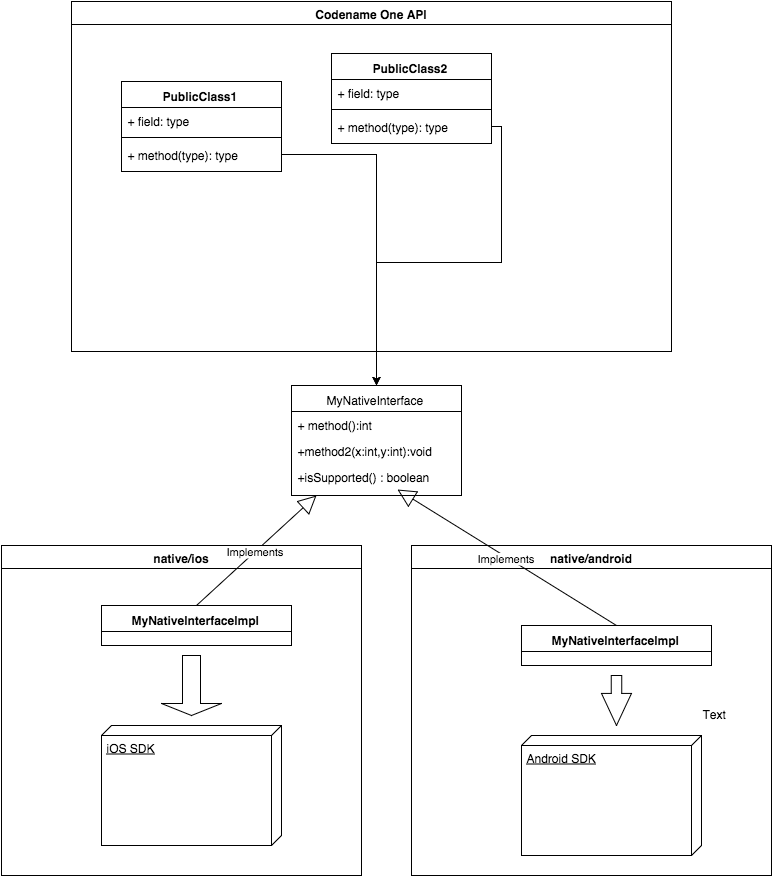
In the specific case of our FreshDesk API, the public API and classes will look like:
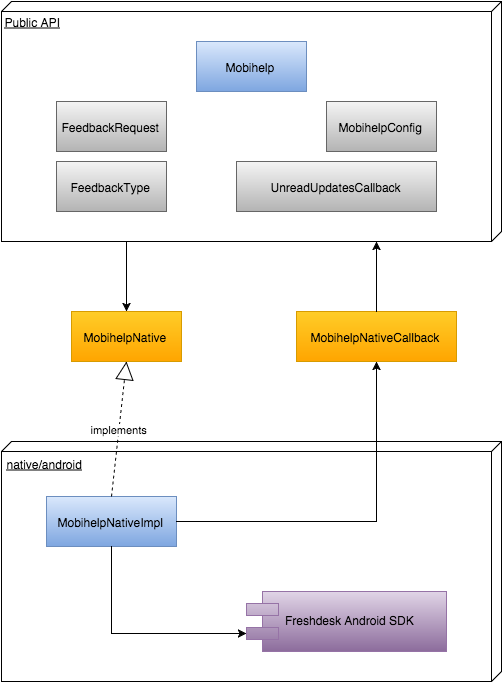
-
The public API consists of the main class (
Mobihelp), and a few supporting classes (FeedbackRequest,FeedbackType,MobihelpConfig,MobihelpCallbackStatus), which were copied almost directly from the Android SDK. -
The only way for the public API to communicate with the native SDK is via the
MobihelpNativeinterface. -
We introduced the
MobihelpNativeCallbackclass to facilitate native code calling back into the public API. This was necessary for a few methods that used asynchronous callbacks.
We have already looked at the final product of the public API in the previous step, but let’s back up and walk through the process step-by-step.
I wanted to model my API closely around the Android API, and the central class that includes all of the functionality of the SDK is the com.freshdesk.mobihelp.Mobihelp class, so we begin there.
We’ll start by creating our own package (com.codename1.freshdesk) and our own Mobihelp class inside it.
In a first glance at the com.freshdesk.mobihelp.Mobihelp API we see that many of the methods take a parameter of type android.content.Context. This class is part of the core Android SDK, and will not be accessible to any pure Codename One APIs. Therefore, our public API cannot include any such references. Luckily, we’ll be able to access a suitable context in the native layer, so we’ll just omit this parameter from our public API, and inject them in our native implementation.
Hence, the method signature public static final void setUserFullName (Context context, String name) will simply become public static final void setUserFullName (String name) in our public API.
Although our public API isn’t constrained by the same rules as our Native Interfaces with respect to parameter and return types, we need to be cognizant of the fact that parameters we pass to our public API will ultimately be funnelled through our native interface. Therefore, we should pay attention to any parameters or return types that can’t be passed directly to a native interface, and start forming a strategy for them. E.g. consider the following method signature from the Android Mobihelp class:
public static final void showSolutions (Context activityContext, ArrayList<String> tags)
We’ve already decided to just omit the Context parameter in our API, so that’s a non-issue. But what about the ArrayList<String> tags parameter? Passing this to our public API is no problem, but when we implement the public API, how will we pass this ArrayList to our native interface, since native interfaces don’t allow us to arrays of strings as parameters?
I generally use one of three strategies in such cases:
-
Encode the parameter as either a single
String(e.g. using JSON or some other easily parseable format) or a byte[] array (in some known format that can easily be parsed in native code). -
Store the parameter on the Codename One side and pass some ID or token that can be used on the native side to retrieve the value.
-
If the data structure can be expressed as a finite number of primitive values, then simply design the native interface method to take the individual values as parameters instead of a single object. E.g. If there is a User class with properties
nameandphoneNumber, the native interface can just havenameandphoneNumber parameters rather than a single `userparameter.
In this case, because an array of strings is such a simple data structure, I decided to use a variation on strategy number 1: Merge the array into a single string with a delimiter.
In any case, we don’t have to come up with the specifics right now, as we are still on the public API, but it will pay dividends later if we think this through ahead of time.
It is quite often the case that native code needs to call back into Codename One code when an event occurs. This may be connected directly to an API method call (e.g. as the result of an asynchronous method invocation), or due to something initiated by the operating system or the native SDK on its own (e.g. a push notification, a location event, etc..).
Native code will have access to both the Codename One API and any native APIs in your app, but on some platforms, accessing the Codename One API may be a little tricky. E.g. on iOS you’ll be calling from Objective-C back into Java which requires knowledge of Codename One’s java-to-objective C conversion process. In general, I have found that the easiest way to facilitate callbacks is to provide abstractions that involve static java methods (in Codename One space) that accept and return primitive types.
In the case of our Mobihelp class, the following method hints at the need to have a "callback plan":
public static final void getUnreadCountAsync (Context context, UnreadUpdatesCallback callback)
The interface definition for UnreadUpdatesCallback is:
public interface UnreadUpdatesCallback {
    //This method is called once the unread updates count is available.
    void onResult(MobihelpCallbackStatus status, Integer count);

}
I.e. If we were to implement this method (which I plan to do), we need to have a way for the native code to call the callback.onResult() method of the passed parameter.
So we have two issues that will need to be solved here:
-
How to pass the
callbackobject through the native interface. -
How to call the
callback.onResult()method from native code at the right time.
For the first issue, we’ll use strategy #2 that we mentioned previously: (Store the parameter on the Codename One side and pass some ID or token that can be used on the native side to retrieve the value).
For the second issue, we’ll create a static method that can take the token generated to solve the first issue, and call the stored callback object’s onResult() method. We abstract both sides of this process using the MobihelpNativeCallback class.
public class MobihelpNativeCallback {
    private static int nextId = 0;
    private static Map<Integer,UnreadUpdatesCallback> callbacks = new HashMap<Integer,UnreadUpdatesCallback>();

    static int registerUnreadUpdatesCallback(UnreadUpdatesCallback callback) {
        callbacks.put(nextId, callback);
        return nextId++;
    }

    public static void fireUnreadUpdatesCallback(int callbackId, final int status, final int count) {
        final UnreadUpdatesCallback cb = callbacks.get(callbackId);
        if (cb != null) {
            callbacks.remove(callbackId);
            Display.getInstance().callSerially(new Runnable() {

                public void run() {
                    MobihelpCallbackStatus status2 = MobihelpCallbackStatus.values()[status];
                    cb.onResult(status2, count);
                }

            });
        }
    }

}
Things to notice here:
-
This class uses a static
Map<Integer,UnreadUpdatesCallback>member to keep track of all callbacks, mapping a unique integer ID to each callback. -
The
registerUnreadUpdatesCallback()method takes anUnreadUpdatesCallbackobject, places it in thecallbacksmap, and returns the integer token that can be used to fire the callback later. This method would be called by the public API inside thegetUnreadCountAsync()method implementation to convert thecallbackinto an integer, which can then be passed to the native API. -
The
fireUnreadUpdatesCallback()method would be called later from native code. Its first parameter is the token for the callback to call. -
We wrap the
onResult()call inside aDisplay.callSerially()invocation to ensure that the callback is called on the EDT. This is a general convention that is used throughout Codename One, and you’d be well-advised to follow it. Event handlers should be run on the EDT unless there is a good reason not to - and in that case your documentation and naming conventions should make this clear to avoid accidentally stepping into multithreading hell!
Most Native SDKs include some sort of initialization method where you pass your developer and application credentials to the API. When I filled in FreshDesk’s web-based form to create a new application, it generated an application ID, an app "secret", and a "domain". The SDK requires me to pass all three of these values to its init() method via the MobihelpConfig class.
Note, however, that FreshDesk (and most other service provides that have native SDKs) requires me to create different Apps for each platform. This means that my App ID and App secret will be different on iOS than they will be on Android.
Therefore our public API needs to enable us to provide multiple credentials in the same app, and our API needs to know to use the correct credentials depending on the device that the app is running on.
There are many solutions to this problem, but the one I chose was to provide two different init() methods:
public final static void initIOS(MobihelpConfig config)and
public final static void initAndroid(MobihelpConfig config)Then I can set up the API with code like:
MobihelpConfig config = new MobihelpConfig();
config.setAppSecret("xxxxxxx");
config.setAppId("freshdeskdemo-2-xxxxxx");
config.setDomain("codenameonetest1.freshdesk.com");
Mobihelp.initIOS(config);

config = new MobihelpConfig();
config.setAppSecret("yyyyyyyy");
config.setAppId("freshdeskdemo-1-yyyyyyyy");
config.setDomain("https://codenameonetest1.freshdesk.com");
Mobihelp.initAndroid(config);public class Mobihelp {
private static char[] separators = new char[]{',','|','/','@','#','%','!','^','&','*','=','+','*','<'};
private static MobihelpNative peer;
public static boolean isSupported() {
....
}
public static void setPeer(MobihelpNative peer) {
....
}
//Attach the given custom data (key-value pair) to the conversations/tickets.
public final static void addCustomData(String key, String value) {
...
}
//Attach the given custom data (key-value pair) to the conversations/tickets with the ability to flag sensitive data.
public final static void addCustomData(String key, String value, boolean isSensitive) {
...
}
//Clear all breadcrumb data.
public final static void clearBreadCrumbs() {
...
}
//Clear all custom data.
public final static void clearCustomData() {
...
}
//Clears User information.
public final static void clearUserData() {
...
}
//Retrieve the number of unread items across all the conversations for the user synchronously i.e.
public final static int getUnreadCount() {
...
}
//Retrieve the number of unread items across all the conversations for the user asynchronously, count is delivered to the supplied UnreadUpdatesCallback instance Note : This may return 0 or stale value when there is no network connectivity etc
public final static void getUnreadCountAsync(UnreadUpdatesCallback callback) {
...
}
//Initialize the Mobihelp support section with necessary app configuration.
public final static void initAndroid(MobihelpConfig config) {
...
}
public final static void initIOS(MobihelpConfig config) {
...
}
//Attaches the given text as a breadcrumb to the conversations/tickets.
public final static void leaveBreadCrumb(String crumbText) {
...
}
//Set the email of the user to be reported on the Freshdesk Portal
public final static void setUserEmail(String email) {
...
}
//Set the name of the user to be reported on the Freshdesk Portal.
public final static void setUserFullName(String name) {
...
}
//Display the App Rating dialog with option to Rate, Leave feedback etc
public static void showAppRateDialog() {
...
}
//Directly launch Conversation list screen from anywhere within the application
public final static void showConversations() {
...
}
//Directly launch Feedback Screen from anywhere within the application.
public final static void showFeedback(FeedbackRequest feedbackRequest) {
...
}
//Directly launch Feedback Screen from anywhere within the application.
public final static void showFeedback() {
...
}
//Displays the Support landing page (Solution Article List Activity) where only solutions tagged with the given tags are displayed.
public final static void showSolutions(ArrayList<String> tags) {
...
}
private static String findUnusedSeparator(ArrayList<String> tags) {
...
}
//Displays the Support landing page (Solution Article List Activity) from where users can do the following
//View solutions,
//Search solutions,
public final static void showSolutions() {
...
}
//Displays the Integrated Support landing page where only solutions tagged with the given tags are displayed.
public final static void showSupport(ArrayList<String> tags) {
...
}
//Displays the Integrated Support landing page (Solution Article List Activity) from where users can do the following
//View solutions,
//Search solutions,
// Start a new conversation,
//View existing conversations update/ unread count etc
public final static void showSupport() {
...
}
}The final native interface is nearly identical to our public API, except in cases where the public API included non-primitive parameters.
public interface MobihelpNative extends NativeInterface {

    /**
     * @return the appId
     */
    public String config_getAppId();

    /**
     * @param appId the appId to set
     */
    public void config_setAppId(String appId);

    /**
     * @return the appSecret
     */
    public String config_getAppSecret();

    /**
     * @param appSecret the appSecret to set
     */
    public void config_setAppSecret(String appSecret);
    /**
     * @return the domain
     */
    public String config_getDomain();
    /**
     * @param domain the domain to set
     */
    public void config_setDomain(String domain) ;

    /**
     * @return the feedbackType
     */
    public int config_getFeedbackType() ;

    /**
     * @param feedbackType the feedbackType to set
     */
    public void config_setFeedbackType(int feedbackType);

    /**
     * @return the launchCountForReviewPrompt
     */
    public int config_getLaunchCountForReviewPrompt() ;
    /**
     * @param launchCountForReviewPrompt the launchCountForReviewPrompt to set
     */
    public void config_setLaunchCountForReviewPrompt(int launchCountForReviewPrompt);
    /**
     * @return the prefetchSolutions
     */
    public boolean config_isPrefetchSolutions();
    /**
     * @param prefetchSolutions the prefetchOptions to set
     */
    public void config_setPrefetchSolutions(boolean prefetchSolutions);
    /**
     * @return the autoReplyEnabled
     */
    public boolean config_isAutoReplyEnabled();

    /**
     * @param autoReplyEnabled the autoReplyEnabled to set
     */
    public void config_setAutoReplyEnabled(boolean autoReplyEnabled) ;

    /**
     * @return the enhancedPrivacyModeEnabled
     */
    public boolean config_isEnhancedPrivacyModeEnabled() ;

    /**
     * @param enhancedPrivacyModeEnabled the enhancedPrivacyModeEnabled to set
     */
    public void config_setEnhancedPrivacyModeEnabled(boolean enhancedPrivacyModeEnabled) ;


    //Attach the given custom data (key-value pair) to the conversations/tickets.
    public void	addCustomData(String key, String value);
    //Attach the given custom data (key-value pair) to the conversations/tickets with the ability to flag sensitive data.
    public void addCustomDataWithSensitivity(String key, String value, boolean isSensitive);
    //Clear all breadcrumb data.
    public void	clearBreadCrumbs() ;
    //Clear all custom data.
    public void	clearCustomData();
    //Clears User information.
    public void	clearUserData();
    //Retrieve the number of unread items across all the conversations for the user synchronously i.e.
    public int getUnreadCount();

    //Retrieve the number of unread items across all the conversations for the user asynchronously, count is delivered to the supplied UnreadUpdatesCallback instance Note : This may return 0 or stale value when there is no network connectivity etc
    public void	getUnreadCountAsync(int callbackId);

    public void initNative();

    //Attaches the given text as a breadcrumb to the conversations/tickets.
    public  void leaveBreadCrumb(String crumbText);
    //Set the email of the user to be reported on the Freshdesk Portal

    public void setUserEmail(String email);

    //Set the name of the user to be reported on the Freshdesk Portal.
    public void setUserFullName(String name);

    //Display the App Rating dialog with option to Rate, Leave feedback etc
    public void	showAppRateDialog();
    //Directly launch Conversation list screen from anywhere within the application
    public void showConversations();

    //Directly launch Feedback Screen from anywhere within the application.
    public void	showFeedbackWithArgs(String subject, String description);
    //Directly launch Feedback Screen from anywhere within the application.
    public void	showFeedback();

    //Displays the Support landing page (Solution Article List Activity) where only solutions tagged with the given tags are displayed.
    public void	showSolutionsWithTags(String tags, String separator);

    //Displays the Support landing page (Solution Article List Activity) from where users can do the following
    //View solutions,
    //Search solutions,
    public void	showSolutions();
    //Displays the Integrated Support landing page where only solutions tagged with the given tags are displayed.
    public void	showSupportWithTags(String tags, String separator);

    //Displays the Integrated Support landing page (Solution Article List Activity) from where users can do the following
    //View solutions,
    //Search solutions,
    //  Start a new conversation,
    //View existing conversations update/ unread count etc
    public void	showSupport();
}
Notice also, that the native interface includes a set of methods with names prefixed with config__. This is just a naming conventions I used to identify methods that map to the MobihelpConfig class. I could have used a separate native interface for these, but decided to keep all the native stuff in one class for simplicity and maintainability.
So we have a public API, and we have a native interface. The idea is that the public API should be a thin wrapper around the native interface to smooth out rough edges that are likely to exist due to the strict set of rules involved in native interfaces. We’ll, therefore, use delegation inside the Mobihelp class to provide it a reference to an instance of MobihelpNative:
public class Mobihelp {
    private static MobihelpNative peer;
    //...
}
We’ll initialize this peer inside the init() method of the Mobihelp class. Notice, though that init() is private since we have provided abstractions for the Android and iOS apps separately:
    //Initialize the Mobihelp support section with necessary app configuration.
    public final static void initAndroid(MobihelpConfig config) {
        if ("and".equals(Display.getInstance().getPlatformName())) {
            init(config);
        }
    }

    public final static void initIOS(MobihelpConfig config) {
        if ("ios".equals(Display.getInstance().getPlatformName())) {
            init(config);
        }
    }

    private static void init(MobihelpConfig config) {
        peer = (MobihelpNative)NativeLookup.create(MobihelpNative.class);
        peer.config_setAppId(config.getAppId());
        peer.config_setAppSecret(config.getAppSecret());
        peer.config_setAutoReplyEnabled(config.isAutoReplyEnabled());
        peer.config_setDomain(config.getDomain());
        peer.config_setEnhancedPrivacyModeEnabled(config.isEnhancedPrivacyModeEnabled());
        if (config.getFeedbackType() != null) {
            peer.config_setFeedbackType(config.getFeedbackType().ordinal());
        }
        peer.config_setLaunchCountForReviewPrompt(config.getLaunchCountForReviewPrompt());
        peer.config_setPrefetchSolutions(config.isPrefetchSolutions());
        peer.initNative();

    }
Things to Notice:
-
The
initAndroid()andinitIOS()methods include a check to see if they are running on the correct platform. Ultimately they both callinit(). -
The
init()method, uses the NativeLookup class to instantiate our native interface.
For most of the methods in the Mobihelp class, we can see that the public API will just be a thin wrapper around the native interface. E.g. the public API implementation of setUserFullName(String) is:
public final static void setUserFullName(String name) {
    peer.setUserFullName(name);
}
For some other methods, the public API needs to break apart the parameters into a form that the native interface can accept. E.g. the init() method, shown above, takes a MobihelpConfig object as a parameter, but it passed the properties of the config object individually into the native interface.
Another example, is the showSupport(ArrayList<String> tags) method. The corresponding native interface method that is wraps is showSupport(String tags, `String separator)` - i.e it needs to merge all tags into a single delimited string, and pass then to the native interface along with the delimiter used. The implementation is:
public final static void showSupport(ArrayList<String> tags) {
    String separator = findUnusedSeparator(tags);
    StringBuilder sb = new StringBuilder();
    for (String tag : tags) {
        sb.append(tag).append(separator);
    }
    peer.showSupportWithTags(sb.toString().substring(0, sb.length()-separator.length()), separator);
}
The only other non-trivial wrapper is the getUnreadCountAsync() method that we discussed before:
   public final static void getUnreadCountAsync(UnreadUpdatesCallback callback) {
        int callbackId = MobihelpNativeCallback.registerUnreadUpdatesCallback(callback);
        peer.getUnreadCountAsync(callbackId);
}Now that we have set up our public API and our native interface, it is time to work on the native side of things. You can generate stubs for all platforms in your IDE (Netbeans in my case), by right clicking on the MobihelpNative class in the project explorer and selecting "Generate Native Access".
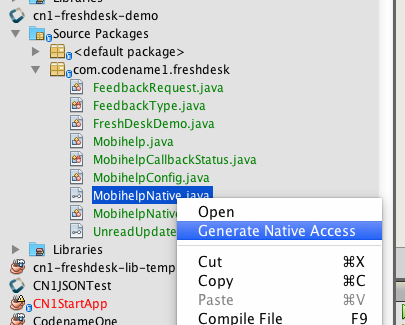
This will generate a separate directory for each platform inside your project’s native directory:
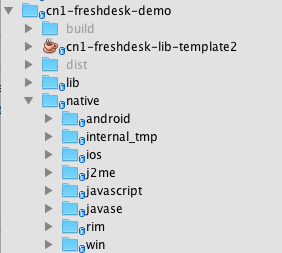
Inside the android directory, this generates a com/codename1/freshdesk/MobihelpNativeImpl class with stubs for each method.
Our implementation will be a thin wrapper around the native Android SDK. See the source here.
Some highlights:
-
Context: The native API requires us to pass a context object as a parameter on many methods. This should be the context for the current activity. It will allow the FreshDesk API to know where to return to after it has done its thing. Codename One provides a class calledAndroidNativeUtilthat allows us to retrieve the app’s Activity (which includes the Context). We’ll wrap this with a convenience method in our class as follows:private static Context context() { return com.codename1.impl.android.AndroidNativeUtil.getActivity().getApplicationContext(); }
This will enable us to easily wrap the freshdesk native API. E.g.:
public void clearUserData() {
    com.freshdesk.mobihelp.Mobihelp.clearUserData(context());
}
-
runOnUiThread()- Many of the calls to the FreshDesk API may have been made from the Codename One EDT. However, Android has its own event dispatch thread that should be used for interacting with native Android UI. Therefore, any API calls that look like they initiate some sort of native Android UI process should be wrapped inside Android’srunOnUiThread()method which is similar to Codename One’sDisplay.callSerially()method. E.g. see theshowSolutions()method:public void showSolutions() { activity().runOnUiThread(new Runnable() { public void run() { com.freshdesk.mobihelp.Mobihelp.showSolutions(context()); } }); }
(Note here that the
activity()method is another convenience method to retrieve the app’s currentActivityfrom theAndroidNativeUtilclass). -
Callbacks. We discussed, in detail, the mechanisms we put in place to enable our native code to perform callbacks into Codename One. You can see the native side of this by viewing the
getUnreadCountAsync()method implementation:public void getUnreadCountAsync(final int callbackId) { activity().runOnUiThread(new Runnable() { public void run() { com.freshdesk.mobihelp.Mobihelp.getUnreadCountAsync(context(), new com.freshdesk.mobihelp.UnreadUpdatesCallback() { public void onResult(com.freshdesk.mobihelp.MobihelpCallbackStatus status, Integer count) { MobihelpNativeCallback.fireUnreadUpdatesCallback(callbackId, status.ordinal(), count); } }); } }); }
The last step (at least on the Android side) is to bundle the FreshDesk SDK. For Android, there are a few different scenarios you’ll run into for embedding SDKs:
-
The SDK includes only Java classes - NO XML UI files, assets, or resources that aren’t included inside a simple .jar file. In this case, you can just place the .jar file inside your project’s
native/androiddirectory. -
The SDK includes some XML UI files, resources, and assets. In this case, the SDK is generally distributed as an Android project folder that can be imported into an Eclipse or Android studio workspace. In general, in this case, you would need to zip the entire directory and change the extension of the resulting .zip file to ".andlib", and place this in your project’s
native/androiddirectory. -
The SDK is distributed as an
.aarfile - In this case you can just copy the.aarfile into yournative/androiddirectory.
The FreshDesk (aka Mobihelp) SDK is distributed as a project folder (i.e. scenario 2 from the above list). Therefore, our procedure is to download the SDK (download link), and rename it from mobihelp_sdk_android.zip to mobihelp_sdk_android.andlib, and copy it into our native/android directory.
Unfortunately, in this case there’s a catch. The Mobihelp SDK includes a dependency:
Mobihelp SDK depends on AppCompat-v7 (Revision 19.0+) Library. You will need to update project.properties to point to the Appcompat library.
If we look inside the project.properties file (inside the Mobihelp SDK directory--- i.e. you’d need to extract it from the zip to view its contents), you’ll see the dependency listed:
android.library.reference.1=../appcompat_v7
I.e. it is expecting to find the appcompat_v7 library located in the same parent directory as the Mobihelp SDK project. After a little bit of research (if you’re not yet familiar with the Android AppCompat support library), we find that the AppCompat_v7 library is part of the Android Support library, which can can installed into your local Android SDK using Android SDK Manager. Installation processed specified here.
After installing the support library, you need to retrieve it from your Android SDK. You can find that .aar file inside the ANDROID_HOME/sdk/extras/android/m2repository/com/android/support/appcompat-v7/19.1.0/ directory (for version 19.1.0). The contents of that directory on my system are:
appcompat-v7-19.1.0.aar		appcompat-v7-19.1.0.pom
appcompat-v7-19.1.0.aar.md5	appcompat-v7-19.1.0.pom.md5
appcompat-v7-19.1.0.aar.sha1	appcompat-v7-19.1.0.pom.sha1
There are two files of interest here:
-
appcompat-v7-19.1.0.aar - This is the actual library that we need to include in our project to satisfy the Mobisdk dependency.
-
appcompat-v7-19.1.0.pom - This is the Maven XML file for the library. It will show us any dependencies that the appcompat library has. We will also need to include these dependencies:
  <dependencies>
    <dependency>
      <groupId>com.android.support</groupId>
      <artifactId>support-v4</artifactId>
      <version>19.1.0</version>
      <scope>compile</scope>
    </dependency>
  </dependencies>
i.e. We need to include the
support-v4library version 19.1.0 in our project. This is also part of the Android Support library. If we back up a couple of directories to:ANDROID_HOME/sdk/extras/android/m2repository/com/android/support, we’ll see it listed there:appcompat-v7 palette-v7 cardview-v7 recyclerview-v7 gridlayout-v7 support-annotations leanback-v17 support-v13 mediarouter-v7 support-v4 multidex test multidex-instrumentation
+ And if we look inside the appropriate version directory of
support-v4(inANDROID_HOME/sdk/extras/android/m2repository/com/android/support/support-v4/19.1.0), we see:support-v4-19.1.0-javadoc.jar support-v4-19.1.0.jar support-v4-19.1.0-javadoc.jar.md5 support-v4-19.1.0.jar.md5 support-v4-19.1.0-javadoc.jar.sha1 support-v4-19.1.0.jar.sha1 support-v4-19.1.0-sources.jar support-v4-19.1.0.pom support-v4-19.1.0-sources.jar.md5 support-v4-19.1.0.pom.md5 support-v4-19.1.0-sources.jar.sha1 support-v4-19.1.0.pom.sha1
Looks like this library is pure Java classes, so we only need to include the
support-v4-19.1.0.jarfile into our project. Checking the.pomfile we see that there are no additional dependencies we need to add.
So, to summarize our findings, we need to include the following files in our native/android directory:
-
appcompat-v7-19.1.0.aar
-
support-v4-19.1.0.jar
And since our Mobihelp SDK lists the appcompat_v7 dependency path as "../appcompat_v7" in its project.properties file, we are going to rename appcompat-v7-19.1.0.aar to appcompat_v7.aar.
When all is said and done, our native/android directory should contain the following:
appcompat_v7.aar	mobihelp.andlib
com			support-v4-19.1.0.jar
The final step on the Android side is to inject necessary permissions and services into the project’s AndroidManifest.xml file.
We can find the manifest file injections required by opening the AndroidManifest.xml file from the MobiHelp SDK project. Its contents are as follows:
<?xml version="1.0" encoding="utf-8"?>
<manifest xmlns:android="http://schemas.android.com/apk/res/android"
    package="com.freshdesk.mobihelp"
    android:versionCode="1"
    android:versionName="1.0" >

     <uses-sdk
        android:minSdkVersion="10" />

    <uses-permission android:name="android.permission.INTERNET" />
    <uses-permission android:name="android.permission.READ_LOGS" />
    <uses-permission android:name="android.permission.ACCESS_NETWORK_STATE" />
    <uses-permission android:name="android.permission.WRITE_EXTERNAL_STORAGE" />

    <application>
        <activity
            android:name="com.freshdesk.mobihelp.activity.SolutionArticleListActivity"
            android:configChanges="orientation|screenSize"
            android:theme="@style/Theme.Mobihelp"
            android:windowSoftInputMode="adjustPan" >
        </activity>
        <activity
            android:name="com.freshdesk.mobihelp.activity.FeedbackActivity"
            android:configChanges="keyboardHidden|orientation|screenSize"
            android:theme="@style/Theme.Mobihelp"
            android:windowSoftInputMode="adjustResize|stateVisible" >
        </activity>
        <activity
            android:name="com.freshdesk.mobihelp.activity.InterstitialActivity"
            android:configChanges="orientation|screenSize"
            android:theme="@style/Theme.AppCompat">
		</activity>
        <activity
            android:name="com.freshdesk.mobihelp.activity.TicketListActivity"
            android:parentActivityName="com.freshdesk.mobihelp.activity.SolutionArticleListActivity"
            android:theme="@style/Theme.Mobihelp" >

            <!-- Parent activity meta-data to support 4.0 and lower -->
            <meta-data
                android:name="android.support.PARENT_ACTIVITY"
                android:value="com.freshdesk.mobihelp.activity.SolutionArticleListActivity" />
        </activity>
        <activity
            android:name="com.freshdesk.mobihelp.activity.SolutionArticleActivity"
            android:parentActivityName="com.freshdesk.mobihelp.activity.SolutionArticleListActivity"
            android:theme="@style/Theme.Mobihelp"
            android:configChanges="orientation|screenSize|keyboard|keyboardHidden" >

            <!-- Parent activity meta-data to support 4.0 and lower -->
            <meta-data
                android:name="android.support.PARENT_ACTIVITY"
                android:value="com.freshdesk.mobihelp.activity.SolutionArticleListActivity" />
        </activity>
        <activity
            android:name="com.freshdesk.mobihelp.activity.ConversationActivity"
            android:parentActivityName="com.freshdesk.mobihelp.activity.SolutionArticleListActivity"
            android:theme="@style/Theme.Mobihelp"
            android:windowSoftInputMode="adjustResize|stateHidden" >

            <!-- Parent activity meta-data to support 4.0 and lower -->
            <meta-data
                android:name="android.support.PARENT_ACTIVITY"
                android:value="com.freshdesk.mobihelp.activity.SolutionArticleListActivity" />
        </activity>
        <activity
            android:name="com.freshdesk.mobihelp.activity.AttachmentHandlerActivity"
            android:configChanges="keyboardHidden|orientation|screenSize"
            android:parentActivityName="com.freshdesk.mobihelp.activity.SolutionArticleListActivity"
            android:theme="@style/Theme.Mobihelp" >

            <!-- Parent activity meta-data to support 4.0 and lower -->
            <meta-data
                android:name="android.support.PARENT_ACTIVITY"
                android:value="com.freshdesk.mobihelp.activity.SolutionArticleListActivity" />
        </activity>

        <service android:name="com.freshdesk.mobihelp.service.MobihelpService" />

        <receiver android:name="com.freshdesk.mobihelp.receiver.ConnectivityReceiver" >
            <intent-filter>
                <action android:name="android.net.conn.CONNECTIVITY_CHANGE" />
            </intent-filter>
        </receiver>
    </application>

</manifest>
We’ll need to add the <uses-permission> tags and all of the contents of the <application> tag to our manifest file. Codename One provides the following build hints for these:
-
android.xpermissions- For your<uses-permission>directives. Add a build hint with nameandroid.xpermissions, and for the value, paste the actual<uses-permission>XML tag. -
android.xapplication- For the contents of your<application>tag.
For the release build, we’ll also need to inject some proguard configuration so that important classes don’t get stripped out at build time. The FreshDesk SDK instructions state:
If you use Proguard, please make sure you have the following included in your project’s proguard-project.txt
-keep class android.support.v4.** { *; }
-keep class android.support.v7.** { *; }
In addition, if you look at the proguard-project.txt file inside the Mobihelp SDK, you’ll see the rules:
-keep public class * extends android.app.Service
-keep public class * extends android.content.BroadcastReceiver
-keep public class * extends android.app.Activity
-keep public class * extends android.preference.Preference
-keep public class com.freshdesk.mobihelp.exception.MobihelpComponentNotFoundException

-keepclassmembers class * implements android.os.Parcelable {
  public static final android.os.Parcelable$Creator *;
}
We’ll want to merge this and then paste them into the build hint android.proguardKeep of our project.
Part 1 of this tutorial focused on the Android native integration. Now we’ll shift our focus to the iOS implementation.
After selecting "Generate Native Interfaces" for our "MobihelpNative" class, you’ll find a native/ios directory in your project with the following files:
These files contain stub implementations corresponding to our MobihelpNative class.
We make use of the API docs to see how the native SDK needs to be wrapped. The method names aren’t the same. E.g. instead of a method showFeedback(), it has a message -presentFeedback:
We more-or-less just follow the iOS integration guide for wrapping the API. Some key points include:
-
Remember to import the
Mobihelp.hfile in your header file:#import "Mobihelp.h" -
Similar to our use of
runOnUiThread()in Android, we will wrap all of our API calls in eitherdispatch_async()ordispatch_sync()calls to ensure that we are interacting with the Mobihelp API on the app’s main thread rather than the Codename One EDT. -
Some methods/messages in the Mobihelp SDK require us to pass a
UIViewControlleras a parameter. In Codename One, the entire application uses a single UIViewController:CodenameOne_GLViewController. You can obtain a reference to this using the[CodenameOne_GLViewController instance]message. We need to import its header file:#import "CodenameOne_GLViewController.h"
As an example, let’s look at the
showFeedback()method:-(void)showFeedback{ dispatch_async(dispatch_get_main_queue(), ^{ [[Mobihelp sharedInstance] presentFeedback:[CodenameOne_GLViewController instance]]; }); }
We described earlier how we created a static method on the MobihelpNativeCallback class so that native code could easily fire a callback method. Now let’s take a look at how this looks from the iOS side of the fence. Here is the implementation of getUnreadCountAsync():
-(void)getUnreadCountAsync:(int)param{
  dispatch_async(dispatch_get_main_queue(), ^{
    [[Mobihelp sharedInstance]
      unreadCountWithCompletion:^(NSInteger count){
        com_codename1_freshdesk_MobihelpNativeCallback_fireUnreadUpdatesCallback___int_int_int(
                CN1_THREAD_GET_STATE_PASS_ARG param, 3 /*SUCCESS*/, count);
      }];
  });
}
In our case the iOS SDK version of this method is +unreadCountWithCompletion: which takes a block (which is like an anonymous function) as a parameter.
The callback to our Codename One function occurs on this line:
com_codename1_freshdesk_MobihelpNativeCallback_fireUnreadUpdatesCallback___int_int_int(
    CN1_THREAD_GET_STATE_PASS_ARG param, 3 /*SUCCESS*/, count);
Some things worth mentioning here:
-
The method name is the result of taking the FQN (
MobihelpNativeCallback.fireUpdateUnreadUpdatesCallback(int, int, int)in the packagecom.codename1.freshdesk) and replacing all.characters with underscores, suffixing two underscores after the end of the method name, then appending_intonce for each of theintarguments. -
We also need to import the header file for this class:
#import "com_codename1_freshdesk_MobihelpNativeCallback.h"
Now that we have implemented our iOS native interface, we need to bundle the Mobihelp iOS SDK into our project. There are a few different scenarios you may face when looking to include a native SDK:
-
The SDK includes
.bundleresource files. In this case, just copy the.bundlefile(s) into yournative/iosdirectory. -
The SDK includes
.hheader files. In this case, just copy the.hfile(s) into yournative/iosdirectory. -
The SDK includes
.afiles. In this case, just copy the.afile(s) into yournative/iosdirectory. -
The SDK includes
.frameworkfiles. In this case, you’ll need to zip up the framework, and copy it into yournative/iosdirectory. E.g. If the framework is named, MyFramework.framework, then the zip file should be named MyFramework.framework.zip, and should be located atnative/ios/MyFramework.framework.zip.
The FreshDesk SDK doesn’t include any .framework files, so we don’t need to worry about that last scenario. We simply download the iOS SDK, copy the libFDMobihelpSDK.a, Mobihelp.h. MHModel.bundle, MHResources.bundle, and MHLocalization/en.proj/MHLocalizable.strings into native/ios.
If you run into problems with the build, you can select "Include Sources" in the build server to download the resulting Xcode Project. You can then debug the Xcode project locally, make changes to your iOS native implementation files, and copy them back into your project once it is building properly.
The iOS integration guide for the FreshDesk SDK lists the following core frameworks as dependencies:
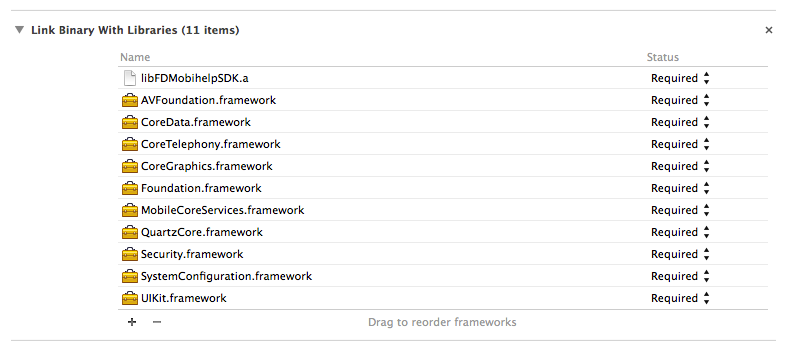
We can add these dependencies to our project using the ios.add_libs build hint. E.g.

I.e. we just list the framework names separated by semicolons. Notice that my list in the above image doesn’t include all of the frameworks that they list because many of the frameworks are already included by default (I obtained the default list by simply building the project with "include sources" checked, then looked at the frameworks that were included).
During the initial development, I generally find it easier to use a regular Codename One project so that I can run and test as I go. But once it is stabilized, and I want to distribute the library to other developers, I will transfer it over to a Codename One library project. This general process involves:
-
Create a Codename One Library project.
-
Copy the .java files from my original project into the library project.
-
Copy the
nativedirectory from the original project into the library project. -
Copy the relevant build hints from the original project’s
codenameone_settings.propertiesfile into the library project’scodenameone_library_appended.propertiesfile.
In the case of the FreshDesk .cn1lib, I modified the original project’s build script to generate and build a library project automatically. But that is beyond the scope of this tutorial.
A Layout contains all the logic for positioning Codename One components. It essentially traverses a Codename One Container and positions components absolutely based on internal logic.
When we build the layout we need to take margin into consideration and make sure to add it into the position/size calculations. Building a layout manager involves two simple methods: layoutContainer & getPreferredSize.
layoutContainer is invoked whenever Codename One decides the container needs rearranging, Codename One tries to avoid calling this method and only invokes it at the last possible moment. Since this method is generally very expensive (imagine the recursion with nested layouts). Codename One just marks a flag indicating layout is "dirty" when something important changes and tries to avoid "reflows".
getPreferredSize allows the layout to determine the size desired for the container. This might be a difficult call to make for some layout managers that try to provide both flexibility and simplicity.
Most of FlowLayout bugs stem from the fact that this method is just impossible to implement correctly & efficiently for all the use cases of a deeply nested FlowLayout. The size of the final layout won’t necessarily match the requested size (it probably won’t) but the requested size is taken into consideration, especially when scrolling and also when sizing parent containers.
This is a layout manager that just arranges components in a center column aligned to the middle. We then show the proper usage of margin to create a stair like effect with this layout manager:
class CenterLayout extends Layout {
    public void layoutContainer(Container parent) {
        int components = parent.getComponentCount();
        Style parentStyle = parent.getStyle();
        int centerPos = parent.getLayoutWidth() / 2 + parentStyle.getMargin(Component.LEFT);
        int y = parentStyle.getMargin(Component.TOP);
        boolean rtl = parent.isRTL();
        for (int iter = 0; iter < components; iter++) {
            Component current = parent.getComponentAt(iter);
            Dimension d = current.getPreferredSize();
            Style currentStyle = current.getStyle();
            int marginRight = currentStyle.getMarginRight(rtl);
            int marginLeft = currentStyle.getMarginLeft(rtl);
            int marginTop = currentStyle.getMarginTop();
            int marginBottom = currentStyle.getMarginBottom();
            current.setSize(d);
            int actualWidth = d.getWidth() + marginLeft + marginRight;
            current.setX(centerPos - actualWidth / 2 + marginLeft);
            y += marginTop;
            current.setY(y);
            y += d.getHeight() + marginBottom;
        }
    }

    public Dimension getPreferredSize(Container parent) {
        int components = parent.getComponentCount();
        Style parentStyle = parent.getStyle();
        int height = parentStyle.getMargin(Component.TOP) + parentStyle.getMargin(Component.BOTTOM);
        int marginX = parentStyle.getMargin(Component.RIGHT) + parentStyle.getMargin(Component.LEFT);
        int width = marginX;
        for (int iter = 0; iter < components; iter++) {
            Component current = parent.getComponentAt(iter);
            Dimension d = current.getPreferredSize();
            Style currentStyle = current.getStyle();
            width = Math.max(d.getWidth() + marginX + currentStyle.getMargin(Component.RIGHT)
                    + currentStyle.getMargin(Component.LEFT), width);
            height += currentStyle.getMargin(Component.TOP) + d.getHeight()
                    + currentStyle.getMargin(Component.BOTTOM);
        }
        Dimension size = new Dimension(width, height);
        return size;
    }
}

Form hi = new Form("Center Layout", new CenterLayout());
for(int iter = 1 ; iter < 10 ; iter++) {
    Label l = new Label("Label: " + iter);
    l.getUnselectedStyle().setMarginLeft(iter * 3);
    l.getUnselectedStyle().setMarginRight(0);
    hi.add(l);
}
hi.add(new Label("Really Wide Label Text!!!"));
hi.show();
The GridBagLayout was ported to Codename One relatively easily considering the complexity of that specific layout manager. Here are some tips you should take into account when porting a Swing/AWT layout manager:
-
Codename One doesn’t have
Insets, we added some support for them in order to port GridBag but components in Codename One have a margin they need to consider instead of theInsets(the padding is in the preferred size and is thus hidden from the layout manager). -
AWT layout managers also synchronize a lot on the AWT thread. This is no longer necessary since Codename One is single threaded, like Swing.
-
AWT considers the top left position of the
Containerto be 0,0 whereas Codename One considers the position based on its parentContainer. The top left position in Codename One isgetX(),getY().
Other than those things it’s mostly just fixing method and import statements, which are slightly different. Pretty trivial stuff.
As you may have already read, we have just added support for Kotlin in Codename One. This is something that you can achieve without the help of Codename One. You could port a 3rd party language like Scala, Ruby, Python etc. to Codename One.
A JVM Language is any programming language that can be compiled to byte-codes that will run on the JVM (Java Virtual Machine). Java was the original JVM language, but many others have sprung up over the years. Kotlin, Scala, Groovy, and JRuby come to mind as well-established and mature languages, but there are many others.
The difficulty of porting a particular language to Codename One will vary depending on such factors as:
-
Does it require a runtime library?
-
How complex is the runtime library? (E.g. Does it require classes that aren’t currently offered in Codename One’s subset of the java standard libraries?)
-
-
Does it need reflection?
-
Codename One doesn’t support reflection because it would result in a very large application size. If a JVM language requires reflection just to get off the ground then adding it to Codename one would be tricky.
-
-
Does it perform any runtime byte-code manipulation?
-
Some dynamic languages may perform byte-code manipulation at runtime. This is problematic on iOS (and possibly other platforms) which prohibits such runtime behavior.
-
The more similar a language, and its build outputs are to Java, the easier it will be to port (probably). Most JVM languages have two parts:
-
A compiler, which compiles source files to JVM byte-code (usually as .class files).
-
A runtime library.
Currently I’m only aware of one language (other than Java) that doesn’t require a runtime library, and that is Mirah.
|
Note
|
Codename One also supports Mirah |
The first thing I do is take a look at the byte-code that is produced by the compiler. I use javap to print out a nice version.
Consider this sample Kotlin class:
package com.codename1.hellokotlin2

import com.codename1.ui.Button
import com.codename1.ui.Form
import com.codename1.ui.Label
import com.codename1.ui.layouts.BoxLayout

/**
 * Created by shannah on 2017-07-10.
 */
class KotlinForm : Form {

    constructor() : super("Hello Kotlin", BoxLayout.y()) {
        val label = Label("Hello Kotlin")
        val clickMe = Button("Click Me")
        clickMe.addActionListener {
            label.setText("You Clicked Me");
            revalidate();
        }

        add(label).add(clickMe);

    }


}
Let’s take a look at the bytecode that Kotlin produced for this class:
$ javap -v com/codename1/hellokotlin2/KotlinForm.class
  Last modified 10-Jul-2017; size 1456 bytes
  MD5 checksum 1cb00f6e63b918bb5a9f146ca8b0b78e
  Compiled from "KotlinForm.kt"
public final class com.codename1.hellokotlin2.KotlinForm extends com.codename1.ui.Form
  SourceFile: "KotlinForm.kt"
  InnerClasses:
       static final #31; //class com/codename1/hellokotlin2/KotlinForm$1
  RuntimeVisibleAnnotations:
    0: #56(#57=[I#58,I#58,I#59],#60=[I#58,I#61,I#58],#62=I#58,#63=[s#64],#65=[s#55,s#66,s#6,s#67])
  minor version: 0
  major version: 50
  flags: ACC_PUBLIC, ACC_FINAL, ACC_SUPER
Constant pool:
   #1 = Utf8               com/codename1/hellokotlin2/KotlinForm
   #2 = Class              #1             //  com/codename1/hellokotlin2/KotlinForm
   #3 = Utf8               com/codename1/ui/Form
   #4 = Class              #3             //  com/codename1/ui/Form
   #5 = Utf8               <init>
   #6 = Utf8               ()V
   #7 = Utf8               Hello Kotlin
   #8 = String             #7             //  Hello Kotlin
   #9 = Utf8               com/codename1/ui/layouts/BoxLayout
  #10 = Class              #9             //  com/codename1/ui/layouts/BoxLayout
  #11 = Utf8               y
  #12 = Utf8               ()Lcom/codename1/ui/layouts/BoxLayout;
  #13 = NameAndType        #11:#12        //  y:()Lcom/codename1/ui/layouts/BoxLayout;
  #14 = Methodref          #10.#13        //  com/codename1/ui/layouts/BoxLayout.y:()Lcom/codename1/ui/layouts/BoxLayout;
  #15 = Utf8               com/codename1/ui/layouts/Layout
  #16 = Class              #15            //  com/codename1/ui/layouts/Layout
  #17 = Utf8               (Ljava/lang/String;Lcom/codename1/ui/layouts/Layout;)V
  #18 = NameAndType        #5:#17         //  "<init>":(Ljava/lang/String;Lcom/codename1/ui/layouts/Layout;)V
  #19 = Methodref          #4.#18         //  com/codename1/ui/Form."<init>":(Ljava/lang/String;Lcom/codename1/ui/layouts/Layout;)V
  #20 = Utf8               com/codename1/ui/Label
  #21 = Class              #20            //  com/codename1/ui/Label
  #22 = Utf8               (Ljava/lang/String;)V
  #23 = NameAndType        #5:#22         //  "<init>":(Ljava/lang/String;)V
  #24 = Methodref          #21.#23        //  com/codename1/ui/Label."<init>":(Ljava/lang/String;)V
  #25 = Utf8               com/codename1/ui/Button
  #26 = Class              #25            //  com/codename1/ui/Button
  #27 = Utf8               Click Me
  #28 = String             #27            //  Click Me
  #29 = Methodref          #26.#23        //  com/codename1/ui/Button."<init>":(Ljava/lang/String;)V
  #30 = Utf8               com/codename1/hellokotlin2/KotlinForm$1
  #31 = Class              #30            //  com/codename1/hellokotlin2/KotlinForm$1
  #32 = Utf8               (Lcom/codename1/hellokotlin2/KotlinForm;Lcom/codename1/ui/Label;)V
  #33 = NameAndType        #5:#32         //  "<init>":(Lcom/codename1/hellokotlin2/KotlinForm;Lcom/codename1/ui/Label;)V
  #34 = Methodref          #31.#33        //  com/codename1/hellokotlin2/KotlinForm$1."<init>":(Lcom/codename1/hellokotlin2/KotlinForm;Lcom/codename1/ui/Label;)V
  #35 = Utf8               com/codename1/ui/events/ActionListener
  #36 = Class              #35            //  com/codename1/ui/events/ActionListener
  #37 = Utf8               addActionListener
  #38 = Utf8               (Lcom/codename1/ui/events/ActionListener;)V
  #39 = NameAndType        #37:#38        //  addActionListener:(Lcom/codename1/ui/events/ActionListener;)V
  #40 = Methodref          #26.#39        //  com/codename1/ui/Button.addActionListener:(Lcom/codename1/ui/events/ActionListener;)V
  #41 = Utf8               com/codename1/ui/Component
  #42 = Class              #41            //  com/codename1/ui/Component
  #43 = Utf8               add
  #44 = Utf8               (Lcom/codename1/ui/Component;)Lcom/codename1/ui/Container;
  #45 = NameAndType        #43:#44        //  add:(Lcom/codename1/ui/Component;)Lcom/codename1/ui/Container;
  #46 = Methodref          #2.#45         //  com/codename1/hellokotlin2/KotlinForm.add:(Lcom/codename1/ui/Component;)Lcom/codename1/ui/Container;
  #47 = Utf8               com/codename1/ui/Container
  #48 = Class              #47            //  com/codename1/ui/Container
  #49 = Methodref          #48.#45        //  com/codename1/ui/Container.add:(Lcom/codename1/ui/Component;)Lcom/codename1/ui/Container;
  #50 = Utf8               clickMe
  #51 = Utf8               Lcom/codename1/ui/Button;
  #52 = Utf8               label
  #53 = Utf8               Lcom/codename1/ui/Label;
  #54 = Utf8               this
  #55 = Utf8               Lcom/codename1/hellokotlin2/KotlinForm;
  #56 = Utf8               Lkotlin/Metadata;
  #57 = Utf8               mv
  #58 = Integer            1
  #59 = Integer            6
  #60 = Utf8               bv
  #61 = Integer            0
  #62 = Utf8               k
  #63 = Utf8               d1
  #64 = Utf8
                           \n\n\20¢¨
  #65 = Utf8               d2
  #66 = Utf8               Lcom/codename1/ui/Form;
  #67 = Utf8               HelloKotlin2
  #68 = Utf8               KotlinForm.kt
  #69 = Utf8               Code
  #70 = Utf8               LocalVariableTable
  #71 = Utf8               LineNumberTable
  #72 = Utf8               SourceFile
  #73 = Utf8               InnerClasses
  #74 = Utf8               RuntimeVisibleAnnotations
{
  public com.codename1.hellokotlin2.KotlinForm();
    descriptor: ()V
    flags: ACC_PUBLIC
    Code:
      stack=5, locals=3, args_size=1
         0: aload_0
         1: ldc           #8                  // String Hello Kotlin
         3: invokestatic  #14                 // Method com/codename1/ui/layouts/BoxLayout.y:()Lcom/codename1/ui/layouts/BoxLayout;
         6: checkcast     #16                 // class com/codename1/ui/layouts/Layout
         9: invokespecial #19                 // Method com/codename1/ui/Form."<init>":(Ljava/lang/String;Lcom/codename1/ui/layouts/Layout;)V
        12: new           #21                 // class com/codename1/ui/Label
        15: dup
        16: ldc           #8                  // String Hello Kotlin
        18: invokespecial #24                 // Method com/codename1/ui/Label."<init>":(Ljava/lang/String;)V
        21: astore_1
        22: new           #26                 // class com/codename1/ui/Button
        25: dup
        26: ldc           #28                 // String Click Me
        28: invokespecial #29                 // Method com/codename1/ui/Button."<init>":(Ljava/lang/String;)V
        31: astore_2
        32: aload_2
        33: new           #31                 // class com/codename1/hellokotlin2/KotlinForm$1
        36: dup
        37: aload_0
        38: aload_1
        39: invokespecial #34                 // Method com/codename1/hellokotlin2/KotlinForm$1."<init>":(Lcom/codename1/hellokotlin2/KotlinForm;Lcom/codename1/ui/Label;)V
        42: checkcast     #36                 // class com/codename1/ui/events/ActionListener
        45: invokevirtual #40                 // Method com/codename1/ui/Button.addActionListener:(Lcom/codename1/ui/events/ActionListener;)V
        48: aload_0
        49: aload_1
        50: checkcast     #42                 // class com/codename1/ui/Component
        53: invokevirtual #46                 // Method add:(Lcom/codename1/ui/Component;)Lcom/codename1/ui/Container;
        56: aload_2
        57: checkcast     #42                 // class com/codename1/ui/Component
        60: invokevirtual #49                 // Method com/codename1/ui/Container.add:(Lcom/codename1/ui/Component;)Lcom/codename1/ui/Container;
        63: pop
        64: return
      LocalVariableTable:
        Start  Length  Slot  Name   Signature
           32      32     2 clickMe   Lcom/codename1/ui/Button;
           22      42     1 label   Lcom/codename1/ui/Label;
            0      65     0  this   Lcom/codename1/hellokotlin2/KotlinForm;
      LineNumberTable:
        line 13: 0
        line 14: 12
        line 15: 22
        line 16: 32
        line 21: 48
}
That’s a big mess of stuff, but it’s pretty easy to pick through it when you know what you’re looking for. The layout of this output is pretty straight forward. The beginning shows that this is a class definition:
public final class com.codename1.hellokotlin2.KotlinForm extends com.codename1.ui.Form {
    //...
}
Even just comparing this line with the class definition from the source file we have learned something about the Kotlin compiler. It has made the class final by default. That observation shouldn’t affect our assessment here, but it is kind of interesting.
After the class definition, it shows the internal classes:
InnerClasses:
     static final #31; //class com/codename1/hellokotlin2/KotlinForm$1
The Constant Pool
And the constants that are used in the class:
Constant pool:
   #1 = Utf8               com/codename1/hellokotlin2/KotlinForm
   #2 = Class              #1             //  com/codename1/hellokotlin2/KotlinForm
   #3 = Utf8               com/codename1/ui/Form
   #4 = Class              #3             //  com/codename1/ui/Form
   #5 = Utf8               <init>
   #6 = Utf8               ()V
   #7 = Utf8               Hello Kotlin
   #8 = String             #7             //  Hello Kotlin
   #9 = Utf8               com/codename1/ui/layouts/BoxLayout
   ... etc...
The constant pool will consist of class names, and strings mostly. You’ll want to peruse this list to see if the compiler has added any classes that aren’t in the source code. In the example above, it looks like Kotlin is pretty faithful to the original source’s dependencies. It didn’t inject any classes that aren’t in the original source.
Even if the compiler does inject other dependencies into the bytecode, it might not be a problem. It is only a problem if those classes aren’t supported by Codename One. Keep your eyes peeled for anything in the java.lang.reflect package or unsolicited use of java.net, java.nio, or any other package that aren’t part of the Codename One standard library. If you’re not sure if a class or package is available in the Codename One standard library, check the javadocs.
The ByteCode Instructions:
After the constant pool, we see each of the methods of the class written out as a list of bytecode instructions. E.g.
public com.codename1.hellokotlin2.KotlinForm();
  descriptor: ()V
  flags: ACC_PUBLIC
  Code:
    stack=5, locals=3, args_size=1
       0: aload_0
       1: ldc           #8                  // String Hello Kotlin
       3: invokestatic  #14                 // Method com/codename1/ui/layouts/BoxLayout.y:()Lcom/codename1/ui/layouts/BoxLayout;
       6: checkcast     #16                 // class com/codename1/ui/layouts/Layout
       9: invokespecial #19                 // Method com/codename1/ui/Form."<init>":(Ljava/lang/String;Lcom/codename1/ui/layouts/Layout;)V
      12: new           #21                 // class com/codename1/ui/Label
      15: dup
      16: ldc           #8                  // String Hello Kotlin
      etc...
In the above snippet, the first instruction is aload_0 (which adds this to the stack). The 2nd instruction is ldc, (which loads constant #8 — the string "Hello Kotlin" to the stack). The 3rd instruction is invokestatic which calls the static method define by Constant #14 from the constant pool, with the two parameters that had just been added to the stack.
|
Note
|
You don’t need to understand what all of these instructions do. You just need to look for instructions that may be problematic. |
The only instruction that I think might be problematic is "invokedynamic". All other instructions should work find in Codename One. (I don’t know for a fact that invokedynmic won’t work - I just suspect it might not work on some platforms).
Summary of Byte-code Assessment
So to summarize, the byte-code assessment phase, we’re basically just looking to make sure that the compiler doesn’t tend to add dependencies to parts of the JDK that Codename One doesn’t currently support. And we want to make sure that it doesn’t use invokedynamic.
If you find that the compiler does use invokedynamic or add references to classes that Codename One doesn’t support, don’t give up just yet. You might be able to create your own "porting" runtime library that will provide these dependencies at runtime.
The process for assessing the runtime library is pretty similar to the process for the bytecodes. You’ll want to get your hands on the language’s runtime library, and use javap to inspect the .class files. You’re looking for the same things as you were looking for in the compiler’s output: "invokedynamic" and classes that aren’t supported in Codename One.
Once you have assessed the language and are optimistic that it is a good candidate for porting, you can proceed to port the runtime library into Codename One. Usually that language’s runtime library will be distributed in .jar format. You need to convert this into a cn1lib so that it can be used in a Codename One project. If you can get your hands on the source code for the runtime library then the best approach is to paste the source files into a Codename One Library project, and try to build it. This has the advantage that it will validate the source during compile to ensure that it doesn’t depend on any classes that Codename One doesn’t support.
If you can’t find the sources of the runtime library or they don’t seem to be easily "buildable", then the next best thing is to just get the binary distribution’s jar file and convert it to a cn1lib. This is what we did for the Kotlin runtime library.
This procedure exploits the fact that a cn1lib file is just a zip file with a specific file structure inside it. The cross-platform Java .class files are all contained inside a file named "main.zip", inside the zip file. This is the only mandatory file that must be inside a cn1lib.
To make the library easier to use the cn1lib file can also contain a file named "stubs.zip" which includes stubs of the Java sources. When you build a cn1lib using a Codename One Library project, it will automatically generate stubs of the source so that the IDE will have access to nice things like Javadoc when using the library. The kotlin distribution includes a separate jar file with the runtime sources, named "kotlin-runtime-sources.jar", so we used this as the "stubs". It contains full sources, which isn’t necessary, but it also doesn’t hurt.
So now that we had my two jar files: kotlin-runtime.jar and kotlin-runtime-sources.jar, I created a new empty directory, and copied them inside. I renamed the jars "main.zip" and "stubs.zip" respectively. Then I zipped up the directory and renamed the zip file "kotlin-runtime.cn1lib".
|
Important
|
Building cn1libs manually in this way is a very bad habit, as it bypasses the API verification step that normally occurs when building a library project. It is possible, even likely, that the jar files that you convert depend on classes that aren’t in the Codename One library, so your library will fail at runtime in unexpected ways. The only reason we could do this with kotlin’s runtime (with some confidence) is because I already analyzed the bytecodes to ensure that they didn’t include anything problematic. |
For our "Hello World" test we will need to create a separate project in our JVM language and produce class files that we will manually copy into an appropriate location of our project. We’ll want to use the normal tools for the language and not worry about how it integrates with Codename One. For Kotlin, I just followed the getting started tutorial on the Kotlin site to create a new Kotlin project in IntelliJ. When Steve ported Mirah, he just used a text editor and the mirahc command-line compiler to create my Hello World class. The tools and process will depend on the language.
Here is the "hello world" we created in Kotlin:
package com.mycompany.myapp

class HelloKotlin {

    fun hello() {
        System.out.println("Hello from Kotlin");
    }
}
After building this, I have a directory that contains "com/mycompany/myapp/HelloKotlin.class".
It also produced a .jar file that contains this class.
The easiest way to integrate external code into a Codename One project, is just to wrap it as a cn1lib file and place it into my Codename One project’s lib directory. That way you don’t have to mess with any of the build files. So, using roughly the same procedure as we used to create the kotlin-runtime.cn1lib, I wrap my hellokotlin.jar as a cn1lib to produce "hellokotlin.cn1lib" and copy it to the "lib" directory of a Codename One project.
|
Note
|
Remember to select "Codename One" → "Refresh CN1Libs" after placing the cn1lib in your lib directory or it won’t get picked up. |
Finally, I call my library from the start() method of my app:
HelloKotlin hello = new HelloKotlin();
hello.hello();
If we run this in the Simulator, it should print "Hello from Kotlin" in the output console. If we get an error, then we can dig in and try to figure out what went wrong using my standard debugging techniques. EXPECT an error on the first run. Hopefully it will just be a missing import or something simple.
In the case of Kotlin, the hello world example app would actually run without the runtime library because it was so simple. So it was necessary to add a more complex example to prove the need for the runtime library. It doesn’t matter what you do with your more complex example, as long as it doesn’t require classes that aren’t in Codename One.
If you want to use the Codename One inside your project, you should add the CodenameOne.jar (found inside any Codename One project) to your classpath so that it will compile.
At this point we already have a manual process for incorporating files built with our alternate language into a Codename One project. The process looks like:
-
Use standard tools for your JVM language to write your code.
-
Use the JVM language’s standard build tools (e.g. command-line compiler, etc..) to compile your code so that you have .class files (and optionally a .jar file).
-
Wrap your .class files in a cn1lib.
-
Add the cn1lib to the lib directory of a Codename One project.
-
Use your library from the Codename One project.
When Steve first developed Mirah support he automated this process using an ANT script. He also automatically generated some bootstrap code so that he could develop the whole app in Mirah and he woudn’t have to write any Java. However, this level of integration has limitations.
For example, with this approach alone, you couldn’t have two-way dependencies between Java source and Mirah source. Yes, Mirah code could use Java libraries (and it did depend on CodenameOne.jar), and my Java code could use my Mirah code. However, Mirah source code could not depend on the Java source code in my project. This has to do with the order in which code is compiled. It’s a bit of a chicken and egg issue. If we are building a project that has Java source code and Mirah source code, we are using two different compilers: mirahc to compile the Mirah files, and javac to compile the Java files. If we are starting from a clean build, and we run mirahc first, then the .java files haven’t yet been compiled to .class files - and thus mirahc can’t reference them - and any mirah code that depends on those uncompiled Java classes will fail. If we compile the .java files first, then we have the opposite problem.
Steve worked around this problem in Mirah by writing my own pseudo-compiler that produced stub class files for the java source that would be referenced by mirahc when compiling the Mirah files. In this way he was able to have two-way dependencies between Java and Mirah in the same project.
Kotlin also supports two-way dependencies, probably using a similar mechanism.
For both the Kotlin and Mirah support, we wanted integration to be seamless. We didn’t want users to have to create a separate project for their Kotlin/Mirah code. We wanted them to simply add a Kotlin/Mirah file into their project and have it just work. Achieving this level of integration in Kotlin was quite easy, since they provide an ANT plugin that essentially allowed me to just add one tag inside my <javac/> tags:
<withKotlin/>And it would automatically handle Kotlin and Java files together: Seamlessly. There are a few places in a Codename One’s build.xml file where we call "javac" so we just needed to inject these tags in those places. This injection is performed automatically by the Codename One IntelliJ plugin.
For Mirah, Steve developed his own ANT plugins and Netbeans module that do something similar in Netbeans.
When we launched Codename One in 2012 we needed a way to ship updates and fixes faster than the plugin update system. So we built the client lib update system. Then we needed a way to update the designer tool (resource editor), the GUI builder & the skins… We also needed a system to update the builtin builder code (CodeNameOneBuildClient.jar so we built a tool for that too).
The Update Framework solves several problems in the old systems:
-
Download once - if you have multiple projects the library will only download once to the
.codenameonedirectory. All the projects will update from local storage -
Skins update automatically - this is hugely important. When we change a theme we need to update it in the skins and if you don’t update the skin you might see a difference between the simulator and the device
-
Update of settings/designer without IDE plugin update - The IDE plugin update process is slow and tedious. This way we can push out a bug fix for the GUI builder without going through the process of releasing a new plugin version
For the most part this framework should be seamless. You should no longer see the "downloading" message whenever we push an update after your build client is updated. Your system would just poll for a new version daily and update when new updates are available.
You can also use the usual method of Codename One Settings → Basic → Update Client Libs which will force an update check. Notice that the UI will look a bit different after this update.
You can see the full code here the gist of it is very simple. We create a jar called UpdateCodenameOne.jar under ~/.codenameone (~ represents the users home directory).
An update happens by running this tool with a path to a Codename One project e.g.:
java -jar ~/.codenameone/UpdateCodenameOne.jar path_to_my_codenameone_projectE.g.:
java -jar ~/.codenameone/UpdateCodenameOne.jar ~/dev/AccordionDemo
Checking: JavaSE.jar
Checking: CodeNameOneBuildClient.jar
Checking: CLDC11.jar
Checking: CodenameOne.jar
Checking: CodenameOne_SRC.jar
Checking: designer_1.jar
Checking: guibuilder_1.jar
Updating the file: /Users/shai/dev/AccordionDemo/JavaSE.jar
Updating the file: /Users/shai/dev/AccordionDemo/CodeNameOneBuildClient.jar
Updating the file: /Users/shai/dev/AccordionDemo/lib/CLDC11.jar
Updating the file: /Users/shai/dev/AccordionDemo/lib/CodenameOne.jar
Updated project files
Notice that no download happened since the files were up to date. You can also force a check against the server by adding the force argument as such:
java -jar ~/.codenameone/UpdateCodenameOne.jar path_to_my_codenameone_projectThe way this works under the hood is thought a Versions.properties within your directory that lists the versions of local files. That way we know what should be updated.
|
Tip
|
Exclude Versions.properties from Git
|
Under the ~/.codenameone directory we have a more detailed UpdateStatus.properties file that includes versions of the locally downloaded files. Notice you can delete this file and it will be recreated as all the jars get downloaded over again.
You will notice 3 big things that aren’t covered in this unified framework:
-
We don’t update cn1libs - I’m not sure if this is something we would like to update automatically
-
Versioned builds - there is a lot of complexity in the versioned build system. This might be something we address in the future but for now I wanted to keep the framework simple.
-
Offline builds - Offline builds work through manual download and aren’t subjected to this framework